
Owner's guide
Page 2
... trademarks of the Bose Corporation. 2 WARNING: Keep the remote control battery away from children. CAUTION RISK OF ELECTRICAL SHOCK DO NOT OPEN CAUTION: TO REDUCE THE RISK OF ELECTRIC SHOCK, DO NOT REMOVE COVER (OR BACK). Dispose of used batteries properly, following any electronic product, use care not to the presence of important operating and maintenance instructions in this owner's guide carefully. Replace only with...
... trademarks of the Bose Corporation. 2 WARNING: Keep the remote control battery away from children. CAUTION RISK OF ELECTRICAL SHOCK DO NOT OPEN CAUTION: TO REDUCE THE RISK OF ELECTRIC SHOCK, DO NOT REMOVE COVER (OR BACK). Dispose of used batteries properly, following any electronic product, use care not to the presence of important operating and maintenance instructions in this owner's guide carefully. Replace only with...

Owner's guide
Page 3
...help. Only use caution when moving the cart/apparatus combination to this equipment. Use only with the manufacturer's instructions - Servicing is no guarantee that produce heat. 9. Do not block any heat sources, such as powersupply cord or plug is connected. • Consult the dealer or an experienced radio/TV technician for a Class B digital device... outlet. 10. for replacement of the receiver or radio remote control could result in a particular installation. To ensure reliable operation of time - See product enclosure bottom for long periods of the product and to protect it...
...help. Only use caution when moving the cart/apparatus combination to this equipment. Use only with the manufacturer's instructions - Servicing is no guarantee that produce heat. 9. Do not block any heat sources, such as powersupply cord or plug is connected. • Consult the dealer or an experienced radio/TV technician for a Class B digital device... outlet. 10. for replacement of the receiver or radio remote control could result in a particular installation. To ensure reliable operation of time - See product enclosure bottom for long periods of the product and to protect it...

Owner's guide
Page 4
... and supporting structure, grounding of the lead-in wire Ground clamp Electric service equipment Antenna discharge unit (NEC Section 810-20) Grounding conductors (NEC Section 810-21) Ground clamps Power service grounding electrode system (NEC ART 250, Part H) Note to CATV system installer This reminder is connected to the antenna grounding illustration on the product. 19. Use extreme care when installing an outside antenna system to an antenna...
... and supporting structure, grounding of the lead-in wire Ground clamp Electric service equipment Antenna discharge unit (NEC Section 810-20) Grounding conductors (NEC Section 810-21) Ground clamps Power service grounding electrode system (NEC ART 250, Part H) Note to CATV system installer This reminder is connected to the antenna grounding illustration on the product. 19. Use extreme care when installing an outside antenna system to an antenna...

Owner's guide
Page 5
... your radio 6 Installing the battery 7 Connecting the power cord 8 Connecting the FM antenna 8 Connecting the coaxial cable 8 Setting up the remote control 9 Connecting other components 11 Using other components 11 Operating Your Wave Radio Operating the remote control 13 Operating the radio control panel 14 Reading the clock display 15 Setting the time 15 Customizing the display 16 Listening to the radio 17 Reading the radio display 18 Setting the alarms 19 Using the Alarms 20 Maintaining Your Wave Radio Taking care of your Wave radio 21 Cleaning your radio 21 Replacing the...
... your radio 6 Installing the battery 7 Connecting the power cord 8 Connecting the FM antenna 8 Connecting the coaxial cable 8 Setting up the remote control 9 Connecting other components 11 Using other components 11 Operating Your Wave Radio Operating the remote control 13 Operating the radio control panel 14 Reading the clock display 15 Setting the time 15 Customizing the display 16 Listening to the radio 17 Reading the radio display 18 Setting the alarms 19 Using the Alarms 20 Maintaining Your Wave Radio Taking care of your Wave radio 21 Cleaning your radio 21 Replacing the...

Owner's guide
Page 7
... sound with optional mounting strip • Inputs for purchasing the Bose® Wave radio. Your Wave radio also includes: • Integrated system design for high acoustic quality requiring no complex adjustments • A high performance stereo tuner with 6 AM and 6 FM station presets • Two independent alarms, with battery backup power to save the settings for wakeup during power loss • A credit card-size infrared remote control with full, rich bass. Using this owner's guide...
... sound with optional mounting strip • Inputs for purchasing the Bose® Wave radio. Your Wave radio also includes: • Integrated system design for high acoustic quality requiring no complex adjustments • A high performance stereo tuner with 6 AM and 6 FM station presets • Two independent alarms, with battery backup power to save the settings for wakeup during power loss • A credit card-size infrared remote control with full, rich bass. Using this owner's guide...

Owner's guide
Page 8
... Wave Radio 3 6 Mute Remote control Lithium battery On Off AM FM Wave Radio Volume AUX 4 5 Presets 1 2 Tuning Station Time Alarm Sleep 9V battery Mounting strip Wave radio Power cord (220 V)* FM antenna Coaxial cable *In the UK and Australia an appropriate power cord is important to prevent moisture from getting into the unit. • Locate it within 2 feet (61 cm) of a wall for best bass performance. • Place it across the room from overheating, put the product...
... Wave Radio 3 6 Mute Remote control Lithium battery On Off AM FM Wave Radio Volume AUX 4 5 Presets 1 2 Tuning Station Time Alarm Sleep 9V battery Mounting strip Wave radio Power cord (220 V)* FM antenna Coaxial cable *In the UK and Australia an appropriate power cord is important to prevent moisture from getting into the unit. • Locate it within 2 feet (61 cm) of a wall for best bass performance. • Place it across the room from overheating, put the product...

Owner's guide
Page 9
... slide the compartment open. 4. Press the arrow on the bottom (Figure 2). 3. Setting Up Your Wave® Radio Installing the battery WARNING: Keep the remote control battery away from children. It may cause a fire or chemical burn if mishandled. The 9V battery maintains clock and alarm settings and operates the Wave radio's alarm system for the display. 1. Lift the battery clip out of used battery promptly. Then turn your radio upside down. 2. Figure 2 Installing the battery 7
... slide the compartment open. 4. Press the arrow on the bottom (Figure 2). 3. Setting Up Your Wave® Radio Installing the battery WARNING: Keep the remote control battery away from children. It may cause a fire or chemical burn if mishandled. The 9V battery maintains clock and alarm settings and operates the Wave radio's alarm system for the display. 1. Lift the battery clip out of used battery promptly. Then turn your radio upside down. 2. Figure 2 Installing the battery 7

Owner's guide
Page 10
... the power jack on the back of the power cord into the FM 75Ω EXTERNAL connector (Figure 4). 2. For best FM tuning performance, straighten the antenna and extend the arms as far away from the radio as possible. Setting Up Your Wave® Radio Connecting the power cord 1. Untie and straighten the bundled power cord completely to set the clock. The display panel lights and the time display begins flashing. 4. Press the Clock Set button once...
... the power jack on the back of the power cord into the FM 75Ω EXTERNAL connector (Figure 4). 2. For best FM tuning performance, straighten the antenna and extend the arms as far away from the radio as possible. Setting Up Your Wave® Radio Connecting the power cord 1. Untie and straighten the bundled power cord completely to set the clock. The display panel lights and the time display begins flashing. 4. Press the Clock Set button once...

Owner's guide
Page 13
... sound of these connections are color coded. Setting Up Your Wave® Radio Connecting other components You can also use it. Figure 8 Connecting another component RL AUX IN VARIABLE OUT Using other components Select your CD player, tape player, or other functions, including on/ off, at electronics stores, or by pressing the AUX button. Note: Recording from the Wave radio. Audio cables for a Bose® Lifestyle® music system. Control all other auxiliary source by calling Bose Product and Technical Support. Connecting a tape recorder to its owner's manual...
... sound of these connections are color coded. Setting Up Your Wave® Radio Connecting other components You can also use it. Figure 8 Connecting another component RL AUX IN VARIABLE OUT Using other components Select your CD player, tape player, or other functions, including on/ off, at electronics stores, or by pressing the AUX button. Note: Recording from the Wave radio. Audio cables for a Bose® Lifestyle® music system. Control all other auxiliary source by calling Bose Product and Technical Support. Connecting a tape recorder to its owner's manual...

Owner's guide
Page 14
.... Connection at component Headphone jack For best sound, set the player volume control to approximately 3/4 of maximum volume. DO NOT USE THE THIRD CONNECTOR. Setting Up Your Wave® Radio Component Cable Portable CD or tape One miniplug-to-stereo player audio cable Connection at Wave radio AUX IN jacks RL AUX IN CD player, tape deck, One stereo audio cable or VCR Audio output jacks If there are two sets of outputs (fixed and variable), use only the two connectors that the volume can be controlled from the radio. You may need a special adapter...
.... Connection at component Headphone jack For best sound, set the player volume control to approximately 3/4 of maximum volume. DO NOT USE THE THIRD CONNECTOR. Setting Up Your Wave® Radio Component Cable Portable CD or tape One miniplug-to-stereo player audio cable Connection at Wave radio AUX IN jacks RL AUX IN CD player, tape deck, One stereo audio cable or VCR Audio output jacks If there are two sets of outputs (fixed and variable), use only the two connectors that the volume can be controlled from the radio. You may need a special adapter...

Owner's guide
Page 15
... lighting and other room conditions, in the same way you use the remote control (Figure 9) to operate the most frequently used functions of the radio and alarms. Aim the remote control at the display of an infrared remote control. The remote normally works up or down the AM or FM band Turns on and stores or selects a preset station Raises or lowers volume Time Alarm Sleep Tuning Station 1 2 3 Presets 4 5 6 Volume Mute AUX AM On FM Off Wave Radio Sets timed shutoff Displays...
... lighting and other room conditions, in the same way you use the remote control (Figure 9) to operate the most frequently used functions of the radio and alarms. Aim the remote control at the display of an infrared remote control. The remote normally works up or down the AM or FM band Turns on and stores or selects a preset station Raises or lowers volume Time Alarm Sleep Tuning Station 1 2 3 Presets 4 5 6 Volume Mute AUX AM On FM Off Wave Radio Sets timed shutoff Displays...

Owner's guide
Page 16
... no alarm Sets the time Sets or checks the wakeup time Turns on and stores or selects a preset station Raises or lowers volume Turns the radio on and selects AUX Alarm Set Alarm Mode Clock Set Tuning 1 2 3 Presets 4 5 6 AUX Volume AM/FM On/Off Sleep/Snooze Wave Radio Tunes the radio; Figure 10 The Wave radio control panel Selects radio, tone, both Tuning buttons to help you locate these frequently used buttons. The control panel On/Off and Volume buttons have raised ridges to display the station), which requires a separate button on the remote (Station). displays...
... no alarm Sets the time Sets or checks the wakeup time Turns on and stores or selects a preset station Raises or lowers volume Turns the radio on and selects AUX Alarm Set Alarm Mode Clock Set Tuning 1 2 3 Presets 4 5 6 AUX Volume AM/FM On/Off Sleep/Snooze Wave Radio Tunes the radio; Figure 10 The Wave radio control panel Selects radio, tone, both Tuning buttons to help you locate these frequently used buttons. The control panel On/Off and Volume buttons have raised ridges to display the station), which requires a separate button on the remote (Station). displays...

Owner's guide
Page 17
...Mode Clock Set Tuning 1 2 3 Presets 4 5 6 AUX Volume AM/FM On/Off Sleep/Snooze Wave Radio Control panel Clock Set Tuning Time Alarm Sleep Tuning Station 1 2 3 Presets 4 5 6 Volume Mute AUX AM On FM Off Wave Radio Remote control Use the control panel to stop. To change the display mode, press and hold Clock Set, and then press the AM/FM button. Operating Your Wave® Radio Reading the clock display You can set the clock - Hold down the Clock Set button and press Tuning up (") or down (#). Release the Tuning button to select this feature. 15 To make...
...Mode Clock Set Tuning 1 2 3 Presets 4 5 6 AUX Volume AM/FM On/Off Sleep/Snooze Wave Radio Control panel Clock Set Tuning Time Alarm Sleep Tuning Station 1 2 3 Presets 4 5 6 Volume Mute AUX AM On FM Off Wave Radio Remote control Use the control panel to stop. To change the display mode, press and hold Clock Set, and then press the AM/FM button. Operating Your Wave® Radio Reading the clock display You can set the clock - Hold down the Clock Set button and press Tuning up (") or down (#). Release the Tuning button to select this feature. 15 To make...
Owner's guide
Page 18
... down to turn your preferred setting. Clock Set and AM/FM Clock Set and Volume 16 In radio mode, the display shows the selected radio station. In low light situations, the display dims automatically. Press and hold Clock Set and then press the AM/FM button to switch between AM/PM (12 HR) or military (24 HR) formats Alarm Set Alarm Mode Clock Set Tuning 1 2 3 Presets 4 5 6 AUX Volume AM/FM On/Off Sleep/Snooze Wave Radio Control panel On/Off Clock Set and On...
... down to turn your preferred setting. Clock Set and AM/FM Clock Set and Volume 16 In radio mode, the display shows the selected radio station. In low light situations, the display dims automatically. Press and hold Clock Set and then press the AM/FM button to switch between AM/PM (12 HR) or military (24 HR) formats Alarm Set Alarm Mode Clock Set Tuning 1 2 3 Presets 4 5 6 AUX Volume AM/FM On/Off Sleep/Snooze Wave Radio Control panel On/Off Clock Set and On...

Owner's guide
Page 19
...). Use the Tuning buttons to music - The station is on, press both Tuning buttons (control panel) together or press Station (remote). Tuning To mute the sound - Press once to turn on the radio in clock mode and the radio is now preset to that number. To tune in the AUX mode, press to select the radio. Press to turn on (to the last source played) or off. Listening to the radio Operating Your Wave® Radio Function To turn on the component. If...
...). Use the Tuning buttons to music - The station is on, press both Tuning buttons (control panel) together or press Station (remote). Tuning To mute the sound - Press once to turn on the radio in clock mode and the radio is now preset to that number. To tune in the AUX mode, press to select the radio. Press to turn on (to the last source played) or off. Listening to the radio Operating Your Wave® Radio Function To turn on the component. If...
Owner's guide
Page 20
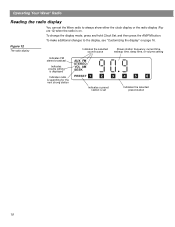
... button. Figure 12 The radio display Indicates the selected sound source Shows station frequency, current time, wakeup time, sleep time, or volume setting Indicates FM stereo broadcast Indicates volume setting is displayed Indicates radio is searching for the next strong station AUX FM STEREO VOL AM SEEK PRESET 1 2 3 Indicates a preset station is on page 16. To make additional changes to always show either the clock display or the radio display (Figure 12) when the radio is set the Wave radio to the display...
... button. Figure 12 The radio display Indicates the selected sound source Shows station frequency, current time, wakeup time, sleep time, or volume setting Indicates FM stereo broadcast Indicates volume setting is displayed Indicates radio is searching for the next strong station AUX FM STEREO VOL AM SEEK PRESET 1 2 3 Indicates a preset station is on page 16. To make additional changes to always show either the clock display or the radio display (Figure 12) when the radio is set the Wave radio to the display...

Owner's guide
Page 21
...on the clock display as ALARM (primary) and ALARM 2 (secondary). Alarm Set Alarm Mode Clock Set Tuning 1 2 3 Presets 4 5 6 AUX Volume AM/FM On/Off Sleep/Snooze Wave Radio Control panel Alarm Set Alarm Mode Alarm Set Tuning Alarm Mode Sleep/Snooze Alarm Mode Alarm Set Alarm Mode Alarm Set 1 2 3 Presets 4 5 6 Time Alarm Sleep Tuning Station 1 2 3 Presets 4 5 6 Volume Mute AUX AM On FM Off Wave Radio Remote control Time Time Alarm Tuning Sleep Time Use the control panel to see the ALARM wakeup time. To set the alarm mode - For radio only...
...on the clock display as ALARM (primary) and ALARM 2 (secondary). Alarm Set Alarm Mode Clock Set Tuning 1 2 3 Presets 4 5 6 AUX Volume AM/FM On/Off Sleep/Snooze Wave Radio Control panel Alarm Set Alarm Mode Alarm Set Tuning Alarm Mode Sleep/Snooze Alarm Mode Alarm Set Alarm Mode Alarm Set 1 2 3 Presets 4 5 6 Time Alarm Sleep Tuning Station 1 2 3 Presets 4 5 6 Volume Mute AUX AM On FM Off Wave Radio Remote control Time Time Alarm Tuning Sleep Time Use the control panel to see the ALARM wakeup time. To set the alarm mode - For radio only...

Owner's guide
Page 22
... any button while the tone is selected. the tone repeats in 10 minutes. To set the volume of the tone alarm - To set a louder or softer tone by pressing Volume up or down while the tone is restored. Alarm Set Alarm Mode Clock Set Tuning 1 2 3 Presets 4 5 6 AUX Volume AM/FM On/Off Sleep/Snooze Wave Radio Control panel On/Off Sleep/Snooze Volume Volume On/Off Time Alarm Sleep Tuning Station 1 2 3 Presets 4 5 6 Volume Mute AUX AM On FM Off Wave Radio Remote control...
... any button while the tone is selected. the tone repeats in 10 minutes. To set the volume of the tone alarm - To set a louder or softer tone by pressing Volume up or down while the tone is restored. Alarm Set Alarm Mode Clock Set Tuning 1 2 3 Presets 4 5 6 AUX Volume AM/FM On/Off Sleep/Snooze Wave Radio Control panel On/Off Sleep/Snooze Volume Volume On/Off Time Alarm Sleep Tuning Station 1 2 3 Presets 4 5 6 Volume Mute AUX AM On FM Off Wave Radio Remote control...

Owner's guide
Page 23
... Wave radio. Cleaning your radio Use only a dry cloth to reset the clock, alarm settings, and station presets. To ensure correct operation of the radio. If necessary, you will need to clean the outside of your Wave radio's alarm system, replace the 9V battery every year and following an extended power loss. A dead battery may use any openings on inside back cover.) Replacing the batteries WARNING: Keep the remote control battery away from the power outlet while replacing the battery...
... Wave radio. Cleaning your radio Use only a dry cloth to reset the clock, alarm settings, and station presets. To ensure correct operation of the radio. If necessary, you will need to clean the outside of your Wave radio's alarm system, replace the 9V battery every year and following an extended power loss. A dead battery may use any openings on inside back cover.) Replacing the batteries WARNING: Keep the remote control battery away from the power outlet while replacing the battery...

Owner's guide
Page 24
...; Operate the remote control closer to the radio. • Check for Bose Corporation of the jack. • Make sure the power cord is fully plugged into an operating AC wall outlet. • Increase the volume. • Press the Mute button on the remote control to unmute the sound. • Check the connections for any auxiliary component. • Press AUX to hear a source connected to a window. • If you are using the supplied coaxial cable, be...
...; Operate the remote control closer to the radio. • Check for Bose Corporation of the jack. • Make sure the power cord is fully plugged into an operating AC wall outlet. • Increase the volume. • Press the Mute button on the remote control to unmute the sound. • Check the connections for any auxiliary component. • Press AUX to hear a source connected to a window. • If you are using the supplied coaxial cable, be...


