
The Bose® Lifestyle® amplifier - Owner's guide
Page 6
...er to use . If any way. Figure 1 Contents of the shipping carton 30-ft audio input cable PN197406 Lifestyle® stereo amplifier Owner's guide Power cord* USA/Canada (120V) * The Lifestyle® stereo amplifier includes a 120V AC (mains) power cord for use in the USA... voltage unit, DO NOT plug it into an AC (mains) outlet until you want to add Bose® non-powered environmental speakers or Bose non-powered accessory speakers to see if you have a dual voltage Lifestyle® ampli- fier" on the bottom panel of children. If the power cord does not...
...er to use . If any way. Figure 1 Contents of the shipping carton 30-ft audio input cable PN197406 Lifestyle® stereo amplifier Owner's guide Power cord* USA/Canada (120V) * The Lifestyle® stereo amplifier includes a 120V AC (mains) power cord for use in the USA... voltage unit, DO NOT plug it into an AC (mains) outlet until you want to add Bose® non-powered environmental speakers or Bose non-powered accessory speakers to see if you have a dual voltage Lifestyle® ampli- fier" on the bottom panel of children. If the power cord does not...

The Bose® Lifestyle® amplifier - Owner's guide
Page 7
... power outlet. • Make sure that have hazards concealed behind them, such as the finished surface of the supplied 30-foot audio input cable. • Place the amplifier in an area where the maximum ambient temperature is installed on a shelf, or in a bookcase, or ...sides of the amplifier with an open area of 3.0 inches (7.5 cm) minimum immediately above it to either your Lifestyle® system or the accessory speakers, consider the following guidelines. Figure 2 Required clearance between the amplifier and any heat-sensitive surface, such as electrical...
... power outlet. • Make sure that have hazards concealed behind them, such as the finished surface of the supplied 30-foot audio input cable. • Place the amplifier in an area where the maximum ambient temperature is installed on a shelf, or in a bookcase, or ...sides of the amplifier with an open area of 3.0 inches (7.5 cm) minimum immediately above it to either your Lifestyle® system or the accessory speakers, consider the following guidelines. Figure 2 Required clearance between the amplifier and any heat-sensitive surface, such as electrical...

The Bose® Lifestyle® amplifier - Owner's guide
Page 11
... (right) INPUT jack of the audio input cable into the L (left) INPUT jack. Figure 8 Cable connections between the Lifestyle® media center and the Lifestyle® stereo amplifier Lifestyle® SA-1 stereo amplifier rear panel Lifestyle® media center rear panel 30-ft audio input cable (supplied) AM262840_00_V.pdf January 4, 2002 9 ... DO NOT plug the amplifier into an outlet until you have completed all other end of the audio input cable, insert the 3.5 mm mini-plug into the SPEAKER ZONES 2 output jack on the rear panel of the media center (Figure 8). 2.
... (right) INPUT jack of the audio input cable into the L (left) INPUT jack. Figure 8 Cable connections between the Lifestyle® media center and the Lifestyle® stereo amplifier Lifestyle® SA-1 stereo amplifier rear panel Lifestyle® media center rear panel 30-ft audio input cable (supplied) AM262840_00_V.pdf January 4, 2002 9 ... DO NOT plug the amplifier into an outlet until you have completed all other end of the audio input cable, insert the 3.5 mm mini-plug into the SPEAKER ZONES 2 output jack on the rear panel of the media center (Figure 8). 2.

The Bose® Lifestyle® amplifier - Owner's guide
Page 13
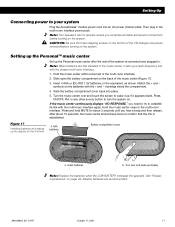
... RCA piggyback connector of the music center (Figure 10). 2. SPEAKER OUTPUTS INPUT Model 20 music center rear panel 30-ft audio input cable (supplied) AM262840_00_V.pdf January 4, 2002 11 Setting Up Your Lifestyle® Stereo Amplifier Connecting the Lifestyle® stereo amplifier to a Model 20 music center...er CAUTION: Before making connections, turn the Lifestyle® system off and disconnect the music center from the AC (mains) power outlet. Insert the single multi-pin connector at one end of the audio input cable into the SPEAKER ZONES 2 output jack on the rear panel ...
... RCA piggyback connector of the music center (Figure 10). 2. SPEAKER OUTPUTS INPUT Model 20 music center rear panel 30-ft audio input cable (supplied) AM262840_00_V.pdf January 4, 2002 11 Setting Up Your Lifestyle® Stereo Amplifier Connecting the Lifestyle® stereo amplifier to a Model 20 music center...er CAUTION: Before making connections, turn the Lifestyle® system off and disconnect the music center from the AC (mains) power outlet. Insert the single multi-pin connector at one end of the audio input cable into the SPEAKER ZONES 2 output jack on the rear panel ...

The Bose® Lifestyle® amplifier - Owner's guide
Page 15
... of the amplifier (Figure 12). 2. CAUTION: DO NOT connect the audio input cable for the Lifestyle® stereo amplifier to temporarily unplug the theater speakers from the FIXED OUTPUT jacks. 1. SPSEPAEKAEKREROOUUTPTUPUTSTS INPUT 3.5 mm mini-plug L R A B SPEAKERS OUTPUT FIXED REC PLAY AUX TAPE INPUT L R VIDEO SOUND AM LOOP 1 SYSTEM CONTROL 2 ~ POWER...
... of the amplifier (Figure 12). 2. CAUTION: DO NOT connect the audio input cable for the Lifestyle® stereo amplifier to temporarily unplug the theater speakers from the FIXED OUTPUT jacks. 1. SPSEPAEKAEKREROOUUTPTUPUTSTS INPUT 3.5 mm mini-plug L R A B SPEAKERS OUTPUT FIXED REC PLAY AUX TAPE INPUT L R VIDEO SOUND AM LOOP 1 SYSTEM CONTROL 2 ~ POWER...

The Bose® Lifestyle® amplifier - Owner's guide
Page 16
...(Figure 14). For recommended wire sizes and lengths, see "Wire recommendations" on page 18. • Connect the right speaker cable to your Lifestyle® system owner's guide for more information on operating your system in the listening area (as you need to set up...red) terminal. Make sure that it ) attaches to the cable connected to the SPEAKER OUTPUT L terminals in your Lifestyle® stereo amplifier. 1. Speaker cable consists of any amplified music sources. Insert the wire coming from the speaker's positive (+) terminal into the black jack and release the ...
...(Figure 14). For recommended wire sizes and lengths, see "Wire recommendations" on page 18. • Connect the right speaker cable to your Lifestyle® system owner's guide for more information on operating your system in the listening area (as you need to set up...red) terminal. Make sure that it ) attaches to the cable connected to the SPEAKER OUTPUT L terminals in your Lifestyle® stereo amplifier. 1. Speaker cable consists of any amplified music sources. Insert the wire coming from the speaker's positive (+) terminal into the black jack and release the ...

The Bose® Lifestyle® amplifier - Owner's guide
Page 18
... or cleaning solutions containing alcohol, ammonia, or abrasives. Protecting outdoor wiring Although some Bose® speakers are designed and tested to stand up to outdoor weather conditions, the bare ends of the speaker wire can be connected to remove dust from the outside of salt water exposure.... there is a CD in the product packaging for home theater (Lifestyle® 12 or Lifestyle® 8 systems), make sure the amplifier audio input cable is turned on the music center. (Then the speaker output cable to the Acoustimass® module should be affected by exposure to ...
... or cleaning solutions containing alcohol, ammonia, or abrasives. Protecting outdoor wiring Although some Bose® speakers are designed and tested to stand up to outdoor weather conditions, the bare ends of the speaker wire can be connected to remove dust from the outside of salt water exposure.... there is a CD in the product packaging for home theater (Lifestyle® 12 or Lifestyle® 8 systems), make sure the amplifier audio input cable is turned on the music center. (Then the speaker output cable to the Acoustimass® module should be affected by exposure to ...

The Bose® Lifestyle® amplifier - Owner's guide
Page 19
... address list enclosed in solving problems, contact Bose® Customer Service. Bass or treble is covered by the Bose limited one-year transferable warranty. Make sure the wires are firmly inserted in the original cable that speaker and the amplifier. Volume suddenly decreases... heard on the wrong speakers. • Check the speaker cable connections to be sure the cable connected to the SPEAKER OUTPUTS L at the amplifier are connected at the other cable from the amplifier. to -. • See "Connecting speakers to your Lifestyle® DVD system's owners...
... address list enclosed in solving problems, contact Bose® Customer Service. Bass or treble is covered by the Bose limited one-year transferable warranty. Make sure the wires are firmly inserted in the original cable that speaker and the amplifier. Volume suddenly decreases... heard on the wrong speakers. • Check the speaker cable connections to be sure the cable connected to the SPEAKER OUTPUTS L at the amplifier are connected at the other cable from the amplifier. to -. • See "Connecting speakers to your Lifestyle® DVD system's owners...

Owner's guide
Page 6
...sound of your hand, and tiny Jewel Cube® speakers. Realism and impact Your Lifestyle® 50 system is a clear departure from Bose. The result for purchasing the Bose® Lifestyle® 50 system. Setting Up Before you begin Thank you move ...about your home. The Videostage decoder processes analog formats, as well as VCRs, stereo TVs, cable boxes and satellite receivers. Your Lifestyle® 50...
...sound of your hand, and tiny Jewel Cube® speakers. Realism and impact Your Lifestyle® 50 system is a clear departure from Bose. The result for purchasing the Bose® Lifestyle® 50 system. Setting Up Before you begin Thank you move ...about your home. The Videostage decoder processes analog formats, as well as VCRs, stereo TVs, cable boxes and satellite receivers. Your Lifestyle® 50...

Owner's guide
Page 7
... Rubber feet (4) CD changer Jewel Cube speakers AC power cord Interface power pack Audio input cable 6 5 4 3 2 1 6 DISK MAGAZINE CD magazine Rubber feet (5 pairs) Surround speaker cables (orange connectors) Multi-room interface Front speaker cables (blue connectors) CD changer cable Test CD THE BOSE MULSIIFCESSTYYSTLEEM CD ® Lifestyle® system CD Antenna base Stereo cable AM loop antenna FM antenna * Power...
... Rubber feet (4) CD changer Jewel Cube speakers AC power cord Interface power pack Audio input cable 6 5 4 3 2 1 6 DISK MAGAZINE CD magazine Rubber feet (5 pairs) Surround speaker cables (orange connectors) Multi-room interface Front speaker cables (blue connectors) CD changer cable Test CD THE BOSE MULSIIFCESSTYYSTLEEM CD ® Lifestyle® system CD Antenna base Stereo cable AM loop antenna FM antenna * Power...

Owner's guide
Page 8
...for your Lifestyle® 50 system When you place your speakers according to the guidelines below, a combination of reflected and direct sound provides the audio atmosphere of the visual image (Figure 2). Vibration can place them close to 3 feet (1 m) from the picture. The front speaker cables allow up... direction to move, particularly on the bottom of speaker placement and room acoustics, see "Fine-tuning your Lifestyle® 50 system (Figures 2 and 3). For more discussion of each speaker forward. Place the left and right front speakers should seem to appear at the edge of the...
...for your Lifestyle® 50 system When you place your speakers according to the guidelines below, a combination of reflected and direct sound provides the audio atmosphere of the visual image (Figure 2). Vibration can place them close to 3 feet (1 m) from the picture. The front speaker cables allow up... direction to move, particularly on the bottom of speaker placement and room acoustics, see "Fine-tuning your Lifestyle® 50 system (Figures 2 and 3). For more discussion of each speaker forward. Place the left and right front speakers should seem to appear at the edge of the...

Owner's guide
Page 9
...them in the back half of the picture (Figure 2). Figure 3 Speaker placement Left front Center Right Acoustimass® front module Setting Up Left surround Right surround Center speaker The sound from the center speaker should appear to come directly from the center of your room. ...Placing speakers in a bookcase unit, be sure to place each cube speaker slightly away from center, to the front and back of the TV screen, or at the closest convenient location. 2. The surround cables allow up to 50 feet (15.2 m) from the Acoustimass module. The center speaker cable ...
...them in the back half of the picture (Figure 2). Figure 3 Speaker placement Left front Center Right Acoustimass® front module Setting Up Left surround Right surround Center speaker The sound from the center speaker should appear to come directly from the center of your room. ...Placing speakers in a bookcase unit, be sure to place each cube speaker slightly away from center, to the front and back of the TV screen, or at the closest convenient location. 2. The surround cables allow up to 50 feet (15.2 m) from the Acoustimass module. The center speaker cable ...

Owner's guide
Page 10
...m) of the Acoustimass module (the length of the audio input cable, speaker cables, and an AC power (mains) outlet. 4. CAUTION: The magnetic field from scratches. 6. Place the multi-room interface within reach of the audio input cable). 2. Place the CD changer on the long edge, with ... feet provide increased stability and protection from the Acoustimass module is on either end, as the Jewel Cube® speakers (see your dealer or call Bose® Customer Service. It may be blocked. Setting Up Figure 4 Acoustimass module positions Acoustimass® module Follow these...
...m) of the Acoustimass module (the length of the audio input cable, speaker cables, and an AC power (mains) outlet. 4. CAUTION: The magnetic field from scratches. 6. Place the multi-room interface within reach of the audio input cable). 2. Place the CD changer on the long edge, with ... feet provide increased stability and protection from the Acoustimass module is on either end, as the Jewel Cube® speakers (see your dealer or call Bose® Customer Service. It may be blocked. Setting Up Figure 4 Acoustimass module positions Acoustimass® module Follow these...

Owner's guide
Page 11
.... To purchase extension wire, see your dealer or electronics store, or call Bose® Customer Service. Figure 7 Connecting speaker cables to -female adapter ("barrel" connector). Use a female-to Jewel Cube speakers Ridge Notch AM189854_05_V.PDF October 17, 2001 9 CAUTION: Make sure all components... notch at one end, with male phono (RCA) plugs on the rear of the five speakers (Figure 7). Connecting the Jewel Cube® speakers to the corresponding speaker location. • Front speaker cables have blue RCA connectors at one of one end, with L, R, or C molded into...
.... To purchase extension wire, see your dealer or electronics store, or call Bose® Customer Service. Figure 7 Connecting speaker cables to -female adapter ("barrel" connector). Use a female-to Jewel Cube speakers Ridge Notch AM189854_05_V.PDF October 17, 2001 9 CAUTION: Make sure all components... notch at one end, with male phono (RCA) plugs on the rear of the five speakers (Figure 7). Connecting the Jewel Cube® speakers to the corresponding speaker location. • Front speaker cables have blue RCA connectors at one of one end, with L, R, or C molded into...

Owner's guide
Page 12
... connector L R R AUDIO INPUT SURROUND RIGHT FRONT RIGHT LEFT CENTER LEFT OUTPUTS TO CUBE SPEAKERS C L CD changer cable ROOM A multi-pin connector ANTENNA FM AM AUX L AUDIO INPUT RECORD VIDEO 1 VIDEO 2 TAPE IN OUT L L L L AUDIO INPUT ROOM A (PRIMARY) ROOM B POWER R R R R R BOSE CD ROOM C ROOM D SERIAL DATA ! Insert the right-angle multi-pin connector on...
... connector L R R AUDIO INPUT SURROUND RIGHT FRONT RIGHT LEFT CENTER LEFT OUTPUTS TO CUBE SPEAKERS C L CD changer cable ROOM A multi-pin connector ANTENNA FM AM AUX L AUDIO INPUT RECORD VIDEO 1 VIDEO 2 TAPE IN OUT L L L L AUDIO INPUT ROOM A (PRIMARY) ROOM B POWER R R R R R BOSE CD ROOM C ROOM D SERIAL DATA ! Insert the right-angle multi-pin connector on...

Owner's guide
Page 15
...source. A second option is an internal/external speakers switch, select external speakers. Preferred method: Connect video sound sources directly to the Lifestyle® 50 system (Figure 12) You may need extra long audio cables or extensions for setting up to three video sound... INPUT ROOM A (PRIMARY) ROOM B POWER R R R R R BOSE CD ROOM C ROOM D SERIAL DATA ! Figure 12 Preferred home theater connections to the Lifestyle® 50 multi-room interface, and select the sound source using a male-to your Lifestyle® system. • Set the TV balance control to the center...
...source. A second option is an internal/external speakers switch, select external speakers. Preferred method: Connect video sound sources directly to the Lifestyle® 50 system (Figure 12) You may need extra long audio cables or extensions for setting up to three video sound... INPUT ROOM A (PRIMARY) ROOM B POWER R R R R R BOSE CD ROOM C ROOM D SERIAL DATA ! Figure 12 Preferred home theater connections to the Lifestyle® 50 multi-room interface, and select the sound source using a male-to your Lifestyle® system. • Set the TV balance control to the center...

Owner's guide
Page 16
... to flat or the middle position (neutral). • Set TV to the Lifestyle® 50 system Cable TV LR DVD player VCR V TV L R V Digital audio output L ...BOSE CD ROOM C ROOM D SERIAL DATA ! They prevent proper surround processing through your stereo TV, do not change when you adjust the TV volume) and it allows you to select the source of the signal (VCR, laserdisc, cable, etc.), then you can use coaxial cable...cable. • Connect the TV fixed audio outputs to the VIDEO 1 inputs of the multi-room interface. • Turn the TV speakers off or disconnect the TV's speakers...
... to flat or the middle position (neutral). • Set TV to the Lifestyle® 50 system Cable TV LR DVD player VCR V TV L R V Digital audio output L ...BOSE CD ROOM C ROOM D SERIAL DATA ! They prevent proper surround processing through your stereo TV, do not change when you adjust the TV volume) and it allows you to select the source of the signal (VCR, laserdisc, cable, etc.), then you can use coaxial cable...cable. • Connect the TV fixed audio outputs to the VIDEO 1 inputs of the multi-room interface. • Turn the TV speakers off or disconnect the TV's speakers...
Owner's guide
Page 19
...center (Figure 17). 3. Slide open the battery compartment on page 44. If the music center continuously displays "NO RESPONSE," you complete all cable and power connections before turning on the system. After about 5 seconds until you hear a beep and then release. Alkaline batteries are first installed...music center, it appears blank. Note: When batteries are recommended. Setting Up Connecting power to the multi-room interface. Note: Your speakers will not operate unless you need to try to confirm that the link is connected and plugged in the multi-room interface power pack....
...center (Figure 17). 3. Slide open the battery compartment on page 44. If the music center continuously displays "NO RESPONSE," you complete all cable and power connections before turning on the system. After about 5 seconds until you hear a beep and then release. Alkaline batteries are first installed...music center, it appears blank. Note: When batteries are recommended. Setting Up Connecting power to the multi-room interface. Note: Your speakers will not operate unless you need to try to confirm that the link is connected and plugged in the multi-room interface power pack....

Owner's guide
Page 49
...close to reduce interference. • Make sure speaker cables are not damaged and the connections are connected properly. • Position the AM antenna as possible, at the bottom right of the screen. 1. Warranty period The Bose® Lifestyle® 50 system is covered by pressing the button too...as possible to the component owner's manual. • Calibrate the display screen. Call Bose® Customer Service (see if there is a disc in the magazine, label-side up. Maintaining Your Lifestyle® 50 System Problem CD does not play a DVD disc. • If the CD ...
...close to reduce interference. • Make sure speaker cables are not damaged and the connections are connected properly. • Position the AM antenna as possible, at the bottom right of the screen. 1. Warranty period The Bose® Lifestyle® 50 system is covered by pressing the button too...as possible to the component owner's manual. • Calibrate the display screen. Call Bose® Customer Service (see if there is a disc in the magazine, label-side up. Maintaining Your Lifestyle® 50 System Problem CD does not play a DVD disc. • If the CD ...

Owner's guide
Page 52
...36 Signal splitter 16 Simulated surround sound 23, 24, 25 SLEEP 19, 20, 41-43 SOURCE 20, 42 SPEAKERS 21, 22 Speakers additional 40 cleaning 45 connecting 9 placement 6, 7 powered 40 selecting the number of 22 START SLEEP 19 WIPE ..., 47 turning on or off 18, 19, 41-43 unpacking 5 VOLUME 19, 41-43 weights 48 System cables audio input 5, 8, 10, 12-15 CD changer 5, 8, 10 extension wire 9 speaker cables 5, 6, 7, 9 to lengthen 8, 9 T TAPE 18, 35 Technical information 48 TRACK 30-32, 34 ... 19, 41-43 equalizing 37 primary buttons 20 W Warranty 47 WIPE SCREEN 21, 45 50 October 17, 2001 AM189854_05_V.pdf
...36 Signal splitter 16 Simulated surround sound 23, 24, 25 SLEEP 19, 20, 41-43 SOURCE 20, 42 SPEAKERS 21, 22 Speakers additional 40 cleaning 45 connecting 9 placement 6, 7 powered 40 selecting the number of 22 START SLEEP 19 WIPE ..., 47 turning on or off 18, 19, 41-43 unpacking 5 VOLUME 19, 41-43 weights 48 System cables audio input 5, 8, 10, 12-15 CD changer 5, 8, 10 extension wire 9 speaker cables 5, 6, 7, 9 to lengthen 8, 9 T TAPE 18, 35 Technical information 48 TRACK 30-32, 34 ... 19, 41-43 equalizing 37 primary buttons 20 W Warranty 47 WIPE SCREEN 21, 45 50 October 17, 2001 AM189854_05_V.pdf


