
Owner's guide
Page 2
...;TENT. Class 1 laser product This compact disc player is intended to alert the user to the presence of your Lifestyle® Personal® music center, Acoustimass® module, multi-room interface, and CD changer: The lightning flash with this owner's guide Please take the time to rain or moisture. The CLASS 1 LASER PRODUCT...
...;TENT. Class 1 laser product This compact disc player is intended to alert the user to the presence of your Lifestyle® Personal® music center, Acoustimass® module, multi-room interface, and CD changer: The lightning flash with this owner's guide Please take the time to rain or moisture. The CLASS 1 LASER PRODUCT...

Owner's guide
Page 5
... Index ...49 Bose® Corporation Inside back cover For your system 17 Setting up the Personal™ music center 17 Operating Your Lifestyle® 50 System 18 Turning on the bottom panels of the Personal music center, multi-room interface, CD changer, and the Acoustimass...center serial number Multi-room interface serial number CD changer serial number Acoustimass module serial number Dealer name Dealer phone Purchase date We suggest you begin ...4 Unpacking the carton ...5 Selecting the locations for your Lifestyle® 50 system 6 Connecting your system 9 Connecting your...
... Index ...49 Bose® Corporation Inside back cover For your system 17 Setting up the Personal™ music center 17 Operating Your Lifestyle® 50 System 18 Turning on the bottom panels of the Personal music center, multi-room interface, CD changer, and the Acoustimass...center serial number Multi-room interface serial number CD changer serial number Acoustimass module serial number Dealer name Dealer phone Purchase date We suggest you begin ...4 Unpacking the carton ...5 Selecting the locations for your Lifestyle® 50 system 6 Connecting your system 9 Connecting your...

Owner's guide
Page 6
..., communicating with : • Digital-audio bitstreams. Look for purchasing the Bose® Lifestyle® 50 system. The other elements of the Lifestyle® 50 system are also far from conventional. Your Lifestyle® 50 system cannot process MPEG-2 or DTS digital bitstreams. • Surround-sound...begin Thank you from being overwhelmed by Digital Dynamic Range® compression. The Bose Jewel Cube speakers are designed to be hidden from view: • The elegant Lifestyle® CD changer, designed to constantly adjust the volume. 4 October 17, 2001 AM189854_05_V.PDF The...
..., communicating with : • Digital-audio bitstreams. Look for purchasing the Bose® Lifestyle® 50 system. The other elements of the Lifestyle® 50 system are also far from conventional. Your Lifestyle® 50 system cannot process MPEG-2 or DTS digital bitstreams. • Surround-sound...begin Thank you from being overwhelmed by Digital Dynamic Range® compression. The Bose Jewel Cube speakers are designed to be hidden from view: • The elegant Lifestyle® CD changer, designed to constantly adjust the volume. 4 October 17, 2001 AM189854_05_V.PDF The...

Owner's guide
Page 7
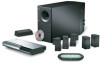
...Surround speaker cables (orange connectors) Multi-room interface Front speaker cables (blue connectors) CD changer cable Test CD THE BOSE MULSIIFCESSTYYSTLEEM CD ® Lifestyle® system CD Antenna base Stereo cable AM loop antenna FM antenna * Power cord and pack shown...of children. Setting Up Unpacking the carton Carefully unpack your authorized Bose dealer immediately. Notify Bose® or your system. Then write them on your Lifestyle® 50 system: • Personal music center • CD changer • Multi-room interface • Interface power pack* &#...
...Surround speaker cables (orange connectors) Multi-room interface Front speaker cables (blue connectors) CD changer cable Test CD THE BOSE MULSIIFCESSTYYSTLEEM CD ® Lifestyle® system CD Antenna base Stereo cable AM loop antenna FM antenna * Power cord and pack shown...of children. Setting Up Unpacking the carton Carefully unpack your authorized Bose dealer immediately. Notify Bose® or your system. Then write them on your Lifestyle® 50 system: • Personal music center • CD changer • Multi-room interface • Interface power pack* &#...

Owner's guide
Page 10
...Treble Bass Alternate position ® RIGHT REAR LEFT REAR RIGHT FRONT CENTER LEFT FRONT CUOBUETSPPUETASKTEORS ® Figure 5 The multi-room interface Figure 6 The CD changer 5. An alternate position is not an immediate risk to avoid blocking the port or creating too much bass. 7. CAUTION: Do not cover the ...2001 AM189854_05_V.PDF If you should not be placed out of your components, see the example along the wall to your dealer or call Bose® Customer Service. Do not place the module on its largest side, with the bass and treble controls facing up. The slots...
...Treble Bass Alternate position ® RIGHT REAR LEFT REAR RIGHT FRONT CENTER LEFT FRONT CUOBUETSPPUETASKTEORS ® Figure 5 The multi-room interface Figure 6 The CD changer 5. An alternate position is not an immediate risk to avoid blocking the port or creating too much bass. 7. CAUTION: Do not cover the ...2001 AM189854_05_V.PDF If you should not be placed out of your components, see the example along the wall to your dealer or call Bose® Customer Service. Do not place the module on its largest side, with the bass and treble controls facing up. The slots...

Owner's guide
Page 11
...both the RCA connectors and the Jewel Cube connectors at the other end. • Surround speaker cables have selected locations for your speakers, CD changer, and interface, connect the system. Connect each cable to -). to the corresponding speaker location. • Front speaker cables have blue ... Connecting your system Once you begin hooking up the system. To purchase extension wire, see your dealer or electronics store, or call Bose® Customer Service. Match each cable to Jewel Cube speakers Ridge Notch AM189854_05_V.PDF October 17, 2001 9 Connecting the Jewel Cube&#...
...both the RCA connectors and the Jewel Cube connectors at the other end. • Surround speaker cables have selected locations for your speakers, CD changer, and interface, connect the system. Connect each cable to -). to the corresponding speaker location. • Front speaker cables have blue ... Connecting your system Once you begin hooking up the system. To purchase extension wire, see your dealer or electronics store, or call Bose® Customer Service. Match each cable to Jewel Cube speakers Ridge Notch AM189854_05_V.PDF October 17, 2001 9 Connecting the Jewel Cube&#...

Owner's guide
Page 12
... the back of the interface. 2. See "Setting up ) into the jack marked BOSE CD on the audio input cable is for connecting the digital output of the CD changer. Plug the other digital source to the system. For information on connecting multi-room systems...L L L L AUDIO INPUT ROOM A (PRIMARY) ROOM B POWER R R R R R BOSE CD ROOM C ROOM D SERIAL DATA ! Note: The female RCA connector on the back of the interface. Setting Up Figure 8 Speakers, CD changer, and multi-room interface connections Connecting the Acoustimass® module to the multi-room interface Connect...
... the back of the interface. 2. See "Setting up ) into the jack marked BOSE CD on the audio input cable is for connecting the digital output of the CD changer. Plug the other digital source to the system. For information on connecting multi-room systems...L L L L AUDIO INPUT ROOM A (PRIMARY) ROOM B POWER R R R R R BOSE CD ROOM C ROOM D SERIAL DATA ! Note: The female RCA connector on the back of the interface. Setting Up Figure 8 Speakers, CD changer, and multi-room interface connections Connecting the Acoustimass® module to the multi-room interface Connect...

Owner's guide
Page 17
...AUDIO OUTPUT ROOM A (PRIMARY) ROOM B POWER R R R R R BOSE CD ROOM C ROOM D SERIAL DATA ! Do not connect it to the TV. You can use a Y-adapter (available at electronics stores) to L (left ). Laserdisc player or additional CD changer To use an external tape recorder (analog audio cassette, analog open reel, ...the interface TAPE IN jacks. Thus, the video signal must be connected directly to the Lifestyle® 50 system. See Figure 14. Note: The Lifestyle® 50 system cannot turn on the multi-room interface. Note: For assistance with RIAA equalization). ...
...AUDIO OUTPUT ROOM A (PRIMARY) ROOM B POWER R R R R R BOSE CD ROOM C ROOM D SERIAL DATA ! Do not connect it to the TV. You can use a Y-adapter (available at electronics stores) to L (left ). Laserdisc player or additional CD changer To use an external tape recorder (analog audio cassette, analog open reel, ...the interface TAPE IN jacks. Thus, the video signal must be connected directly to the Lifestyle® 50 system. See Figure 14. Note: The Lifestyle® 50 system cannot turn on the multi-room interface. Note: For assistance with RIAA equalization). ...
Owner's guide
Page 19
... displays "NO RESPONSE," you hear a beep and then release. Figure 17 Installing batteries and waking up the Personal music center after the rest of the CD changer have been removed before turning on the bottom of the system is established. Note: Your speakers will not operate unless you complete all cable and...
... displays "NO RESPONSE," you hear a beep and then release. Figure 17 Installing batteries and waking up the Personal music center after the rest of the CD changer have been removed before turning on the bottom of the system is established. Note: Your speakers will not operate unless you complete all cable and...

Owner's guide
Page 20
... pages 26-28. • To operate the CD changer, see "Selecting the number of the system operations in 5-speaker mode. The center is backlit for maximum battery life, the display and backlight turn on the screen. 2. To verify your new Lifestyle® system. Operating Your Lifestyle® 50 System Turning on a source Turning the system...
... pages 26-28. • To operate the CD changer, see "Selecting the number of the system operations in 5-speaker mode. The center is backlit for maximum battery life, the display and backlight turn on the screen. 2. To verify your new Lifestyle® system. Operating Your Lifestyle® 50 System Turning on a source Turning the system...

Owner's guide
Page 31
Operating Your Lifestyle® 50 System Listening to compact discs Using the CD changer You can load the CD changer with up to six compact discs at the lower left of the arrow on the magazine (Figure 32). Note the slot numbers 1 through 6, from the CD magazine Press the white ... CAUTION: Do not insert more than one slot could damage the discs, the CD magazine, or the CD changer. Figure 31 Loading and ejecting a CD 6 5 4 3 2 1 6 5 4 3 2 1 6 DISK MAGAZINE Figure 32 Loading and unloading the CD magazine Ejecting discs from bottom to become stuck, and could cause them to top,...
Operating Your Lifestyle® 50 System Listening to compact discs Using the CD changer You can load the CD changer with up to six compact discs at the lower left of the arrow on the magazine (Figure 32). Note the slot numbers 1 through 6, from the CD magazine Press the white ... CAUTION: Do not insert more than one slot could damage the discs, the CD magazine, or the CD changer. Figure 31 Loading and ejecting a CD 6 5 4 3 2 1 6 5 4 3 2 1 6 DISK MAGAZINE Figure 32 Loading and unloading the CD magazine Ejecting discs from bottom to become stuck, and could cause them to top,...

Owner's guide
Page 32
Operating Your Lifestyle® 50 System Figure 33 The CD changer display Turning the system on and choosing the CD changer Press the CD source button to the previous track, press the TRACK backward button. The button symbol flashes. To skip to select the CD changer. If the system is off, this turns it begins to play another disc Press...
Operating Your Lifestyle® 50 System Figure 33 The CD changer display Turning the system on and choosing the CD changer Press the CD source button to the previous track, press the TRACK backward button. The button symbol flashes. To skip to select the CD changer. If the system is off, this turns it begins to play another disc Press...

Owner's guide
Page 37
... 1. If the CD changer is directed to the RECORD OUT jacks. is sent to the RECORD OUT jacks. This turns your Personal music center to any source except TAPE, the output signal of the dashes (Figure 38). Note: The ROOM outputs of the Lifestyle® 50 system are designated ... displayed under the source display area (Figure 38). 2. The appropriate display indicator appears when the system is selected. Operating Your Lifestyle® 50 System Using the system with external components Follow the instructions on pages 12-15 for RECORD OUT, it shuts off after 24 ...
... 1. If the CD changer is directed to the RECORD OUT jacks. is sent to the RECORD OUT jacks. This turns your Personal music center to any source except TAPE, the output signal of the dashes (Figure 38). Note: The ROOM outputs of the Lifestyle® 50 system are designated ... displayed under the source display area (Figure 38). 2. The appropriate display indicator appears when the system is selected. Operating Your Lifestyle® 50 System Using the system with external components Follow the instructions on pages 12-15 for RECORD OUT, it shuts off after 24 ...

Owner's guide
Page 44
...on different sources in more rooms and select them as VIDEO 1, to turn on the display tell you what is currently selected. Similarly, with one CD changer, the system cannot play one radio station in one room to the next in A-B-C-D order. See "Setting up the Personal music center. 2. Returning..." on . Control that room. Setting up a shared source Now, let's say you have gained control of a single room. Operating a Multi-Room Lifestyle® 50 System Using the ROOM button The ROOM button allows you to select any connected room and control any sound source you want to hear in...
...on different sources in more rooms and select them as VIDEO 1, to turn on the display tell you what is currently selected. Similarly, with one CD changer, the system cannot play one radio station in one room to the next in A-B-C-D order. See "Setting up the Personal music center. 2. Returning..." on . Control that room. Setting up a shared source Now, let's say you have gained control of a single room. Operating a Multi-Room Lifestyle® 50 System Using the ROOM button The ROOM button allows you to select any connected room and control any sound source you want to hear in...

Owner's guide
Page 46
...2001 AM189854_05_V.pdf Pressing VOLUME v on page 17 for two minutes. Replace the batteries with the + and - Figure 50 The LOW BATTERY warning message ON OFF LOW BATTERY VOLUÂE SLEEP ÂUTE ÂENU VOLUÂE System ...settings are not lost when batteries are nearly depleted. Maintaining Your Lifestyle® 50 System Finding a misplaced Personal™ music center The "find me" feature assists you in any rooms that are... of the multi-room interface (under the antenna connections, next to the CD changer cable connection).
...2001 AM189854_05_V.pdf Pressing VOLUME v on page 17 for two minutes. Replace the batteries with the + and - Figure 50 The LOW BATTERY warning message ON OFF LOW BATTERY VOLUÂE SLEEP ÂUTE ÂENU VOLUÂE System ...settings are not lost when batteries are nearly depleted. Maintaining Your Lifestyle® 50 System Finding a misplaced Personal™ music center The "find me" feature assists you in any rooms that are... of the multi-room interface (under the antenna connections, next to the CD changer cable connection).

Owner's guide
Page 47
Maintaining Your Lifestyle® 50 System Cleaning the system The only maintenance your speakers with a soft, damp ...Acoustimass® module Clean the surface of the CD changer. Do not use this option to disable the display buttons for up to maintain the finish. Then turn the system off and contact Bose® Customer Service. You can use any problems... into any openings of the page. For information on again. Figure 51 Entering the WIPE SCREEN display Cleaning the CD changer Use only a soft cloth to warn you are ready to wipe the screen, press START to air dry....
Maintaining Your Lifestyle® 50 System Cleaning the system The only maintenance your speakers with a soft, damp ...Acoustimass® module Clean the surface of the CD changer. Do not use this option to disable the display buttons for up to maintain the finish. Then turn the system off and contact Bose® Customer Service. You can use any problems... into any openings of the page. For information on again. Figure 51 Entering the WIPE SCREEN display Cleaning the CD changer Use only a soft cloth to warn you are ready to wipe the screen, press START to air dry....

Owner's guide
Page 48
...it . Make sure to select the correct source for the desired input. • Be sure the CD is placed correctly label-side up in the magazine, and the magazine is inserted properly in the CD changer. • Connect the FM and AM antennas. • Make sure the center cube cable is ...8226; If NO RESPONSE is continuously displayed, the link between your music center and the multi-room interface may be broken. Maintaining Your Lifestyle® 50 System Troubleshooting Problem System does not function at all No sound No sound from center speaker Too much sound from center speaker No sound ...
...it . Make sure to select the correct source for the desired input. • Be sure the CD is placed correctly label-side up in the magazine, and the magazine is inserted properly in the CD changer. • Connect the FM and AM antennas. • Make sure the center cube cable is ...8226; If NO RESPONSE is continuously displayed, the link between your music center and the multi-room interface may be broken. Maintaining Your Lifestyle® 50 System Troubleshooting Problem System does not function at all No sound No sound from center speaker Too much sound from center speaker No sound ...

Owner's guide
Page 49
... back cover for listings). • Make sure antennas are loaded. • Eject the magazine and try loading the CD again. • There may be necessary. Call Bose® Customer Service (see inside back cover for a disc that came with the appropriate area of weak signal coverage... hold the source display area (top center) until CAL appears. 2. Maintaining Your Lifestyle® 50 System Problem CD does not play a DVD disc. • If the CD changer is not properly connected the display shows Plug in cd. • A display message Err indicates a mechanical error. Press the small round...
... back cover for listings). • Make sure antennas are loaded. • Eject the magazine and try loading the CD again. • There may be necessary. Call Bose® Customer Service (see inside back cover for a disc that came with the appropriate area of weak signal coverage... hold the source display area (top center) until CAL appears. 2. Maintaining Your Lifestyle® 50 System Problem CD does not play a DVD disc. • If the CD changer is not properly connected the display shows Plug in cd. • A display message Err indicates a mechanical error. Press the small round...

Owner's guide
Page 50
...Polymer, painted Multi-room interface Polymer CD changer Aluminum Jewel Cube speakers Polymer, painted Acoustimass module Vinyl veneer, Polymer Accessories To find out about mounting brackets, stands, CD magazines, and connecting additional Bose® powered loudspeakers, contact your Bose dealer. Product Information Technical information Speaker...room interface power pack power rating USA/Canada: 120V~ 60 Hz 25VA Europe: 230V~ 50 Hz 25VA Australia: 240V~ 50 Hz 25VA Dual voltage: 120V~ 60 Hz 25VA and 230V~ 50 Hz 25VA Multi-room interface inputs TAPE IN: 2Vrms, maximum AUX, VIDEO 1, VIDEO...
...Polymer, painted Multi-room interface Polymer CD changer Aluminum Jewel Cube speakers Polymer, painted Acoustimass module Vinyl veneer, Polymer Accessories To find out about mounting brackets, stands, CD magazines, and connecting additional Bose® powered loudspeakers, contact your Bose dealer. Product Information Technical information Speaker...room interface power pack power rating USA/Canada: 120V~ 60 Hz 25VA Europe: 230V~ 50 Hz 25VA Australia: 240V~ 50 Hz 25VA Dual voltage: 120V~ 60 Hz 25VA and 230V~ 50 Hz 25VA Multi-room interface inputs TAPE IN: 2Vrms, maximum AUX, VIDEO 1, VIDEO...

Owner's guide
Page 51
... control 36 Batteries first installed 17 LOW BATTERY 44 replacing 17, 44 Beep adjustment display 37 Built-in sources 20 C CAUTION marks 2 CD 18, 20, 29, 30-32, 33-34 CD changer display 30 loading 29 location 8 omit a track 31 PAUSE 30 PLAY 30 select 30 shipping screws 5, 17 STOP 30 TRACK 30... 34 EDIT 33, 34 erase 34 FULL 34 INSERT 34 ITEM 33 programming 33 STORE 33, 34 CENTER 22 CHANGING 30 Cleaning Acoustimass module 45 CD changer 45 personal music center 45 speakers 45 WIPE SCREEN 21, 45 CLEAR, CLEAR LIST 34 CLEAR OMIT TRACK 31 Connecting powered speakers 40 Customer Service...
... control 36 Batteries first installed 17 LOW BATTERY 44 replacing 17, 44 Beep adjustment display 37 Built-in sources 20 C CAUTION marks 2 CD 18, 20, 29, 30-32, 33-34 CD changer display 30 loading 29 location 8 omit a track 31 PAUSE 30 PLAY 30 select 30 shipping screws 5, 17 STOP 30 TRACK 30... 34 EDIT 33, 34 erase 34 FULL 34 INSERT 34 ITEM 33 programming 33 STORE 33, 34 CENTER 22 CHANGING 30 Cleaning Acoustimass module 45 CD changer 45 personal music center 45 speakers 45 WIPE SCREEN 21, 45 CLEAR, CLEAR LIST 34 CLEAR OMIT TRACK 31 Connecting powered speakers 40 Customer Service...


