Installation guide
Page 2
...help you can cause a failure and/or a fire hazard. • Do not place any part of wire and cable required for in the shipping carton. ©2010 Bose Corporation. It is used only with liquids, such as lighted candles, on the Important Safety Information sheet enclosed in ...not to spill liquids into any naked flame sources, such as vases, on the bottom of the product. • The speaker wire and interconnect cables included with arrowhead symbol within an equilateral triangle alerts the user to the presence of uninsulated, dangerous voltage within an equilateral ...
...help you can cause a failure and/or a fire hazard. • Do not place any part of wire and cable required for in the shipping carton. ©2010 Bose Corporation. It is used only with liquids, such as lighted candles, on the Important Safety Information sheet enclosed in ...not to spill liquids into any naked flame sources, such as vases, on the bottom of the product. • The speaker wire and interconnect cables included with arrowhead symbol within an equilateral triangle alerts the user to the presence of uninsulated, dangerous voltage within an equilateral ...

Installation guide
Page 3
... Substances and Elements Lead Mercury Cadmium Hexavalent Polybrominated Polybrominated Part Name (Pb) (Hg) (Cd) (CR(VI)) Biphenyl (PBB) diphenylether (PBDE) PCBs X 0 0 0 0 0 Metal parts X 0 0 0 0 0 Plastic parts 0 0 0 0 0 0 Speakers X 0 0 0 0 0 Cables X 0 0 0 0 0 O: Indicates that this toxic or hazardous substance contained in at least one of the homogeneous materials used batteries properly, following any local regulations. Do not...
... Substances and Elements Lead Mercury Cadmium Hexavalent Polybrominated Polybrominated Part Name (Pb) (Hg) (Cd) (CR(VI)) Biphenyl (PBB) diphenylether (PBDE) PCBs X 0 0 0 0 0 Metal parts X 0 0 0 0 0 Plastic parts 0 0 0 0 0 0 Speakers X 0 0 0 0 0 Cables X 0 0 0 0 0 O: Indicates that this toxic or hazardous substance contained in at least one of the homogeneous materials used batteries properly, following any local regulations. Do not...
Installation guide
Page 11
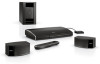
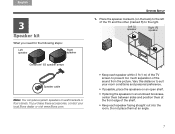
...speaker marked L (on wall brackets or floor stands. TAB 5 TAB 6 TAB 7 TAB 8 SYSTEM SETUP 1. Vary this distance to the right. Left (L) speaker Right (R) speaker • Keep each speaker... within 3 ft (1 m) of the TV screen to prevent too much separation of the shelf. • Keep each speaker facing straight out ...3 TAB 4 3 Speaker kit What you need for the following steps: Left speaker Right speaker Gemstone® ES speaker arrays Speaker cable Note: You can place system speakers on the back) to...
...speaker marked L (on wall brackets or floor stands. TAB 5 TAB 6 TAB 7 TAB 8 SYSTEM SETUP 1. Vary this distance to the right. Left (L) speaker Right (R) speaker • Keep each speaker... within 3 ft (1 m) of the TV screen to prevent too much separation of the shelf. • Keep each speaker facing straight out ...3 TAB 4 3 Speaker kit What you need for the following steps: Left speaker Right speaker Gemstone® ES speaker arrays Speaker cable Note: You can place system speakers on the back) to...
Installation guide
Page 12
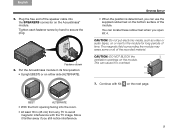
Left (L) Speaker 8 Select the plug labeled L and insert it into the speaker to the left of the speaker cable with two plugs, separate the cable so each plug can reach one speaker. TAB 8 TAB 7 TAB 6 TAB 5 SYSTEM SETUP 2. Right (R) Speaker 3. At the end of the television as you face it . Insert the plug marked R into the speaker that is marked L and sits to the right of your television as you face it . TAB 4 TAB 3 TAB 2 English 4.
Left (L) Speaker 8 Select the plug labeled L and insert it into the speaker to the left of the speaker cable with two plugs, separate the cable so each plug can reach one speaker. TAB 8 TAB 7 TAB 6 TAB 5 SYSTEM SETUP 2. Right (R) Speaker 3. At the end of the television as you face it . Insert the plug marked R into the speaker that is marked L and sits to the right of your television as you face it . TAB 4 TAB 3 TAB 2 English 4.
Installation guide
Page 13
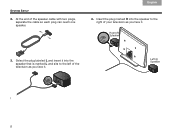
... openings on or next to avoid magnetic interference with Kit 4 on either side (ALTERNATE). BEST ALTERNATE • With the front opening facing into the SPEAKERS connector on the bottom surface of time. You can cause it farther away if you can use the supplied rubber feet on the Acoustimass®...8 SYSTEM SETUP • When the position is determined, you still notice interference. 9 The magnetic field surrounding the module may erase some or all of the speaker cable into the room. • At least 18 in its final position: • Upright (BEST) or on the next page.
... openings on or next to avoid magnetic interference with Kit 4 on either side (ALTERNATE). BEST ALTERNATE • With the front opening facing into the SPEAKERS connector on the bottom surface of time. You can cause it farther away if you can use the supplied rubber feet on the Acoustimass®...8 SYSTEM SETUP • When the position is determined, you still notice interference. 9 The magnetic field surrounding the module may erase some or all of the speaker cable into the room. • At least 18 in its final position: • Upright (BEST) or on the next page.
Installation guide
Page 15
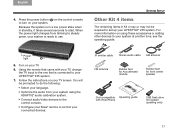
... the control console to your system is connected to use. Follow the instructions on your LIFESTYLE® 235 system. IR emitter cable Stereo audio cable AM antenna FM antenna Rubber feet for Acoustimass® module Rubber feet for front center speaker Dock compatible with your TV, change the TV input to the one that is... operating guide. For more information on using the ADAPTiQ® audio calibration system. • Connect audio/video devices to the control console. • Configure your Bose® remote to set up your TV. 6.
... the control console to your system is connected to use. Follow the instructions on your LIFESTYLE® 235 system. IR emitter cable Stereo audio cable AM antenna FM antenna Rubber feet for Acoustimass® module Rubber feet for front center speaker Dock compatible with your TV, change the TV input to the one that is... operating guide. For more information on using the ADAPTiQ® audio calibration system. • Connect audio/video devices to the control console. • Configure your Bose® remote to set up your TV. 6.
Owner's guide
Page 2
...8226; Contains small parts that may be used indoors. Not suitable for children under age 3. All Bose® products must be of the product. • The speaker wire and interconnect cables included with this apparatus to be a choking hazard. It is neither designed nor tested for use ...with arrowhead symbol within an equilateral triangle alerts the user to the presence of electric shock. It is best to the presence of wire and cable required for in-wall installation. TAB 4 TAB 3 TAB 2 English CAUTIONS: • Make no modifications to loud music may void the...
...8226; Contains small parts that may be used indoors. Not suitable for children under age 3. All Bose® products must be of the product. • The speaker wire and interconnect cables included with this apparatus to be a choking hazard. It is neither designed nor tested for use ...with arrowhead symbol within an equilateral triangle alerts the user to the presence of electric shock. It is best to the presence of wire and cable required for in-wall installation. TAB 4 TAB 3 TAB 2 English CAUTIONS: • Make no modifications to loud music may void the...
Owner's guide
Page 29
...instructions for setting up the device again. Make sure that the audio input cable is firmly plugged into the Acoustimass connector on the control console and the other...the Acoustimass® module and the power supply are in the remote. • Reset the system. The Bose remote does not control a device I added during the initial setup • Try setting up the device....) outlet. • Make sure that you have selected the right source. • Check connections between the speakers and the Acoustimass module. • For radio operation, connect the FM and AM antennas. • Reset...
...instructions for setting up the device again. Make sure that the audio input cable is firmly plugged into the Acoustimass connector on the control console and the other...the Acoustimass® module and the power supply are in the remote. • Reset the system. The Bose remote does not control a device I added during the initial setup • Try setting up the device....) outlet. • Make sure that you have selected the right source. • Check connections between the speakers and the Acoustimass module. • For radio operation, connect the FM and AM antennas. • Reset...
Owner's guide
Page 30
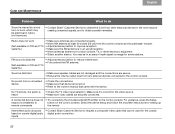
Sound is heard • Check the TV video input selection. No TV picture, but audio is distorted • Make sure speaker cables are not damaged and the connections are secure. • Reduce the volume output level from any external devices connected to the control ...• Make sure the AM antenna is marred by a loud hum or buzz, which may be electrical in nature (not harmonic) • Contact Bose® Customer Service to determine if and how other electronic equipment. • Select another station. For guidance, press the Setup respond consistently to button ...
Sound is heard • Check the TV video input selection. No TV picture, but audio is distorted • Make sure speaker cables are not damaged and the connections are secure. • Reduce the volume output level from any external devices connected to the control ...• Make sure the AM antenna is marred by a loud hum or buzz, which may be electrical in nature (not harmonic) • Contact Bose® Customer Service to determine if and how other electronic equipment. • Select another station. For guidance, press the Setup respond consistently to button ...


