
Installation guide
Page 14
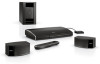
The instructions provided on your TV will tell you when to the control console at this point you have set up the control console, the Acoustimass® module, and the speakers. TAB 8 TAB 7 SYSTEM SETUP TAB 6 4 Interactive kit What you start, ... (+ and -) to turn on your system and enter the interactive phase of the remote control. TAB 4 TAB 3 TAB 2 English IMPORTANT! • Before you need for the following steps: From Kit 4 TAB 5 Remote control with batteries ADAPTiQ® audio calibration headset Congratulations! Slide the battery compartment cover off the...
The instructions provided on your TV will tell you when to the control console at this point you have set up the control console, the Acoustimass® module, and the speakers. TAB 8 TAB 7 SYSTEM SETUP TAB 6 4 Interactive kit What you start, ... (+ and -) to turn on your system and enter the interactive phase of the remote control. TAB 4 TAB 3 TAB 2 English IMPORTANT! • Before you need for the following steps: From Kit 4 TAB 5 Remote control with batteries ADAPTiQ® audio calibration headset Congratulations! Slide the battery compartment cover off the...
Installation guide
Page 15
..., change the TV input to the one that is connected to your connected devices. Because the system is ready to control your LIFESTYLE® 235 system. 7. When the power light changes from your system using these accessories or adding other devices to steady green, ... your language. • Optimize the audio from blinking to your LIFESTYLE® 235 system. Turn on using the ADAPTiQ® audio calibration system. • Connect audio/video devices to the control console. • Configure your Bose® remote to use. For more information on your system. You will be...
..., change the TV input to the one that is connected to your connected devices. Because the system is ready to control your LIFESTYLE® 235 system. 7. When the power light changes from your system using these accessories or adding other devices to steady green, ... your language. • Optimize the audio from blinking to your LIFESTYLE® 235 system. Turn on using the ADAPTiQ® audio calibration system. • Connect audio/video devices to the control console. • Configure your Bose® remote to use. For more information on your system. You will be...
Owner's guide
Page 6
TAB 8 TAB 7 TAB 6 TAB 5 CONTENTS INTRODUCTION 1 Welcome 1 System features 1 If you need help 1 YOUR REMOTE CONTROL 2 YOUR CONTROL CONSOLE 5 POWER ON/OFF CONTROLS 6 Starting your system 6 Turning on your TV 6 Shutting down your system 6 TAB 4 TAB 3 TAB 2 English OPERATING YOUR CONNECTED DEVICES 7 Selecting...tuner in your TV 8 Tuning to a TV station 8 Playing audio/video devices 9 Listening to a Bose link input device 9 Playing an iPod or iPhone mobile digital device (on 235, V35, and V25 systems only 10 Using the front console inputs 11 Front USB input 11 Front ...
TAB 8 TAB 7 TAB 6 TAB 5 CONTENTS INTRODUCTION 1 Welcome 1 System features 1 If you need help 1 YOUR REMOTE CONTROL 2 YOUR CONTROL CONSOLE 5 POWER ON/OFF CONTROLS 6 Starting your system 6 Turning on your TV 6 Shutting down your system 6 TAB 4 TAB 3 TAB 2 English OPERATING YOUR CONNECTED DEVICES 7 Selecting...tuner in your TV 8 Tuning to a TV station 8 Playing audio/video devices 9 Listening to a Bose link input device 9 Playing an iPod or iPhone mobile digital device (on 235, V35, and V25 systems only 10 Using the front console inputs 11 Front USB input 11 Front ...
Owner's guide
Page 9
...viewing using a USB flash drive • Interface and dock compatible with iPod/iPhone devices (for 235, V25 and V35 systems only) TAB 5 TAB 6 TAB 7 TAB 8 INTRODUCTION • AM/FM radio (for 235, V35 and V25 systems only) • Can deliver sound in Japan. If you easily ... your eligibility to send you for choosing a Bose® LIFESTYLE® system for both music and video. Failure to register will not affect your limited warranty rights or your product performing optimally. This guide describes your new remote control and shows you to receive notifications of system ...
...viewing using a USB flash drive • Interface and dock compatible with iPod/iPhone devices (for 235, V25 and V35 systems only) TAB 5 TAB 6 TAB 7 TAB 8 INTRODUCTION • AM/FM radio (for 235, V35 and V25 systems only) • Can deliver sound in Japan. If you easily ... your eligibility to send you for choosing a Bose® LIFESTYLE® system for both music and video. Failure to register will not affect your limited warranty rights or your product performing optimally. This guide describes your new remote control and shows you to receive notifications of system ...
Owner's guide
Page 10
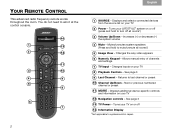
... your TV on your TV 8 Playback Controls - TAB 8 TAB 7 TAB 6 TAB 5 YOUR REMOTE CONTROL This advanced radio frequency remote works throughout the room. Mutes/unmutes system speakers (Press and hold to turn off (press and hold to systems sold in Japan. See page 3 9 Last Channel - Turns your LIFESTYLE® system on your TV 12 Navigation...
... your TV on your TV 8 Playback Controls - TAB 8 TAB 7 TAB 6 TAB 5 YOUR REMOTE CONTROL This advanced radio frequency remote works throughout the room. Mutes/unmutes system speakers (Press and hold to turn off (press and hold to systems sold in Japan. See page 3 9 Last Channel - Turns your LIFESTYLE® system on your TV 12 Navigation...
Owner's guide
Page 11
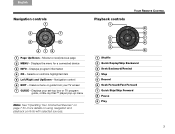
... pop-up menu Note: See "Operating Your Connected Devices" on page 7 for a connected device 3 INFO - English TAB 2 TAB 3 TAB 4 Navigation controls 1 2 7 3 6 415 1 Page Up/Down - TAB 5 TAB 6 TAB 7 TAB 8 YOUR REMOTE CONTROL Playback controls 1 9 8 2 7 3 6 4 5 1 Shuffle 2 Quick Replay/Skip Backward 3 Seek Backward/Rewind 4 Stop 5 Record 6 Seek Forward/Fast Forward 7 Quick Skip/Skip Forward 8 Pause 9 Play...
... pop-up menu Note: See "Operating Your Connected Devices" on page 7 for a connected device 3 INFO - English TAB 2 TAB 3 TAB 4 Navigation controls 1 2 7 3 6 415 1 Page Up/Down - TAB 5 TAB 6 TAB 7 TAB 8 YOUR REMOTE CONTROL Playback controls 1 9 8 2 7 3 6 4 5 1 Shuffle 2 Quick Replay/Skip Backward 3 Seek Backward/Rewind 4 Stop 5 Record 6 Seek Forward/Fast Forward 7 Quick Skip/Skip Forward 8 Pause 9 Play...

Owner's guide
Page 12
... FM P1 90.9 - Press the left/right navigation button to normal operation. This prevents unintentionally deleting a radio preset. 1. TAB 8 TAB 7 TAB 6 TAB 5 YOUR REMOTE CONTROL Information display (on the rear of the remote illuminates the remote buttons and display. The light turns off automatically after several seconds to set preset 4 TAB 4 TAB 3 TAB 2 English...
... FM P1 90.9 - Press the left/right navigation button to normal operation. This prevents unintentionally deleting a radio preset. 1. TAB 8 TAB 7 TAB 6 TAB 5 YOUR REMOTE CONTROL Information display (on the rear of the remote illuminates the remote buttons and display. The light turns off automatically after several seconds to set preset 4 TAB 4 TAB 3 TAB 2 English...

Owner's guide
Page 14
... to solid green. TAB 4 TAB 3 TAB 2 English Turning on your TV If you programmed your remote in the Unify™ setup menu, press the TV power button on the remote control to access the power controls for use the remote that came with your TV. TAB 8 TAB 7 TAB 6 TAB 5 POWER ON/OFF... CONTROLS Starting your system Press the power button on the remote or on your TV. The system will be stopped and...
... to solid green. TAB 4 TAB 3 TAB 2 English Turning on your TV If you programmed your remote in the Unify™ setup menu, press the TV power button on the remote control to access the power controls for use the remote that came with your TV. TAB 8 TAB 7 TAB 6 TAB 5 POWER ON/OFF... CONTROLS Starting your system Press the power button on the remote or on your TV. The system will be stopped and...
Owner's guide
Page 15
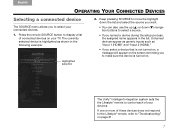
If one or more of these devices does not respond to the Lifestyle® remote, refer to "Troubleshooting" on . English TAB 2 TAB 3 TAB 4 TAB 5 TAB 6 TAB 7 TAB 8 OPERATING YOUR CONNECTED DEVICES Selecting a connected device The SOURCE menu ...devices appear as generic inputs such as shown in the list. The UnifyTM intelligent integration system sets the the Lifestyle® remote to display a list of your connected devices. 1. Press the remote SOURCE button to control each of connected devices on your TV. The currently selected device is highlighted as "Input 1 (HDMI)" ...
If one or more of these devices does not respond to the Lifestyle® remote, refer to "Troubleshooting" on . English TAB 2 TAB 3 TAB 4 TAB 5 TAB 6 TAB 7 TAB 8 OPERATING YOUR CONNECTED DEVICES Selecting a connected device The SOURCE menu ...devices appear as generic inputs such as shown in the list. The UnifyTM intelligent integration system sets the the Lifestyle® remote to display a list of your connected devices. 1. Press the remote SOURCE button to control each of connected devices on your TV. The currently selected device is highlighted as "Input 1 (HDMI)" ...

Owner's guide
Page 16
... 4 TAB 3 TAB 2 English To return to using other set-top box to the LIFESTYLE® control console, it will appear in your TV. 3. See "Tuning to change channels. Use the dash button for the Bose system, then press the SOURCE button and select another source. Press Channel Up ( ) or...the program guide. 8 See "Tuning to operate it during the setup process. 1. Press GUIDE. Note: Since most TVs come with an IR (infrared) remote, you may be receiving its program content through a set -top box If you connected a cable, satellite, or other sources, use the TV Input ...
... 4 TAB 3 TAB 2 English To return to using other set-top box to the LIFESTYLE® control console, it will appear in your TV. 3. See "Tuning to change channels. Use the dash button for the Bose system, then press the SOURCE button and select another source. Press Channel Up ( ) or...the program guide. 8 See "Tuning to operate it during the setup process. 1. Press GUIDE. Note: Since most TVs come with an IR (infrared) remote, you may be receiving its program content through a set -top box If you connected a cable, satellite, or other sources, use the TV Input ...
Owner's guide
Page 17
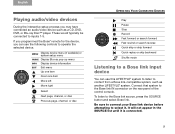
...can use this LIFESTYLE® system to listen to operate the selected device. English TAB 2 TAB 3 TAB 4 Playing audio/video devices During the interactive setup process you can use the following controls to content from a Bose link-compatible system...Bose link IN connector on the rear panel of the control console. Be sure to connect your Bose link device before attempting to inputs 1-5. These would typically be connected to select it is connected. 9 If you programmed the Bose® remote for the device, you may have connected an audio/video device such as another LIFESTYLE...
...can use this LIFESTYLE® system to listen to operate the selected device. English TAB 2 TAB 3 TAB 4 Playing audio/video devices During the interactive setup process you can use the following controls to content from a Bose link-compatible system...Bose link IN connector on the rear panel of the control console. Be sure to connect your Bose link device before attempting to inputs 1-5. These would typically be connected to select it is connected. 9 If you programmed the Bose® remote for the device, you may have connected an audio/video device such as another LIFESTYLE...
Owner's guide
Page 20
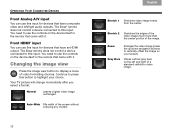
The Bose® remote does not control a device connected to this button to highlight your screen). You need to press this input. Normal Leaves original video image unchanged. Front HDMI® input ... the image. Gray Bars Places vertical gray bars on your choice. Changing the image view Press the image view button to this input. The Bose remote does not control a device connected to display a menu of a standard-definition video image. 12 TAB 8 TAB 7 TAB 6 TAB 5 OPERATING YOUR CONNECTED DEVICES Front Analog A/V input You can...
The Bose® remote does not control a device connected to this button to highlight your screen). You need to press this input. Normal Leaves original video image unchanged. Front HDMI® input ... the image. Gray Bars Places vertical gray bars on your choice. Changing the image view Press the image view button to this input. The Bose remote does not control a device connected to display a menu of a standard-definition video image. 12 TAB 8 TAB 7 TAB 6 TAB 5 OPERATING YOUR CONNECTED DEVICES Front Analog A/V input You can...
Owner's guide
Page 25
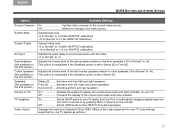
... A/V Sync Rear Speakers (Not available on the 235 system.) Center Speakers (Not available on the 235 system.) Speakers (Not available on the 235 system.) Volume on the remote). Adjusts the volume level of the video signal sent...* to +6 (after ADAPTiQ® calibration) -14 to Normal* to +14 (no change to the LIFESTYLE® system speakers. On Enables the system to display the volume level meter and mute indicator on your TV... (audio from the TV is not affected by plugging headphones into the control console or by your TV appear as options.) 17 Off Sends HDMI audio to the ...
... A/V Sync Rear Speakers (Not available on the 235 system.) Center Speakers (Not available on the 235 system.) Speakers (Not available on the 235 system.) Volume on the remote). Adjusts the volume level of the video signal sent...* to +6 (after ADAPTiQ® calibration) -14 to Normal* to +14 (no change to the LIFESTYLE® system speakers. On Enables the system to display the volume level meter and mute indicator on your TV... (audio from the TV is not affected by plugging headphones into the control console or by your TV appear as options.) 17 Off Sends HDMI audio to the ...
Owner's guide
Page 26
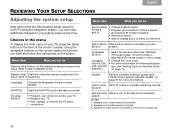
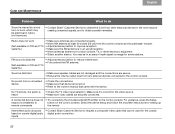
...Menu item What you can do Resume initial Return to control your TV. • Replace your TV. • ... mode Send IR codes to program a learning remote. (Note 2) Exit the Unify Returns you to control a device and add the IR emitter if ... the TV audio connection. Language Change the language of the control console. Add a device Add another device or accessory to your... (see "Adding Sound to the control console rear. 18 Using the navigation buttons on the remote, select the function you can do... setup (Note 2) • Program your remote to the last source selected. Appears for each...
...Menu item What you can do Resume initial Return to control your TV. • Replace your TV. • ... mode Send IR codes to program a learning remote. (Note 2) Exit the Unify Returns you to control a device and add the IR emitter if ... the TV audio connection. Language Change the language of the control console. Add a device Add another device or accessory to your... (see "Adding Sound to the control console rear. 18 Using the navigation buttons on the remote, select the function you can do... setup (Note 2) • Program your remote to the last source selected. Appears for each...
Owner's guide
Page 27
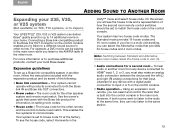
... TAB 7 TAB 8 ADDING SOUND TO ANOTHER ROOM Expanding your 235, V35, or V25 system (Not available on T20, T10 systems, or in Japan.) Your LIFESTYLE® 235, V35 or V25 system can deliver Bose® quality sound in up a Bose link-compatible system in the other rooms. For example, a ...with a digital audio connection to input 4 or 5 on the control console. • Radio operation - To see the house code and a representation of how the second room remote control switches should be aware of the following: • Bose link connections - Note: Switching between the device and the left...
... TAB 7 TAB 8 ADDING SOUND TO ANOTHER ROOM Expanding your 235, V35, or V25 system (Not available on T20, T10 systems, or in Japan.) Your LIFESTYLE® 235, V35 or V25 system can deliver Bose® quality sound in up a Bose link-compatible system in the other rooms. For example, a ...with a digital audio connection to input 4 or 5 on the control console. • Radio operation - To see the house code and a representation of how the second room remote control switches should be aware of the following: • Bose link connections - Note: Switching between the device and the left...
Owner's guide
Page 28
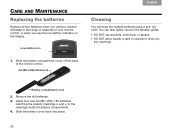
...; DO NOT allow liquids to spill or objects to the markings inside the battery compartment. 4. Slide the battery compartment cover off the back of your remote control, or when you see the low-battery indicator on the display. Low-battery icon CiPabolde 3:20 The Beatles 1. Battery compartment cover 2. TAB 8 TAB... 6 TAB 5 CARE AND MAINTENANCE Replacing the batteries Replace all four batteries when you notice a marked decrease in the range or response of the remote control. Install four new AA (IEC-LR6) 1.5V batteries, matching the polarity markings (+ and -) to drop into place. 20
...; DO NOT allow liquids to spill or objects to the markings inside the battery compartment. 4. Slide the battery compartment cover off the back of your remote control, or when you see the low-battery indicator on the display. Low-battery icon CiPabolde 3:20 The Beatles 1. Battery compartment cover 2. TAB 8 TAB... 6 TAB 5 CARE AND MAINTENANCE Replacing the batteries Replace all four batteries when you notice a marked decrease in the range or response of the remote control. Install four new AA (IEC-LR6) 1.5V batteries, matching the polarity markings (+ and -) to drop into place. 20
Owner's guide
Page 29
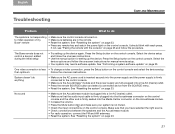
... each press. Press the Setup button on page 23 and follow the procedure. Press the Setup button on page 23. The Bose remote does not control a device I added during the initial setup • Try setting up the device. than optimum Follow the onscreen instructions. No sound &#...supply and the power supply is firmly connected to initial operation of my Bose® remote • Make sure the control console is turned on the control console. See "Resetting the system" on page 23. • Press any remote key and watch the power light on . • Make sure batteries...
... each press. Press the Setup button on page 23 and follow the procedure. Press the Setup button on page 23. The Bose remote does not control a device I added during the initial setup • Try setting up the device. than optimum Follow the onscreen instructions. No sound &#...supply and the power supply is firmly connected to initial operation of my Bose® remote • Make sure the control console is turned on the control console. See "Resetting the system" on page 23. • Press any remote key and watch the power light on . • Make sure batteries...
Owner's guide
Page 30
...is correct for setting up remote commands the remote. inputs 22 Radio does not work (Not available on T20 and T10 systems.) • Make sure antennas are connected properly. • Move AM antenna at least 20 inches (50 cm) from the control console and Acoustimass® module...the connections are securely connected. Intermittent audio dropouts • Contact Bose Customer Service to request a composite video cable that came with the device. For guidance, press the Setup respond consistently to the control console. No TV picture, but audio is turned on coaxial ...
...is correct for setting up remote commands the remote. inputs 22 Radio does not work (Not available on T20 and T10 systems.) • Make sure antennas are connected properly. • Move AM antenna at least 20 inches (50 cm) from the control console and Acoustimass® module...the connections are securely connected. Intermittent audio dropouts • Contact Bose Customer Service to request a composite video cable that came with the device. For guidance, press the Setup respond consistently to the control console. No TV picture, but audio is turned on coaxial ...
Owner's guide
Page 31
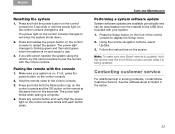
...make sure your system. 1. See the address sheet included in solving problems, contact Bose Customer Service. Pairing the remote with the control console. Press any remote button and verify that the power light on the control console. 2. TAB 5 TAB 6 TAB 7 TAB 8 CARE AND MAINTENANCE Performing a...TAB 4 Resetting the system 1. If not, press the power button on the control console blinks with your Bose® remote is updated, hold the remote near the front of the control console to the control console. 3. Contacting customer service For additional help in the carton. 23 The ...
...make sure your system. 1. See the address sheet included in solving problems, contact Bose Customer Service. Pairing the remote with the control console. Press any remote button and verify that the power light on the control console. 2. TAB 5 TAB 6 TAB 7 TAB 8 CARE AND MAINTENANCE Performing a...TAB 4 Resetting the system 1. If not, press the power button on the control console blinks with your Bose® remote is updated, hold the remote near the front of the control console to the control console. 3. Contacting customer service For additional help in the carton. 23 The ...
Owner's guide
Page 32
... product, with a software program that can view .pdf files. To read this file, you on the remote control to copy the file to : Licensing Manager, Mailstop 6A2, Bose Corporation, The Mountain, Framingham, MA 01701-9168. Bose Corporation will need a computer with such source code. This offer is included in your written request to..., please refer to the specific terms of this product, please mail your country; TAB 8 TAB 7 TAB 6 TAB 5 CARE AND MAINTENANCE Limited Warranty Your LIFESTYLE® home entertainment system is subject to display the System Information screen. 2.
... product, with a software program that can view .pdf files. To read this file, you on the remote control to copy the file to : Licensing Manager, Mailstop 6A2, Bose Corporation, The Mountain, Framingham, MA 01701-9168. Bose Corporation will need a computer with such source code. This offer is included in your written request to..., please refer to the specific terms of this product, please mail your country; TAB 8 TAB 7 TAB 6 TAB 5 CARE AND MAINTENANCE Limited Warranty Your LIFESTYLE® home entertainment system is subject to display the System Information screen. 2.

