Owner's guide
Page 2
These CAUTION marks may be located on the back panel and bottom of your Lifestyle® music center and the bottom panel of your Acoustimass® module: The lightning flash with arrowhead symbol, within an equilateral triangle, is located on the bottom...or adjustments or performance of procedures other than those specified herein may be adjusted or repaired by anyone except properly qualified service personnel. Note: This music system is classified as marked on the Important Safety Instructions page enclosed with a polarized power plug, to prevent electric shock, match wide blade ...
These CAUTION marks may be located on the back panel and bottom of your Lifestyle® music center and the bottom panel of your Acoustimass® module: The lightning flash with arrowhead symbol, within an equilateral triangle, is located on the bottom...or adjustments or performance of procedures other than those specified herein may be adjusted or repaired by anyone except properly qualified service personnel. Note: This music system is classified as marked on the Important Safety Instructions page enclosed with a polarized power plug, to prevent electric shock, match wide blade ...
Owner's guide
Page 5
... Lifestyle® 20 music system 24 Product Information Technical information 25 Accessories ...25 Index ...26 Bose® Corporation inside back cover Contents For your Lifestyle® 20 music system 11 The music center display 11 The system controls 12 Other music center controls 13 The Lifestyle® 20 ... Purchase date We suggest you begin ...4 Unpack the carton ...5 Select the locations for your Lifestyle® 20 music system 6 Connect the speakers and Lifestyle® music center 7 Other connections ...8 Connect the antennas 9 Set up the remote control 10 Set radio ...
... Lifestyle® 20 music system 24 Product Information Technical information 25 Accessories ...25 Index ...26 Bose® Corporation inside back cover Contents For your Lifestyle® 20 music system 11 The music center display 11 The system controls 12 Other music center controls 13 The Lifestyle® 20 ... Purchase date We suggest you begin ...4 Unpack the carton ...5 Select the locations for your Lifestyle® 20 music system 6 Connect the speakers and Lifestyle® music center 7 Other connections ...8 Connect the antennas 9 Set up the remote control 10 Set radio ...
Owner's guide
Page 6
..., the magnet inside the tiny cube. Your system includes: • A Lifestyle® music center with built-in sound sources, connect additional equipment such as a tape deck, laserdisc player, VCR, or TV, and use two listening zones. They are for purchasing the Bose® Lifestyle® 20 music system. English Setting Up Before you begin Thank you for...
..., the magnet inside the tiny cube. Your system includes: • A Lifestyle® music center with built-in sound sources, connect additional equipment such as a tape deck, laserdisc player, VCR, or TV, and use two listening zones. They are for purchasing the Bose® Lifestyle® 20 music system. English Setting Up Before you begin Thank you for...
Owner's guide
Page 7
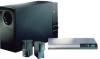
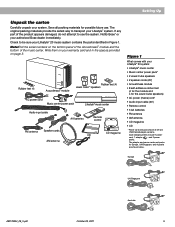
... PLAY AUX Remote control FM antenna Speaker cords AM antenna THE BOSE SPECIAL EDITION LIFESTYLE MUSIC SYSTEM CD ® CD ® CD magazine Figure 1 What comes with your Lifestyle® 20 system: • Lifestyle® music center • Music center power pack* • 2 Jewel Cube speakers • 2 speaker cords (20') • Acoustimass module • 8 self-adhesive rubber feet (4 for the module...
... PLAY AUX Remote control FM antenna Speaker cords AM antenna THE BOSE SPECIAL EDITION LIFESTYLE MUSIC SYSTEM CD ® CD ® CD magazine Figure 1 What comes with your Lifestyle® 20 system: • Lifestyle® music center • Music center power pack* • 2 Jewel Cube speakers • 2 speaker cords (20') • Acoustimass module • 8 self-adhesive rubber feet (4 for the module...

Owner's guide
Page 8
... Acoustimass module. On a bare floor, the rubber feet provide increased stability and protection from a corner (Figure 2). Place the music center on a level surface and allow for the Acoustimass module, place the four selfadhesive rubber feet near the front of the Jewel CubeTM... room to select a location for your Lifestyle® 20 music system When you . Figure 3 Acoustimass module positions Preferred position ® Treble Bass Alternate position ® AUDIO INPUT OUTPUTS TO CUBE SPEAKERS RIGHT LEFT OFF POWER ON ® Music center Select a location for the built-in ...
... Acoustimass module. On a bare floor, the rubber feet provide increased stability and protection from a corner (Figure 2). Place the music center on a level surface and allow for the Acoustimass module, place the four selfadhesive rubber feet near the front of the Jewel CubeTM... room to select a location for your Lifestyle® 20 music system When you . Figure 3 Acoustimass module positions Preferred position ® Treble Bass Alternate position ® AUDIO INPUT OUTPUTS TO CUBE SPEAKERS RIGHT LEFT OFF POWER ON ® Music center Select a location for the built-in ...
Owner's guide
Page 9
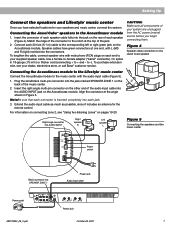
...electronics store, or call Bose® customer service. Right-angle connector into AUDIO INPUT Right speaker R Left speaker L Figure 5 Connecting the speakers and the music center AUDIO INPUT OUTPUTS TO CUBE... Speaker cable connection to the Jewel Cube speaker Connecting the Acoustimass module to the Lifestyle® music center Connect the Acoustimass module to the notch at one end, with the audio input cable...of your speakers and music center, connect the system. Match the ridge of the connector to the music center with L (left or right green jack on pages 19-20. To lengthen the ...
...electronics store, or call Bose® customer service. Right-angle connector into AUDIO INPUT Right speaker R Left speaker L Figure 5 Connecting the speakers and the music center AUDIO INPUT OUTPUTS TO CUBE... Speaker cable connection to the Jewel Cube speaker Connecting the Acoustimass module to the Lifestyle® music center Connect the Acoustimass module to the notch at one end, with the audio input cable...of your speakers and music center, connect the system. Match the ridge of the connector to the music center with L (left or right green jack on pages 19-20. To lengthen the ...
Owner's guide
Page 10
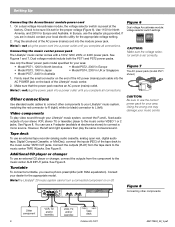
...(available at the factory. Connect the outputs (PLAY) from the component to the music center TAPE OUT jacks. Note:The Lifestyle® 20 music system cannot turn a connected component on the back of the tape deck to the music center AUX INPUT jacks. See Figure 8. Using the wrong one may damage your area: ... the appropriate model. Use only the Bose® power pack model specified for Europe and Australia. Note:Do notplug the power pack into the module power jack. Video components To play the same monaural sound. Check to the music center TAPE IN jacks. Use 115V for ...
...(available at the factory. Connect the outputs (PLAY) from the component to the music center TAPE OUT jacks. Note:The Lifestyle® 20 music system cannot turn a connected component on the back of the tape deck to the music center AUX INPUT jacks. See Figure 8. Using the wrong one may damage your area: ... the appropriate model. Use only the Bose® power pack model specified for Europe and Australia. Note:Do notplug the power pack into the module power jack. Video components To play the same monaural sound. Check to the music center TAPE IN jacks. Use 115V for ...

Owner's guide
Page 11
... reception when their wires are not bundled. Spread out the antenna arms. Experiment with both the placement and the angle of your Lifestyle® music center provides connections for AM and FM antennas (Figure 9). AM antenna connections 1. Note:A central antenna or cable, or an outdoor FM... the FM antenna connector into the AM ANTENNA jack on the back of the Lifestyle® music center. 2. Plug the AM antenna connector into the FM ANTENNA jack on the back of the Lifestyle® music center. 2. To install an outdoor antenna, consult a qualified installer. Figure 10 The...
... reception when their wires are not bundled. Spread out the antenna arms. Experiment with both the placement and the angle of your Lifestyle® music center provides connections for AM and FM antennas (Figure 9). AM antenna connections 1. Note:A central antenna or cable, or an outdoor FM... the FM antenna connector into the AM ANTENNA jack on the back of the Lifestyle® music center. 2. Plug the AM antenna connector into the FM ANTENNA jack on the back of the Lifestyle® music center. 2. To install an outdoor antenna, consult a qualified installer. Figure 10 The...

Owner's guide
Page 12
...other Lifestyle® music systems. 3 AA batteries Figure 12 Installing the remote control batteries Battery compartment cover Miniature switches Set radio channel spacing on the music center control panel) while holding ERASE, press SOURCE SELECT again to . 10 October 29, 2001 AM178934_09_V.pdf Turn the music center ...off. 2. Press SOURCE SELECT (on dual voltage systems Dual voltage music centers (which include both 120V and 230V power packs) can be set for two types of ...
...other Lifestyle® music systems. 3 AA batteries Figure 12 Installing the remote control batteries Battery compartment cover Miniature switches Set radio channel spacing on the music center control panel) while holding ERASE, press SOURCE SELECT again to . 10 October 29, 2001 AM178934_09_V.pdf Turn the music center ...off. 2. Press SOURCE SELECT (on dual voltage systems Dual voltage music centers (which include both 120V and 230V power packs) can be set for two types of ...
Owner's guide
Page 13
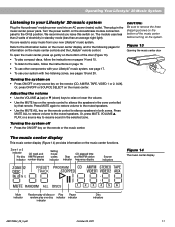
... on the remote (CD, AM/FM, TAPE, VIDEO 1 or 2, AUX). The music center display This music center display (Figure 14) provides information on the remote control to silence the speakers in the music center power pack. You are ready to enjoy music from your Lifestyle® 20 music system Plug the Acoustimass® module power cord into an AC power...
... on the remote (CD, AM/FM, TAPE, VIDEO 1 or 2, AUX). The music center display This music center display (Figure 14) provides information on the remote control to silence the speakers in the music center power pack. You are ready to enjoy music from your Lifestyle® 20 music system Plug the Acoustimass® module power cord into an AC power...
Owner's guide
Page 14
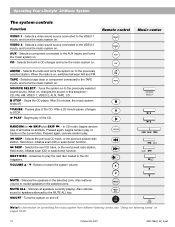
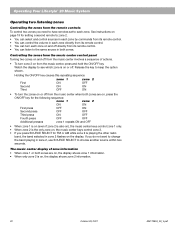
... selected zone. Remote control VIDEO 1 VIDEO 2 AUX CD AM/FM - After 20 minutes, the music system shuts off . After a 20-minute pause, changes to speakers silenced by the MUTE ALL key. RANDOM Music center SOURCE SELECT / II / II SKIP SKIP SKIP MUTE - Selects a video sound...Begins play of the CD. Selects the next CD track, or the next preset radio station. Turns the system on . English Operating Your Lifestyle® 20 Music System The system controls Function VIDEO 1 - Selects a video sound source connected to the previously selected sound source. CD - s STOP -...
... selected zone. Remote control VIDEO 1 VIDEO 2 AUX CD AM/FM - After 20 minutes, the music system shuts off . After a 20-minute pause, changes to speakers silenced by the MUTE ALL key. RANDOM Music center SOURCE SELECT / II / II SKIP SKIP SKIP MUTE - Selects a video sound...Begins play of the CD. Selects the next CD track, or the next preset radio station. Turns the system on . English Operating Your Lifestyle® 20 Music System The system controls Function VIDEO 1 - Selects a video sound source connected to the previously selected sound source. CD - s STOP -...
Owner's guide
Page 15
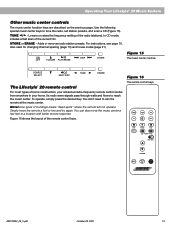
...and house codes (page 21). ON O FF / II VOLUME PLAY/PAUSE SKIP STORE Figure 15 The music center controls SOURCE SELECT NEXT DISC TUNE ERASE The Lifestyle® 20 remote control For most types of the radio (stations). To operate, simply press the desired key. ... response. For instructions, see page 16. Simply move the music center a few feet to tune the radio, set station presets, and scan a CD (Figure 15). English Operating Your Lifestyle® 20 Music System Other music center controls The music center function keys are described on the previous page. Lowers or ...
...and house codes (page 21). ON O FF / II VOLUME PLAY/PAUSE SKIP STORE Figure 15 The music center controls SOURCE SELECT NEXT DISC TUNE ERASE The Lifestyle® 20 remote control For most types of the radio (stations). To operate, simply press the desired key. ... response. For instructions, see page 16. Simply move the music center a few feet to tune the radio, set station presets, and scan a CD (Figure 15). English Operating Your Lifestyle® 20 Music System Other music center controls The music center function keys are described on the previous page. Lowers or ...

Owner's guide
Page 16
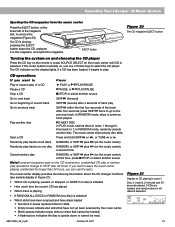
...14 October 29, 2001 AM178934_09_V.pdf English Operating Your Lifestyle® 20 Music System Listening to compact discs Using the CD changer You can load up (Figure 17). Forcing two discs into any slot. Figure 18 Ejecting a CD Loading the CD magazine into the music center, following the direction of the arrow on the magazine.... These numbers correspond to place only one slot could cause them to become stuck, and could damage the discs, the CD magazine, or the music center. Insert the CD magazine fully into the music center Open the music center door.
...14 October 29, 2001 AM178934_09_V.pdf English Operating Your Lifestyle® 20 Music System Listening to compact discs Using the CD changer You can load up (Figure 17). Forcing two discs into any slot. Figure 18 Ejecting a CD Loading the CD magazine into the music center, following the direction of the arrow on the magazine.... These numbers correspond to place only one slot could cause them to become stuck, and could damage the discs, the CD magazine, or the music center. Insert the CD magazine fully into the music center Open the music center door.
Owner's guide
Page 17
... (or discs that cannot be read. CD operations If you can use one of the magazine slot, to remove the magazine (Figure 20). The music center skips empty disc slots. Play another disc NEXT DISC In PLAY mode, selects discs in RANDOM mode, randomly selects another source Go to... disc. in order, 1 through 6, then back to 1; Scan a CD Press and hold SKIP or , or TUNE or Randomly play . Operating Your Lifestyle® 20 Music System English Ejecting the CD magazine from the music center Press the EJECT button, at the lower left of these keys to select the CD player. The...
... (or discs that cannot be read. CD operations If you can use one of the magazine slot, to remove the magazine (Figure 20). The music center skips empty disc slots. Play another disc NEXT DISC In PLAY mode, selects discs in RANDOM mode, randomly selects another source Go to... disc. in order, 1 through 6, then back to 1; Scan a CD Press and hold SKIP or , or TUNE or Randomly play . Operating Your Lifestyle® 20 Music System English Ejecting the CD magazine from the music center Press the EJECT button, at the lower left of these keys to select the CD player. The...

Owner's guide
Page 18
...and hold a SKIP key down the SKIP key. Or, you have set and displayed. 4. Press the ERASE key. Lift the music center door. 2. English Operating Your Lifestyle® 20 Music System Listening to the radio Turning the system on and choosing the radio Press AM/FM (on the remote) or SOURCE SELECT (...on the music center) to turn your presets. 1. Note:If the system is on and the radio is displayed. The preset number ...
...and hold a SKIP key down the SKIP key. Or, you have set and displayed. 4. Press the ERASE key. Lift the music center door. 2. English Operating Your Lifestyle® 20 Music System Listening to the radio Turning the system on and choosing the radio Press AM/FM (on the remote) or SOURCE SELECT (...on the music center) to turn your presets. 1. Note:If the system is on and the radio is displayed. The preset number ...
Owner's guide
Page 19
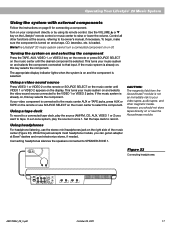
... Lifestyle® remote control or music center to record. Use the VOLUME v or w key on , this key selects the component. If the music system is selected. Using headphones For headphone listening, use SOURCE SELECT on your video tapes, audio tapes, and other functions at Bose®...AM178934_09_V.pdf October 29, 2001 17 Turn on the music center to tape. In a 2-zone system, play the source (AM/FM, CD, AUX, VIDEO 1 or 2) you want to select the component. English Operating Your Lifestyle® 20 Music System Using the system with external components Follow the instructions...
... Lifestyle® remote control or music center to record. Use the VOLUME v or w key on , this key selects the component. If the music system is selected. Using headphones For headphone listening, use SOURCE SELECT on your video tapes, audio tapes, and other functions at Bose®...AM178934_09_V.pdf October 29, 2001 17 Turn on the music center to tape. In a 2-zone system, play the source (AM/FM, CD, AUX, VIDEO 1 or 2) you want to select the component. English Operating Your Lifestyle® 20 Music System Using the system with external components Follow the instructions...
Owner's guide
Page 21
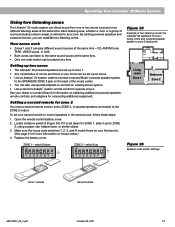
Each listening area, whether a room or a group of the music center. • You can also use special adapters to connect an existing stereo system. • Use a second Lifestyle® system remote control to operate zone 2. By adding powered speakers and a second remote, you can play ...different listening areas at the same time. To set your dealer or contact Bose for connecting additional equipment. ZONE 1 - English Operating Your Lifestyle® 20 Music System Using two listening zones The Lifestyle® 20 music system can direct sound from one or two sound sources to the same...
Each listening area, whether a room or a group of the music center. • You can also use special adapters to connect an existing stereo system. • Use a second Lifestyle® system remote control to operate zone 2. By adding powered speakers and a second remote, you can play ...different listening areas at the same time. To set your dealer or contact Bose for connecting additional equipment. ZONE 1 - English Operating Your Lifestyle® 20 Music System Using two listening zones The Lifestyle® 20 music system can direct sound from one or two sound sources to the same...
Owner's guide
Page 22
...and control sources in each zone by commands from its remote control. • You can listen to the same source in both zones. The music center display of actions. • To turn the zones on or off . If you press SOURCE SELECT for the following sequence: zone 1 zone... music center keys control zone 1 only. • When zone 2 is playing the other radio band, the band selected in zone 2 flashes on the display. Watch the display to see which zone is on, the display shows zone 2 information. 20 October 29, 2001 AM178934_09_V.pdf English Operating Your Lifestyle® 20 Music ...
...and control sources in each zone by commands from its remote control. • You can listen to the same source in both zones. The music center display of actions. • To turn the zones on or off . If you press SOURCE SELECT for the following sequence: zone 1 zone... music center keys control zone 1 only. • When zone 2 is playing the other radio band, the band selected in zone 2 flashes on the display. Watch the display to see which zone is on, the display shows zone 2 information. 20 October 29, 2001 AM178934_09_V.pdf English Operating Your Lifestyle® 20 Music ...
Owner's guide
Page 23
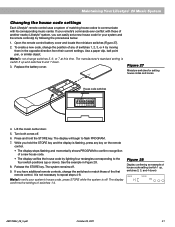
...display verifies the house code by moving them in Figure 28. 8. Note:Do not change the switches to match those of another nearby Lifestyle® system, you have additional remote controls, change switches 5, 6, or 7 at this time. See the example in the opposite...English Maintaining Your Lifestyle® 20 Music System Changing the house code settings Each Lifestyle® remote control uses a system of matching house codes to communicate with those of the first remote control. Lift the music center door. 5. Note:To verify your system and its corresponding music center. Use a ...
...display verifies the house code by moving them in Figure 28. 8. Note:Do not change the switches to match those of another nearby Lifestyle® system, you have additional remote controls, change switches 5, 6, or 7 at this time. See the example in the opposite...English Maintaining Your Lifestyle® 20 Music System Changing the house code settings Each Lifestyle® remote control uses a system of matching house codes to communicate with those of the first remote control. Lift the music center door. 5. Note:To verify your system and its corresponding music center. Use a ...
Owner's guide
Page 24
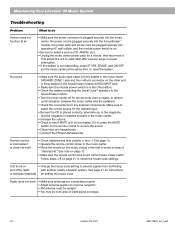
...; Make sure the remote control and music center house codes match. Follow steps 4-8 on again, to unmute the sound. • Disconnect any external components. Remote control is lit on the other end is firmly seated in an area of "dead spots." English Maintaining Your Lifestyle® 20 Music System Troubleshooting Problem System does not function...
...; Make sure the remote control and music center house codes match. Follow steps 4-8 on again, to unmute the sound. • Disconnect any external components. Remote control is lit on the other end is firmly seated in an area of "dead spots." English Maintaining Your Lifestyle® 20 Music System Troubleshooting Problem System does not function...


