
The Bose® Lifestyle® amplifier - Owner's guide
Page 4
... and receiver. • Connect the equipment to an outlet on this equipment. These limits are encouraged to try to correct the interference by turning the equipment off and on, you are designed to radio communications. This product complies with the limits for a Class B digital device, pursuant...unit, connection to this is no guarantee that the cable ground shall be sure the antenna or cable system is practical. ©2001 Bose Corporation, The Mountain, Framingham, MA 01701-9168 USA 255805 AM Rev.00 JN10494 2b January 10, 2002 AM262840_00_V.pdf Antenna lead-in ...
... and receiver. • Connect the equipment to an outlet on this equipment. These limits are encouraged to try to correct the interference by turning the equipment off and on, you are designed to radio communications. This product complies with the limits for a Class B digital device, pursuant...unit, connection to this is no guarantee that the cable ground shall be sure the antenna or cable system is practical. ©2001 Bose Corporation, The Mountain, Framingham, MA 01701-9168 USA 255805 AM Rev.00 JN10494 2b January 10, 2002 AM262840_00_V.pdf Antenna lead-in ...

The Bose® Lifestyle® amplifier - Owner's guide
Page 9
Figure 6 Cable connections between a multi-room interface and the Lifestyle® stereo amplifier Lifestyle® stereo amplifier rear panel Multi-room interface rear panel 4 Ω MINIMUM LL R L SYSTEM RR CONTROL L R +- Insert the single multi-... SYSTEM CONTROL jack on the rear of the amplifier. Setting Up Your Lifestyle® Stereo Amplifier Connecting the Lifestyle® stereo amplifier to a multi-room interface CAUTION: Before making any connections, turn the Lifestyle® system off and disconnect the music center from the AC (mains) power ...
Figure 6 Cable connections between a multi-room interface and the Lifestyle® stereo amplifier Lifestyle® stereo amplifier rear panel Multi-room interface rear panel 4 Ω MINIMUM LL R L SYSTEM RR CONTROL L R +- Insert the single multi-... SYSTEM CONTROL jack on the rear of the amplifier. Setting Up Your Lifestyle® Stereo Amplifier Connecting the Lifestyle® stereo amplifier to a multi-room interface CAUTION: Before making any connections, turn the Lifestyle® system off and disconnect the music center from the AC (mains) power ...

The Bose® Lifestyle® amplifier - Owner's guide
Page 11
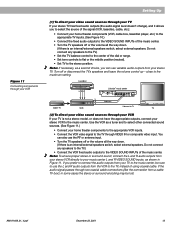
... connections. 1. Insert the red RCA piggyback connector into the L (left) INPUT jack. Setting Up Your Lifestyle® Stereo Amplifier Connecting the Lifestyle® stereo amplifier to a Lifestyle® media center CAUTION: Before making connections, turn the Lifestyle® system off and disconnect the media center from the AC (mains) power outlet. Insert the...
... connections. 1. Insert the red RCA piggyback connector into the L (left) INPUT jack. Setting Up Your Lifestyle® Stereo Amplifier Connecting the Lifestyle® stereo amplifier to a Lifestyle® media center CAUTION: Before making connections, turn the Lifestyle® system off and disconnect the media center from the AC (mains) power outlet. Insert the...

The Bose® Lifestyle® amplifier - Owner's guide
Page 12
.... 3. You will open the on again; this ensures that the house code settings (switches 1, 2, 3, and 4) match those in more ...". While your Lifestyle® DVD system is on, press the Settings button on operating your system in your remote control. Scroll down -arrow button and select System Setup... using Zone 2, shut off the system and turn it on -screen display. 2. ON Figure 9a Setting Zone 2 Protocol Setting Zone 2 Protocol For the SA-1 amplifier to work properly...
.... 3. You will open the on again; this ensures that the house code settings (switches 1, 2, 3, and 4) match those in more ...". While your Lifestyle® DVD system is on, press the Settings button on operating your system in your remote control. Scroll down -arrow button and select System Setup... using Zone 2, shut off the system and turn it on -screen display. 2. ON Figure 9a Setting Zone 2 Protocol Setting Zone 2 Protocol For the SA-1 amplifier to work properly...

The Bose® Lifestyle® amplifier - Owner's guide
Page 13
... the supplied cable into the L (left) INPUT jack. Lifestyle® stereo amplifier rear panel 4 Ω MINIMUM LL R L SYSTEM RR CONTROL L R +- Setting Up Your Lifestyle® Stereo Amplifier Connecting the Lifestyle® stereo amplifier to a Model 20 music ...center ® Figure 10 Cable connections between the Model 20 music center and the Lifestyle® stereo amplifier CAUTION: Before making connections, turn the Lifestyle® system ...
... the supplied cable into the L (left) INPUT jack. Lifestyle® stereo amplifier rear panel 4 Ω MINIMUM LL R L SYSTEM RR CONTROL L R +- Setting Up Your Lifestyle® Stereo Amplifier Connecting the Lifestyle® stereo amplifier to a Model 20 music ...center ® Figure 10 Cable connections between the Model 20 music center and the Lifestyle® stereo amplifier CAUTION: Before making connections, turn the Lifestyle® system ...

The Bose® Lifestyle® amplifier - Owner's guide
Page 15
... into the multi-pin INPUT jack on the rear of the amplifier (Figure 12). 2. Figure 12 Cable connections between the Model 5 music center and the Lifestyle® stereo amplifier Model 5 music center rear panel Lifestyle® stereo amplifier rear panel 4 Ω MINIMUM LL LL SYSTEM RR ...amplifier is designed to work properly with the fixed output level available from both FIXED OUTPUT jacks. 4. CAUTION: Before making connections, turn the Lifestyle® system off and disconnect the music center from the FIXED R and FIXED L OUTPUT jacks. When adding the...
... into the multi-pin INPUT jack on the rear of the amplifier (Figure 12). 2. Figure 12 Cable connections between the Model 5 music center and the Lifestyle® stereo amplifier Model 5 music center rear panel Lifestyle® stereo amplifier rear panel 4 Ω MINIMUM LL LL SYSTEM RR ...amplifier is designed to work properly with the fixed output level available from both FIXED OUTPUT jacks. 4. CAUTION: Before making connections, turn the Lifestyle® system off and disconnect the music center from the FIXED R and FIXED L OUTPUT jacks. When adding the...

The Bose® Lifestyle® amplifier - Owner's guide
Page 18
.... Troubleshooting If you do Neither speaker plays • Make sure the Lifestyle® music center and the amplifier are plugged in and turned on . • If using a Model 5 music center for home theater (Lifestyle® 12 or Lifestyle® 8 systems), make sure the audio input cable is inserted into...It is especially true of the speaker wire can be sure there is designed only for service, or contact Bose Customer Service. If CD or AUX is selected, check to AUX is turned on . • Make sure the plugs are inserted fully and the outlets are correct. Only one ...
.... Troubleshooting If you do Neither speaker plays • Make sure the Lifestyle® music center and the amplifier are plugged in and turned on . • If using a Model 5 music center for home theater (Lifestyle® 12 or Lifestyle® 8 systems), make sure the audio input cable is inserted into...It is especially true of the speaker wire can be sure there is designed only for service, or contact Bose Customer Service. If CD or AUX is selected, check to AUX is turned on . • Make sure the plugs are inserted fully and the outlets are correct. Only one ...

Owner's guide
Page 3
...such as radiators, heat registers, stoves or other apparatus (including amplifiers) that will not occur in a particular installation. Please call Bose to be determined by turning the equipment off and on a bed, sofa, or similar surface that could void the user's authority to avoid injury from the ...-over. 13. Clean only with the manufacturer's instructions - Unplug this equipment. Do not block any way: such as directed by the manufacturer. 12. Install in any ventilation openings. For example, do not place the product on , you . 15. Do not defeat the safety purpose of...
...such as radiators, heat registers, stoves or other apparatus (including amplifiers) that will not occur in a particular installation. Please call Bose to be determined by turning the equipment off and on a bed, sofa, or similar surface that could void the user's authority to avoid injury from the ...-over. 13. Clean only with the manufacturer's instructions - Unplug this equipment. Do not block any way: such as directed by the manufacturer. 12. Install in any ventilation openings. For example, do not place the product on , you . 15. Do not defeat the safety purpose of...
Owner's guide
Page 5
...channel spacing for dual voltage and 120V systems 17 Turn on the music center 17 Operating Your Lifestyle® 12 System The music center display 18 The system controls ...18 The music center controls 19 The Lifestyle® remote control 19 Listening to your records... Troubleshooting ...26 Warranty period ...27 Customer service ...27 Cleaning the Lifestyle® 12 system 28 Product Information Technical information 29 Accessories ...29 Index ...30 Bose® Corporation inside back cover For your Lifestyle® 12 system 20 Listening to video sound 20 Listening to the radio 21...
...channel spacing for dual voltage and 120V systems 17 Turn on the music center 17 Operating Your Lifestyle® 12 System The music center display 18 The system controls ...18 The music center controls 19 The Lifestyle® remote control 19 Listening to your records... Troubleshooting ...26 Warranty period ...27 Customer service ...27 Cleaning the Lifestyle® 12 system 28 Product Information Technical information 29 Accessories ...29 Index ...30 Bose® Corporation inside back cover For your Lifestyle® 12 system 20 Listening to video sound 20 Listening to the radio 21...
Owner's guide
Page 15
Laserdisc Cable TV LRV VCR L R V Lifestyle® music center ® LIFESTYLE ® MODEL 5 MUSIC CENTER B Z T G642 950 D S BOSE Corporation UL LISTED 917D AUDIO ® EQUIPMENT MANUFACTURED: TÜV Rheinland BOSE CORPORATION, FRAMINGHAM, MA 01701-9168 MADE IN USA geprüdfte Sicherheit SPEAKERS L FIXED R 93 A B ...your stereo VCR to the maximum setting. You can use variable audio outputs from a cable TV box), in Figure 11. Turn off or the volume all the way down . (If there is an internal/external speakers switch, select external speakers. ...
Laserdisc Cable TV LRV VCR L R V Lifestyle® music center ® LIFESTYLE ® MODEL 5 MUSIC CENTER B Z T G642 950 D S BOSE Corporation UL LISTED 917D AUDIO ® EQUIPMENT MANUFACTURED: TÜV Rheinland BOSE CORPORATION, FRAMINGHAM, MA 01701-9168 MADE IN USA geprüdfte Sicherheit SPEAKERS L FIXED R 93 A B ...your stereo VCR to the maximum setting. You can use variable audio outputs from a cable TV box), in Figure 11. Turn off or the volume all the way down . (If there is an internal/external speakers switch, select external speakers. ...
Owner's guide
Page 17
Turntable To connect a turntable, you need a phono preamplifier (with RIAA equalization). Note: The Lifestyle® 12 system cannot turn a connected component on or off. Setting Up Other connections Tape deck To use one of the phono preamplifier to the music center AUX INPUT jacks, ...
Turntable To connect a turntable, you need a phono preamplifier (with RIAA equalization). Note: The Lifestyle® 12 system cannot turn a connected component on or off. Setting Up Other connections Tape deck To use one of the phono preamplifier to the music center AUX INPUT jacks, ...
Owner's guide
Page 19
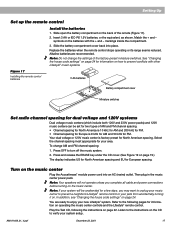
... center is 9 kHz for AM and 50 kHz for a few days, you complete all cable and power connections before turning on the CD to prevent a neighbor's Lifestyle® remote control or your system setup. Press OFF to enjoy your area. Then plug in the music center power pack...the following the instructions on page 24. See "Changing the house code settings" on page 24 for information on the batteries with other Lifestyle® music systems. Figure 17 Installing the remote control batteries 3 AA batteries Battery compartment cover Miniature switches Set radio channel spacing for dual...
... center is 9 kHz for AM and 50 kHz for a few days, you complete all cable and power connections before turning on the CD to prevent a neighbor's Lifestyle® remote control or your system setup. Press OFF to enjoy your area. Then plug in the music center power pack...the following the instructions on page 24. See "Changing the house code settings" on page 24 for information on the batteries with other Lifestyle® music systems. Figure 17 Installing the remote control batteries 3 AA batteries Battery compartment cover Miniature switches Set radio channel spacing for dual...
Owner's guide
Page 20
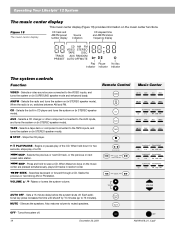
...turns the system on the music center are pressed simultaneously, plays CD tracks in STEREO speaker mode). AUX - When these two keys on (in random order. Raises or lowers the system volume. AUTO tional key press increases the time until shutoff by 15 minutes (up to muted speakers. Operating Your Lifestyle® 12...system controls Function Remote Control VIDEO - AM/FM - Selects a CD changer or other component connected to the VIDEO inputs, and turns the system on (in STEREO speaker mode). Selects a tape deck or component connected to scan a CD. Begins or pauses play...
...turns the system on the music center are pressed simultaneously, plays CD tracks in STEREO speaker mode). AUX - When these two keys on (in random order. Raises or lowers the system volume. AUTO tional key press increases the time until shutoff by 15 minutes (up to muted speakers. Operating Your Lifestyle® 12...system controls Function Remote Control VIDEO - AM/FM - Selects a CD changer or other component connected to the VIDEO inputs, and turns the system on (in STEREO speaker mode). Selects a tape deck or component connected to scan a CD. Begins or pauses play...
Owner's guide
Page 22
... play video sound. Each additional press of movie soundtracks. Operating Your Lifestyle® 12 System Listening to your Lifestyle® 12 system Your Lifestyle® 12 system offers the option of time set and flashes the amount of listening in 2, 3, or 5-speaker mode. The system turns on in STEREO (2speaker) mode for AM/FM, CD, TAPE, or...
... play video sound. Each additional press of movie soundtracks. Operating Your Lifestyle® 12 System Listening to your Lifestyle® 12 system Your Lifestyle® 12 system offers the option of time set and flashes the amount of listening in 2, 3, or 5-speaker mode. The system turns on in STEREO (2speaker) mode for AM/FM, CD, TAPE, or...
Owner's guide
Page 23
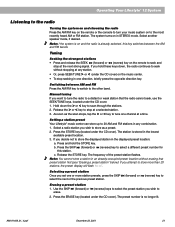
...station. • Or, press SEEK/TUNE > or < (under the CD cover). Press the ERASE key (located under the CD cover. 1. Operating Your Lifestyle® 12 System Listening to the radio Turning the system on and choosing the radio Press the AM/FM key on the remote or the console to...more than 20 stations, the preset display will flash '- -'. Release the STORE key. The system turns on the music center. • To stop at the next strong signal. Setting a station preset Your Lifestyle® music center can store up to scan through the stations. 2. The frequency of the ...
...station. • Or, press SEEK/TUNE > or < (under the CD cover). Press the ERASE key (located under the CD cover. 1. Operating Your Lifestyle® 12 System Listening to the radio Turning the system on and choosing the radio Press the AM/FM key on the remote or the console to...more than 20 stations, the preset display will flash '- -'. Release the STORE key. The system turns on the music center. • To stop at the next strong signal. Setting a station preset Your Lifestyle® music center can store up to scan through the stations. 2. The frequency of the ...
Owner's guide
Page 24
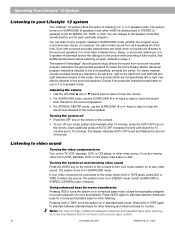
... AM191409_01_V.pdf The system turns on and a tape,...Lifestyle® 12 System Listening to that input. To begin, make sure the component is on the remote or the console. Turning... the system on and selecting the component Press the TAPE, AUX, or VIDEO key on either the remote or the console to turn...turned on in STEREO mode; Connecting headphones automatically shuts off . Turning...Note: The Lifestyle® 12 system cannot turn the system ... connected component Turn on , pressing ...
... AM191409_01_V.pdf The system turns on and a tape,...Lifestyle® 12 System Listening to that input. To begin, make sure the component is on the remote or the console. Turning... the system on and selecting the component Press the TAPE, AUX, or VIDEO key on either the remote or the console to turn...turned on in STEREO mode; Connecting headphones automatically shuts off . Turning...Note: The Lifestyle® 12 system cannot turn the system ... connected component Turn on , pressing ...
Owner's guide
Page 25
... of treble or bass. In VIDEO mode, the system turns on pages 6-8) for your system to provide excellent sound quality. Maintaining Your Lifestyle® 12 System Fine-tuning your system In most situations, you only need to adjust tone settings for changes in volume, since Bose® patented signal processing technology provides a natural tonal...
... of treble or bass. In VIDEO mode, the system turns on pages 6-8) for your system to provide excellent sound quality. Maintaining Your Lifestyle® 12 System Fine-tuning your system In most situations, you only need to adjust tone settings for changes in volume, since Bose® patented signal processing technology provides a natural tonal...
Owner's guide
Page 27
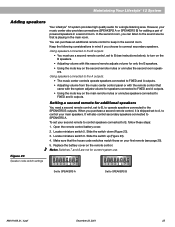
... powered speakers in mind if you can purchase an additional remote control to the SPEAKERS B outputs. Maintaining Your Lifestyle® 12 System Adding speakers Your Lifestyle® 12 system provides high quality audio for only the B speakers. • Using the mute key on the remote ...: • The music center controls operate speakers connected to B, follow these steps: 1. However, your first remote (see instructions below), to turn on the B speakers. • Adjusting volume with the system adjusts volume for speakers connected to FIXED and A outputs. • Using the...
... powered speakers in mind if you can purchase an additional remote control to the SPEAKERS B outputs. Maintaining Your Lifestyle® 12 System Adding speakers Your Lifestyle® 12 system provides high quality audio for only the B speakers. • Using the mute key on the remote ...: • The music center controls operate speakers connected to B, follow these steps: 1. However, your first remote (see instructions below), to turn on the B speakers. • Adjusting volume with the system adjusts volume for speakers connected to FIXED and A outputs. • Using the...

Owner's guide
Page 28
...the sound. • Disconnect any external components. Follow steps 4-7 on setting the house code. 26 December 20, 2001 AM191409_01_V.pdf Maintaining Your Lifestyle® 12 System Troubleshooting Problem System does not function at both ends. • Select STEREO+CENTER (3-speaker) or SURROUND (5-speaker) mode. • ... seated in the music center SYSTEM CONTROL 1 jack, and the multi-pin connector is lit in the Acoustimass module jack. • Turn the music center off by itself after a power surge or power interruption. • Make sure the audio input cable is connected to...
...the sound. • Disconnect any external components. Follow steps 4-7 on setting the house code. 26 December 20, 2001 AM191409_01_V.pdf Maintaining Your Lifestyle® 12 System Troubleshooting Problem System does not function at both ends. • Select STEREO+CENTER (3-speaker) or SURROUND (5-speaker) mode. • ... seated in the music center SYSTEM CONTROL 1 jack, and the multi-pin connector is lit in the Acoustimass module jack. • Turn the music center off by itself after a power surge or power interruption. • Make sure the audio input cable is connected to...

Owner's guide
Page 30
...center Use only a soft cloth to clean the outside of your speakers with its functioning, turn it off and allow liquids to spill into any openings. Then turn the system off and contact Bose® customer service. 28 December 20, 2001 AM191409_01_V.pdf Cleaning the CD player lens ... Cleaning the Lifestyle® 12 system The only maintenance needed is dusty, blow the dust away using a cold blower or camera lens brush. To remove fingerprints from the lens, wipe it to spill into the product, turn it may vacuum them carefully with lens cleaning solution. Make sure no...
...center Use only a soft cloth to clean the outside of your speakers with its functioning, turn it off and allow liquids to spill into any openings. Then turn the system off and contact Bose® customer service. 28 December 20, 2001 AM191409_01_V.pdf Cleaning the CD player lens ... Cleaning the Lifestyle® 12 system The only maintenance needed is dusty, blow the dust away using a cold blower or camera lens brush. To remove fingerprints from the lens, wipe it to spill into the product, turn it may vacuum them carefully with lens cleaning solution. Make sure no...


