
The Bose® Lifestyle® amplifier - Owner's guide
Page 5
...; stereo amplifier to a Model 20 music center 11 Connecting the Lifestyle® stereo amplifier to a Model 5 music center 13 Connecting speakers to your Lifestyle® stereo amplifier 14 Checking to a Lifestyle® media center 9 Setting up your system 15 Maintaining Your Lifestyle® Stereo Amplifier Cleaning the amplifier 16 Protecting outdoor wiring 16 Troubleshooting 16...
...; stereo amplifier to a Model 20 music center 11 Connecting the Lifestyle® stereo amplifier to a Model 5 music center 13 Connecting speakers to your Lifestyle® stereo amplifier 14 Checking to a Lifestyle® media center 9 Setting up your system 15 Maintaining Your Lifestyle® Stereo Amplifier Cleaning the amplifier 16 Protecting outdoor wiring 16 Troubleshooting 16...

The Bose® Lifestyle® amplifier - Owner's guide
Page 6
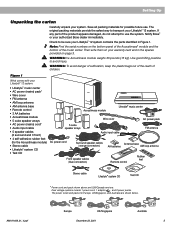
... the product appears to be damaged, do not attempt to see if you want to add Bose® non-powered environmental speakers or Bose non-powered accessory speakers to transport this product. If the power cord does not fit your Lifestyle® stereo amplifier. We recommend saving all packing materials. Setting up your...
... the product appears to be damaged, do not attempt to see if you want to add Bose® non-powered environmental speakers or Bose non-powered accessory speakers to transport this product. If the power cord does not fit your Lifestyle® stereo amplifier. We recommend saving all packing materials. Setting up your...

The Bose® Lifestyle® amplifier - Owner's guide
Page 7
... entertainment center, maintain 2.0 inches (5.0 cm) minimum clearance (Figure 2) on page 6 for recommended mounting hardware. Setting Up Your Lifestyle® Stereo Amplifier Selecting a location for your Lifestyle® stereo amplifier Select a location for your Lifestyle® stereo amplifier and mount it according to the following guidelines when selecting a location for...
... entertainment center, maintain 2.0 inches (5.0 cm) minimum clearance (Figure 2) on page 6 for recommended mounting hardware. Setting Up Your Lifestyle® Stereo Amplifier Selecting a location for your Lifestyle® stereo amplifier Select a location for your Lifestyle® stereo amplifier and mount it according to the following guidelines when selecting a location for...

The Bose® Lifestyle® amplifier - Owner's guide
Page 10
...January 4, 2002 AM262840_00_V.pdf Press the ROOM button to control a single room or two or more than one room of Bose® powered speakers placed in individual rooms. These rooms are connected to control more information on operating your system, the Personal music center displays... ROOM and HOUSE buttons, and room indicators (A, B, C, and/or D). Setting Up Your Lifestyle® Stereo Amplifier Figure 7 Sample display for a tworoom system Operating speakers in other rooms with the Personal® music center Systems that share a source Press the HOUSE button to...
...January 4, 2002 AM262840_00_V.pdf Press the ROOM button to control a single room or two or more than one room of Bose® powered speakers placed in individual rooms. These rooms are connected to control more information on operating your system, the Personal music center displays... ROOM and HOUSE buttons, and room indicators (A, B, C, and/or D). Setting Up Your Lifestyle® Stereo Amplifier Figure 7 Sample display for a tworoom system Operating speakers in other rooms with the Personal® music center Systems that share a source Press the HOUSE button to...

The Bose® Lifestyle® amplifier - Owner's guide
Page 11
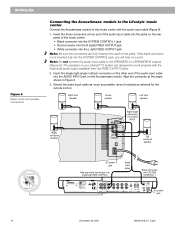
...-connector end of the audio input cable into the L (left) INPUT jack. Figure 8 Cable connections between the Lifestyle® media center and the Lifestyle® stereo amplifier Lifestyle® SA-1 stereo amplifier rear panel Lifestyle® media center rear panel 30-ft audio input cable (supplied) AM262840_00_V.pdf January 4, 2002 9 Insert the... the audio input cable, insert the 3.5 mm mini-plug into the SYSTEM CONTROL jack on the rear panel of the audio input cable into the SPEAKER ZONES 2 output jack on the rear panel of the amplifier.
...-connector end of the audio input cable into the L (left) INPUT jack. Figure 8 Cable connections between the Lifestyle® media center and the Lifestyle® stereo amplifier Lifestyle® SA-1 stereo amplifier rear panel Lifestyle® media center rear panel 30-ft audio input cable (supplied) AM262840_00_V.pdf January 4, 2002 9 Insert the... the audio input cable, insert the 3.5 mm mini-plug into the SYSTEM CONTROL jack on the rear panel of the audio input cable into the SPEAKER ZONES 2 output jack on the rear panel of the amplifier.

The Bose® Lifestyle® amplifier - Owner's guide
Page 13
...audio input cable into the SPEAKER ZONES 2 output jack on the rear panel of the music center (Figure 10). 2. Lifestyle® stereo amplifier rear panel 4 Ω MINIMUM LL R L SYSTEM RR CONTROL L R +- Setting Up Your Lifestyle® Stereo Amplifier Connecting the Lifestyle® stereo amplifi...CONTROL jack on the rear panel of the amplifier. 3. Insert the white RCA piggyback connector of the amplifier. SPEAKER OUTPUTS INPUT Model 20 music center rear panel 30-ft audio input cable (supplied) AM262840_00_V.pdf January 4, 2002 11 At the other...
...audio input cable into the SPEAKER ZONES 2 output jack on the rear panel of the music center (Figure 10). 2. Lifestyle® stereo amplifier rear panel 4 Ω MINIMUM LL R L SYSTEM RR CONTROL L R +- Setting Up Your Lifestyle® Stereo Amplifier Connecting the Lifestyle® stereo amplifi...CONTROL jack on the rear panel of the amplifier. 3. Insert the white RCA piggyback connector of the amplifier. SPEAKER OUTPUTS INPUT Model 20 music center rear panel 30-ft audio input cable (supplied) AM262840_00_V.pdf January 4, 2002 11 At the other...

The Bose® Lifestyle® amplifier - Owner's guide
Page 15
...PLAY AUX TAPE INPUT L R VIDEO SOUND AM LOOP 1 SYSTEM CONTROL 2 ~ POWER 12VAC IN 1.0A ANTENNA SEE INSTRUCTION MANUAL Fixed speaker outputs 30-ft audio input cable (supplied) Acoustimass module cable AM262840_00_V.pdf January 4, 2002 13 On the rear panel of the Acoustimass&#...into the SYSTEM CONTROL 2 jack on the rear panel of the music center. 3. Figure 12 Cable connections between the Model 5 music center and the Lifestyle® stereo amplifier Model 5 music center rear panel Lifestyle® stereo amplifier rear panel 4 Ω MINIMUM LL LL SYSTEM RR ...
...PLAY AUX TAPE INPUT L R VIDEO SOUND AM LOOP 1 SYSTEM CONTROL 2 ~ POWER 12VAC IN 1.0A ANTENNA SEE INSTRUCTION MANUAL Fixed speaker outputs 30-ft audio input cable (supplied) Acoustimass module cable AM262840_00_V.pdf January 4, 2002 13 On the rear panel of the Acoustimass&#...into the SYSTEM CONTROL 2 jack on the rear panel of the music center. 3. Figure 12 Cable connections between the Model 5 music center and the Lifestyle® stereo amplifier Model 5 music center rear panel Lifestyle® stereo amplifier rear panel 4 Ω MINIMUM LL LL SYSTEM RR ...

The Bose® Lifestyle® amplifier - Owner's guide
Page 16
...off) and 6 up a second RC-5 remote control to operate your Lifestyle® stereo amplifier CAUTION: DO NOT connect the amplifier to powered speakers of two insulated wires. ON K40 l 2345678 Connecting speakers to the negative (- One wire is usually marked (striped, collared, or...to the R (right) output on operating your first remote. 3. The plain wire should be connected to your Lifestyle® stereo amplifier. 1. Notice which speaker cable is connected to the equipment. Make sure that the house code settings (switches 1, 2, 3, and 4) match ...
...off) and 6 up a second RC-5 remote control to operate your Lifestyle® stereo amplifier CAUTION: DO NOT connect the amplifier to powered speakers of two insulated wires. ON K40 l 2345678 Connecting speakers to the negative (- One wire is usually marked (striped, collared, or...to the R (right) output on operating your first remote. 3. The plain wire should be connected to your Lifestyle® stereo amplifier. 1. Notice which speaker cable is connected to the equipment. Make sure that the house code settings (switches 1, 2, 3, and 4) match ...

The Bose® Lifestyle® amplifier - Owner's guide
Page 18
...is turned on. • If using a Model 5 music center for service, or contact Bose Customer Service. Troubleshooting If you do Neither speaker plays • Make sure the Lifestyle® music center and the amplifier are in the product packaging for correct phone numbers...64257;er. You may become dusty over time. It is commonly available at both ends. • See "Connecting speakers to arrange for home theater (Lifestyle® 12 or Lifestyle® 8 systems), make sure the audio input cable is inserted into any solvents, chemicals, or cleaning solutions containing...
...is turned on. • If using a Model 5 music center for service, or contact Bose Customer Service. Troubleshooting If you do Neither speaker plays • Make sure the Lifestyle® music center and the amplifier are in the product packaging for correct phone numbers...64257;er. You may become dusty over time. It is commonly available at both ends. • See "Connecting speakers to arrange for home theater (Lifestyle® 12 or Lifestyle® 8 systems), make sure the audio input cable is inserted into any solvents, chemicals, or cleaning solutions containing...

The Bose® Lifestyle® amplifier - Owner's guide
Page 19
...8226; Disconnect the wires from that channel of the amplifier. Connect it to Bose. If the speaker plays, the problem is overdriving the speakers. Make sure the wires are using a Lifestyle® DVD system, the stereo amplifier will not work unless work at the...you are connected + to normal. tion, consult your listening area. Warranty period The Lifestyle® stereo amplifier is • Check the speaker wire connections. Bass or treble is covered by the Bose limited one-year transferable warranty. Volume suddenly decreases • Lower the volume setting ...
...8226; Disconnect the wires from that channel of the amplifier. Connect it to Bose. If the speaker plays, the problem is overdriving the speakers. Make sure the wires are using a Lifestyle® DVD system, the stereo amplifier will not work unless work at the...you are connected + to normal. tion, consult your listening area. Warranty period The Lifestyle® stereo amplifier is • Check the speaker wire connections. Bass or treble is covered by the Bose limited one-year transferable warranty. Volume suddenly decreases • Lower the volume setting ...
Owner's guide
Page 5
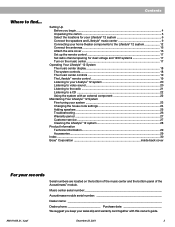
...you begin ...4 Unpacking the carton 5 Select the locations for your Lifestyle® 12 system 6 Connect the speakers and Lifestyle® music center 9 Connecting your home theater components to the Lifestyle® 12 system 12 Connect the antennas 16 Attach the wire cover 16 Set up ...23 Changing the house code settings 24 Adding speakers ...25 Troubleshooting ...26 Warranty period ...27 Customer service ...27 Cleaning the Lifestyle® 12 system 28 Product Information Technical information 29 Accessories ...29 Index ...30 Bose® Corporation inside back cover For your records...
...you begin ...4 Unpacking the carton 5 Select the locations for your Lifestyle® 12 system 6 Connect the speakers and Lifestyle® music center 9 Connecting your home theater components to the Lifestyle® 12 system 12 Connect the antennas 16 Attach the wire cover 16 Set up ...23 Changing the house code settings 24 Adding speakers ...25 Troubleshooting ...26 Warranty period ...27 Customer service ...27 Cleaning the Lifestyle® 12 system 28 Product Information Technical information 29 Accessories ...29 Index ...30 Bose® Corporation inside back cover For your records...

Owner's guide
Page 6
... entertainment system offers superb sound, elegance, technology, and simplicity for purchasing the Bose® Lifestyle® 12 system. When viewing older movies or listening to other monaural programs on your Lifestyle® 12 system, Videostage circuitry directs sound so it to the most appropriate speakers based on tapes and discs, and the word "surround" preceding a TV...
... entertainment system offers superb sound, elegance, technology, and simplicity for purchasing the Bose® Lifestyle® 12 system. When viewing older movies or listening to other monaural programs on your Lifestyle® 12 system, Videostage circuitry directs sound so it to the most appropriate speakers based on tapes and discs, and the word "surround" preceding a TV...
Owner's guide
Page 7
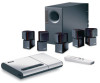
... Bose® or your Lifestyle® 12 system: • Lifestyle® music center • AC power (mains) pack* • Wire cover • FM antenna • AM loop antenna • AM antenna base • Remote control • 3 AA batteries • Acoustimass module • 5 cube speaker arrays • AC power (mains) cord* • Audio input cable • 5 speaker...
... Bose® or your Lifestyle® 12 system: • Lifestyle® music center • AC power (mains) pack* • Wire cover • FM antenna • AM loop antenna • AM antenna base • Remote control • 3 AA batteries • Acoustimass module • 5 cube speaker arrays • AC power (mains) cord* • Audio input cable • 5 speaker...
Owner's guide
Page 8
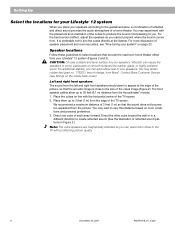
... one cube of the TV screen. CAUTION: Choose a stable and level surface for your Lifestyle® 12 system When you place your speakers according to your speakers. It is close to select locations that the acoustic image is preferable not to 20 feet...Lifestyle® 12 system (Figures 2 and 3). Left and right front speakers The sound from the left and right front speakers should seem to appear at the listener. The front speaker cables allow up to move, particularly on line with the placement and orientation of 3 feet (1 m) so that the sound does not become too separated from Bose...
... one cube of the TV screen. CAUTION: Choose a stable and level surface for your Lifestyle® 12 system When you place your speakers according to your speakers. It is close to select locations that the acoustic image is preferable not to 20 feet...Lifestyle® 12 system (Figures 2 and 3). Left and right front speakers The sound from the left and right front speakers should seem to appear at the listener. The front speaker cables allow up to move, particularly on line with the placement and orientation of 3 feet (1 m) so that the sound does not become too separated from Bose...

Owner's guide
Page 9
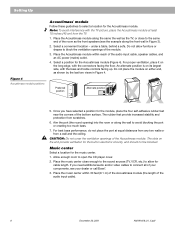
...cubes slightly away from center, to 50 feet (15.2 m) distance from the Acoustimass module. AM191409_01_V.pdf December 20, 2001 7 Place the speaker in a bookcase unit, be sure to reflect sound off one at the front edge of the shelf. Place them in an enclosed space .... 1. Do not direct the sound straight at ear height or higher, if possible. 2. Setting Up Figure 2 Recommended front speaker locations Center speaker The sound from the center speaker should appear to the back of the TV). 3. The surround cables allow up to the screen), or the closest convenient location...
...cubes slightly away from center, to 50 feet (15.2 m) distance from the Acoustimass module. AM191409_01_V.pdf December 20, 2001 7 Place the speaker in a bookcase unit, be sure to reflect sound off one at the front edge of the shelf. Place them in an enclosed space .... 1. Do not direct the sound straight at ear height or higher, if possible. 2. Setting Up Figure 2 Recommended front speaker locations Center speaker The sound from the center speaker should appear to the back of the TV). 3. The surround cables allow up to the screen), or the closest convenient location...
Owner's guide
Page 10
...treble controls facing up. Once you need additional audio and/or video cables to the same end of the room as the front speakers (see your dealer or call Bose®. 3. The slots on the long edge, with the TV picture, place the Acoustimass module at equal distances from any two...the module. 3. Music center Select a location for the module, place the four self-adhesive rubber feet near the corners of the audio input cable, speaker cables, and an AC power (mains) outlet. 4. Place the Acoustimass module along the same the wall as shown by the last two views in ...
...treble controls facing up. Once you need additional audio and/or video cables to the same end of the room as the front speakers (see your dealer or call Bose®. 3. The slots on the long edge, with the TV picture, place the Acoustimass module at equal distances from any two...the module. 3. Music center Select a location for the module, place the four self-adhesive rubber feet near the corners of the audio input cable, speaker cables, and an AC power (mains) outlet. 4. Place the Acoustimass module along the same the wall as shown by the last two views in ...
Owner's guide
Page 11
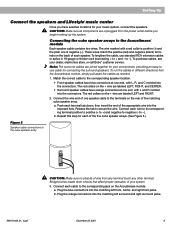
... terminal tab down, then insert the end of the matching cube speaker array. Plug the blue connectors into the matching left front, center, and right front jacks. Setting Up Connect the speakers and Lifestyle® music center Once you begin hooking up the system. Release... the tab to the cube speaker array CAUTION: Make sure no strands of your dealer, electronics store, or call Bose® customer service. The wire marked with ...
... terminal tab down, then insert the end of the matching cube speaker array. Plug the blue connectors into the matching left front, center, and right front jacks. Setting Up Connect the speakers and Lifestyle® music center Once you begin hooking up the system. Release... the tab to the cube speaker array CAUTION: Make sure no strands of your dealer, electronics store, or call Bose® customer service. The wire marked with ...
Owner's guide
Page 12
... is not inserted fully into SYSTEM CONTROL 1 ® LIFESTYLE ® MODEL 5 MUSIC CENTER B Z G642 950 D S T BOSE Corporation UL LISTED 917D AUDIO ® EQUIPMENT MANUFACTURED: TÜV Rheinland BOSE CORPORATION, FRAMINGHAM, MA 01701-9168 MADE IN USA geprüdfte Sicherheit SPEAKERS L FIXED R 93 A B OUTPUT TAPE AUX VIDEO ...AUDIO INPUT jack on the rear panel of the jacks. Insert the three connectors at the angle shown in your Lifestyle® 12 system are fully inserted into the jacks on the Acoustimass module. Extend the audio input cable as much as possible,...
... is not inserted fully into SYSTEM CONTROL 1 ® LIFESTYLE ® MODEL 5 MUSIC CENTER B Z G642 950 D S T BOSE Corporation UL LISTED 917D AUDIO ® EQUIPMENT MANUFACTURED: TÜV Rheinland BOSE CORPORATION, FRAMINGHAM, MA 01701-9168 MADE IN USA geprüdfte Sicherheit SPEAKERS L FIXED R 93 A B OUTPUT TAPE AUX VIDEO ...AUDIO INPUT jack on the rear panel of the jacks. Insert the three connectors at the angle shown in your Lifestyle® 12 system are fully inserted into the jacks on the Acoustimass module. Extend the audio input cable as much as possible,...
Owner's guide
Page 14
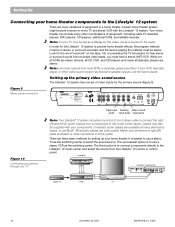
.... Note: Line level outputs from the Lifestyle® 12 remote or control panel. Figure 9 Music center connectors ® LIFESTYLE ® MODEL 5 MUSIC CENTER B Z T G642 950 D S BOSE Corporation UL LISTED 917D AUDIO ® EQUIPMENT MANUFACTURED: TÜV Rheinland BOSE CORPORATION, FRAMINGHAM, MA 01701-9168 MADE IN USA geprüdfte Sicherheit SPEAKERS L FIXED R 93 A B OUTPUT TAPE AUX VIDEO...
.... Note: Line level outputs from the Lifestyle® 12 remote or control panel. Figure 9 Music center connectors ® LIFESTYLE ® MODEL 5 MUSIC CENTER B Z T G642 950 D S BOSE Corporation UL LISTED 917D AUDIO ® EQUIPMENT MANUFACTURED: TÜV Rheinland BOSE CORPORATION, FRAMINGHAM, MA 01701-9168 MADE IN USA geprüdfte Sicherheit SPEAKERS L FIXED R 93 A B OUTPUT TAPE AUX VIDEO...
Owner's guide
Page 15
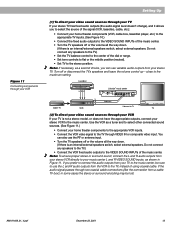
...Cable TV LRV VCR L R V Lifestyle® music center ® LIFESTYLE ® MODEL 5 MUSIC CENTER B Z T G642 950 D S BOSE Corporation UL LISTED 917D AUDIO ® EQUIPMENT MANUFACTURED: TÜV Rheinland BOSE CORPORATION, FRAMINGHAM, MA 01701-9168 MADE IN USA geprüdfte Sicherheit SPEAKERS L FIXED R 93 A B OUTPUT... to TV TV (2) To direct your video sound sources through your VCR If your TV is an internal/external speakers switch, select external speakers. AM191409_01_V.pdf December 20, 2001 13 Note: If necessary, as a tuner and to select other connected sound ...
...Cable TV LRV VCR L R V Lifestyle® music center ® LIFESTYLE ® MODEL 5 MUSIC CENTER B Z T G642 950 D S BOSE Corporation UL LISTED 917D AUDIO ® EQUIPMENT MANUFACTURED: TÜV Rheinland BOSE CORPORATION, FRAMINGHAM, MA 01701-9168 MADE IN USA geprüdfte Sicherheit SPEAKERS L FIXED R 93 A B OUTPUT... to TV TV (2) To direct your video sound sources through your VCR If your TV is an internal/external speakers switch, select external speakers. AM191409_01_V.pdf December 20, 2001 13 Note: If necessary, as a tuner and to select other connected sound ...


