Owner's guide
Page 2
... of its advanced features. Batteries Batteries Please dispose of plug to wide slot, insert fully. Bose FreeStyle speaker system is a registered trademark of important operating and maintenance instructions in the Bose® FreeStyle® powered speaker system. AVIS RISQUE DE CHOC ÉLECTRIQUE NE PAS OUVRIR ATTENTION : ... of uninsulated dangerous voltage within an equilateral triangle, as vases, shall not be placed on the apparatus. Safety Information The Interface module is to be used only with liquids, such as marked on the system, is intended to alert the user to the...
... of its advanced features. Batteries Batteries Please dispose of plug to wide slot, insert fully. Bose FreeStyle speaker system is a registered trademark of important operating and maintenance instructions in the Bose® FreeStyle® powered speaker system. AVIS RISQUE DE CHOC ÉLECTRIQUE NE PAS OUVRIR ATTENTION : ... of uninsulated dangerous voltage within an equilateral triangle, as vases, shall not be placed on the apparatus. Safety Information The Interface module is to be used only with liquids, such as marked on the system, is intended to alert the user to the...
Owner's guide
Page 3
...the system 15 Using the mute button 15 Using the source buttons 15 Reference 16 Taking care of your FreeStyle speaker system 16 Cleaning the speakers 16 Replacing the remote control battery 16 Troubleshooting 17 Customer service 18 Warranty...2002 Safety Information 2 Introduction 4 Before you begin 4 For your records 4 System Setup 5 Unpacking 5 Selecting locations for your FreeStyle® speakers and Interface module 6 Positioning the Interface module 6 Placing the speakers 7 Selecting a location for the Acoustimass® module 8 Make sure your choice is both convenient and...
...the system 15 Using the mute button 15 Using the source buttons 15 Reference 16 Taking care of your FreeStyle speaker system 16 Cleaning the speakers 16 Replacing the remote control battery 16 Troubleshooting 17 Customer service 18 Warranty...2002 Safety Information 2 Introduction 4 Before you begin 4 For your records 4 System Setup 5 Unpacking 5 Selecting locations for your FreeStyle® speakers and Interface module 6 Positioning the Interface module 6 Placing the speakers 7 Selecting a location for the Acoustimass® module 8 Make sure your choice is both convenient and...
Owner's guide
Page 4
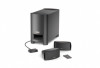
... systems, yet from surround encoded DVDs, and a natural soundstage for purchasing a Bose® FreeStyle® speaker system, which delivers the superior acoustic performance needed to -use, aim-and-press infrared (IR) remote control • Interface module with this owner's guide. *"Dolby" and the double-D symbol are trademarks... records The serial number is located on the rear of the Acoustimass module. Using Dolby* Digital® and Bose VideoStage® signal processing technology, FreeStyle speakers provide improved spaciousness for bold 3-D effects from Dolby Laboratories.
... systems, yet from surround encoded DVDs, and a natural soundstage for purchasing a Bose® FreeStyle® speaker system, which delivers the superior acoustic performance needed to -use, aim-and-press infrared (IR) remote control • Interface module with this owner's guide. *"Dolby" and the double-D symbol are trademarks... records The serial number is located on the rear of the Acoustimass module. Using Dolby* Digital® and Bose VideoStage® signal processing technology, FreeStyle speakers provide improved spaciousness for bold 3-D effects from Dolby Laboratories.

Owner's guide
Page 5
... 1 Contents of the shipping carton: • 2 Speakers • 4 Rubber feet, large • 1 Acoustimass module • 8 Rubber feet, small • 1 Interface module • 1 extra attachment strip • 1 Remote control (battery installed) • 1 120V power cord (8-foot) • 1 Stereo cable (6-foot)) •... 1 Speaker cable (15-foot) Carefully unpack your authorized Bose® dealer immediately. Notify Bose or your system. If any part of the system appears damaged, do not attempt to be sure your system includes the ...
... 1 Contents of the shipping carton: • 2 Speakers • 4 Rubber feet, large • 1 Acoustimass module • 8 Rubber feet, small • 1 Interface module • 1 extra attachment strip • 1 Remote control (battery installed) • 1 120V power cord (8-foot) • 1 Stereo cable (6-foot)) •... 1 Speaker cable (15-foot) Carefully unpack your authorized Bose® dealer immediately. Notify Bose or your system. If any part of the system appears damaged, do not attempt to be sure your system includes the ...
Owner's guide
Page 6
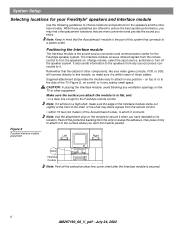
... it connects Note: Use the attachment strip on the module to secure it . Positioning the Interface module The Interface module is within 15 feet (4.6 meters) of sight to the FreeStyle remote control Note: If it to the surface where you may block signals from the strip to...of the TV (Figure 2), on the TV or other components, like your FreeStyle® speakers and Interface module Use the following guidelines to choose locations and positions for the FreeStyle speaker system. CAUTION: In placing the Interface module, avoid blocking any ventilation openings on a shelf, or in any ...
... it connects Note: Use the attachment strip on the module to secure it . Positioning the Interface module The Interface module is within 15 feet (4.6 meters) of sight to the FreeStyle remote control Note: If it to the surface where you may block signals from the strip to...of the TV (Figure 2), on the TV or other components, like your FreeStyle® speakers and Interface module Use the following guidelines to choose locations and positions for the FreeStyle speaker system. CAUTION: In placing the Interface module, avoid blocking any ventilation openings on a shelf, or in any ...
Owner's guide
Page 8
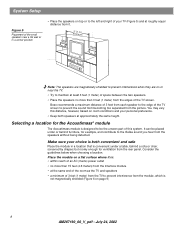
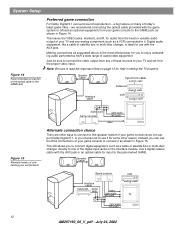
System Setup Figure 5 Placement of the small speakers near the TV. • Try to prevent interference from the Interface module • at approximately the same height. Bose recommends a maximum distance of 3 feet from each speaker to the edge of your TV (Figure 5) and at least 3 feet (1 meter) of space between the two ...
System Setup Figure 5 Placement of the small speakers near the TV. • Try to prevent interference from the Interface module • at approximately the same height. Bose recommends a maximum distance of 3 feet from each speaker to the edge of your TV (Figure 5) and at least 3 feet (1 meter) of space between the two ...
Owner's guide
Page 9
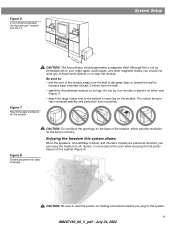
Enjoying the freedom this system allows When the speakers, Acoustimass module, and Interface module are placed as directed, you plug in circuitry. The rubber feet provide increased stability and protection from the wall). • stand the Acoustimass module ...
Enjoying the freedom this system allows When the speakers, Acoustimass module, and Interface module are placed as directed, you plug in circuitry. The rubber feet provide increased stability and protection from the wall). • stand the Acoustimass module ...
Owner's guide
Page 10
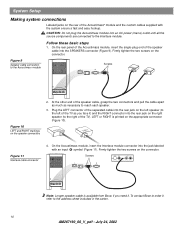
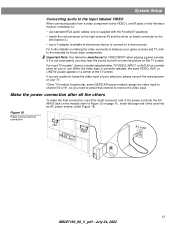
...Screws SPEAKERS RIGHT LEFT SPEAKERS Figure 10 LEFT and RIGHT markings on the left speaker (to the left of the TV as necessary to the Interface module. Figure 9 Speaker cable connection to the address sheet included in the carton. 10 AM267190_00_V_pdf • July 24, 2002 Plug the ...LEFT connector of the separated cable into the rear jack on the speaker connectors 2. LEFT or RIGHT is available from Bose, if you face it . On the Acoustimass module, insert the Interface module connector into the rear jack on the appropriate connector (Figure 10). RIGHT LEFT Figure 11...
...Screws SPEAKERS RIGHT LEFT SPEAKERS Figure 10 LEFT and RIGHT markings on the left speaker (to the left of the TV as necessary to the Interface module. Figure 9 Speaker cable connection to the address sheet included in the carton. 10 AM267190_00_V_pdf • July 24, 2002 Plug the ...LEFT connector of the separated cable into the rear jack on the speaker connectors 2. LEFT or RIGHT is available from Bose, if you face it . On the Acoustimass module, insert the Interface module connector into the rear jack on the appropriate connector (Figure 10). RIGHT LEFT Figure 11...
Owner's guide
Page 11
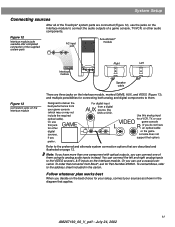
...RIGHT LEFT Speaker cable There are three jacks on the Interface module, marked GAME, AUX, and VIDEO (Figure 13), and multiple possibilities for other audio components. Or you prefer. To order that option). To contact Bose, refer to them using its analog audio inputs instead....coaxial converter. Refer to the VIDEO source L & R inputs on the Interface module. System Setup Connecting sources After all of the FreeStyle® system parts are connected (Figure 12), use the jacks on the Interface module to deliver the best performance from your sources as shown in the ...
...RIGHT LEFT Speaker cable There are three jacks on the Interface module, marked GAME, AUX, and VIDEO (Figure 13), and multiple possibilities for other audio components. Or you prefer. To order that option). To contact Bose, refer to them using its analog audio inputs instead....coaxial converter. Refer to the VIDEO source L & R inputs on the Interface module. System Setup Connecting sources After all of the FreeStyle® system parts are connected (Figure 12), use the jacks on the Interface module to deliver the best performance from your sources as shown in the ...
Owner's guide
Page 12
...recommend connecting the optical cable (provided with the game system or offered as optional equipment) from cable audio & video Cable/sat audio & video Interface cable VCR audio & video TV digital audio Game console right audio left audio 12 AM267190_00_V_pdf • July 24, 2002 cable Input from your ...optical cable for input to use the RCA connections of your TV and any of the digital input jacks on the Interface module. Speaker cable Game console Interface cable Cable/sat digital audio or video right audio left audio VCR audio & video TV right audio left audio ...
...recommend connecting the optical cable (provided with the game system or offered as optional equipment) from cable audio & video Cable/sat audio & video Interface cable VCR audio & video TV digital audio Game console right audio left audio 12 AM267190_00_V_pdf • July 24, 2002 cable Input from your ...optical cable for input to use the RCA connections of your TV and any of the digital input jacks on the Interface module. Speaker cable Game console Interface cable Cable/sat digital audio or video right audio left audio VCR audio & video TV right audio left audio ...
Owner's guide
Page 13
... to the input labeled VIDEO When connecting audio from a video component to the VIDEO L and R jacks on the Interface module, remember to: • use standard RCA audio cables (one is supplied with the FreeStyle® speakers) • match the red connector to the right channel (R) and the white (or black) connector to...
... to the input labeled VIDEO When connecting audio from a video component to the VIDEO L and R jacks on the Interface module, remember to: • use standard RCA audio cables (one is supplied with the FreeStyle® speakers) • match the red connector to the right channel (R) and the white (or black) connector to...

Owner's guide
Page 15
... source buttons (Figure 18). Refer to turn the system off . Operation Using the system With the battery already installed in the remote control, your FreeStyle® system is now ready for use of the component. Use the power button on the component, or on the remote provided with it , ...to the owner's guide that input. 15 AM267190_00_V_pdf • July 24, 2002 Note: Be sure to point the remote control directly at the Interface module when you want to the next), use the up ( ) and down ( ) volume arrows. • To turn the component on use . Press the button...
... source buttons (Figure 18). Refer to turn the system off . Operation Using the system With the battery already installed in the remote control, your FreeStyle® system is now ready for use of the component. Use the power button on the component, or on the remote provided with it , ...to the owner's guide that input. 15 AM267190_00_V_pdf • July 24, 2002 Note: Be sure to point the remote control directly at the Interface module when you want to the next), use the up ( ) and down ( ) volume arrows. • To turn the component on use . Press the button...
Owner's guide
Page 17
...speakers. No sound • Increase the volume. • Check to a second language... DTS signals are not supported. • Make sure the Interface module and speaker cables are • Press the source button one language. See Important Note on page 16. • Point the remote control at... toggle from that both being broadcast in a clear line of which are turned GAME optical input) on again, to restore communication between the Interface module and the speakers. • Unplug the power cord from the outlet for a minute, then reconnect it. See "Replacing the remote ...
...speakers. No sound • Increase the volume. • Check to a second language... DTS signals are not supported. • Make sure the Interface module and speaker cables are • Press the source button one language. See Important Note on page 16. • Point the remote control at... toggle from that both being broadcast in a clear line of which are turned GAME optical input) on again, to restore communication between the Interface module and the speakers. • Unplug the power cord from the outlet for a minute, then reconnect it. See "Replacing the remote ...


