
Owner's guide
Page 1
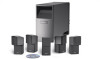
The Bose® Acoustimass® 6 Series III and Acoustimass 10 Series III Home Theater Speaker Systems Owner's Guide August 13 , 2002 AM264887_00_V.pdf Bose Corporation
The Bose® Acoustimass® 6 Series III and Acoustimass 10 Series III Home Theater Speaker Systems Owner's Guide August 13 , 2002 AM264887_00_V.pdf Bose Corporation
Owner's guide
Page 2
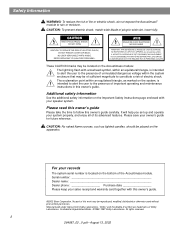
... Works. ©1992-1997 Dolby Laboratories. CAUTION: To prevent electric shock, match wide blade of its advanced features. No part of the Acoustimass module. Please save your sales receipt and warranty card together with arrowhead symbol, within an equilateral triangle, is intended to alert the user to constitute a risk of important operating and maintenance instructions in this owner's guide...
... Works. ©1992-1997 Dolby Laboratories. CAUTION: To prevent electric shock, match wide blade of its advanced features. No part of the Acoustimass module. Please save your sales receipt and warranty card together with arrowhead symbol, within an equilateral triangle, is intended to alert the user to constitute a risk of important operating and maintenance instructions in this owner's guide...
Owner's guide
Page 3
... the Acoustimass module 8 Connecting rear cube speakers to the Acoustimass module 9 Connecting the Acoustimass module to the receiver 10 Checking the connections 12 Connecting the Acoustimass module to power 12 Using your system 13 For realistic home theater sound 13 Adjusting the LFE level 13 Adjusting the bass/room compensation level 13 Setting your digital surround sound receiver 13 Be sure to find ... Contents Where to get the digital audio signal 14 Setting your analog surround sound receiver 14 Reference 15 Troubleshooting 15 Customer service...
... the Acoustimass module 8 Connecting rear cube speakers to the Acoustimass module 9 Connecting the Acoustimass module to the receiver 10 Checking the connections 12 Connecting the Acoustimass module to power 12 Using your system 13 For realistic home theater sound 13 Adjusting the LFE level 13 Adjusting the bass/room compensation level 13 Setting your digital surround sound receiver 13 Be sure to find ... Contents Where to get the digital audio signal 14 Setting your analog surround sound receiver 14 Reference 15 Troubleshooting 15 Customer service...
Owner's guide
Page 4
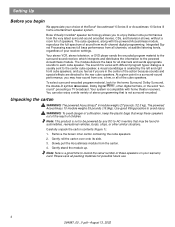
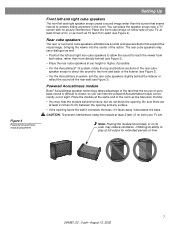
... appreciate your choice of stereo programming that is not surround-encoded. Gently stand the module up. Note: Now is a good time to the center cube speaker, a visual soundstage is compatible with home theater receivers. The cube speakers, along with different program types: dialogue is usually sent to record the serial number of sound from multi-channel digital programming. Unpacking the carton WARNING: The powered Acoustimass® 6 module weighs 27...
... appreciate your choice of stereo programming that is not surround-encoded. Gently stand the module up. Note: Now is a good time to the center cube speaker, a visual soundstage is compatible with home theater receivers. The cube speakers, along with different program types: dialogue is usually sent to record the serial number of sound from multi-channel digital programming. Unpacking the carton WARNING: The powered Acoustimass® 6 module weighs 27...
Owner's guide
Page 5
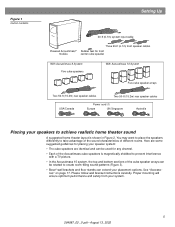
... 1 Carton contents Setting Up 20-ft (6.1m) system input cable Powered Acoustimass® module Three 20-ft (6.1m) front speaker cables Rubber feet for front center cube speaker With Acoustimass 6 System Five cube speakers With Acoustimass 10 System Five cube speaker arrays Two 50-ft (15.2m) rear speaker cables Two 50-ft (15.2m) rear speaker cables USA/Canada Power cord (1) Europe UK/Singapore Australia Placing your speakers to achieve realistic home theater sound A suggested...
... 1 Carton contents Setting Up 20-ft (6.1m) system input cable Powered Acoustimass® module Three 20-ft (6.1m) front speaker cables Rubber feet for front center cube speaker With Acoustimass 6 System Five cube speakers With Acoustimass 10 System Five cube speaker arrays Two 50-ft (15.2m) rear speaker cables Two 50-ft (15.2m) rear speaker cables USA/Canada Power cord (1) Europe UK/Singapore Australia Placing your speakers to achieve realistic home theater sound A suggested...
Owner's guide
Page 6
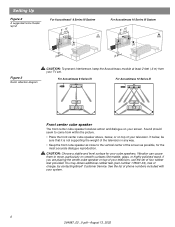
... rubber feet (part number 178321-04), free of the screen as possible, for your system. 6 264887_00 _V.pdf • August 13, 2002 See the list of phone numbers included with your cube speakers. If you are placing the center cube speaker on smooth surfaces like marble, glass, or highly polished wood. Setting Up Figure 2 A suggested home theater layout For Acoustimass® 6 Series III System (26...
... rubber feet (part number 178321-04), free of the screen as possible, for your system. 6 264887_00 _V.pdf • August 13, 2002 See the list of phone numbers included with your cube speakers. If you are placing the center cube speaker on smooth surfaces like marble, glass, or highly polished wood. Setting Up Figure 2 A suggested home theater layout For Acoustimass® 6 Series III System (26...
Owner's guide
Page 7
... block the opening faces the wall it decreases the bass. Be sure there are at ear height or higher, if possible. • For the Acoustimass® 10 system, rotate the top and bottom sections of the rear cube speaker arrays to direct the sound to the front and back of the listener (see Figure 3). You can hide the powered Acoustimass module...
... block the opening faces the wall it decreases the bass. Be sure there are at ear height or higher, if possible. • For the Acoustimass® 10 system, rotate the top and bottom sections of the rear cube speaker arrays to direct the sound to the front and back of the listener (see Figure 3). You can hide the powered Acoustimass module...
Owner's guide
Page 8
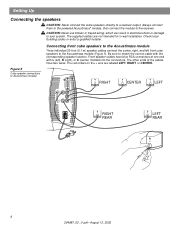
...fied installer. The red collars on the + wire are not intended for in electrical shock or damage to a receiver output. CAUTION: Never use broken or frayed wiring, which can result in -wall installation. Figure 5 Cube speaker connections to the receiver. The other ends of the cables have blue RCA connectors at one end with the corresponding speaker location. Setting Up Connecting the speakers CAUTION: Never connect the cube speakers directly to...
...fied installer. The red collars on the + wire are not intended for in electrical shock or damage to a receiver output. CAUTION: Never use broken or frayed wiring, which can result in -wall installation. Figure 5 Cube speaker connections to the receiver. The other ends of the cables have blue RCA connectors at one end with the corresponding speaker location. Setting Up Connecting the speakers CAUTION: Never connect the cube speakers directly to...
Owner's guide
Page 9
... Rear orange RCA jacks, respectively, on the Acoustimass® module. The red collars on the back of the cables have orange RCA connectors at one end with LR (left rear) and RR (right rear) molded into the connectors. Plug the other ends of the cube speaker. Connect the wire pair marked LEFT REAR to the center cube speaker (Figure 5). The other end of the cube speaker. Connect the wire...
... Rear orange RCA jacks, respectively, on the Acoustimass® module. The red collars on the back of the cables have orange RCA connectors at one end with LR (left rear) and RR (right rear) molded into the connectors. Plug the other ends of the cube speaker. Connect the wire pair marked LEFT REAR to the center cube speaker (Figure 5). The other end of the cube speaker. Connect the wire...
Owner's guide
Page 10
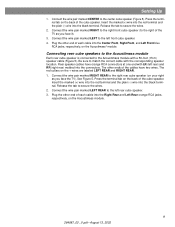
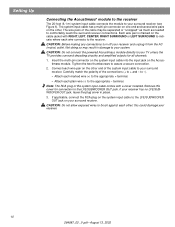
... the multi-pin connector on the system input cable into the input jack on the other end of the system input cable comes with RIGHT, LEFT, CENTER, RIGHT SURROUND or LEFT SURROUND to indicate where each other; Carefully match the polarity of the cable may result in place. 3. If your surround receiver. this cover for all channels. 1. CAUTION: Before making any connections turn off your receiver. 10 264887_00 _V.pdf •...
... the multi-pin connector on the system input cable into the input jack on the other end of the system input cable comes with RIGHT, LEFT, CENTER, RIGHT SURROUND or LEFT SURROUND to indicate where each other; Carefully match the polarity of the cable may result in place. 3. If your surround receiver. this cover for all channels. 1. CAUTION: Before making any connections turn off your receiver. 10 264887_00 _V.pdf •...
Owner's guide
Page 11
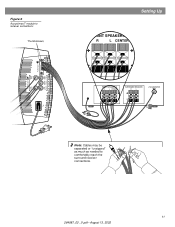
Figure 6 Acoustimass® module to receiver connections Thumbscrews Audio Output Left Rear Right Rear Audio Input Left Center Right Front Front Front Setting Up FRONT SPEAKERS A R L CENTER FRONT SPEAKERS A R L CENTER SURROUND SPEAKERS R L LFE/SUBWOOFER OUT Note: Cables may be separated or "unzipped" as much as needed to comfortably reach the surround receiver connections. 11 264887_00 _V.pdf • August 13, 2002
Figure 6 Acoustimass® module to receiver connections Thumbscrews Audio Output Left Rear Right Rear Audio Input Left Center Right Front Front Front Setting Up FRONT SPEAKERS A R L CENTER FRONT SPEAKERS A R L CENTER SURROUND SPEAKERS R L LFE/SUBWOOFER OUT Note: Cables may be separated or "unzipped" as much as needed to comfortably reach the surround receiver connections. 11 264887_00 _V.pdf • August 13, 2002
Owner's guide
Page 12
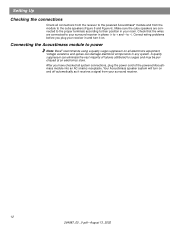
... majority of the powered Acoustimass module into an AC (mains) receptacle. Your Acoustimass speaker system will turn it receives a signal from the module to + and - Setting Up Checking the connections Check all connections from the receiver to the powered Acoustimass® module and from your surround receiver. 12 264887_00 _V.pdf • August 13, 2002 Correct wiring problems before you have checked all system connections, plug the power cord of failures attributed...
... majority of the powered Acoustimass module into an AC (mains) receptacle. Your Acoustimass speaker system will turn it receives a signal from the module to + and - Setting Up Checking the connections Check all connections from the receiver to the powered Acoustimass® module and from your surround receiver. 12 264887_00 _V.pdf • August 13, 2002 Correct wiring problems before you have checked all system connections, plug the power cord of failures attributed...
Owner's guide
Page 13
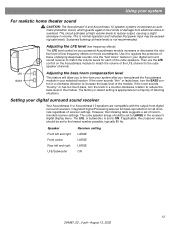
Adjusting the LFE level (low frequency effects) The LFE level control on your digital surround sound receiver Your Acoustimass 6 or Acoustimass 10 speakers are compatible with the output from electrical stress or overload. If the room sounds "boomy" or has too much bass, turn the BASS control in volume. Integrated Signal Processing assures full bass reproduction for a majority of listening situations. tive level of the LFE channel to ON. The factory or detent setting is set of recommended receiver settings. However, the...
Adjusting the LFE level (low frequency effects) The LFE level control on your digital surround sound receiver Your Acoustimass 6 or Acoustimass 10 speakers are compatible with the output from electrical stress or overload. If the room sounds "boomy" or has too much bass, turn the BASS control in volume. Integrated Signal Processing assures full bass reproduction for a majority of listening situations. tive level of the LFE channel to ON. The factory or detent setting is set of recommended receiver settings. However, the...
Owner's guide
Page 14
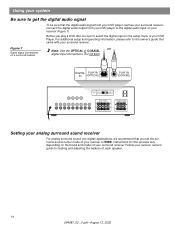
... get the digital audio signal To be sure to select the digital ouput in the setup menu of each speaker. 14 264887_00 _V.pdf • August 13, 2002 Before you set the surround-sound center mode of your surround receiver. For additional setup and operating information, please refer to the owner's guide that the digital audio signal from your DVD player reaches your surround receiver, connect the digital audio output from your DVD player to the digital audio input on a surround receiver Note: Use the OPTICAL or COAXIAL OR digital input connections, but...
... get the digital audio signal To be sure to select the digital ouput in the setup menu of each speaker. 14 264887_00 _V.pdf • August 13, 2002 Before you set the surround-sound center mode of your surround receiver. For additional setup and operating information, please refer to the owner's guide that the digital audio signal from your DVD player reaches your surround receiver, connect the digital audio output from your DVD player to the digital audio input on a surround receiver Note: Use the OPTICAL or COAXIAL OR digital input connections, but...
Owner's guide
Page 15
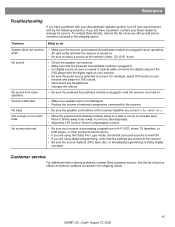
... your receiver is plugged in and the receiver is Dolby Digital encoded. Reference Troubleshooting If you have a problem, contact your Bose® dealer to arrange for DVD sound. • Disconnect any headphones. • Increase the volume. No sound • Check the speaker connections. • Make sure that the powered Acoustimass module is processing a signal from a wall or corner to decrease bass. • Adjust the LFE Level or Room Compensation control. Customer service For additional help...
... your receiver is plugged in and the receiver is Dolby Digital encoded. Reference Troubleshooting If you have a problem, contact your Bose® dealer to arrange for DVD sound. • Disconnect any headphones. • Increase the volume. No sound • Check the speaker connections. • Make sure that the powered Acoustimass module is processing a signal from a wall or corner to decrease bass. • Adjust the LFE Level or Room Compensation control. Customer service For additional help...
Owner's guide
Page 16
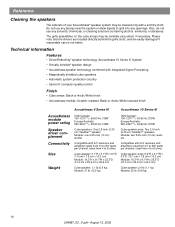
... White textured finish Acoustimass 6 Series III Acoustimass 10 Series III Acoustimass module power rating Speaker driver complement Connectivity Size Weight USA/Canada: 100-127V 50/60 Hz 135W Europe/Australia: 220-240V 50/60 Hz 135W Cube speakers: One 2.5-inch (6.35 cm) TwiddlerTM speaker Module: one 5.25-inch (13 cm) woofer Compatible with A/V receivers and amplifiers rated from 10 to150 watts per channel, rated from 4 to 8 ohms...
... White textured finish Acoustimass 6 Series III Acoustimass 10 Series III Acoustimass module power rating Speaker driver complement Connectivity Size Weight USA/Canada: 100-127V 50/60 Hz 135W Europe/Australia: 220-240V 50/60 Hz 135W Cube speakers: One 2.5-inch (6.35 cm) TwiddlerTM speaker Module: one 5.25-inch (13 cm) woofer Compatible with A/V receivers and amplifiers rated from 10 to150 watts per channel, rated from 4 to 8 ohms...
Owner's guide
Page 17
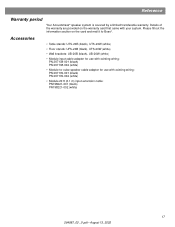
...20W (white) • Wall brackets: UB-20B (black), UB-20W (white) • Module input cable adapter for use with existing wiring: PN 267139-001 (black) PN 267139-002 (white) • Module 20 ft (6.1 m) input extension cable: PN198221-001 (black) PN198221-002 (white) 17 264887_00 _V.pdf • August 13, ... with existing wiring: PN 267138-001 (black) PN 267138-002 (white) • Module-to Bose®. Details of the warranty are provided on the card and mail it to -cube speaker cable adapter for use with your system. Reference Warranty period Your Acoustimass® speaker system is...
...20W (white) • Wall brackets: UB-20B (black), UB-20W (white) • Module input cable adapter for use with existing wiring: PN 267139-001 (black) PN 267139-002 (white) • Module 20 ft (6.1 m) input extension cable: PN198221-001 (black) PN198221-002 (white) 17 264887_00 _V.pdf • August 13, ... with existing wiring: PN 267138-001 (black) PN 267138-002 (white) • Module-to Bose®. Details of the warranty are provided on the card and mail it to -cube speaker cable adapter for use with your system. Reference Warranty period Your Acoustimass® speaker system is...

Owner's guide
Page 18
©2002 Bose Corporation, The Mountain, Framingham, MA 01701-9168 USA 264887 AM Rev.00 JN20952 264887_00 _V.pdf • August 13, 2002
©2002 Bose Corporation, The Mountain, Framingham, MA 01701-9168 USA 264887 AM Rev.00 JN20952 264887_00 _V.pdf • August 13, 2002


