
uMusic®+ guide
Page 2
English TAB 2 TAB 3 TAB 4 INTRODUCTION 2 Listening made easy 2 Specific uMusic+ remote buttons 2 GETTING STARTED 3 Storing a CD 3 Discs you can store 3 Reserving time for storing 4 Keeping music data up to date 4 Playing stored music 5 To control the ...
English TAB 2 TAB 3 TAB 4 INTRODUCTION 2 Listening made easy 2 Specific uMusic+ remote buttons 2 GETTING STARTED 3 Storing a CD 3 Discs you can store 3 Reserving time for storing 4 Keeping music data up to date 4 Playing stored music 5 To control the ...
uMusic®+ guide
Page 3
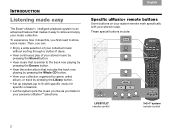
... personal uStationTM selections. These special buttons include: LIFESTYLE® remote control 3•2•1® system remote control 2 TAB 4 TAB 3 TAB 2 English Specific uMusic+ remote buttons Some buttons on your system remote work specifically with specific music for specific occasions. • Let... the system pick the music you like as you first need to store some music. TAB 8 TAB 7 TAB 6 INTRODUCTION Listening made easy TAB 5 The Bose®...
... personal uStationTM selections. These special buttons include: LIFESTYLE® remote control 3•2•1® system remote control 2 TAB 4 TAB 3 TAB 2 English Specific uMusic+ remote buttons Some buttons on your system remote work specifically with specific music for specific occasions. • Let... the system pick the music you like as you first need to store some music. TAB 8 TAB 7 TAB 6 INTRODUCTION Listening made easy TAB 5 The Bose®...
uMusic®+ guide
Page 6
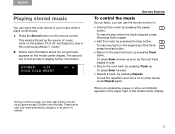
... continuous play, you press play in the continuous uMusic®+ mode*. 2. To halt the repetition and move on the remote control. English TAB 2 TAB 3 TAB 4 Playing stored music You can use the remote control to: • Interrupt the music by category or as part of music, turns on the system if it...
... continuous play, you press play in the continuous uMusic®+ mode*. 2. To halt the repetition and move on the remote control. English TAB 2 TAB 3 TAB 4 Playing stored music You can use the remote control to: • Interrupt the music by category or as part of music, turns on the system if it...
uMusic®+ guide
Page 7
... on the remote to move down and highlight tracks in the list. • To play •Continue to the next screen Elapsed Time 1:08/3:31 Data by Nora Jones Genre - The selected track plays first, followed by the tracks below it. • To return to see what 's playing While your Bose®...
... on the remote to move down and highlight tracks in the list. • To play •Continue to the next screen Elapsed Time 1:08/3:31 Data by Nora Jones Genre - The selected track plays first, followed by the tracks below it. • To return to see what 's playing While your Bose®...
uMusic®+ guide
Page 9
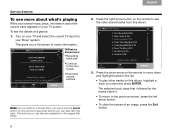
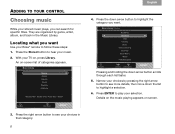
... Stored button to follow these steps: 1. TAB 8 TAB 7 TAB 6 ADDING TO YOUR CONTROL Choosing music TAB 5 While your music. 2. Press ENTER to play your Bose® remote to hear your stored music plays, you want Use your selection. Music Library Genres Artists Albums Tracks Playlists uStations Albums 180 • Tracks 1642 •...
... Stored button to follow these steps: 1. TAB 8 TAB 7 TAB 6 ADDING TO YOUR CONTROL Choosing music TAB 5 While your music. 2. Press ENTER to play your Bose® remote to hear your stored music plays, you want Use your selection. Music Library Genres Artists Albums Tracks Playlists uStations Albums 180 • Tracks 1642 •...

uMusic®+ guide
Page 14
... a playlist, press the Playlist button, then press the Preset button to see the list of its number and name (up to 8 characters) appear on the remote to the playlist, you want . Or wait for the one you can : • Replay the list by pressing Whole CD. • Resume continuous uMusic play... the random play. • Replay tracks in the list randomly by pressing the uMusic button. The edit screen keyboard appears. 13 Note: When using the remote control 1.
... a playlist, press the Playlist button, then press the Preset button to see the list of its number and name (up to 8 characters) appear on the remote to the playlist, you want . Or wait for the one you can : • Replay the list by pressing Whole CD. • Resume continuous uMusic play... the random play. • Replay tracks in the list randomly by pressing the uMusic button. The edit screen keyboard appears. 13 Note: When using the remote control 1.

uMusic®+ guide
Page 16
... button to Save and press ENTER. • To exit the edit screen without saving, move into a different keyboard view. Press the Library button on the remote: • Right, left and deletes a character for a Playlist or uStation name is 16 characters. • To add characters to capital letters, highlight the ...Shift bar and press ENTER. Highlight Edit Name and press the right arrow button. Use these buttons on the remote to see the actions you want to Cancel and press ENTER. 15 The blank moves left , up, and down arrows to move around the...
... button to Save and press ENTER. • To exit the edit screen without saving, move into a different keyboard view. Press the Library button on the remote: • Right, left and deletes a character for a Playlist or uStation name is 16 characters. • To add characters to capital letters, highlight the ...Shift bar and press ENTER. Highlight Edit Name and press the right arrow button. Use these buttons on the remote to see the actions you want to Cancel and press ENTER. 15 The blank moves left , up, and down arrows to move around the...

uMusic®+ guide
Page 20
... the Stored button, you hear a continuous and unedited variety of tracks. Then press the preset number for your different purposes. You can use the remote to make a uStation active. You may vary at all like a playlist, a uStation does not store a list of your taste. When a uStation...selected, every action you want to your stored music. The uStation uses this style of your music. See "Naming a uStationTM" on the remote to change uStations*. Simply press the preset number for members of play music that you take - Getting the system to your family or for ...
... the Stored button, you hear a continuous and unedited variety of tracks. Then press the preset number for your different purposes. You can use the remote to make a uStation active. You may vary at all like a playlist, a uStation does not store a list of your taste. When a uStation...selected, every action you want to your stored music. The uStation uses this style of your music. See "Naming a uStationTM" on the remote to change uStations*. Simply press the preset number for members of play music that you take - Getting the system to your family or for ...

uMusic®+ guide
Page 21
... you find especially pleasing. To refresh uStation 1, refer to play . 2. Press the Stored button on the remote for the first time, the system automatically selects Preset 1. Press a preset number (1*- 9) on the remote to play when the current uStation is selected. • If you play . are more likely to begin ...of these ways: • Listen to a track all the way through. • Skip tracks you do not want to use rating buttons on the remote control to strongly identify what you do or do not want to hear. • Repeat a track that you may want to the music. TAB ...
... you find especially pleasing. To refresh uStation 1, refer to play . 2. Press the Stored button on the remote for the first time, the system automatically selects Preset 1. Press a preset number (1*- 9) on the remote to play when the current uStation is selected. • If you play . are more likely to begin ...of these ways: • Listen to a track all the way through. • Skip tracks you do not want to use rating buttons on the remote control to strongly identify what you do or do not want to hear. • Repeat a track that you may want to the music. TAB ...

uMusic®+ guide
Page 24
.... Press the ENTER button to any album. Your options include: • Changing the uStationTM influences by the system database. A request for confirmation appears on the remote to see the list of actions you want from it just right, you have made to confirm your choice of playlists or uStation presets. TAB...
.... Press the ENTER button to any album. Your options include: • Changing the uStationTM influences by the system database. A request for confirmation appears on the remote to see the list of actions you want from it just right, you have made to confirm your choice of playlists or uStation presets. TAB...

Owner's guide
Page 3
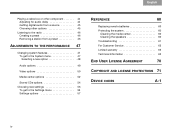
...and AM radio antennas 25 8 Connecting the module to power outlet 28 9 Setting the remote to control your TV and components 30 Inserting the remote batteries 30 Setting the remote for your TV 31 Controlling another component 32 CONTENTS FIRST TIME USE 33 Trying out ...the DVD 33 CONTROLS AND INDICATORS 34 The remote control 34 Power and source buttons 35 Menu and movement buttons 36 Play and numeric buttons 37 Record ...42 Choosing a password 42 Setting a restriction level 43 Ratings supplied by the MPAA 43 iii
...and AM radio antennas 25 8 Connecting the module to power outlet 28 9 Setting the remote to control your TV and components 30 Inserting the remote batteries 30 Setting the remote for your TV 31 Controlling another component 32 CONTENTS FIRST TIME USE 33 Trying out ...the DVD 33 CONTROLS AND INDICATORS 34 The remote control 34 Power and source buttons 35 Menu and movement buttons 36 Play and numeric buttons 37 Record ...42 Choosing a password 42 Setting a restriction level 43 Ratings supplied by the MPAA 43 iii
Owner's guide
Page 4
... Media center options 52 Stored CDs options 54 Choosing new settings 56 To get to the Settings menu 56 Settings options 57 REFERENCE 60 Replacing remote batteries 60 Protecting the system 60 Cleaning the media center 60 Cleaning the speakers 60 Troubleshooting 61 For Customer Service 65 Limited warranty 65 Technical...
... Media center options 52 Stored CDs options 54 Choosing new settings 56 To get to the Settings menu 56 Settings options 57 REFERENCE 60 Replacing remote batteries 60 Protecting the system 60 Cleaning the media center 60 Cleaning the speakers 60 Troubleshooting 61 For Customer Service 65 Limited warranty 65 Technical...
Owner's guide
Page 6
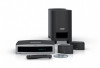
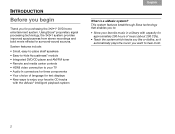
...-to-place shelf speakers • Easy-to-hide Acoustimass® module • Integrated DVD/CD player and AM/FM tuner • Remote and media center controls • HDMI video connection to your TV • Audio In connectors for three components • Your choice of.... 2 Svenska Nederlands FraItnaçliainso DEsepuatsñcohl English INTRODUCTION Before you begin Thank you for surround-sound sources. Using Bose® proprietary signal processing technology, the 3•2•1 system provides improved spaciousness from stereo recordings and bold movie effects for purchasing...
...-to-place shelf speakers • Easy-to-hide Acoustimass® module • Integrated DVD/CD player and AM/FM tuner • Remote and media center controls • HDMI video connection to your TV • Audio In connectors for three components • Your choice of.... 2 Svenska Nederlands FraItnaçliainso DEsepuatsñcohl English INTRODUCTION Before you begin Thank you for surround-sound sources. Using Bose® proprietary signal processing technology, the 3•2•1 system provides improved spaciousness from stereo recordings and bold movie effects for purchasing...

Owner's guide
Page 28
White plug Red plug Be sure to match red to red and white to minimum volume. Use your 3•2•1® system speakers. 24 This prevents the echo effect of this cable into the AUDIO IN TV connectors on the media center. 3. Svenska Nederlands FItralniaçnaois DEsepuatsñcohl English SETUP 2. Insert the red and white plugs at the other end of audio playing through both the TV speakers and your TV remote control to turn the TV speakers down to white.
White plug Red plug Be sure to match red to red and white to minimum volume. Use your 3•2•1® system speakers. 24 This prevents the echo effect of this cable into the AUDIO IN TV connectors on the media center. 3. Svenska Nederlands FItralniaçnaois DEsepuatsñcohl English SETUP 2. Insert the red and white plugs at the other end of audio playing through both the TV speakers and your TV remote control to turn the TV speakers down to white.
Owner's guide
Page 34
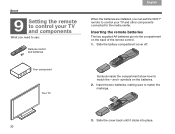
and + symbols on the back of the remote control. 1. Your component Your TV Symbols inside the compartment show how to match the markings. -+ 3. Slide the cover back until it clicks into the compartment ... compartment cover off. Insert the two batteries, making sure to match the - Svenska Nederlands FItralniaçnaois DEsepuatsñcohl English SETUP 9 Setting the remote to control your TV and components What you need to use: Remote control and batteries When the batteries are installed, you can set the 3•2•1®...
and + symbols on the back of the remote control. 1. Your component Your TV Symbols inside the compartment show how to match the markings. -+ 3. Slide the cover back until it clicks into the compartment ... compartment cover off. Insert the two batteries, making sure to match the - Svenska Nederlands FItralniaçnaois DEsepuatsñcohl English SETUP 9 Setting the remote to control your TV and components What you need to use: Remote control and batteries When the batteries are installed, you can set the 3•2•1®...

Owner's guide
Page 35
...briefly as you can work , repeat steps 5-8 using the number buttons or by pressing Channel up or down several seconds. Point the 3•2•1 remote at the top of DVD or VCR device codes can try a different code for your 3•2•1 system. 5. English DEsepuatsñcohl FItralniaç...off completely after all digits are entered. Write the code numbers below: If this code is invalid. In some cases, the same brand of the remote turns on again and change channels, you press each key. 7. Turn on page A-21. Note: For a CD changer or combination CD/DVD player...
...briefly as you can work , repeat steps 5-8 using the number buttons or by pressing Channel up or down several seconds. Point the 3•2•1 remote at the top of DVD or VCR device codes can try a different code for your 3•2•1 system. 5. English DEsepuatsñcohl FItralniaç...off completely after all digits are entered. Write the code numbers below: If this code is invalid. In some cases, the same brand of the remote turns on again and change channels, you press each key. 7. Turn on page A-21. Note: For a CD changer or combination CD/DVD player...

Owner's guide
Page 36
...forward by pressing channel up or down. In the Device Codes list, find the codes for several or seconds. On the 3•2•1® remote, press and hold the button for this source. Write the code numbers below: If this code is invalid. If it performs both operations, ...steps 2-5 using a different code for your component. 5. The light turns off completely after all digits are entered. If the light blinks instead of the remote turns on again and to turn the component on . 3. Enter the device code for your CBL•SAT, VCR, or other component turned on, ...
...forward by pressing channel up or down. In the Device Codes list, find the codes for several or seconds. On the 3•2•1® remote, press and hold the button for this source. Write the code numbers below: If this code is invalid. If it performs both operations, ...steps 2-5 using a different code for your component. 5. The light turns off completely after all digits are entered. If the light blinks instead of the remote turns on again and to turn the component on . 3. Enter the device code for your CBL•SAT, VCR, or other component turned on, ...
Owner's guide
Page 37
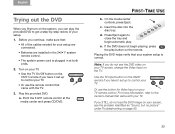
...Eject. c. d. For more information, refer to control your setup. 1. Turn on your TV. • Use the TV On/Off button on the 3•2•1 remote if you continue, make sure that your setup are connected. • Batteries are installed in at the media center and press CD/DVD. Insert the...tray. Press Eject again to control your TV. • Or use the button for your system setup is plugged in the 3•2•1® system remote control. • The system power cord is correct. Playing the DVD helps verify that : • All of your TV. Before you have it ...
...Eject. c. d. For more information, refer to control your setup. 1. Turn on your TV. • Use the TV On/Off button on the 3•2•1 remote if you continue, make sure that your setup are connected. • Batteries are installed in at the media center and press CD/DVD. Insert the...tray. Press Eject again to control your TV. • Or use the button for your system setup is plugged in the 3•2•1® system remote control. • The system power cord is correct. Playing the DVD helps verify that : • All of your TV. Before you have it ...
Owner's guide
Page 38
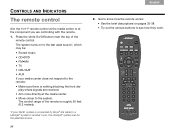
... source*, which may be the selected source. 2. Svenska Nederlands FItralniaçnaois DEsepuatsñcohl English CONTROLS AND INDICATORS The remote control Aim the 3•2•1® remote control at the media center or at the media center. • Move closer to the system. The control range of ...at the component you are controlling with the remote. 1. Press the white On/Off button near the top of the remote is roughly 20 feet (6.2 meters). *If your media center does not respond to the remote: • Make sure there is connected by Bose® link cable to see how they ...
... source*, which may be the selected source. 2. Svenska Nederlands FItralniaçnaois DEsepuatsñcohl English CONTROLS AND INDICATORS The remote control Aim the 3•2•1® remote control at the media center or at the media center. • Move closer to the system. The control range of ...at the component you are controlling with the remote. 1. Press the white On/Off button near the top of the remote is roughly 20 feet (6.2 meters). *If your media center does not respond to the remote: • Make sure there is connected by Bose® link cable to see how they ...
Owner's guide
Page 39
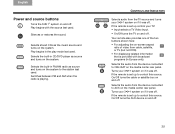
...•SAT on the system. Turns your TV: • Input selects a TV Video Input. • On/Off turns the TV on and off. If the remote is set up control your 3•2•1 system on the media center rear panel. Selects stored CDs as source and turns on the system to... radio as the music source and turns on -screen aspect ratio of the two buttons shown here: • For adjusting the on the system. Your remote also provides one of video from the TV source and turns your 3•2•1 system on and off. 35 Switches between FM and AM when...
...•SAT on the system. Turns your TV: • Input selects a TV Video Input. • On/Off turns the TV on and off. If the remote is set up control your 3•2•1 system on the media center rear panel. Selects stored CDs as source and turns on the system to... radio as the music source and turns on -screen aspect ratio of the two buttons shown here: • For adjusting the on the system. Your remote also provides one of video from the TV source and turns your 3•2•1 system on and off. 35 Switches between FM and AM when...

