Owners Manual
Page 2
... L'ARRIÈRE). The CAUTION marks shown here are located on the bottom of your 3•2•1 Series II home entertainment system media center and the rear panel of the Acoustimass module: The lightning flash with arrowhead symbol, within an equilateral triangle,... meets all of important operating and maintenance instructions in hazardous radiation exposure. REFER SERVICING TO QUALIFIED PERSONNEL. The exclamation point within the media center is located on the apparatus. The CLASS 1 LASER PRODUCT label is classified as a CLASS 1 LASER PRODUCT according to EN60825-1:1994...
... L'ARRIÈRE). The CAUTION marks shown here are located on the bottom of your 3•2•1 Series II home entertainment system media center and the rear panel of the Acoustimass module: The lightning flash with arrowhead symbol, within an equilateral triangle,... meets all of important operating and maintenance instructions in hazardous radiation exposure. REFER SERVICING TO QUALIFIED PERSONNEL. The exclamation point within the media center is located on the apparatus. The CLASS 1 LASER PRODUCT label is classified as a CLASS 1 LASER PRODUCT according to EN60825-1:1994...
Owners Manual
Page 3
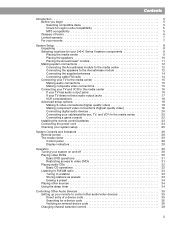
... Glossary of terms 6 Limited warranty 7 For your records 7 System Setup 8 Unpacking 8 Selecting locations for your 3•2•1 Series II system components 9 Placing the media center 9 Placing the speakers 10 Placing the Acoustimass® module 11 Making system connections 12 Connecting the Acoustimass module to the...(highest quality video 19 Connecting digital audio devices 20 Connecting your cable/satellite box, TV, and VCR to the media center 20 Connecting a game console 22 Installing the remote control batteries 23 Connecting the power cord 24 Checking your system setup...
... Glossary of terms 6 Limited warranty 7 For your records 7 System Setup 8 Unpacking 8 Selecting locations for your 3•2•1 Series II system components 9 Placing the media center 9 Placing the speakers 10 Placing the Acoustimass® module 11 Making system connections 12 Connecting the Acoustimass module to the...(highest quality video 19 Connecting digital audio devices 20 Connecting your cable/satellite box, TV, and VCR to the media center 20 Connecting a game console 22 Installing the remote control batteries 23 Connecting the power cord 24 Checking your system setup...
Owners Manual
Page 5
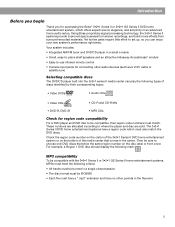
... the following mark: MP3 compatibility To be compatible with the 3•2•1 Series II or 3•2•1 GS Series II home entertainment systems, MP3s must meet the following types of the media center that show the same region number on the disc label or front cover. Check...series II media center can enjoy your new system's performance right away. These numbers are sold. Yet its few parts require little effort to where the player and disc are allocated according to set up, so you for purchasing the Bose® 3•2•1 Series II or 3•2•1 GS Series II...
... the following mark: MP3 compatibility To be compatible with the 3•2•1 Series II or 3•2•1 GS Series II home entertainment systems, MP3s must meet the following types of the media center that show the same region number on the disc label or front cover. Check...series II media center can enjoy your new system's performance right away. These numbers are sold. Yet its few parts require little effort to where the player and disc are allocated according to set up, so you for purchasing the Bose® 3•2•1 Series II or 3•2•1 GS Series II...

Owners Manual
Page 7
...card that is a serial data stream that came with this owner's guide. 7 Model: 3•2•1 Series II 3•2•1 GS Series II Check one Media center serial number Acoustimass module serial number Dealer name Dealer phone Purchase date We suggest you keep your sales receipt and... warranty The 3•2•1 Series II and 3•2•1 GS Series II home entertainment systems are located on the card and mail it does not require a comb filter to do so will not affect your serial number ready before contacting Bose® Customer Service. Individual ...
...card that is a serial data stream that came with this owner's guide. 7 Model: 3•2•1 Series II 3•2•1 GS Series II Check one Media center serial number Acoustimass module serial number Dealer name Dealer phone Purchase date We suggest you keep your sales receipt and... warranty The 3•2•1 Series II and 3•2•1 GS Series II home entertainment systems are located on the card and mail it does not require a comb filter to do so will not affect your serial number ready before contacting Bose® Customer Service. Individual ...
Owners Manual
Page 8
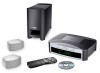
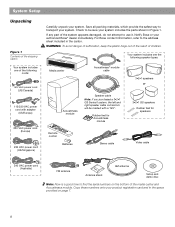
... 7. 8 Your system includes one of the following speaker types: Media center Acoustimass® module cable 3•2•1 speakers or Acoustimass module Speaker cable Note: If you purchased a 3•2•1 GS Series II system, the left and right speaker cable connectors will be sure your system. Notify Bose or your product registration card and in the carton...
... 7. 8 Your system includes one of the following speaker types: Media center Acoustimass® module cable 3•2•1 speakers or Acoustimass module Speaker cable Note: If you purchased a 3•2•1 GS Series II system, the left and right speaker cable connectors will be sure your system. Notify Bose or your product registration card and in the carton...
Owners Manual
Page 9
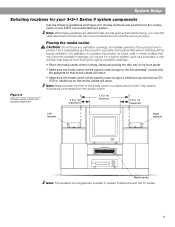
...to protect it from overheating, put it may receive IR (infrared) commands from flowing through its ventilation openings. • Place the media center where nothing obstructs opening the disc tray on a bed, sofa, or similar surface that are more convenient and provide the sound you...so that all the cables will not interfere with the TV screen. 9 Placing the media center CAUTION: Do not block any ventilation openings. System Setup Selecting locations for your 3•2•1 Series II system components Use the following guidelines and Figure 2 to choose locations and positions for ...
...to protect it from overheating, put it may receive IR (infrared) commands from flowing through its ventilation openings. • Place the media center where nothing obstructs opening the disc tray on a bed, sofa, or similar surface that are more convenient and provide the sound you...so that all the cables will not interfere with the TV screen. 9 Placing the media center CAUTION: Do not block any ventilation openings. System Setup Selecting locations for your 3•2•1 Series II system components Use the following guidelines and Figure 2 to choose locations and positions for ...

Owners Manual
Page 18
...(such as a cable box and VCR) to the media center. You will need a Y-adapter cable (available at electronics stores) to connect audio to the media center. For this connection you will need an S-video cable which can be purchased from your Bose dealer or a local electronics retailer. • Insert one...TV Stereo cable (red and white connectors) 18 System Setup VCR considerations • Some combination TV/VCR units may not work with 3•2•1 Series II home entertainment systems. Please refer to select "Mono decoding" (see "TV, CBL-SAT, and AUX settings menu" on page 43) so your...
...(such as a cable box and VCR) to the media center. You will need a Y-adapter cable (available at electronics stores) to connect audio to the media center. For this connection you will need an S-video cable which can be purchased from your Bose dealer or a local electronics retailer. • Insert one...TV Stereo cable (red and white connectors) 18 System Setup VCR considerations • Some combination TV/VCR units may not work with 3•2•1 Series II home entertainment systems. Please refer to select "Mono decoding" (see "TV, CBL-SAT, and AUX settings menu" on page 43) so your...

Owners Manual
Page 20
... DTS bitstream from the internal DVD player can purchase the required cables at a local electronics store. Therefore, the media center output video is sent to the TV also through an S-video connection. • Analog and digital coax audio... connections are not able to the audio source in the system settings menu. System Setup Figure 16 Media center digital audio input jacks Connecting digital audio devices Some audio devices may use an optical digital connection. In this setup...audio inputs Connecting your VCR and TV, refer to the 3•2•1 Series II system.
... DTS bitstream from the internal DVD player can purchase the required cables at a local electronics store. Therefore, the media center output video is sent to the TV also through an S-video connection. • Analog and digital coax audio... connections are not able to the audio source in the system settings menu. System Setup Figure 16 Media center digital audio input jacks Connecting digital audio devices Some audio devices may use an optical digital connection. In this setup...audio inputs Connecting your VCR and TV, refer to the 3•2•1 Series II system.
Owners Manual
Page 21
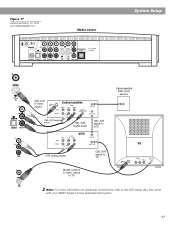
Figure 17 Advanced setup: TV, VCR and cable/satellite box Media center System Setup CBL-SAT S-video output Cable/satellite Cable/satellite (CBL-SAT) service CBL-SAT analog audio CBL-SAT digital audio VCR CBL-SAT signal to VCR TV VCR analog audio CBL-SAT signal to TV Media center's S-video output to TV Note: For more information on advanced connections, refer to the DVD setup disc that came with your 3•2•1 Series II home entertainment system. 21
Figure 17 Advanced setup: TV, VCR and cable/satellite box Media center System Setup CBL-SAT S-video output Cable/satellite Cable/satellite (CBL-SAT) service CBL-SAT analog audio CBL-SAT digital audio VCR CBL-SAT signal to VCR TV VCR analog audio CBL-SAT signal to TV Media center's S-video output to TV Note: For more information on advanced connections, refer to the DVD setup disc that came with your 3•2•1 Series II home entertainment system. 21
Owners Manual
Page 34
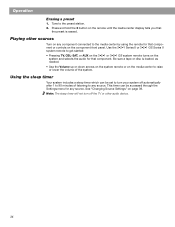
... through the Settings menu for that component. Use the 3•2•1 Series II or 3•2•1 GS Series II system remote to get started: • Pressing TV, CBL-SAT, or AUX on the 3•2•1 or 3•2•1 GS system remote turns on the media center to any source. Note: The sleep timer will not turn your system...
... through the Settings menu for that component. Use the 3•2•1 Series II or 3•2•1 GS Series II system remote to get started: • Pressing TV, CBL-SAT, or AUX on the 3•2•1 or 3•2•1 GS system remote turns on the media center to any source. Note: The sleep timer will not turn your system...

Owners Manual
Page 48
...;1 Series II system when L, M, N, or O it is connected. 48 Darkens or lightens the media center display. US [default] European Channel spacing for selected source. Digital signal received via optical cable. Figure 30 Media Center system options Audio Video Media Remote Center Control DVD Lock Select Media Center to adjust these system options: Display Brightness Display Language Optical Source Tuner Spacing Bose...
...;1 Series II system when L, M, N, or O it is connected. 48 Darkens or lightens the media center display. US [default] European Channel spacing for selected source. Digital signal received via optical cable. Figure 30 Media Center system options Audio Video Media Remote Center Control DVD Lock Select Media Center to adjust these system options: Display Brightness Display Language Optical Source Tuner Spacing Bose...


