Owner's guide
Page 3
... radio antennas 25 8 Connecting the module to a power outlet 28 9 Setting the remote to control your TV and components 30 Inserting the remote batteries 30 Setting the remote for your TV 31 Controlling another component 32 FIRST-TIME USE 33 Trying out the... DVD 33 CONTROLS AND INDICATORS 34 The remote control 34 Power and source buttons 35 Menu and movement buttons 36 Play and numeric buttons 37 Record and ... 42 Choosing a password 42 Setting a restriction level 43 Ratings supplied by the MPAA 43 iii
... radio antennas 25 8 Connecting the module to a power outlet 28 9 Setting the remote to control your TV and components 30 Inserting the remote batteries 30 Setting the remote for your TV 31 Controlling another component 32 FIRST-TIME USE 33 Trying out the... DVD 33 CONTROLS AND INDICATORS 34 The remote control 34 Power and source buttons 35 Menu and movement buttons 36 Play and numeric buttons 37 Record and ... 42 Choosing a password 42 Setting a restriction level 43 Ratings supplied by the MPAA 43 iii
Owner's guide
Page 4
... 49 Video options 50 Media center options 52 Choosing new settings 53 To get to the Settings menu 53 Settings options 54 REFERENCE 59 Replacing remote batteries 59 Protecting the system 59 Cleaning the media center 59 Cleaning the speakers 59 Troubleshooting 60 For customer service 63 Limited warranty 63 Technical...
... 49 Video options 50 Media center options 52 Choosing new settings 53 To get to the Settings menu 53 Settings options 54 REFERENCE 59 Replacing remote batteries 59 Protecting the system 59 Cleaning the media center 59 Cleaning the speakers 59 Troubleshooting 60 For customer service 63 Limited warranty 63 Technical...
Owner's guide
Page 6
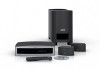
...easy-to-place shelf speakers • Easy-to-hide Acoustimass® module • Integrated DVD/CD player and AM/FM tuner • Remote and media center controls • HDMI video connection to your TV • Audio In connectors for three components • Your choice of ...language for purchasing the 3•2•1® DVD home entertainment system. Using Bose® proprietary signal processing technology, the 3•2•1 system provides improved spaciousness from stereo recordings and bold movie effects for surround-sound ...
...easy-to-place shelf speakers • Easy-to-hide Acoustimass® module • Integrated DVD/CD player and AM/FM tuner • Remote and media center controls • HDMI video connection to your TV • Audio In connectors for three components • Your choice of ...language for purchasing the 3•2•1® DVD home entertainment system. Using Bose® proprietary signal processing technology, the 3•2•1 system provides improved spaciousness from stereo recordings and bold movie effects for surround-sound ...
Owner's guide
Page 28
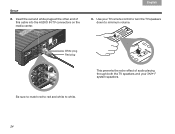
Insert the red and white plugs at the other end of audio playing through both the TV speakers and your TV remote control to turn the TV speakers down to white. Svenska Nederlands FItralniaçnaois DEsepuatsñcohl English SETUP 2. This prevents the echo effect of this cable into the AUDIO IN TV connectors on the media center. 3. White plug Red plug Be sure to match red to red and white to minimum volume. Use your 3•2•1® system speakers. 24
Insert the red and white plugs at the other end of audio playing through both the TV speakers and your TV remote control to turn the TV speakers down to white. Svenska Nederlands FItralniaçnaois DEsepuatsñcohl English SETUP 2. This prevents the echo effect of this cable into the AUDIO IN TV connectors on the media center. 3. White plug Red plug Be sure to match red to red and white to minimum volume. Use your 3•2•1® system speakers. 24

Owner's guide
Page 34
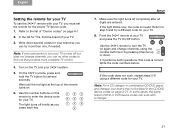
...to match the - and + symbols on the back of the remote control. 1. Svenska Nederlands FItralniaçnaois DEsepuatsñcohl English SETUP 9 Setting the remote to control your TV and components What you need to use: Remote control and batteries When the batteries are installed, you can set the... 3•2•1® remote to control your TV and other components connected to the ...
...to match the - and + symbols on the back of the remote control. 1. Svenska Nederlands FItralniaçnaois DEsepuatsñcohl English SETUP 9 Setting the remote to control your TV and components What you need to use: Remote control and batteries When the batteries are installed, you can set the... 3•2•1® remote to control your TV and other components connected to the ...
Owner's guide
Page 35
... red light at your TV and press the TV On/Off button. Use the number buttons on . 6. Return to the list of the remote turns on this remote to turn your TV, you can try other codes to find the brand of DVD or VCR device codes can work , repeat steps 5-8 using... down several seconds. If it performs both operations, this code does not work with your TV on again and change channels, you must set the remote for several codes for your TV. In some cases, the same brand of your brand so you press each key. 7. Refer to step 5 and try...
... red light at your TV and press the TV On/Off button. Use the number buttons on . 6. Return to the list of the remote turns on this remote to turn your TV, you can try other codes to find the brand of DVD or VCR device codes can work , repeat steps 5-8 using... down several seconds. If it performs both operations, this code does not work with your TV on again and change channels, you must set the remote for several codes for your TV. In some cases, the same brand of your brand so you press each key. 7. Refer to step 5 and try...

Owner's guide
Page 36
...source. In the Device Codes list, find the codes for your component. 32 Point the 3•2•1 remote at the top of the remote turns on , follow these steps. 1. Use the 3•2•1 remote to turn the component on again and to step 2 and try a different code for this code does... If the light blinks instead of your component. 2. If it performs both operations, this component for your component. On the 3•2•1® remote, press and hold the button for this code is invalid. Make sure the light turns off , the code is correct. Return to skip forward by...
...source. In the Device Codes list, find the codes for your component. 32 Point the 3•2•1 remote at the top of the remote turns on , follow these steps. 1. Use the 3•2•1 remote to turn the component on again and to step 2 and try a different code for this code does... If the light blinks instead of your component. 2. If it performs both operations, this component for your component. On the 3•2•1® remote, press and hold the button for this code is invalid. Make sure the light turns off , the code is correct. Return to skip forward by...
Owner's guide
Page 37
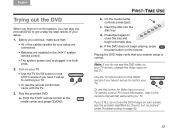
... refer to control your TV. e. If the DVD does not begin automatic play button on the remote. Turn on your TV. • Use the TV On/Off button on the 3•2•1 remote if you do not see the DVD image on your screen, see the DVD video on your .... a. On the media center controls, press Eject. Or use the remote control that came with your system setup is plugged in the 3•2•1® system remote control. • The system power cord is correct. Point the 3•2•1 remote control at both ends. 2. Insert the disc into the disc tray....
... refer to control your TV. e. If the DVD does not begin automatic play button on the remote. Turn on your TV. • Use the TV On/Off button on the 3•2•1 remote if you do not see the DVD image on your screen, see the DVD video on your .... a. On the media center controls, press Eject. Or use the remote control that came with your system setup is plugged in the 3•2•1® system remote control. • The system power cord is correct. Point the 3•2•1 remote control at both ends. 2. Insert the disc into the disc tray....
Owner's guide
Page 38
The control range of the remote control. The system turns on pages 35-38. • Try out the various buttons to see how they work. *If your 3•2•1 system is connected by Bose® link cable to a Lifestyle® system in another room, your media center does ...display where signals are received. • Aim more directly at the component you are controlling with the remote. 1. Get to know how the remote works: • See the brief descriptions on to the remote: • Make sure there is roughly 20 feet (6.2 meters). 2. Svenska Nederlands FItralniaçnaois ...
The control range of the remote control. The system turns on pages 35-38. • Try out the various buttons to see how they work. *If your 3•2•1 system is connected by Bose® link cable to a Lifestyle® system in another room, your media center does ...display where signals are received. • Aim more directly at the component you are controlling with the remote. 1. Get to know how the remote works: • See the brief descriptions on to the remote: • Make sure there is roughly 20 feet (6.2 meters). 2. Svenska Nederlands FItralniaçnaois ...
Owner's guide
Page 39
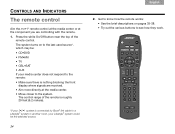
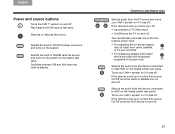
...the media center rear panel. Turns your 3•2•1 system on if it was off . If the remote is set up control your 3•2•1 system on and off . Silences or restores the sound. ... a TV Video Input. • On/Off turns the TV on if it was off . If the remote is set up to AUX on if it was off . Selects the built-in Europe only). Selects audio ...from the device connected to the station last used . Your remote also provides one of the two buttons shown here: • For adjusting the on-screen aspect ratio ...
...the media center rear panel. Turns your 3•2•1 system on if it was off . If the remote is set up control your 3•2•1 system on and off . Silences or restores the sound. ... a TV Video Input. • On/Off turns the TV on if it was off . If the remote is set up to AUX on if it was off . Selects the built-in Europe only). Selects audio ...from the device connected to the station last used . Your remote also provides one of the two buttons shown here: • For adjusting the on-screen aspect ratio ...

Owner's guide
Page 42
...Selects the screen content labeled red. Yellow - Starts DVR or VCR recording of the cable, satellite, or TV program that the 3•2•1® remote is playing. Green - Makes a selection from a cable on-screen List C. Selects the screen content labeled green. Selects the screen content labeled blue...buttons (not in Europe only) These buttons can be used with Teletext, a cable box, or a satellite box (if the 3•2•1 remote is set to control the box). Colored buttons (in Europe) These buttons can be used with a DVR, VCR, a cable box, or satellite box....
...Selects the screen content labeled red. Yellow - Starts DVR or VCR recording of the cable, satellite, or TV program that the 3•2•1® remote is playing. Green - Makes a selection from a cable on-screen List C. Selects the screen content labeled green. Selects the screen content labeled blue...buttons (not in Europe only) These buttons can be used with Teletext, a cable box, or a satellite box (if the 3•2•1 remote is set to control the box). Colored buttons (in Europe) These buttons can be used with a DVR, VCR, a cable box, or satellite box....
Owner's guide
Page 43
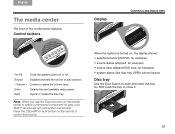
English DEsepuatsñcohl FItralniaçnaois Nederlands Svenska The media center The front of play , your 3•2•1® remote will not control that source. Volume + Lowers or raises the volume level. Eject Opens or closes the disc tray. Press the CBL•SAT or ... tray OPEN, shown below) Disc tray Use the Eject button to open and close it. 39 Note: When you use the Source button on the remote to close this tray. When the system is turned on or off. Source Displays and sets the choice of the media center features: Control buttons...
English DEsepuatsñcohl FItralniaçnaois Nederlands Svenska The media center The front of play , your 3•2•1® remote will not control that source. Volume + Lowers or raises the volume level. Eject Opens or closes the disc tray. Press the CBL•SAT or ... tray OPEN, shown below) Disc tray Use the Eject button to open and close it. 39 Note: When you use the Source button on the remote to close this tray. When the system is turned on or off. Source Displays and sets the choice of the media center features: Control buttons...
Owner's guide
Page 44
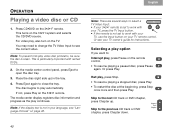
... you want to the next CD track or DVD chapter, press Chapter up ) in your language, see your TV, use the Input button on the remote control. • To resume playing a paused disc, press Pause again. Note: There are several ways to select a TV Video Input: • If your 3•... the disc is not set to work with your TV owner's guide for instructions. Skip to : Interrupt play , also turn on the 3•2•1® remote. The media center display registers disc information and progress as the play , press Stop. • To resume playing a stopped disc, press Play. • To ...
... you want to the next CD track or DVD chapter, press Chapter up ) in your language, see your TV, use the Input button on the remote control. • To resume playing a paused disc, press Pause again. Note: There are several ways to select a TV Video Input: • If your 3•... the disc is not set to work with your TV owner's guide for instructions. Skip to : Interrupt play , also turn on the 3•2•1® remote. The media center display registers disc information and progress as the play , press Stop. • To resume playing a stopped disc, press Play. • To ...
Owner's guide
Page 46
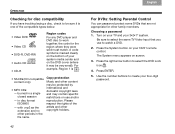
... a single closed session - Please respect the rights of the artists and other periods in the file name. Turn on use to create your 3•2•1 remote control. Svenska Nederlands FItralniaçnaois DEsepuatsñcohl English OPERATION Checking for disc compatibility If you use and/or reproduction. Press ENTER. 5. burned in...
... a single closed session - Please respect the rights of the artists and other periods in the file name. Turn on use to create your 3•2•1 remote control. Svenska Nederlands FItralniaçnaois DEsepuatsñcohl English OPERATION Checking for disc compatibility If you use and/or reproduction. Press ENTER. 5. burned in...

Owner's guide
Page 48
... source AUX (CBL•SAT or AUX) you may be difficult to this corrects the problem. If the 3•2•1 remote is a video component. The Settings menu appears on the 3•2•1 remote control. and press 3. Press the button for audio delay While playing a DVD, you want to the audio delay icon...
... source AUX (CBL•SAT or AUX) you may be difficult to this corrects the problem. If the 3•2•1 remote is a video component. The Settings menu appears on the 3•2•1 remote control. and press 3. Press the button for audio delay While playing a DVD, you want to the audio delay icon...

Owner's guide
Page 50
... to be sure this is the preset you want to assign to erase. 3. PRESET:xx* ERASED appears briefly on the display. On the 3•2•1 remote, press FM•AM. Then, by pressing the preset number, you select. 46 PRESET:xx* SET appears briefly on the display. *x represents the number you...
... to be sure this is the preset you want to assign to erase. 3. PRESET:xx* ERASED appears briefly on the display. On the 3•2•1 remote, press FM•AM. Then, by pressing the preset number, you select. 46 PRESET:xx* SET appears briefly on the display. *x represents the number you...
Owner's guide
Page 51
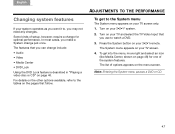
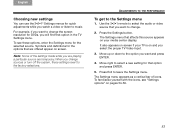
... System menu The System menu appears on your TV screen only. 1. Some kinds of the system features. Press the System button on your 3•2•1 remote. Turn on your 3•2•1® system. 2. English DeEustpsacñhol ItFarliaannçoais Nederlands Svenska ADJUSTMENTS TO THE PERFORMANCE Changing system features If your...
... System menu The System menu appears on your TV screen only. 1. Some kinds of the system features. Press the System button on your 3•2•1 remote. Turn on your 3•2•1® system. 2. English DeEustpsacñhol ItFarliaannçoais Nederlands Svenska ADJUSTMENTS TO THE PERFORMANCE Changing system features If your...
Owner's guide
Page 55
... the black on screen only if the TV connects to the media center using a Component cable. The HDMI cable automatically senses your screen, press the remote up arrow to reselect Off. It is not an adjustable setting. Note: With an HDMI connection, you will not see the On option. English DEsepuats...
... the black on screen only if the TV connects to the media center using a Component cable. The HDMI cable automatically senses your screen, press the remote up arrow to reselect Off. It is not an adjustable setting. Note: With an HDMI connection, you will not see the On option. English DEsepuats...
Owner's guide
Page 57
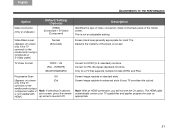
... new settings You can use the 3•2•1® Settings menus for DVDs, you will find that option and press ENTER. 5. Use the 3•2•1 remote to select a new setting for the options that you are playing a particular source are offered appear on and you select the proper TV Video Input...
... new settings You can use the 3•2•1® Settings menus for DVDs, you will find that option and press ENTER. 5. Use the 3•2•1 remote to select a new setting for the options that you are playing a particular source are offered appear on and you select the proper TV Video Input...
Owner's guide
Page 63
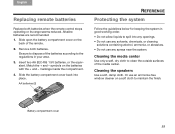
...keeping the system in your area. 3. Battery compartment cover 59 English DeEustpsacñhol ItFarliaannçoais Nederlands Svenska REFERENCE Replacing remote batteries Protecting the system Replace both batteries. Cleaning the media center Use only a soft, dry cloth to clean the outside ... 1.5V batteries, or the equivalent. markings inside the compartment. 4. Remove both batteries when the remote control stops operating or its range seems reduced. symbols on the back of the remote. 2. Or use any sprays near the system. Alkaline batteries are recommended. 1. Be sure to...
...keeping the system in your area. 3. Battery compartment cover 59 English DeEustpsacñhol ItFarliaannçoais Nederlands Svenska REFERENCE Replacing remote batteries Protecting the system Replace both batteries. Cleaning the media center Use only a soft, dry cloth to clean the outside ... 1.5V batteries, or the equivalent. markings inside the compartment. 4. Remove both batteries when the remote control stops operating or its range seems reduced. symbols on the back of the remote. 2. Or use any sprays near the system. Alkaline batteries are recommended. 1. Be sure to...

