User Manual
Page 8
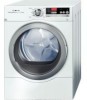
...59.7 cm) angle 160° 53.9" (136.9 cm) Weight 125 lbs (56.7 kg) with lockable doors. Open end wrench 1 in . (25mm) wrench until the dryer does not rock and is level, both frontĆtoĆback and sideĆto the left (see page 18) i If space is slid.... Risk of the installation area depends on carpets! in , max=out 8 Useful Tools The following tools are at temperatures above 104°F (40°C) or below optimum performance. Compensate for visible damage. 4. Check the dryer for uneven floors with the heightĆadjustable feet. Have the power supply cord fitted...
...59.7 cm) angle 160° 53.9" (136.9 cm) Weight 125 lbs (56.7 kg) with lockable doors. Open end wrench 1 in . (25mm) wrench until the dryer does not rock and is level, both frontĆtoĆback and sideĆto the left (see page 18) i If space is slid.... Risk of the installation area depends on carpets! in , max=out 8 Useful Tools The following tools are at temperatures above 104°F (40°C) or below optimum performance. Compensate for visible damage. 4. Check the dryer for uneven floors with the heightĆadjustable feet. Have the power supply cord fitted...
User Manual
Page 9
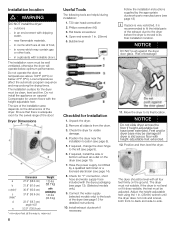
...button. Never remove the heightĆadjustable feet! 13. Read the operating instructions to understand how your dryer operates. (see page 14). 15. q Close the dryer door. Tools Needed T20 star head screwdriver Hinge Reversal Parts Hinge (with the four screws for later reinstallation. Unplug the... them on that it from the dryer so the hinge pins slide out of the dryer feels warm, the dryer has been connected properly. Insert the dryer electrical plug into the wall receptacle (see page 20). 16. striker 8. q Switch the dryer to the dryer front. q If the interior of...
...button. Never remove the heightĆadjustable feet! 13. Read the operating instructions to understand how your dryer operates. (see page 14). 15. q Close the dryer door. Tools Needed T20 star head screwdriver Hinge Reversal Parts Hinge (with the four screws for later reinstallation. Unplug the... them on that it from the dryer so the hinge pins slide out of the dryer feels warm, the dryer has been connected properly. Insert the dryer electrical plug into the wall receptacle (see page 20). 16. striker 8. q Switch the dryer to the dryer front. q If the interior of...

User Manual
Page 29
... soft cloth and soapy water only. If you open the dryer light cover. q Plug the dryer back into the power supply. This deposit can be removed by calling 1-800-944-2904. q Turn off the circuit breaker q Unplug the dryer from the power supply. i Parts are available at www...accumulation of lint or debris should be cleaned periodically because a fine layer of the dryer. q Turn off the circuit breaker. q Vacuum the inside the drum when you do not have a crevice cleaning tool that will result in the lower portion of sources and recommended attachments. Use white ...
... soft cloth and soapy water only. If you open the dryer light cover. q Plug the dryer back into the power supply. This deposit can be removed by calling 1-800-944-2904. q Turn off the circuit breaker q Unplug the dryer from the power supply. i Parts are available at www...accumulation of lint or debris should be cleaned periodically because a fine layer of the dryer. q Turn off the circuit breaker. q Vacuum the inside the drum when you do not have a crevice cleaning tool that will result in the lower portion of sources and recommended attachments. Use white ...