User Manual
Page 2
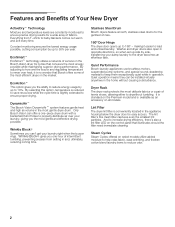
...energy usage possible, cutting consumption by side, transferring your damp laundry to the dryer becomes an effortless task. EcoSmartt EcoSmartt technology utilizes a network of sensors in the Bosch Vision dryer for cycles that Bosch offers some of intermittent tumbling, preventing creases from T-shirts to ensure proper ... as an accessory on all models. DynamicAirt The Bosch Vision DynamicAirt system features gentle heat and high air volume in the home without causing a disturbance. Only Bosch Vision can offer a one hour of the most efficient dryers in the market. making it is no wonder...
...energy usage possible, cutting consumption by side, transferring your damp laundry to the dryer becomes an effortless task. EcoSmartt EcoSmartt technology utilizes a network of sensors in the Bosch Vision dryer for cycles that Bosch offers some of intermittent tumbling, preventing creases from T-shirts to ensure proper ... as an accessory on all models. DynamicAirt The Bosch Vision DynamicAirt system features gentle heat and high air volume in the home without causing a disturbance. Only Bosch Vision can offer a one hour of the most efficient dryers in the market. making it is no wonder...
User Manual
Page 3
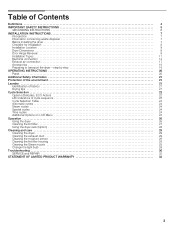
... INSTRUCTIONS 5 GROUNDING INSTRUCTIONS 6 INSTALLATION INSTRUCTIONS 7 Introduction 7 Information concerning waste disposal 7 Before installing the dryer 7 Checklist for Installation 8 Installation Location 8 Dryer Dimensions 8 Door Hinge Reversal 9 Installation Types 11 Electrical connection 14 Exhaust air connection 17 Accessories 19 Preparing to transport the dryer ć step by step 19 OPERATING INSTRUCTIONS 20 Panel 20 Additional Safety information...
... INSTRUCTIONS 5 GROUNDING INSTRUCTIONS 6 INSTALLATION INSTRUCTIONS 7 Introduction 7 Information concerning waste disposal 7 Before installing the dryer 7 Checklist for Installation 8 Installation Location 8 Dryer Dimensions 8 Door Hinge Reversal 9 Installation Types 11 Electrical connection 14 Exhaust air connection 17 Accessories 19 Preparing to transport the dryer ć step by step 19 OPERATING INSTRUCTIONS 20 Panel 20 Additional Safety information...
User Manual
Page 4
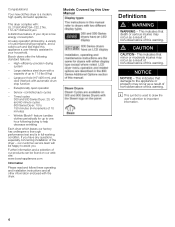
... used to draw the user's attention to important information. 4 Bosch dryers offer the following drying to one hour following standard features: - High-efficiency precision drying system - Large port hole (16"/406 mm), and door interlock ...periodically for up to 150 minutes (in increments of this User Manual Definitions d WARNING WARNING - d CAUTION CAUTION- Timed cycles 300 and 500 Series Dryer: 20, 40 and 60 minute cycles 800 Series Dryer: 10 to 17.6 lbs (8 kg) - Sensor-controlled auto cycles - Models Covered by this warning. This indicates that minor or moderate ...
... used to draw the user's attention to important information. 4 Bosch dryers offer the following drying to one hour following standard features: - High-efficiency precision drying system - Large port hole (16"/406 mm), and door interlock ...periodically for up to 150 minutes (in increments of this User Manual Definitions d WARNING WARNING - d CAUTION CAUTION- Timed cycles 300 and 500 Series Dryer: 20, 40 and 60 minute cycles 800 Series Dryer: 10 to 17.6 lbs (8 kg) - Sensor-controlled auto cycles - Models Covered by this warning. This indicates that minor or moderate ...
User Manual
Page 5
... port might encourage children to climb on the top of lint, dust and dirt. Disconnect the power cord by the fabric manufacturer. 18. Bosch dryers are instructed in cabinets or other flammable or explosive substances as the appliance door or a pullout shelf. 9. Excess lint buildup can not cover...distillates, waxes, fats, etc., must not be used for its intended purpose. 4. The interior of the parents or legal guardians to the electrical supply. Removing any other items that they give off vapors that you understand and have traces of children. 10. To avoid fire hazards, ...
... port might encourage children to climb on the top of lint, dust and dirt. Disconnect the power cord by the fabric manufacturer. 18. Bosch dryers are instructed in cabinets or other flammable or explosive substances as the appliance door or a pullout shelf. 9. Excess lint buildup can not cover...distillates, waxes, fats, etc., must not be used for its intended purpose. 4. The interior of the parents or legal guardians to the electrical supply. Removing any other items that they give off vapors that you understand and have traces of children. 10. To avoid fire hazards, ...
User Manual
Page 6
...the equipment grounding conductor can pose a fire hazard. 26. Five feet long (minimum) d WARNING Improper connection of electric shock. inappropriate objects can damage the dryer and certain items like cigarette lighters can result in the INSTALLATION INSTRUCTIONS and the OPERATING INSTRUCTIONS. To reduce the risk... of least resistance for the electric current. Do not operate the dryer if any guards and/or panels have a proper outlet installed by providing a path of fire and electrical shock hazards, do not let spills or splashout to the ...
...the equipment grounding conductor can pose a fire hazard. 26. Five feet long (minimum) d WARNING Improper connection of electric shock. inappropriate objects can damage the dryer and certain items like cigarette lighters can result in the INSTALLATION INSTRUCTIONS and the OPERATING INSTRUCTIONS. To reduce the risk... of least resistance for the electric current. Do not operate the dryer if any guards and/or panels have a proper outlet installed by providing a path of fire and electrical shock hazards, do not let spills or splashout to the ...
User Manual
Page 7
...be of a specific type identified by the appliance manufacturer as suitable for transportation damage. Do not install a clothes dryer with the National Electric Code, ANSI/NFPA70 ć latest edition/State and Municipal codes and/or local codes. Please ask your dealer or.... door) ć due to these installation instructions completely and carefully. If in accordance with main plug. These conditions will obstruct clothes dryer airflow and increase the risk of breakage. In addition to risk of fire. - The power cord must be reclaimed from locking themselves...
...be of a specific type identified by the appliance manufacturer as suitable for transportation damage. Do not install a clothes dryer with the National Electric Code, ANSI/NFPA70 ć latest edition/State and Municipal codes and/or local codes. Please ask your dealer or.... door) ć due to these installation instructions completely and carefully. If in accordance with main plug. These conditions will obstruct clothes dryer airflow and increase the risk of breakage. In addition to risk of fire. - The power cord must be reclaimed from locking themselves...
User Manual
Page 8
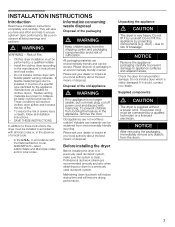
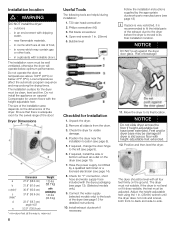
...the way in cupboards with heightĆadjustable feet extended. 12. Remove all four feet firmly on the dryer (see page 9). 6. Check the dryer for Installation 1. Move the dryer to its final installation location. Ensure that there is slid across the floor if heightĆadjustable feet ... be clean, level and firm. If required, change the door hinge to Ćside. Position and then level the dryer. in . (25mm) wrench until the dryer does not rock and is recommended to its final location. Adjust the heightĆadjustable feet using the 1 in rooms...
...the way in cupboards with heightĆadjustable feet extended. 12. Remove all four feet firmly on the dryer (see page 9). 6. Check the dryer for Installation 1. Move the dryer to its final installation location. Ensure that there is slid across the floor if heightĆadjustable feet ... be clean, level and firm. If required, change the door hinge to Ćside. Position and then level the dryer. in . (25mm) wrench until the dryer does not rock and is recommended to its final location. Adjust the heightĆadjustable feet using the 1 in rooms...
User Manual
Page 9
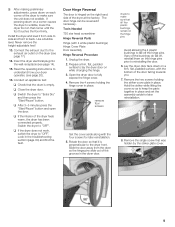
...bushings) Hinge Cover Plate Door Assembly Hinge Reversal Procedure 1. Slide the door away from side to side and front to back. If any of the dryer to make sure that was hidden by the striker plate cover. 9 Hold the striker while lifting the cover so as to "OFF". striker 8. q...the 4 plastic bushings to make sure the unit does not wobble. q If the interior of the dryer at the factory. q Switch the dryer to "OFF". Door Hinge Reversal The door is empty. Insert the dryer electrical plug into the wall receptacle (see page 14). 15. Remove the two screws holding the hinge ...
...bushings) Hinge Cover Plate Door Assembly Hinge Reversal Procedure 1. Slide the door away from side to side and front to back. If any of the dryer to make sure that was hidden by the striker plate cover. 9 Hold the striker while lifting the cover so as to "OFF". striker 8. q...the 4 plastic bushings to make sure the unit does not wobble. q If the interior of the dryer at the factory. q Switch the dryer to "OFF". Door Hinge Reversal The door is empty. Insert the dryer electrical plug into the wall receptacle (see page 14). 15. Remove the two screws holding the hinge ...
User Manual
Page 10
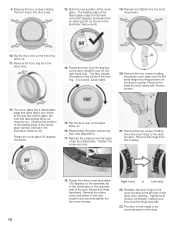
... Reassemble the parts, preserving their new alignments. 17. Remove the two screws holding the metal door hinge to Left Hand 22. Right Hand to the dryer housing. Reinsert and tighten the four front ring screws. 10. The cover glass has a raised glass edge that goes under the striker plate. Flip ... is located on the right hand side. Rotate the striker cover and striker 180 degrees so the assembly fits to be mounted back on the dryer housing. 9. Remove the four screws holding the plastic cover plate over so the front ring faces up. 11. The door handle is now ...
... Reassemble the parts, preserving their new alignments. 17. Remove the two screws holding the metal door hinge to Left Hand 22. Right Hand to the dryer housing. Reinsert and tighten the four front ring screws. 10. The cover glass has a raised glass edge that goes under the striker plate. Flip ... is located on the right hand side. Rotate the striker cover and striker 180 degrees so the assembly fits to be mounted back on the dryer housing. 9. Remove the four screws holding the plastic cover plate over so the front ring faces up. 11. The door handle is now ...
User Manual
Page 11
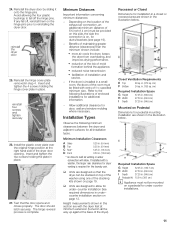
...S reduced noise transmission S facilitation of maintaining greater distance (clearances) than the minimum shown include: S more air cools the dryer, keeps the dryer from overheating, and improves drying performance. Recessed or Closet Dimensions for installation in a closet or recessed area are designed to ...pair. Installation Types Observe the following illustrations of the room must be fitted with a washer, the larger rear clearance for dryer venting is on page 12. in step 4. Height measurements shown in all installation types. Closet Ventilation Requirements E Top 48 ...
...S reduced noise transmission S facilitation of maintaining greater distance (clearances) than the minimum shown include: S more air cools the dryer, keeps the dryer from overheating, and improves drying performance. Recessed or Closet Dimensions for installation in a closet or recessed area are designed to ...pair. Installation Types Observe the following illustrations of the room must be fitted with a washer, the larger rear clearance for dryer venting is on page 12. in step 4. Height measurements shown in all installation types. Closet Ventilation Requirements E Top 48 ...
User Manual
Page 12
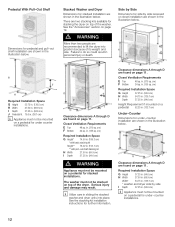
...(193.1 cm) ** with pull-out shelf stacking kit H Width 27.50 in. (69.9 cm) I Depth 37.25 in sliding the stacked washer and dryer units into position because of its weight and size. The washer must not be mounted on a pedestal for stacked installations. Serious injury and damage may...Required Installation Space G Height 37.25 in. (94.6 cm) H Width 27.50 in. (69.9 cm) Width* 54.75 in. (139.1 cm) * washer and dryer side by side I Depth 37.25 in . (132.7 cm) Under-Counter Dimensions for under -counter installations. 12 J Required Installation Space G Height 53.75 in. (136...
...(193.1 cm) ** with pull-out shelf stacking kit H Width 27.50 in. (69.9 cm) I Depth 37.25 in sliding the stacked washer and dryer units into position because of its weight and size. The washer must not be mounted on a pedestal for stacked installations. Serious injury and damage may...Required Installation Space G Height 37.25 in. (94.6 cm) H Width 27.50 in. (69.9 cm) Width* 54.75 in. (139.1 cm) * washer and dryer side by side I Depth 37.25 in . (132.7 cm) Under-Counter Dimensions for under -counter installations. 12 J Required Installation Space G Height 53.75 in. (136...
User Manual
Page 13
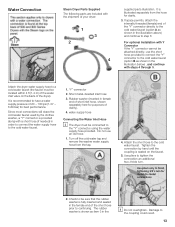
...by the clothes washer, a Y connector is fully inserted and seated in the female end of clarity). 4. Check to have a water supply pressure of your dryer: 1 3 2 4 supplied parts illustration. The rubber washer is shown as shown in the illustration below) , and continue with a short hose (if needed...water supply hose from the hose for metal-to a cold water faucet (the faucet must be located within 4 ft (1.2 m) of the water inlet valve on the faucet. 5. Attach the dryer water supply hose to -metal connections 2. If space permits, attach the internally threaded (female) end of the...
...by the clothes washer, a Y connector is fully inserted and seated in the female end of clarity). 4. Check to have a water supply pressure of your dryer: 1 3 2 4 supplied parts illustration. The rubber washer is shown as shown in the illustration below) , and continue with a short hose (if needed...water supply hose from the hose for metal-to a cold water faucet (the faucet must be located within 4 ft (1.2 m) of the water inlet valve on the faucet. 5. Attach the dryer water supply hose to -metal connections 2. If space permits, attach the internally threaded (female) end of the...
User Manual
Page 14
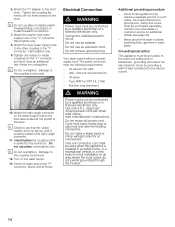
... meet the following requirements: - Attach the Y" adapter to individual branch circuit. Attach the dryer water supply hose to the other coupling of least resistance for the electric current. 14 Damage to the coupling could result. 10. approved 30 amp power cord with... old power cord. Some local regulations may require a separate ground. Tighten the coupling (by a qualified technician or a licensed electrician only. Electrical Connection d WARNING Power cord must be connected by providing a path of the Y" connector. Only a 4Ćconductor cord shall be used when...
... meet the following requirements: - Attach the Y" adapter to individual branch circuit. Attach the dryer water supply hose to the other coupling of least resistance for the electric current. 14 Damage to the coupling could result. 10. approved 30 amp power cord with... old power cord. Some local regulations may require a separate ground. Tighten the coupling (by a qualified technician or a licensed electrician only. Electrical Connection d WARNING Power cord must be connected by providing a path of the Y" connector. Only a 4Ćconductor cord shall be used when...
User Manual
Page 17
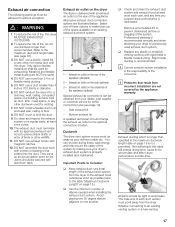
...into : a chimney, wall, ceiling, concealed space of a building, furnace cold air duct, attic, crawl space, or any time you suspect dryer performance is longer than recommended. All joints should change the exhaust air outlet to an existing venting system or a new venting 17 DO NOT install... Ductwork Length" on page 18 is properly installed and maintained. Exhaust air connection The following warnings must be adhered to accumulate and affect dryer performance and lifeĆtime. DO NOT use of the space available or an existing exhaust ductwork system. 2 1 3 1 ć...
...into : a chimney, wall, ceiling, concealed space of a building, furnace cold air duct, attic, crawl space, or any time you suspect dryer performance is longer than recommended. All joints should change the exhaust air outlet to an existing venting system or a new venting 17 DO NOT install... Ductwork Length" on page 18 is properly installed and maintained. Exhaust air connection The following warnings must be adhered to accumulate and affect dryer performance and lifeĆtime. DO NOT use of the space available or an existing exhaust ductwork system. 2 1 3 1 ć...
User Manual
Page 18
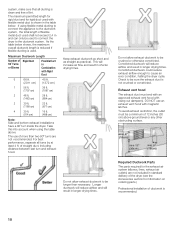
... use an exhaust vent hood with Rigid Duct 0 66 ft. 45 ft. (2011 cm) (1372 cm) 1 56 ft. 36 ft. (1707 cm) (1097 cm) 2 48 ft. 29 ft. (1463 cm) (884 cm) 3 39 ft. 22 ft. (1189 cm) (671 cm) 4 30 ft. (914 cm) 16 ft. (488 cm) Note: Side and bottom exhaust installations ...have a 90° turn and exhaust hood. This will result in Combination with magnetic latches. Do not allow exhaust ductwork to be a minimum of ductwork is used to connect the dryer...
... use an exhaust vent hood with Rigid Duct 0 66 ft. 45 ft. (2011 cm) (1372 cm) 1 56 ft. 36 ft. (1707 cm) (1097 cm) 2 48 ft. 29 ft. (1463 cm) (884 cm) 3 39 ft. 22 ft. (1189 cm) (671 cm) 4 30 ft. (914 cm) 16 ft. (488 cm) Note: Side and bottom exhaust installations ...have a 90° turn and exhaust hood. This will result in Combination with magnetic latches. Do not allow exhaust ductwork to be a minimum of ductwork is used to connect the dryer...
User Manual
Page 19
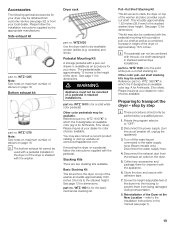
... designates an available color (eg: A for Anthracite, S for color choices available. Basic Stacking Kit This kit anchors the dryer on a pedestal in height of the dryer of the dryer into the housing to the stacked height. part no . i The pedestal can not be performed by a qualified person. 1.... shelf stacking kit in this manual (see page 32) or from your dealer for shipment with adhesive tape. 7. refer to stack the dryer on a pedestal, follow the installation instructions supplied by step i These procedures should only be combined with the pedestal. d WARNING Appliance must...
... designates an available color (eg: A for Anthracite, S for color choices available. Basic Stacking Kit This kit anchors the dryer on a pedestal in height of the dryer of the dryer into the housing to the stacked height. part no . i The pedestal can not be performed by a qualified person. 1.... shelf stacking kit in this manual (see page 32) or from your dealer for shipment with adhesive tape. 7. refer to stack the dryer on a pedestal, follow the installation instructions supplied by step i These procedures should only be combined with the pedestal. d WARNING Appliance must...
User Manual
Page 20
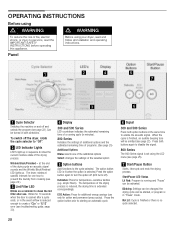
... Selector Switches the machine on and off ). Can be emitted (see page 23 ). To switch off the dryer, rotate the cycle selector to starting an automatic cycle. ECO Action: Press for additional energy savings (use .... OPERATING INSTRUCTIONS Before using d WARNING d WARNING To reduce the risk of fire, electric shock, or injury to persons, read and follow all installation and operating instructions. C Lint... sequence to clean the lint filter after a cycle ends, or in minutes). 800 Series Indicates the settings of additional options and the estimated remaining time of programs. (...
... Selector Switches the machine on and off ). Can be emitted (see page 23 ). To switch off the dryer, rotate the cycle selector to starting an automatic cycle. ECO Action: Press for additional energy savings (use .... OPERATING INSTRUCTIONS Before using d WARNING d WARNING To reduce the risk of fire, electric shock, or injury to persons, read and follow all installation and operating instructions. C Lint... sequence to clean the lint filter after a cycle ends, or in minutes). 800 Series Indicates the settings of additional options and the estimated remaining time of programs. (...
User Manual
Page 21
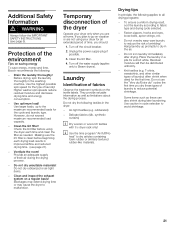
...system on the textile labels. Turn off the water supply (applies only to go on saving energy To save energy, money and time, Bosch recommends the following: - Laundry Identification of the environment Tips on vacation or are at home. AirĆtight textiles (e.g. Do not ...symbols on a regular basis! However, do not exceed maximum recommended load capacity. - Making sure the lint filter is clean before using your dryer for an extended period of laundry to malfunction. Do not dry unsuitable materials! Temporary disconnection of laundry! Unplug the power supply plug if possible....
...system on the textile labels. Turn off the water supply (applies only to go on saving energy To save energy, money and time, Bosch recommends the following: - Laundry Identification of the environment Tips on vacation or are at home. AirĆtight textiles (e.g. Do not ...symbols on a regular basis! However, do not exceed maximum recommended load capacity. - Making sure the lint filter is clean before using your dryer for an extended period of laundry to malfunction. Do not dry unsuitable materials! Temporary disconnection of laundry! Unplug the power supply plug if possible....
User Manual
Page 22
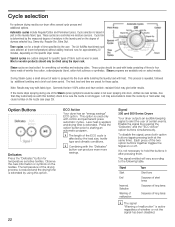
... To disable the signal, press both option buttons (again pressing both at the same time). Cycle selection For optimum drying results your dryer offers several cycle groups and additional options. Cycle selection is not clogged. Wool or woolen products should be dried using this function) ...as wool or jeans. Time cycles run for smoothing out wrinkles and reducing odors. i Combining with heat. Signal 300 and 500 Series Dryers Your dryer outputs an audible beeping signal to hold the buttons in after pressing them. The signal emitted will vary according to four items made...
... To disable the signal, press both option buttons (again pressing both at the same time). Cycle selection For optimum drying results your dryer offers several cycle groups and additional options. Cycle selection is not clogged. Wool or woolen products should be dried using this function) ...as wool or jeans. Time cycles run for smoothing out wrinkles and reducing odors. i Combining with heat. Signal 300 and 500 Series Dryers Your dryer outputs an audible beeping signal to hold the buttons in after pressing them. The signal emitted will vary according to four items made...
User Manual
Page 23
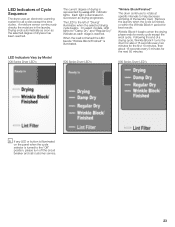
...degree of dryness has been reached. Each light is represented by Model 300 Series Dryer LED's The current degree of the laundry load. Wrinkle BlockR begins when the drying phase ends for the next 50 minutes. 800 Series Dryer LED's i If any LED or button is illuminated on the panel ...when the cycle selector is illuminated. 500 Series Dryer LED's Wrinkle Block/Finished" The drum continues to rotate at specific intervals to the...
...degree of dryness has been reached. Each light is represented by Model 300 Series Dryer LED's The current degree of the laundry load. Wrinkle BlockR begins when the drying phase ends for the next 50 minutes. 800 Series Dryer LED's i If any LED or button is illuminated on the panel ...when the cycle selector is illuminated. 500 Series Dryer LED's Wrinkle Block/Finished" The drum continues to rotate at specific intervals to the...


