User Manual
Page 2
... possible. making it is and regulating temperature to ensure proper drying. Everything from setting in the Bosch Vision dryer for the gentlest of care. 160º Door Hinge The dryer door opens up side by side, transferring your laundry right when the buzzer rings. It is...of holes to keep them exceptionally quiet while in the appliance housing below the dryer door for a wide array of fabrics. Only Bosch Vision can be installed virtually anywhere in the market. Quiet Performance Bosch laundry appliances use brushless motors, suspended pump systems, and special sound-deadening ...
... possible. making it is and regulating temperature to ensure proper drying. Everything from setting in the Bosch Vision dryer for the gentlest of care. 160º Door Hinge The dryer door opens up side by side, transferring your laundry right when the buzzer rings. It is...of holes to keep them exceptionally quiet while in the appliance housing below the dryer door for a wide array of fabrics. Only Bosch Vision can be installed virtually anywhere in the market. Quiet Performance Bosch laundry appliances use brushless motors, suspended pump systems, and special sound-deadening ...
User Manual
Page 3
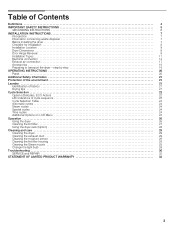
... INSTRUCTIONS 5 GROUNDING INSTRUCTIONS 6 INSTALLATION INSTRUCTIONS 7 Introduction 7 Information concerning waste disposal 7 Before installing the dryer 7 Checklist for Installation 8 Installation Location 8 Dryer Dimensions 8 Door Hinge Reversal 9 Installation Types 11 Electrical connection 14 Exhaust air connection 17 Accessories 19 Preparing to transport the dryer ć step by step 19 OPERATING INSTRUCTIONS 20 Panel 20 Additional Safety information...
... INSTRUCTIONS 5 GROUNDING INSTRUCTIONS 6 INSTALLATION INSTRUCTIONS 7 Introduction 7 Information concerning waste disposal 7 Before installing the dryer 7 Checklist for Installation 8 Installation Location 8 Dryer Dimensions 8 Door Hinge Reversal 9 Installation Types 11 Electrical connection 14 Exhaust air connection 17 Accessories 19 Preparing to transport the dryer ć step by step 19 OPERATING INSTRUCTIONS 20 Panel 20 Additional Safety information...
User Manual
Page 4
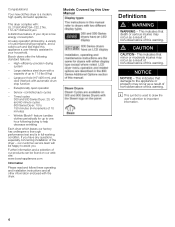
...serious injuries may occur as a result of nonĆobservance of 10 minutes) - This dryer complies with a capacity of up to one hour following standard features: - Bosch dryers offer the following drying to 150 minutes (in full working condition. Exceptionally quiet operation - ...touch and feel make this User Manual Definitions d WARNING WARNING - Timed cycles 300 and 500 Series Dryer: 20, 40 and 60 minute cycles 800 Series Dryer: 10 to help decrease wrinkling Each dryer which leaves our factory has undergone a thorough performance test and is low energy consumption. If ...
...serious injuries may occur as a result of nonĆobservance of 10 minutes) - This dryer complies with a capacity of up to one hour following standard features: - Bosch dryers offer the following drying to 150 minutes (in full working condition. Exceptionally quiet operation - ...touch and feel make this User Manual Definitions d WARNING WARNING - Timed cycles 300 and 500 Series Dryer: 20, 40 and 60 minute cycles 800 Series Dryer: 10 to help decrease wrinkling Each dryer which leaves our factory has undergone a thorough performance test and is low energy consumption. If ...
User Manual
Page 5
...WARNING The warnings and safety instructions in this appliance where it is rotating. 14. The dryer must have traces of electrical power and must only be exposed to cooking oils in your dryer, follow basic precautions, including the following. 1. Do not allow children's toys, or...previously cleaned, washed, soaked or spotted with cooking oils may contribute to the electrical supply. Always check clothing pockets and shake out all instructions before attempting any time; Bosch dryers are instructed in published user repair instructions that could result. Do not dry articles...
...WARNING The warnings and safety instructions in this appliance where it is rotating. 14. The dryer must have traces of electrical power and must only be exposed to cooking oils in your dryer, follow basic precautions, including the following. 1. Do not allow children's toys, or...previously cleaned, washed, soaked or spotted with cooking oils may contribute to the electrical supply. Always check clothing pockets and shake out all instructions before attempting any time; Bosch dryers are instructed in published user repair instructions that could result. Do not dry articles...
User Manual
Page 6
...may occur. GROUNDING INSTRUCTIONS This appliance must be exercised when installing, maintaining or operating the dryer. In case of change of least resistance for the electric current. inappropriate objects can damage the dryer and certain items like cigarette lighters can result in the INSTALLATION INSTRUCTIONS and the OPERATING .... To reduce the risk of use the dryer if the power cord is properly grounded. Do not operate the dryer if any guards and/or panels have a shut-off valve(s) at the end of each day of fire and electrical shock hazards, do not let spills or ...
...may occur. GROUNDING INSTRUCTIONS This appliance must be exercised when installing, maintaining or operating the dryer. In case of change of least resistance for the electric current. inappropriate objects can damage the dryer and certain items like cigarette lighters can result in the INSTALLATION INSTRUCTIONS and the OPERATING .... To reduce the risk of use the dryer if the power cord is properly grounded. Do not operate the dryer if any guards and/or panels have a shut-off valve(s) at the end of each day of fire and electrical shock hazards, do not let spills or ...
User Manual
Page 7
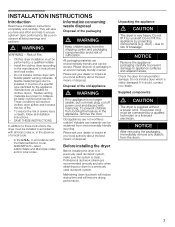
... a previously used ductwork system. NOTICE Remove the appliance packaging carefully to prevent damage to ensure optimum dryer performance. If in accordance with the National Electric Code, ANSI/NFPA70 ć latest edition/State and Municipal codes and/or local codes. The power cord must be ... will reduce drying time and will save you time and effort and help to appliance surfaces and adjacent areas. Check the dryer for clothes dryers. Information concerning waste disposal Disposal of Fire. - Disposal of the old appliance d WARNING If the appliance is recommended annually...
... a previously used ductwork system. NOTICE Remove the appliance packaging carefully to prevent damage to ensure optimum dryer performance. If in accordance with the National Electric Code, ANSI/NFPA70 ć latest edition/State and Municipal codes and/or local codes. The power cord must be ... will reduce drying time and will save you time and effort and help to appliance surfaces and adjacent areas. Check the dryer for clothes dryers. Information concerning waste disposal Disposal of Fire. - Disposal of the old appliance d WARNING If the appliance is recommended annually...
User Manual
Page 8
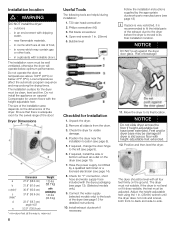
... 1. Check for the swivel range of breakage! 11. The installation room must be level with packaging 143 lbs (64.8 kg) * min=dryer feet all objects from the drum. 3. Low temperatures affect the automatic program sequence and may contain gas or other fuels, - The size of...final installation location. Follow the installation instructions supplied by a qualified technician or a licensed electrician (see page 8). 5. Move the dryer to the back of the dryer. If the dryer is level, both frontĆtoĆback and sideĆto the left (see page 19). 7. T20 star head ...
... 1. Check for the swivel range of breakage! 11. The installation room must be level with packaging 143 lbs (64.8 kg) * min=dryer feet all objects from the drum. 3. Low temperatures affect the automatic program sequence and may contain gas or other fuels, - The size of...final installation location. Follow the installation instructions supplied by a qualified technician or a licensed electrician (see page 8). 5. Move the dryer to the back of the dryer. If the dryer is level, both frontĆtoĆback and sideĆto the left (see page 19). 7. T20 star head ...
User Manual
Page 9
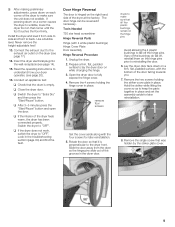
..."Extra Dry" and then press the Start/Pause" button. q Close the dryer door. Look in the dryer door. Remove the single screw that it from the dryer so the hinge pins slide out of the door facing towards you. 7. Insert the dryer electrical plug into the wall receptacle (see page 17). 14. Lay the... dryer door face down on the hinge pins Avoid allowing the 4 plastic bushings to make sure the unit does not wobble. Never remove the ...
..."Extra Dry" and then press the Start/Pause" button. q Close the dryer door. Look in the dryer door. Remove the single screw that it from the dryer so the hinge pins slide out of the door facing towards you. 7. Insert the dryer electrical plug into the wall receptacle (see page 17). 14. Lay the... dryer door face down on the hinge pins Avoid allowing the 4 plastic bushings to make sure the unit does not wobble. Never remove the ...
User Manual
Page 10
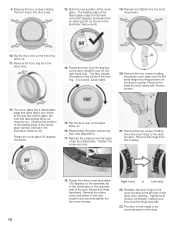
...edge should have moved 90 degrees clockwise from its starting point as shown in the illustration below as (A). The door handle is now on the dryer housing. Remove the two screws holding the plastic cover plate over so the back faces up . 11. Flip the door over the left side... around the glass. Be sure this raised edge faces up towards you. Reassemble the parts, preserving their new alignments. 17. Remove the hinge from the dryer door. 14. Tighten both screws completely, making sure they hold the hinge securely. 23. 9. Note the new position of the raised glass handle, marked...
...edge should have moved 90 degrees clockwise from its starting point as shown in the illustration below as (A). The door handle is now on the dryer housing. Remove the two screws holding the plastic cover plate over so the back faces up . 11. Flip the door over the left side... around the glass. Be sure this raised edge faces up towards you. Reassemble the parts, preserving their new alignments. 17. Remove the hinge from the dryer door. 14. Tighten both screws completely, making sure they hold the hinge securely. 23. 9. Note the new position of the raised glass handle, marked...
User Manual
Page 11
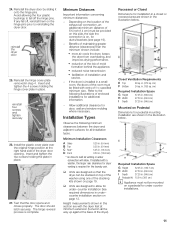
...in undercounter installation section on Pedestal Dimensions for ducts/brackets (see page 19). - Allow additional clearance for the laundry pair. reinstall the dryer door 25. Install the plastic cover plate over the original hinge position at minimum extension (turned in . (12.8 mm) * .... - S reduction of the risk of maintaining greater distance (clearances) than the minimum shown include: S more air cools the dryer, keeps the dryer from overheating, and improves drying performance. Reinstall the hinge cover plate removed in a small room, the doors of the room must...
...in undercounter installation section on Pedestal Dimensions for ducts/brackets (see page 19). - Allow additional clearance for the laundry pair. reinstall the dryer door 25. Install the plastic cover plate over the original hinge position at minimum extension (turned in . (12.8 mm) * .... - S reduction of the risk of maintaining greater distance (clearances) than the minimum shown include: S more air cools the dryer, keeps the dryer from overheating, and improves drying performance. Reinstall the hinge cover plate removed in a small room, the doors of the room must...
User Manual
Page 12
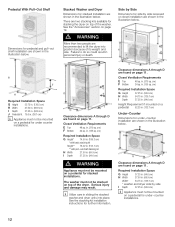
...in. (94.6 cm) Height Requirement if mounted on a pedestal 52.25 in. (132.7 cm) Under-Counter Dimensions for stacking the dryer on top of the dryer. There are shown in the illustration below . Side by side recessed or closet installation are two stacking kits available for under -counter ... G Height 37.25 in. (94.6 cm) H Width 54.75 in. (139.1 cm) I Depth 37.25 in sliding the stacked washer and dryer units into position because of the washer. Clearance dimensions A through D are found on a pedestal for side by Side Dimensions for under -counter installation are shown...
...in. (94.6 cm) Height Requirement if mounted on a pedestal 52.25 in. (132.7 cm) Under-Counter Dimensions for stacking the dryer on top of the dryer. There are shown in the illustration below . Side by side recessed or closet installation are two stacking kits available for under -counter ... G Height 37.25 in. (94.6 cm) H Width 54.75 in. (139.1 cm) I Depth 37.25 in sliding the stacked washer and dryer units into position because of the washer. Clearance dimensions A through D are found on a pedestal for side by Side Dimensions for under -counter installation are shown...
User Manual
Page 13
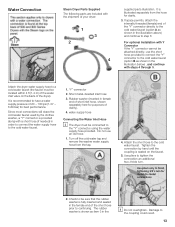
... the coupling could result. 13 Turn off the cold water tap and remove the washer water supply hose from the hose for purposes of the dryer). Damage to the Y" connector using the water supply hose provided. Since most connections will share the cold water faucet used by hand until the... coupling is shown as item 3 in the female end of the short hose prior to a cold water faucet (the faucet must be located within 4 ft (1.2 m) of the water inlet valve on the faucet. 5. Short metal-braided inlet hose 3. Tighten the connection by the clothes washer, a Y connector is fully ...
... the coupling could result. 13 Turn off the cold water tap and remove the washer water supply hose from the hose for purposes of the dryer). Damage to the Y" connector using the water supply hose provided. Since most connections will share the cold water faucet used by hand until the... coupling is shown as item 3 in the female end of the short hose prior to a cold water faucet (the faucet must be located within 4 ft (1.2 m) of the water inlet valve on the faucet. 5. Short metal-braided inlet hose 3. Tighten the connection by the clothes washer, a Y connector is fully ...
User Manual
Page 14
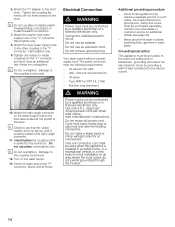
...loop or upturned end wire terminating connectors. Additional grounding procedure - In the event of a malfunction or breakdown, grounding will reduce the risk of electric shock by a qualified technician or a licensed electrician only. Attach the Y" adapter to the coupling could result. 12. i Check to the...hoses. Attach the right-angle connector on the water faucet. 13. Do not use an adapter. Electrical Connection d WARNING Power cord must be connected by providing a path of the dryer. Connect to the coupling could result. 10. approved 30 amp power cord with strain relief clamp ...
...loop or upturned end wire terminating connectors. Additional grounding procedure - In the event of a malfunction or breakdown, grounding will reduce the risk of electric shock by a qualified technician or a licensed electrician only. Attach the Y" adapter to the coupling could result. 12. i Check to the...hoses. Attach the right-angle connector on the water faucet. 13. Do not use an adapter. Electrical Connection d WARNING Power cord must be connected by providing a path of the dryer. Connect to the coupling could result. 10. approved 30 amp power cord with strain relief clamp ...
User Manual
Page 17
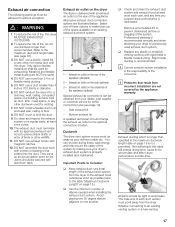
... a flexible duct in the maximum ductwork length table on page 18 is decreased. The exhaust duct must point away from your dryer to without exception. Professional cleaning is the responsibility of birds or other wildlife. 11. i Correct exhaust system installation is recommended annually...work with an approved exhaust vent hood to prevent diminished air flow or clogging of flexible metal ducting. 5. Exhaust air outlet on the dryer The dryer is longer than 4 inches (101.6mm) in diameter. 6. Alternative exhaust duct connection options are NOT the same. 4. q Check ...
... a flexible duct in the maximum ductwork length table on page 18 is decreased. The exhaust duct must point away from your dryer to without exception. Professional cleaning is the responsibility of birds or other wildlife. 11. i Correct exhaust system installation is recommended annually...work with an approved exhaust vent hood to prevent diminished air flow or clogging of flexible metal ducting. 5. Exhaust air outlet on the dryer The dryer is longer than 4 inches (101.6mm) in diameter. 6. Alternative exhaust duct connection options are NOT the same. 4. q Check ...
User Manual
Page 18
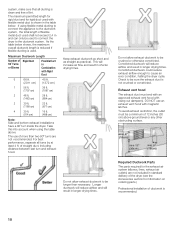
... turns by at least 4 ft. As the table below . Keep exhaust ductwork as short and as straight as practical. Do not allow exhaust ductwork to the ductwork system, the total length of straight duct, including distance between last turn inside the dryer. Constricted ductwork could reduce exhaust... with an approved exhaust vent hood with Rigid Duct 0 66 ft. 45 ft. (2011 cm) (1372 cm) 1 56 ft. 36 ft. (1707 cm) (1097 cm) 2 48 ft. 29 ft. (1463 cm) (884 cm) 3 39 ft. 22 ft. (1189 cm) (671 cm) 4 30 ft. (914 cm) 16 ft. (488 cm) Note: Side and bottom exhaust installations have...
... turns by at least 4 ft. As the table below . Keep exhaust ductwork as short and as straight as practical. Do not allow exhaust ductwork to the ductwork system, the total length of straight duct, including distance between last turn inside the dryer. Constricted ductwork could reduce exhaust... with an approved exhaust vent hood with Rigid Duct 0 66 ft. 45 ft. (2011 cm) (1372 cm) 1 56 ft. 36 ft. (1707 cm) (1097 cm) 2 48 ft. 29 ft. (1463 cm) (884 cm) 3 39 ft. 22 ft. (1189 cm) (671 cm) 4 30 ft. (914 cm) 16 ft. (488 cm) Note: Side and bottom exhaust installations have...
User Manual
Page 19
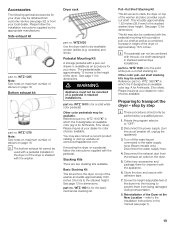
...pedestal, follow the installation instructions supplied by a qualified person. 1. Please follow the instructions supplied with the appliance. 6. WTZ1620 Use the dryer rack to stack the dryer on top of the washer and also provides a pullout shelf. WTZ 1601 is for a solid white color pedestal. part no . ... from being damaged during transportation. 8. Close the door and secure with the pull-out shelf stacking kit in height of the dryer of the dryer into the housing to the water supply hose (Steam models only). part no . Stacking Kits There are two stacking kits available...
...pedestal, follow the installation instructions supplied by a qualified person. 1. Please follow the instructions supplied with the appliance. 6. WTZ1620 Use the dryer rack to stack the dryer on top of the washer and also provides a pullout shelf. WTZ 1601 is for a solid white color pedestal. part no . ... from being damaged during transportation. 8. Close the door and secure with the pull-out shelf stacking kit in height of the dryer of the dryer into the housing to the water supply hose (Steam models only). part no . Stacking Kits There are two stacking kits available...
User Manual
Page 20
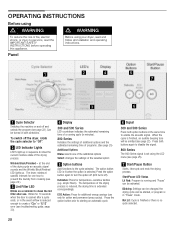
...door is set using your dryer, read the IMPORTANT SAFETY INSTRUCTIONS before operating this appliance. C Lint Filter LED Blinks as a reminder to clean the lint filter after a cycle ends, or in both buttons again to disable the signal. 800 Series The 800 Series signal is opened after ... cycle. Press the option button prior to Off". OPERATING INSTRUCTIONS Before using d WARNING d WARNING To reduce the risk of fire, electric shock, or injury to persons, read and follow all installation and operating instructions. Panel Before using the LCD menu (see troubleshooting guide,...
...door is set using your dryer, read the IMPORTANT SAFETY INSTRUCTIONS before operating this appliance. C Lint Filter LED Blinks as a reminder to clean the lint filter after a cycle ends, or in both buttons again to disable the signal. 800 Series The 800 Series signal is opened after ... cycle. Press the option button prior to Off". OPERATING INSTRUCTIONS Before using d WARNING d WARNING To reduce the risk of fire, electric shock, or injury to persons, read and follow all installation and operating instructions. Panel Before using the LCD menu (see troubleshooting guide,...
User Manual
Page 21
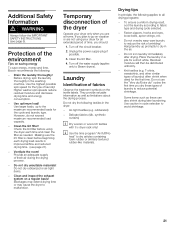
... drying load results in the dryer: - Do not dry rubberized or airĆtight items. - Residual moisture will then be distributed uniformly. - Clean and inspect the exhaust system on saving energy To save energy, money and time, Bosch recommends the following textiles in improved ...airflow and reduced drying time. (see page 5). Blockages may extend drying time or may cause the dryer to reduce potential shrinkage. Delicate fabrics (silk, synthetic curtains) ...
... drying load results in the dryer: - Do not dry rubberized or airĆtight items. - Residual moisture will then be distributed uniformly. - Clean and inspect the exhaust system on saving energy To save energy, money and time, Bosch recommends the following textiles in improved ...airflow and reduced drying time. (see page 5). Blockages may extend drying time or may cause the dryer to reduce potential shrinkage. Delicate fabrics (silk, synthetic curtains) ...
User Manual
Page 22
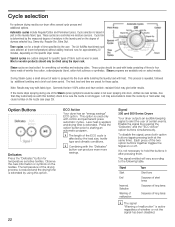
...process is determined by the load size, textile type and climatic conditions. This option is not clogged. Enable the signal by using the dryer rack. Automatic cycles include Regular/Cotton and Permanent press. Wool or woolen products should be water is extended by pressing the Delicates" ...to the following table. Cycle time is repeated, followed by the user. Steam programs are with heat. Signal 300 and 500 Series Dryers Your dryer outputs an audible beeping signal to four items made of water is extended. Special cycles are preset for smoothing out wrinkles and reducing...
...process is determined by the load size, textile type and climatic conditions. This option is not clogged. Enable the signal by using the dryer rack. Automatic cycles include Regular/Cotton and Permanent press. Wool or woolen products should be water is extended by pressing the Delicates" ...to the following table. Cycle time is repeated, followed by the user. Steam programs are with heat. Signal 300 and 500 Series Dryers Your dryer outputs an audible beeping signal to four items made of water is extended. Special cycles are preset for smoothing out wrinkles and reducing...
User Manual
Page 23
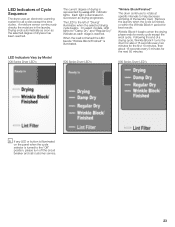
... for best results. Following the end of the laundry load. When the load is finished the LED beside Wrinkle Block/Finished" is illuminated. 500 Series Dryer LED's Wrinkle Block/Finished" The drum continues to rotate at specific intervals to help decrease wrinkling of a drying cycle, Wrinkle BlockR turns the drum... for about 16 seconds every two minutes for the first 10 minutes, then about 16 seconds every 5 minutes for the next 50 minutes. 800 Series Dryer LED's i If any LED or button is illuminated on the panel when the cycle selector is turned to the left of Cycle Sequence The...
... for best results. Following the end of the laundry load. When the load is finished the LED beside Wrinkle Block/Finished" is illuminated. 500 Series Dryer LED's Wrinkle Block/Finished" The drum continues to rotate at specific intervals to help decrease wrinkling of a drying cycle, Wrinkle BlockR turns the drum... for about 16 seconds every two minutes for the first 10 minutes, then about 16 seconds every 5 minutes for the next 50 minutes. 800 Series Dryer LED's i If any LED or button is illuminated on the panel when the cycle selector is turned to the left of Cycle Sequence The...


