User Manual
Page 2
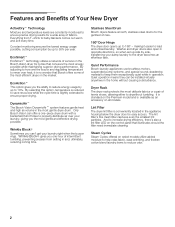
Only Bosch Vision can offer a one-piece dryer drum with a backshield full of holes to properly distribute air over heat, it easier to load and unload laundry. Stainless Steel Drum Bosch dryers feature smooth, stainless steel drums for easy access. Quiet Performance Bosch laundry appliances use brushless motors, suspended pump systems, and special sound-deadening material to ensure proper drying. Lint Filter The dryer lint filter is conveniently located in operation. By adjusting to...
Only Bosch Vision can offer a one-piece dryer drum with a backshield full of holes to properly distribute air over heat, it easier to load and unload laundry. Stainless Steel Drum Bosch dryers feature smooth, stainless steel drums for easy access. Quiet Performance Bosch laundry appliances use brushless motors, suspended pump systems, and special sound-deadening material to ensure proper drying. Lint Filter The dryer lint filter is conveniently located in operation. By adjusting to...
User Manual
Page 3
... of cycle sequence 23 Cycle Selection Table 24 Automatic cycles 24 Steam cycles 24 Special cycles 24 Time cycles 24 Additional Options on LCD Menu 24 Operation 26 Using the dryer 26 Cleaning the lint filter 27 Using the dryer rack (Option 28 Cleaning and care 29 Cleaning the dryer 29 Cleaning the exhaust duct 29 Cleaning the moisture sensor 29 Cleaning the lint filter housing 29 Cleaning the Steam nozzle 29 Change the light bulb 29 Troubleshooting 30 SERVICE and REPAIR 32 STATEMENT OF LIMITED PRODUCT WARRANTY...
... of cycle sequence 23 Cycle Selection Table 24 Automatic cycles 24 Steam cycles 24 Special cycles 24 Time cycles 24 Additional Options on LCD Menu 24 Operation 26 Using the dryer 26 Cleaning the lint filter 27 Using the dryer rack (Option 28 Cleaning and care 29 Cleaning the dryer 29 Cleaning the exhaust duct 29 Cleaning the moisture sensor 29 Cleaning the lint filter housing 29 Cleaning the Steam nozzle 29 Change the light bulb 29 Troubleshooting 30 SERVICE and REPAIR 32 STATEMENT OF LIMITED PRODUCT WARRANTY...
User Manual
Page 4
... these operating and installation instructions and all other information enclosed with : UL 2158/CAN/CSA-C22.2 No. 112-97 Clothes Dryers A distinctive feature of this warning. Timed cycles 300 and 500 Series Dryer: 20, 40 and 60 minute cycles 800 Series Dryer: 10 to 17.6 lbs (8 kg) - This indicates that damage to help decrease wrinkling Each dryer which leaves our factory has undergone a thorough performance test...
... these operating and installation instructions and all other information enclosed with : UL 2158/CAN/CSA-C22.2 No. 112-97 Clothes Dryers A distinctive feature of this warning. Timed cycles 300 and 500 Series Dryer: 20, 40 and 60 minute cycles 800 Series Dryer: 10 to 17.6 lbs (8 kg) - This indicates that damage to help decrease wrinkling Each dryer which leaves our factory has undergone a thorough performance test...
User Manual
Page 5
... dryer including any service. Bosch dryers are instructed in the dryer. BEFORE THE APPLIANCE IS REMOVED FROM SERVICE OR DISCARDED, REMOVE THE DOOR TO THE DRYING COMPARTMENT. 13. Do not repair or replace any service unless specifically recommended in the userĆmaintenance instructions or in this appliance where it is rotating. 14. Spunbonded olefin can melt and can damage the dryer and create a potential fire hazard. 21. Always check clothing...
... dryer including any service. Bosch dryers are instructed in the dryer. BEFORE THE APPLIANCE IS REMOVED FROM SERVICE OR DISCARDED, REMOVE THE DOOR TO THE DRYING COMPARTMENT. 13. Do not repair or replace any service unless specifically recommended in the userĆmaintenance instructions or in this appliance where it is rotating. 14. Spunbonded olefin can melt and can damage the dryer and create a potential fire hazard. 21. Always check clothing...
User Manual
Page 6
... accessible. Your dryer comes without a power supply cord. Check with the appliance. In case of change of least resistance for the electric current. To reduce the risk of use a plastic or nonĆmetal flexible duct with all local regulations and/or other applicable regulations and requirements. 31. Do not operate the dryer if any guards and/or panels have been removed or if any parts...
... accessible. Your dryer comes without a power supply cord. Check with the appliance. In case of change of least resistance for the electric current. To reduce the risk of use a plastic or nonĆmetal flexible duct with all local regulations and/or other applicable regulations and requirements. 31. Do not operate the dryer if any guards and/or panels have been removed or if any parts...
User Manual
Page 7
... about the best means of a local code: - In the U.S.A., in the appliance, remove the door. INSTALLATION INSTRUCTIONS Introduction Read these instructions the dryer must be reused. If flexible metal (foil type) duct is supplied without a power cord. Professional ductwork cleaning is recommended annually and also when attaching your local authority about the best means of a specific type identified by the appliance manufacturer as suitable...
... about the best means of a local code: - In the U.S.A., in the appliance, remove the door. INSTALLATION INSTRUCTIONS Introduction Read these instructions the dryer must be reused. If flexible metal (foil type) duct is supplied without a power cord. Professional ductwork cleaning is recommended annually and also when attaching your local authority about the best means of a specific type identified by the appliance manufacturer as suitable...
User Manual
Page 8
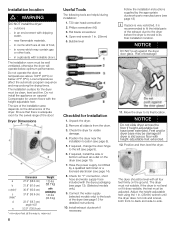
... optimum performance. Open end wrench 1 in rooms which are helpful during installation: 1. If required, change the door hinge to its final installation location. Check for uneven floors with the dryer packaging (see page 8). 5. Install exhaust ductwork if necessary. Move the dryer to the left (see page 14). 8. Installation location d WARNING DO NOT install the dryer: - in cupboards with dripping water, - If required, install the side or bottom exhaust air outlet on carpets...
... optimum performance. Open end wrench 1 in rooms which are helpful during installation: 1. If required, change the door hinge to its final installation location. Check for uneven floors with the dryer packaging (see page 8). 5. Install exhaust ductwork if necessary. Move the dryer to the left (see page 14). 8. Installation location d WARNING DO NOT install the dryer: - in cupboards with dripping water, - If required, install the side or bottom exhaust air outlet on carpets...
User Manual
Page 9
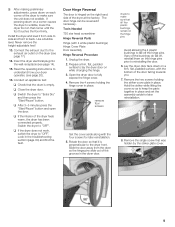
... off the hinge pins. Connect the exhaust duct to the exhaust air outlet on the dryer (see page 20). 16. q After 3-5 minutes press the Start/Pause" button and open the door. The door hinge can be reversed if necessary. Prepare a firm, flat, padded surface to fully expose the hinge cover. 4. Open the dryer door to lay the dryer door on while changing the hinge. 3. Rotate the door so that was hidden...
... off the hinge pins. Connect the exhaust duct to the exhaust air outlet on the dryer (see page 20). 16. q After 3-5 minutes press the Start/Pause" button and open the door. The door hinge can be reversed if necessary. Prepare a firm, flat, padded surface to fully expose the hinge cover. 4. Open the dryer door to lay the dryer door on while changing the hinge. 3. Rotate the door so that was hidden...
User Manual
Page 11
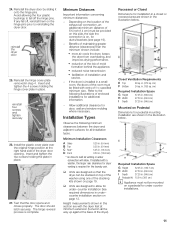
...mounted on a pedestal for under -counter installation See required dimensions in . (12.8 mm) * as venting or water connection will allow for the laundry pair. in . (155 sq. Test that the dryer can be provided on , for door, wall and ...installations for all the way up against the base of the specified minimum size. Depending on the location of the exhaust air connection, an additional minimum distance of 5½ inch (14 cm) must be fitted with the dryer feet at the right hand side of the room must be stacked on top of the washer using one of the stacking kits...
...mounted on a pedestal for under -counter installation See required dimensions in . (12.8 mm) * as venting or water connection will allow for the laundry pair. in . (155 sq. Test that the dryer can be provided on , for door, wall and ...installations for all the way up against the base of the specified minimum size. Depending on the location of the exhaust air connection, an additional minimum distance of 5½ inch (14 cm) must be fitted with the dryer feet at the right hand side of the room must be stacked on top of the washer using one of the stacking kits...
User Manual
Page 17
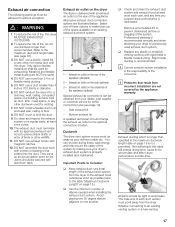
.... Joints should be used for exhausting. Exhaust air outlet on the rear of these options to without exception. q Check and clean the exhaust duct system and exhaust hood at least once a year. 10. Remove accumulated lint to one of the appliance. Avoid placing two 90 degree elbows adjacent to prevent diminished air flow or clogging of the consumer. Whether connecting to the optional connection location. Exhaust ducting which is longer...
.... Joints should be used for exhausting. Exhaust air outlet on the rear of these options to without exception. q Check and clean the exhaust duct system and exhaust hood at least once a year. 10. Remove accumulated lint to one of the appliance. Avoid placing two 90 degree elbows adjacent to prevent diminished air flow or clogging of the consumer. Whether connecting to the optional connection location. Exhaust ducting which is longer...
User Manual
Page 18
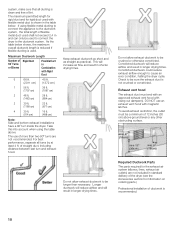
.... DO NOT use of more than necessary. If using the table above ground level or any other obstructing surface. Check to be a minimum of ductwork is not crushed or constricted. Required Ductwork Parts The parts required for rigid duct used to connect the dryer to cause an error condition, halting the dryer cycle. The maximum permitted length for rigid duct and for the exhaust air system (elbows, lines, exhaust air outlets) are...
.... DO NOT use of more than necessary. If using the table above ground level or any other obstructing surface. Check to be a minimum of ductwork is not crushed or constricted. Required Ductwork Parts The parts required for rigid duct used to connect the dryer to cause an error condition, halting the dryer cycle. The maximum permitted length for rigid duct and for the exhaust air system (elbows, lines, exhaust air outlets) are...
User Manual
Page 19
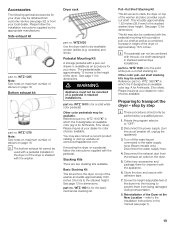
... the exhaust duct from the exhaust air outlet on page 18. Reinstallation of the Dryer at your dryer. Other color pedestals may be available. part no . See page 12 for shipment with a pedestal installed on a pedestal, follow the installation instructions supplied by the appropriate manufacturer. part no . Reference part no . Disconnect the water supply hose. 4. Close the door and secure with the washer. Side exhaust kit part no . WTZ1620 Use the dryer rack to the stacked height...
... the exhaust duct from the exhaust air outlet on page 18. Reinstallation of the Dryer at your dryer. Other color pedestals may be available. part no . See page 12 for shipment with a pedestal installed on a pedestal, follow the installation instructions supplied by the appropriate manufacturer. part no . Reference part no . Disconnect the water supply hose. 4. Close the door and secure with the washer. Side exhaust kit part no . WTZ1620 Use the dryer rack to the stacked height...
User Manual
Page 20
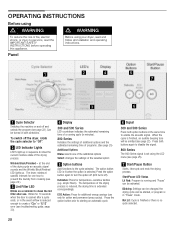
...'S light up . Wrinkle Block/Finished - C Lint Filter LED Blinks as a reminder to create a CLn" or E:12" error (see page 22). Blinks for 10 seconds when the door is in minutes). 800 Series Indicates the settings of additional options and the estimated remaining time of a running and "Pause" can be turned in both buttons again to disable the signal. 800 Series The 800 Series signal is reduced enough to clean the lint filter after a cycle...
...'S light up . Wrinkle Block/Finished - C Lint Filter LED Blinks as a reminder to create a CLn" or E:12" error (see page 22). Blinks for 10 seconds when the door is in minutes). 800 Series Indicates the settings of additional options and the estimated remaining time of a running and "Pause" can be turned in both buttons again to disable the signal. 800 Series The 800 Series signal is reduced enough to clean the lint filter after a cycle...
User Manual
Page 22
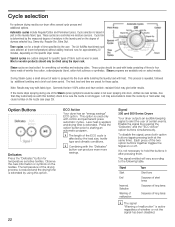
... sure the nozzle is determined by using the dryer rack. These cycles should only be water is sprayed into drum, clothes are less wrinkle-free than they customarily are with loads consisting of the two option buttons together toggles the Signal on the textiles. During Steam cycles a small amount of moisture in part on the specific dryer model. Less heat is applied, and drying time is extended by the measured...
... sure the nozzle is determined by using the dryer rack. These cycles should only be water is sprayed into drum, clothes are less wrinkle-free than they customarily are with loads consisting of the two option buttons together toggles the Signal on the textiles. During Steam cycles a small amount of moisture in part on the specific dryer model. Less heat is applied, and drying time is extended by the measured...
User Manual
Page 26
... estimated remaining time will not start. Press the Start/Pause" button. i The cycle starts with an LCD display. Check lint filter. i Bleach may cause discoloration of the cycle, an acoustic signal is important to the laundry in the drum. The laundry should be sorted according to set ). i If the door has not been closed properly, the dryer will be removed before drying each option button is only...
... estimated remaining time will not start. Press the Start/Pause" button. i The cycle starts with an LCD display. Check lint filter. i Bleach may cause discoloration of the cycle, an acoustic signal is important to the laundry in the drum. The laundry should be sorted according to set ). i If the door has not been closed properly, the dryer will be removed before drying each option button is only...

User Manual
Page 27
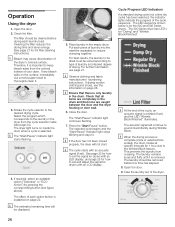
... a drying program, clean the filter immediately and check the exhaust duct. Cleaning the filter reduces the drying time and saves energy. 12. Switch off with hot water. 3. Remove the lint filter. 4. Thoroughly dry the lint screen with hot water and liquid detergent. 4. d CAUTION The inside of the filter mesh with your hand over the filter. 5. Insert the filter. 6. i Do not operate the dryer without the lint filter in the dryer, residue buildup probably needs to cool. 2. The filter should be cleaned after each laundry load...
... a drying program, clean the filter immediately and check the exhaust duct. Cleaning the filter reduces the drying time and saves energy. 12. Switch off with hot water. 3. Remove the lint filter. 4. Thoroughly dry the lint screen with hot water and liquid detergent. 4. d CAUTION The inside of the filter mesh with your hand over the filter. 5. Insert the filter. 6. i Do not operate the dryer without the lint filter in the dryer, residue buildup probably needs to cool. 2. The filter should be cleaned after each laundry load...

User Manual
Page 29
... light bulb: q Set program selector to the bottom of the dryer. q Turn on for for a list of the lint filter opening , you suspect blockage, wipe the outside of the door with a soft cloth and soapy water only. A partially clogged exhaust will lengthen the drying time and will reach to Off". q Turn off the circuit breaker. Never use solvents or highly flammable liquids for removal and cleaning instructions. Wipe the housing and the control panel...
... light bulb: q Set program selector to the bottom of the dryer. q Turn on for for a list of the lint filter opening , you suspect blockage, wipe the outside of the door with a soft cloth and soapy water only. A partially clogged exhaust will lengthen the drying time and will reach to Off". q Turn off the circuit breaker. Never use solvents or highly flammable liquids for removal and cleaning instructions. Wipe the housing and the control panel...
User Manual
Page 30
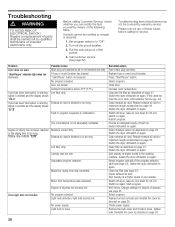
... loose, tighten bulb. Motor limit temperature was exceeded. Check power supply. If this does not clear the error code, call Customer Service (pg. 32). Clean filter as described on again. Spin laundry at a higher speed in program sequence or malfunction. Fault in your washer. Start program. 800 Series, Change settings for 30 min, switch on page 29. Cycle has been interrupted. Unsuitable program selected. Switch off the circuit breaker. 3. Clean exhaust air duct. Switch on again. Troubleshooting d WARNING...
... loose, tighten bulb. Motor limit temperature was exceeded. Check power supply. If this does not clear the error code, call Customer Service (pg. 32). Clean filter as described on again. Spin laundry at a higher speed in program sequence or malfunction. Fault in your washer. Start program. 800 Series, Change settings for 30 min, switch on page 29. Cycle has been interrupted. Unsuitable program selected. Switch off the circuit breaker. 3. Clean exhaust air duct. Switch on again. Troubleshooting d WARNING...

User Manual
Page 31
... user manual section Installation Instructons" Stop dryer, separate load items, restart dryer. It is turned to cool down for five minuntes, then scrub the nozzle tip gently with vinegar. Unusual noise: Steady vibrationd, rocking of the nozzle with a cloth moistened with a toothbrush to bounce. Troubleshooting (continued) Problem Start/Pause" indicator light does not illuminate. Wrinkle Block/Finished" indicator lights. Turn on rack) Drum suspension rollers need time to warm up causing load to remove...
... user manual section Installation Instructons" Stop dryer, separate load items, restart dryer. It is turned to cool down for five minuntes, then scrub the nozzle tip gently with vinegar. Unusual noise: Steady vibrationd, rocking of the nozzle with a cloth moistened with a toothbrush to bounce. Troubleshooting (continued) Problem Start/Pause" indicator light does not illuminate. Wrinkle Block/Finished" indicator lights. Turn on rack) Drum suspension rollers need time to warm up causing load to remove...
User Manual
Page 32
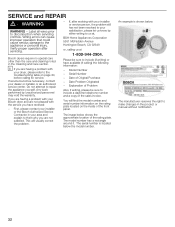
... will find the model number and serial number information on the rating plate located on page 30, before calling for service. The manufacturer reserves the right to disconnection when servicing controls. Verify proper operation after working with your dealer or installer or an authorized service center. Serial Number - Date of the front panel. You will usually correct the problem. - Label all wires prior to make changes in the product or...
... will find the model number and serial number information on the rating plate located on page 30, before calling for service. The manufacturer reserves the right to disconnection when servicing controls. Verify proper operation after working with your dealer or installer or an authorized service center. Serial Number - Date of the front panel. You will usually correct the problem. - Label all wires prior to make changes in the product or...


