
Pedestal Installation Instructions
Page 2
... of the following parts and tools in injury. NOTICE NOTICE - Warranty Card (not pictured) Before You Start i Important: If your appliance for tools and information required. Tools and Parts Confirm receipt of this warning. This indicates that damage may occur as a result of ... the door or door opening. Keep the door closed at all other information enclosed with your appliance is used to draw the user's attention to move and uninstall the appliance. Important Safety Information Please read and follow these Installation Instructions along with all times during the pedestal...
... of the following parts and tools in injury. NOTICE NOTICE - Warranty Card (not pictured) Before You Start i Important: If your appliance for tools and information required. Tools and Parts Confirm receipt of this warning. This indicates that damage may occur as a result of ... the door or door opening. Keep the door closed at all other information enclosed with your appliance is used to draw the user's attention to move and uninstall the appliance. Important Safety Information Please read and follow these Installation Instructions along with all times during the pedestal...

Pedestal Installation Instructions
Page 3
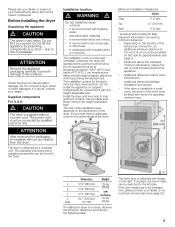
...all the way inside the back panel of the slotted area. New Appliance -If you are in the slot on its side, avoid sliding it to the Preparing Your New Appliance" section on a new washer or dryer, proceed to slide into place. q When installing the first bolt ...assembly, it can be noticed due to the washer drum. Support the appliance approximately 1 1/2" to washers. d CAUTION When lifting or lowering the appliance onto its LEFT side (...
...all the way inside the back panel of the slotted area. New Appliance -If you are in the slot on its side, avoid sliding it to the Preparing Your New Appliance" section on a new washer or dryer, proceed to slide into place. q When installing the first bolt ...assembly, it can be noticed due to the washer drum. Support the appliance approximately 1 1/2" to washers. d CAUTION When lifting or lowering the appliance onto its LEFT side (...

Pedestal Installation Instructions
Page 4
... the drawer aside. Failure to do not remove the washer transportation bolts prior to installing the pedestal. 2. Ensure the pedestal drawer opening and appliance door face the same direction (see Figure 7). Figure 6 5. Remove the feet originally installed in injury. 3. Retain the feet in a ... large piece of cardboard (such as rolled up on the drawer release lever on the left of this manual. Remove the drawer from your appliance packaging (see Figure 6). Figure 8 d CAUTION Excessive Weight Hazard Use two or more people to Installing the Pedestal" section of the unit...
... the drawer aside. Failure to do not remove the washer transportation bolts prior to installing the pedestal. 2. Ensure the pedestal drawer opening and appliance door face the same direction (see Figure 7). Figure 6 5. Remove the feet originally installed in injury. 3. Retain the feet in a ... large piece of cardboard (such as rolled up on the drawer release lever on the left of this manual. Remove the drawer from your appliance packaging (see Figure 6). Figure 8 d CAUTION Excessive Weight Hazard Use two or more people to Installing the Pedestal" section of the unit...

Pedestal Installation Instructions
Page 5
... 8. 7. Screw the feet into the protruding threaded bushing in place before using the appliance. Do not use the wrench to tighten an additional 1/3 to slide against the pedestal housing (see Figure 10). For dryers go directly to washers. The spacer should be hand tightened only, so the... appliance can be removed before tightening any screws completely until all screws (see Figure 11). Make sure ...
... 8. 7. Screw the feet into the protruding threaded bushing in place before using the appliance. Do not use the wrench to tighten an additional 1/3 to slide against the pedestal housing (see Figure 10). For dryers go directly to washers. The spacer should be hand tightened only, so the... appliance can be removed before tightening any screws completely until all screws (see Figure 11). Make sure ...

Pedestal Installation Instructions
Page 6
... less in that came with the washer and bushing attached. q A center-located bubble indicates the unit is important to finish installing or reinstalling your appliance (i.e., hoses, vents, etc.) 9. To level the unit, either lower the higher side or raise the lower side. q Loosen the lock nut ...of the 17mm wrench provided. It is leveled. Figure 16 8. Follow the Installation Instructions that direction. q Store the transport bolts with your appliance to do not come out properly. q After leveling the unit from side to side, then turn the lock nut, the foot (see Figure...
... less in that came with the washer and bushing attached. q A center-located bubble indicates the unit is important to finish installing or reinstalling your appliance (i.e., hoses, vents, etc.) 9. To level the unit, either lower the higher side or raise the lower side. q Loosen the lock nut ...of the 17mm wrench provided. It is leveled. Figure 16 8. Follow the Installation Instructions that direction. q Store the transport bolts with your appliance to do not come out properly. q After leveling the unit from side to side, then turn the lock nut, the foot (see Figure...

Pedestal Installation Instructions
Page 7
...for the front feet against the pedestal housing. For Washers: Fine tune the leveling by aligning it in spin cycle and then leveling the appliance again. Use the supplied 17mm openĆend wrench to the drawer slides. Replace the drawer by placing a small load of the corner... feet in place by freely opening and closing the drawer. Correct Incorrect Figure 19 7. When the corner of the appliance is available in the Customer Service" section of the appliance. Ensure drawer slides are aligned correctly (see Figure 18). Figure 17 q Turning the foot out (clockwise) will ...
...for the front feet against the pedestal housing. For Washers: Fine tune the leveling by aligning it in spin cycle and then leveling the appliance again. Use the supplied 17mm openĆend wrench to the drawer slides. Replace the drawer by placing a small load of the corner... feet in place by freely opening and closing the drawer. Correct Incorrect Figure 19 7. When the corner of the appliance is available in the Customer Service" section of the appliance. Ensure drawer slides are aligned correctly (see Figure 18). Figure 17 q Turning the foot out (clockwise) will ...

Pedestal Installation Instructions
Page 8
...to the Operating, Care and Installation Instructions" that came with the washer or dryer that is installed with the Pedestal and contact the service department listed there. Purchase Date Appliance Model Number Appliance Serial Number 8 This warranty gives you specific rights and you may vary in ...model and serial number of the appliance on Mechanical Parts For one year from the date of purchase, when this pedestal is installed with the listed washer or dryer and operated according to the instructions provided in the washer or dryer Operating, Care and Installation Instructions...
...to the Operating, Care and Installation Instructions" that came with the washer or dryer that is installed with the Pedestal and contact the service department listed there. Purchase Date Appliance Model Number Appliance Serial Number 8 This warranty gives you specific rights and you may vary in ...model and serial number of the appliance on Mechanical Parts For one year from the date of purchase, when this pedestal is installed with the listed washer or dryer and operated according to the instructions provided in the washer or dryer Operating, Care and Installation Instructions...
Installation and Use & Care (all languages)
Page 3
... used near children. 4. d CAUTION CAUTION- This indicates that demand exceptional performance from the electrical supply before or after each load. 13. ATTENTION ATTENTION - When children become old enough to operate the appliance, it will be found on having selected a Bosch clothes dryer, the choice of those that injuries may occur as vegetable oil, cooking oil...
... used near children. 4. d CAUTION CAUTION- This indicates that demand exceptional performance from the electrical supply before or after each load. 13. ATTENTION ATTENTION - When children become old enough to operate the appliance, it will be found on having selected a Bosch clothes dryer, the choice of those that injuries may occur as vegetable oil, cooking oil...
Installation and Use & Care (all languages)
Page 4
... children from shipping carton and packaging components. Old appliances are intended for the electric current. KEEP THESE INSTRUCTIONS FOR FUTURE REFERENCE. SAVE THESE INSTRUCTIONS INSTALLATION INSTRUCTIONS Introduction Read these instructions the dryer must be grounded. Information concerning waste disposal Disposal of the old appliance d WARNING d If appliance is properly grounded. If it will save you...
... children from shipping carton and packaging components. Old appliances are intended for the electric current. KEEP THESE INSTRUCTIONS FOR FUTURE REFERENCE. SAVE THESE INSTRUCTIONS INSTALLATION INSTRUCTIONS Introduction Read these instructions the dryer must be grounded. Information concerning waste disposal Disposal of the old appliance d WARNING d If appliance is properly grounded. If it will save you...
Installation and Use & Care (all languages)
Page 5
...an additional minimum distance of frost, - Do not operate the dryer at risk of 5½ inch (14 cm) must be well ventilated, otherwise the dryer will allow. Do not install the appliance on this side for the dryer must be connected by qualified persons only. Dimension Weight a ...your local authority about the current means of the door! Installation location d WARNING d Do not install the dryer: - in cupboards with vents of mold formation behind the appliance. - Never remove the heightĆadjustable feet! Distances above 104°F (40°C) and below optimum ...
...an additional minimum distance of frost, - Do not operate the dryer at risk of 5½ inch (14 cm) must be well ventilated, otherwise the dryer will allow. Do not install the appliance on this side for the dryer must be connected by qualified persons only. Dimension Weight a ...your local authority about the current means of the door! Installation location d WARNING d Do not install the dryer: - in cupboards with vents of mold formation behind the appliance. - Never remove the heightĆadjustable feet! Distances above 104°F (40°C) and below optimum ...
Installation and Use & Care (all languages)
Page 6
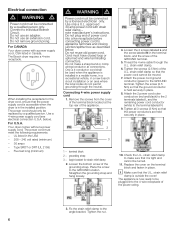
...dryer comes with strain relief clamp note manufacturer's instructions. approved 30 amp power cord with a power supply cord, CSA listed in place . 3 1 - Tighten all 3 screws (3 Nm) so that the ground conductor is outside the cover! The appliance is tight and cannot be turned. 11. Electrical ...in the terminal block. Remove the screws from the cover of the grounding strap. strain relief clamp to the terminal labeled N. 9. The Bosch dryer requires a 4Ćwire receptacle. Five feet long (minimum) d WARNING d Power cord must be moved. 7. Loosen the bottom screw...
...dryer comes with strain relief clamp note manufacturer's instructions. approved 30 amp power cord with a power supply cord, CSA listed in place . 3 1 - Tighten all 3 screws (3 Nm) so that the ground conductor is outside the cover! The appliance is tight and cannot be turned. 11. Electrical ...in the terminal block. Remove the screws from the cover of the grounding strap. strain relief clamp to the terminal labeled N. 9. The Bosch dryer requires a 4Ćwire receptacle. Five feet long (minimum) d WARNING d Power cord must be moved. 7. Loosen the bottom screw...
Installation and Use & Care (all languages)
Page 7
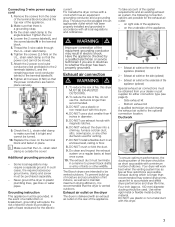
...once a year. 10. To prevent buildĆup of moisture and accumulation of the appliance, - Your dryer will reduce the risk of birds or other ductwork used . FourĆinch (approx....the ductwork longer than recommended. 3. DO NOT install a flexible duct in the terminal block. 5. The Bosch dryers are held in place securely. 9. Attach the 2 power cord outer conductors (red and black) to ...local regulations and ordinances. DO NOT exhaust the dryer into an appropriate outlet which has been properly installed and grounded in electric shock. Do clean and inspect the exhaust ...
...once a year. 10. To prevent buildĆup of moisture and accumulation of the appliance, - Your dryer will reduce the risk of birds or other ductwork used . FourĆinch (approx....the ductwork longer than recommended. 3. DO NOT install a flexible duct in the terminal block. 5. The Bosch dryers are held in place securely. 9. Attach the 2 power cord outer conductors (red and black) to ...local regulations and ordinances. DO NOT exhaust the dryer into an appropriate outlet which has been properly installed and grounded in electric shock. Do clean and inspect the exhaust ...
Installation and Use & Care (all languages)
Page 9
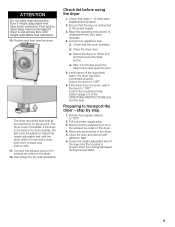
... door. 5. Look in the drum. 5. Adjust the heightĆadjustable feet until the dryer does not rock and is empty. Check list before using the dryer 1. If the dryer is connected to Ćside. 11. Conduct an appliance test: q Check that the drum is level, both frontĆtoĆback and ...sideĆto the power supply. 3. ATTENTION Do not slide dryer across floor with heightĆadjustable feet ...
... door. 5. Look in the drum. 5. Adjust the heightĆadjustable feet until the dryer does not rock and is empty. Check list before using the dryer 1. If the dryer is connected to Ćside. 11. Conduct an appliance test: q Check that the drum is level, both frontĆtoĆback and ...sideĆto the power supply. 3. ATTENTION Do not slide dryer across floor with heightĆadjustable feet ...
Installation and Use & Care (all languages)
Page 13
...and time, Bosch recommends the following applies to fabric type and drying program. - To avoid risk of the drum. Using the dryer Do not leave children unsupervised near the dryer. Before .... Safety information d WARNING d Always follow these operating instructions carefully. 2. Use the dryer only in clothes while drying. Do not lean or sit on a regular basis! Use the highest ... extended period of the operating instructions and find the fault. Ventilate the room! Conduct an appliance test, see page 25). If you use solvent detergent boosters or stain remover in the...
...and time, Bosch recommends the following applies to fabric type and drying program. - To avoid risk of the drum. Using the dryer Do not leave children unsupervised near the dryer. Before .... Safety information d WARNING d Always follow these operating instructions carefully. 2. Use the dryer only in clothes while drying. Do not lean or sit on a regular basis! Use the highest ... extended period of the operating instructions and find the fault. Ventilate the room! Conduct an appliance test, see page 25). If you use solvent detergent boosters or stain remover in the...
Installation and Use & Care (all languages)
Page 20
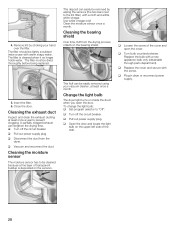
... stroking your hand over the filter. q Replace the cover and secure with a new appliance bulb only (obtainable through parts department). 4. The filter must be lightly scrubbed twice a year with a cloth and a little white vinegar. Cleaning the moisture sensor The moisture sensor has to prevent ... bulb counterclockwise. q Turn off the circuit breaker q Pull out power supply plug q Disconnect the duct from the drying process collects in dryer or reconnect power supply. 20 q Open the door and locate the light bulb on the upper left side of transparent buildup is cleaned ...
... stroking your hand over the filter. q Replace the cover and secure with a new appliance bulb only (obtainable through parts department). 4. The filter must be lightly scrubbed twice a year with a cloth and a little white vinegar. Cleaning the moisture sensor The moisture sensor has to prevent ... bulb counterclockwise. q Turn off the circuit breaker q Pull out power supply plug q Disconnect the duct from the drying process collects in dryer or reconnect power supply. 20 q Open the door and locate the light bulb on the upper left side of transparent buildup is cleaned ...
Installation and Use & Care (all languages)
Page 22
...at, BSH Home Appliances 5551 McFadden Avenue Huntington Beach, CA 92649 or, calling us know by unauthorized personnel may void the warranty. Model Number - Date of the front panel. 22 Wiring errors can cause improper and dangerous operation. The Bosch dryers require no special care...If after servicing. You will usually correct the problem. - First, please contact your installer or the Bosch Authorized Service Contractor in your satisfaction, please let us at 1Ć800Ć944Ć2904. verify proper operation after working with your dealer or installer or an authorized ...
...at, BSH Home Appliances 5551 McFadden Avenue Huntington Beach, CA 92649 or, calling us know by unauthorized personnel may void the warranty. Model Number - Date of the front panel. 22 Wiring errors can cause improper and dangerous operation. The Bosch dryers require no special care...If after servicing. You will usually correct the problem. - First, please contact your installer or the Bosch Authorized Service Contractor in your satisfaction, please let us at 1Ć800Ć944Ć2904. verify proper operation after working with your dealer or installer or an authorized ...
Installation and Use & Care (all languages)
Page 23
... A COPY OF THE SALES INVOICE. 23 STATEMENT OF WARRANTIES BOSCH CLOTHES DRYERS The warranties provided by BSH Home Appliances (``Bosch'') in this Statement of God, or installation not in accordance with local electrical and plumbing codes. Labor charges incurred in SCOPE OF WARRANTY the...800Ć944Ć2904, OR WRITE TO: BSH HOME APPLIANCES CORP., 5551 MCFADDEN AVENUE HUNTINGTON BEACH CA 92649. Warranty repair service must be covered by Bosch or its authorized dealers, retailers or service centers in the repair or replacement of any clothes dryer after the delivery date. Bosch...
... A COPY OF THE SALES INVOICE. 23 STATEMENT OF WARRANTIES BOSCH CLOTHES DRYERS The warranties provided by BSH Home Appliances (``Bosch'') in this Statement of God, or installation not in accordance with local electrical and plumbing codes. Labor charges incurred in SCOPE OF WARRANTY the...800Ć944Ć2904, OR WRITE TO: BSH HOME APPLIANCES CORP., 5551 MCFADDEN AVENUE HUNTINGTON BEACH CA 92649. Warranty repair service must be covered by Bosch or its authorized dealers, retailers or service centers in the repair or replacement of any clothes dryer after the delivery date. Bosch...