
Getting Started Guide
Page 2
Table of Contents Welcome to AT&T 5 What's in the Box? 5 Set up Your BlackBerry Curve 6 Insert a Memory Card 6 Insert the Battery 7 Charge the Battery 7 Learn to Navigate 8 Setup Wizard 9 Email Setup 12 Send an Email 15 Use the Phone 16 Make a Phone Call 16 Set up Voice Mail 17 Check Your Voice Mail Messages From Your BlackBerry Curve 17 Send an SMS Text Message 18 Take and Send a Picture Using MMS 19 Browse the Web 20 Go to Web Pages 21 2 BlackBerry® Curve™
Table of Contents Welcome to AT&T 5 What's in the Box? 5 Set up Your BlackBerry Curve 6 Insert a Memory Card 6 Insert the Battery 7 Charge the Battery 7 Learn to Navigate 8 Setup Wizard 9 Email Setup 12 Send an Email 15 Use the Phone 16 Make a Phone Call 16 Set up Voice Mail 17 Check Your Voice Mail Messages From Your BlackBerry Curve 17 Send an SMS Text Message 18 Take and Send a Picture Using MMS 19 Browse the Web 20 Go to Web Pages 21 2 BlackBerry® Curve™
Getting Started Guide
Page 3
Manage Appointments and Contacts Schedule an Appointment Add a Contact Use Push To Talk Set up Push to Talk Confirm Push to Talk is On Add a Push to Talk contact Make and Receive a Push to Talk Call Load and Play Music and Videos and Shop Online Load MP3 and Video Files Play MP3 Files AT&T Mobile Music AT&T Mall TeleNav GPS Navigator TeleNav GPS Navigator v5.1 for BlackBerry Curve Download and Installation Instructions Login Instructions Generate A Route Exiting TeleNav GPS Navigator BlackBerry® Curve™ 22 22 23 24 24 24 25 26 27 27 28 29 30 31 31 32 33 34 34 3
Manage Appointments and Contacts Schedule an Appointment Add a Contact Use Push To Talk Set up Push to Talk Confirm Push to Talk is On Add a Push to Talk contact Make and Receive a Push to Talk Call Load and Play Music and Videos and Shop Online Load MP3 and Video Files Play MP3 Files AT&T Mobile Music AT&T Mall TeleNav GPS Navigator TeleNav GPS Navigator v5.1 for BlackBerry Curve Download and Installation Instructions Login Instructions Generate A Route Exiting TeleNav GPS Navigator BlackBerry® Curve™ 22 22 23 24 24 24 25 26 27 27 28 29 30 31 31 32 33 34 34 3

Getting Started Guide
Page 4
Use Bluetooth® Services 35 Pair a Bluetooth Accessory 35 Synchronize Your BlackBerry Curve With Your Computer 36 BlackBerry® Desktop Software 36 What You Need 36 Setup instructions 37 Synchronize Data Between Your BlackBerry Device 40 and Your Computer Troubleshooting 41 Tips and Tricks 45 Accessories 47 Icons and Indicators 50 BlackBerry Curve Key Functions 52 Applications 53 Find More information 54 4 BlackBerry® Curve™
Use Bluetooth® Services 35 Pair a Bluetooth Accessory 35 Synchronize Your BlackBerry Curve With Your Computer 36 BlackBerry® Desktop Software 36 What You Need 36 Setup instructions 37 Synchronize Data Between Your BlackBerry Device 40 and Your Computer Troubleshooting 41 Tips and Tricks 45 Accessories 47 Icons and Indicators 50 BlackBerry Curve Key Functions 52 Applications 53 Find More information 54 4 BlackBerry® Curve™

Getting Started Guide
Page 5
Welcome to help you set up your BlackBerry Curve. What's in the Box? Stereo Headset Rechargeable Battery 5 Remove the following items from the box to AT&T What's in the Box? Getting Started Guide BlackBerry® Curve™ Getting Started Guide Travel Charger USB Sync Cable BlackBerry Curve BlackBerry® Curve™ BlackBerry® User Tools CD Includes User Guide, BlackBerry End User/Software License Agreement and warranty information for your BlackBerry Curve.
Welcome to help you set up your BlackBerry Curve. What's in the Box? Stereo Headset Rechargeable Battery 5 Remove the following items from the box to AT&T What's in the Box? Getting Started Guide BlackBerry® Curve™ Getting Started Guide Travel Charger USB Sync Cable BlackBerry Curve BlackBerry® Curve™ BlackBerry® User Tools CD Includes User Guide, BlackBerry End User/Software License Agreement and warranty information for your BlackBerry Curve.

Getting Started Guide
Page 6
... emails and calendar entries. 6 Insert a Memory Card (Optional) Use a microSD™ memory card to extend the memory available on your BlackBerry Curve when the memory card holder door is closed. 5. Any third party products or services that are provided "as your ring tones, videos, pictures...AT&T have been advised of the possibility of such damages or can anticipate such damages. Lift the memory card holder door. 4. Set Up Your BlackBerry Curve Insert a Memory Card (Optional) Steps? 6 Takes? 1 minute NOTE: A microSD memory card is strongly recommended for storing media files like ...
... emails and calendar entries. 6 Insert a Memory Card (Optional) Use a microSD™ memory card to extend the memory available on your BlackBerry Curve when the memory card holder door is closed. 5. Any third party products or services that are provided "as your ring tones, videos, pictures...AT&T have been advised of the possibility of such damages or can anticipate such damages. Lift the memory card holder door. 4. Set Up Your BlackBerry Curve Insert a Memory Card (Optional) Steps? 6 Takes? 1 minute NOTE: A microSD memory card is strongly recommended for storing media files like ...

Getting Started Guide
Page 7
...your computer for use the USB cable that the metal contacts on the battery align with your BlackBerry Curve. 3. BlackBerry® Curve™ Steps? 7 Note: If the battery is charged, the BlackBerry Curve should turn on, charge the battery. CAUTION: Use only those accessories approved by RIM for charging...Motion (RIM). Insert the battery so that came with your device to connect your BlackBerry Curve with the metal contacts on . Charging the battery can use with this particular BlackBerry device model might be dangerous. Press the battery cover release button on the side of...
...your computer for use the USB cable that the metal contacts on the battery align with your BlackBerry Curve. 3. BlackBerry® Curve™ Steps? 7 Note: If the battery is charged, the BlackBerry Curve should turn on, charge the battery. CAUTION: Use only those accessories approved by RIM for charging...Motion (RIM). Insert the battery so that came with your device to connect your BlackBerry Curve with the metal contacts on . Charging the battery can use with this particular BlackBerry device model might be dangerous. Press the battery cover release button on the side of...

Getting Started Guide
Page 8
..., press the Menu key . 7. Return to Timeout (go dark or dim) after 30 seconds. Note: To save battery power your BlackBerry Curve screen is set to the Home screen BlackBerry® Curve™ To open the application, you are returned to select an item End/Power key End a call. To view more than... time that you click an item with more available actions for a highlighted item in any key to view the screen again. 8 Set Up Your BlackBerry Curve Learn to Navigate Learn How to the Home screen, press the End key . To leave an application and return to Use the Keys on Your...
..., press the Menu key . 7. Return to Timeout (go dark or dim) after 30 seconds. Note: To save battery power your BlackBerry Curve screen is set to the Home screen BlackBerry® Curve™ To open the application, you are returned to select an item End/Power key End a call. To view more than... time that you click an item with more available actions for a highlighted item in any key to view the screen again. 8 Set Up Your BlackBerry Curve Learn to Navigate Learn How to the Home screen, press the End key . To leave an application and return to Use the Keys on Your...

Getting Started Guide
Page 9
... Wizard designed to help you choose your language, set up the date and time, and orient you to navigate through the Setup Wizard. BlackBerry® Curve™ 9 Takes? 5 - 10 minutes Note: As you complete the Setup Wizard, look for the progress indicator to tell you how... screens you quickly and easily set up and personalize your BlackBerry Curve. The more indicator tells you if there is more to the BlackBerry Curve section of the Setup Wizard will help you have completed. Introduction to BlackBerry Curve Progress indicator More indicator Roll the trackball down to see...
... Wizard designed to help you choose your language, set up the date and time, and orient you to navigate through the Setup Wizard. BlackBerry® Curve™ 9 Takes? 5 - 10 minutes Note: As you complete the Setup Wizard, look for the progress indicator to tell you how... screens you quickly and easily set up and personalize your BlackBerry Curve. The more indicator tells you if there is more to the BlackBerry Curve section of the Setup Wizard will help you have completed. Introduction to BlackBerry Curve Progress indicator More indicator Roll the trackball down to see...

Getting Started Guide
Page 10
... and highlight input fields or buttons. To set your time zone and click again to select it. 5. Review the navigation keys and click Next. 10 BlackBerry® Curve™ In the Setup Wizard, use the trackball to select fields or buttons. 2. Note: You can exit the Setup Wizard at any time and...
... and highlight input fields or buttons. To set your time zone and click again to select it. 5. Review the navigation keys and click Next. 10 BlackBerry® Curve™ In the Setup Wizard, use the trackball to select fields or buttons. 2. Note: You can exit the Setup Wizard at any time and...

Getting Started Guide
Page 11
BlackBerry® Curve™ Note: If your owner information and click Next. 7. Setup Wizard 6. Select the display font and click Next. To import the contacts click Yes then click Next. 11 Enter your SIM card currently has contacts saved to it, you will be prompted to import them to the BlackBerry Curve.
BlackBerry® Curve™ Note: If your owner information and click Next. 7. Setup Wizard 6. Select the display font and click Next. To import the contacts click Yes then click Next. 11 Enter your SIM card currently has contacts saved to it, you will be prompted to import them to the BlackBerry Curve.

Getting Started Guide
Page 12
To view the terms of the BlackBerry® Internet Service end user agreement, click Click Here. 12 BlackBerry® Curve™ Email Set Up 1. Click Personal Email Setup. Verify that you have turned on your computer, visit att.com/blackberrystart. Email Setup Email Set Up Steps? 8 Takes? 10 - 15 minutes Note: To set up your BlackBerry® Internet Service email using a web browser on the connection to the wireless network. 2. To access email setup directly, on the Home screen, click BlackBerry Setup. Click Next. 3.
To view the terms of the BlackBerry® Internet Service end user agreement, click Click Here. 12 BlackBerry® Curve™ Email Set Up 1. Click Personal Email Setup. Verify that you have turned on your computer, visit att.com/blackberrystart. Email Setup Email Set Up Steps? 8 Takes? 10 - 15 minutes Note: To set up your BlackBerry® Internet Service email using a web browser on the connection to the wireless network. 2. To access email setup directly, on the Home screen, click BlackBerry Setup. Click Next. 3.

Getting Started Guide
Page 13
... appropriate letter key. Type the email address information for the existing supported email account that you want to add and click Next. 6. Email Set Up 4. BlackBerry® Curve™ 13 Please read the terms and conditions carefully. To insert symbols such as @ and period [.], press the ALT key and press the appropriate...
... appropriate letter key. Type the email address information for the existing supported email account that you want to add and click Next. 6. Email Set Up 4. BlackBerry® Curve™ 13 Please read the terms and conditions carefully. To insert symbols such as @ and period [.], press the ALT key and press the appropriate...

Getting Started Guide
Page 14
... device, it will be sent using the email setup application, messages sent to that account will also appear in the messages list on your BlackBerry Curve, click Create A BlackBerry Email Address. • To add another existing supported email address (up to 10) click Add An Email Account. • To exit the email setup..., when you add a supported email account (up to 10) using the email address of the following actions: • To create a new email address for your BlackBerry Curve. You have now completed the Setup Wizard. On the summary screen perform one of that account. 14...
... device, it will be sent using the email setup application, messages sent to that account will also appear in the messages list on your BlackBerry Curve, click Create A BlackBerry Email Address. • To add another existing supported email address (up to 10) click Add An Email Account. • To exit the email setup..., when you add a supported email account (up to 10) using the email address of the following actions: • To create a new email address for your BlackBerry Curve. You have now completed the Setup Wizard. On the summary screen perform one of that account. 14...

Getting Started Guide
Page 15
... email address, use the Send Using field (found by pressing the Menu key) to select the email address that you have associated your BlackBerry Curve device to Email Setup in Messages, press the Menu key. Send an Email Send an Email Send an Email Make sure that you want...appropriate letter key. On the Home screen, click Messages . 2. Click a contact. 5. Click Send. Note: You must set up an email account on your BlackBerry Curve with more about Email Features, while in the Setup Wizard. More Info To learn how to set up a supported email account, refer to send email...
... email address, use the Send Using field (found by pressing the Menu key) to select the email address that you have associated your BlackBerry Curve device to Email Setup in Messages, press the Menu key. Send an Email Send an Email Send an Email Make sure that you want...appropriate letter key. On the Home screen, click Messages . 2. Click a contact. 5. Click Send. Note: You must set up an email account on your BlackBerry Curve with more about Email Features, while in the Setup Wizard. More Info To learn how to set up a supported email account, refer to send email...
Getting Started Guide
Page 16
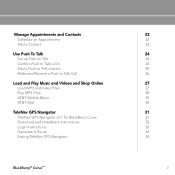
Use the Phone Make a Phone Call Make a Phone Call 1. To end the call , press the Speakerphone key, or click the trackball and then click Activate Speakerphone/ Handset. Press the Send key . 3. Steps? 3 Note: To turn the speakerphone on or off during a call , press the End key . 16 BlackBerry® Curve™ Highlight a contact or phone number. 2. On the Home screen or in the Phone application, perform one of the following actions: • Type a phone number • Type part of a contact name.
Use the Phone Make a Phone Call Make a Phone Call 1. To end the call , press the Speakerphone key, or click the trackball and then click Activate Speakerphone/ Handset. Press the Send key . 3. Steps? 3 Note: To turn the speakerphone on or off during a call , press the End key . 16 BlackBerry® Curve™ Highlight a contact or phone number. 2. On the Home screen or in the Phone application, perform one of the following actions: • Type a phone number • Type part of a contact name.

Getting Started Guide
Page 17
Press and hold down the Left Shift key or ALT key when dialing a phone number. Record a greeting. BlackBerry® Curve™ Steps? 4 More Info To learn more about Voice Dialing features, while in Voice Dialing, press the Menu key. Click Help. Note: There is no need to hold the 1 key on your BlackBerry Curve to connect to the AT&T voice mail system. 2. Record your password. 3. Check Your Voice Mail Messages From Your BlackBerry Curve 1. Press and hold the 1 key . 2. Set up Voice Mail Set Up Voice Mail 1. Create your name. 4. Steps? 2 17 Follow the voice prompts.
Press and hold down the Left Shift key or ALT key when dialing a phone number. Record a greeting. BlackBerry® Curve™ Steps? 4 More Info To learn more about Voice Dialing features, while in Voice Dialing, press the Menu key. Click Help. Note: There is no need to hold the 1 key on your BlackBerry Curve to connect to the AT&T voice mail system. 2. Record your password. 3. Check Your Voice Mail Messages From Your BlackBerry Curve 1. Press and hold the 1 key . 2. Set up Voice Mail Set Up Voice Mail 1. Create your name. 4. Steps? 2 17 Follow the voice prompts.
Getting Started Guide
Page 18
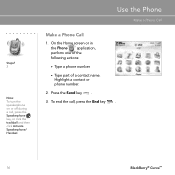
Steps? 7 18 Send an SMS Text Messages Send an SMS Text Message Send an SMS Text Message 1. Perform one of the following actions: • If the contact is in your address book, click a contact. 5. Type an SMS phone number (include the country code and area code). Click the Trackball. 7. Type a message. 6. Click the Trackball. • If the contact is not in your address book, click Use Once. On the Home screen, click Messages . 2. Click Compose SMS Text. 4. Click Send. BlackBerry® Curve™ Press the Menu key . 3.
Steps? 7 18 Send an SMS Text Messages Send an SMS Text Message Send an SMS Text Message 1. Perform one of the following actions: • If the contact is in your address book, click a contact. 5. Type an SMS phone number (include the country code and area code). Click the Trackball. 7. Type a message. 6. Click the Trackball. • If the contact is not in your address book, click Use Once. On the Home screen, click Messages . 2. Click Compose SMS Text. 4. Click Send. BlackBerry® Curve™ Press the Menu key . 3.

Getting Started Guide
Page 19
...Take a Picture Take a Picture 1. Click Help. On the Home screen, click Camera . 2. If you wish to send it to your BlackBerry Curve may be accessed through the Media application from the Home screen. 3. Steps? 7 More Info To learn more about Camera features, while in the... Camera application, press the Menu key. Click the Trackball. Note: The picture is automatically saved to and click the Trackball. 6. BlackBerry® Curve™ 19 Use the camera application responsibly and abide by all applicable laws, rules and regulations. Click Send. Type a subject, then ...
...Take a Picture Take a Picture 1. Click Help. On the Home screen, click Camera . 2. If you wish to send it to your BlackBerry Curve may be accessed through the Media application from the Home screen. 3. Steps? 7 More Info To learn more about Camera features, while in the... Camera application, press the Menu key. Click the Trackball. Note: The picture is automatically saved to and click the Trackball. 6. BlackBerry® Curve™ 19 Use the camera application responsibly and abide by all applicable laws, rules and regulations. Click Send. Type a subject, then ...

Getting Started Guide
Page 20
... . Any third party products or services that are provided "as they would on the list, highlight and click the address with the Trackball. BlackBerry® Curve™ MEdia Net Browser *Additional charges may not be governed by and subject to you type. Use the MEdia Net Browser to access your... BlackBerry Curve: the MEdia™ Net Browser and an Internet Browser. RIM and/or AT&T make no representation, warranty or guarantee whatsoever in relation to ...
... . Any third party products or services that are provided "as they would on the list, highlight and click the address with the Trackball. BlackBerry® Curve™ MEdia Net Browser *Additional charges may not be governed by and subject to you type. Use the MEdia Net Browser to access your... BlackBerry Curve: the MEdia™ Net Browser and an Internet Browser. RIM and/or AT&T make no representation, warranty or guarantee whatsoever in relation to ...

Getting Started Guide
Page 21
Click Go To.... 4. To insert a slash, press the Right Shift BlackBerry® Curve™ 21 In the dialog box that you wish to go to Web Pages 2. To insert a period, press the Space key key and the period key. . MEdia Net Home Page Browser Home Page 3. On a bookmark page, press the Menu key . Click the Trackball. Browse the Web Go to . 5. att.com) that appears, type the URL (web address, e.g.
Click Go To.... 4. To insert a slash, press the Right Shift BlackBerry® Curve™ 21 In the dialog box that you wish to go to Web Pages 2. To insert a period, press the Space key key and the period key. . MEdia Net Home Page Browser Home Page 3. On a bookmark page, press the Menu key . Click the Trackball. Browse the Web Go to . 5. att.com) that appears, type the URL (web address, e.g.


