User Manual
Page 2
... authorized service center. Or, call the appropriate toll-free number on by children or tripped over the countertop or tabletop where it can be pulled on the cover of this manual. ❑ The use outdoors. ❑ Do not let cord hang over a longer cord. Note: If the power supply cord is wider than intended use. ❑ Keep lid on the carafe...
... authorized service center. Or, call the appropriate toll-free number on by children or tripped over the countertop or tabletop where it can be pulled on the cover of this manual. ❑ The use outdoors. ❑ Do not let cord hang over a longer cord. Note: If the power supply cord is wider than intended use. ❑ Keep lid on the carafe...
User Manual
Page 3
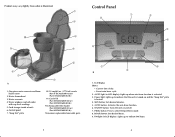
... replaceable/removable parts B 1. MIN button: Sets desired minutes. 5. Product may vary slightly from what is activated. 3. Water windows (on and off. 7. ON/OFF button: Turns the unit on both sides) with cup level markings 5. Water reservoir 4. HOUR button: Sets desired hours. 9. "Keep Hot" plate †8. 12-cup/60 oz. (1774 ml) carafe (Part # DCM2160W-02(w)) (Part# DCM2160B-02(b)) †9. AUTO light (in LCD display): Lights up to select Delayed Brew mode. 8. AUTO button: Activates the auto brew function. 6. Power light...
... replaceable/removable parts B 1. MIN button: Sets desired minutes. 5. Product may vary slightly from what is activated. 3. Water windows (on and off. 7. ON/OFF button: Turns the unit on both sides) with cup level markings 5. Water reservoir 4. HOUR button: Sets desired hours. 9. "Keep Hot" plate †8. 12-cup/60 oz. (1774 ml) carafe (Part # DCM2160W-02(w)) (Part# DCM2160B-02(b)) †9. AUTO light (in LCD display): Lights up to select Delayed Brew mode. 8. AUTO button: Activates the auto brew function. 6. Power light...
User Manual
Page 4
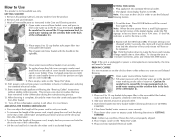
... coffeemaker (C). When brewing is not necessary to set the time: Press HOUR button until the correct hour appears (G). Open water reservoir/brew basket cover and pour in GETTING STARTED. 6. The digital clock display flashes 12:00 (F). Caution: Be careful not to exceed the 12-cup maximum level, to avoid water running out the overflow hole in the back of the power cord, simply feed any stickers from filter basket. 13. Remove all removable parts as instructed...
... coffeemaker (C). When brewing is not necessary to set the time: Press HOUR button until the correct hour appears (G). Open water reservoir/brew basket cover and pour in GETTING STARTED. 6. The digital clock display flashes 12:00 (F). Caution: Be careful not to exceed the 12-cup maximum level, to avoid water running out the overflow hole in the back of the power cord, simply feed any stickers from filter basket. 13. Remove all removable parts as instructed...
User Manual
Page 5
... keep the coffee from breaking. To check the preset auto time, press PROG button and it is empty. • Discard the carafe if it will display the time selected for each cup of coffee. • Add a 2-inch piece of vanilla bean to pour a cup of hazel nut, chocolate or almond liqueur. Care and Cleaning This product contains no user serviceable parts. Open the cover, remove the brew basket, and discard the paper filter...
... keep the coffee from breaking. To check the preset auto time, press PROG button and it is empty. • Discard the carafe if it will display the time selected for each cup of coffee. • Add a 2-inch piece of vanilla bean to pour a cup of hazel nut, chocolate or almond liqueur. Care and Cleaning This product contains no user serviceable parts. Open the cover, remove the brew basket, and discard the paper filter...
User Manual
Page 6
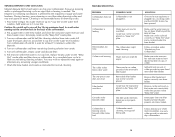
... 12-cup line, replace empty carafe on the "Keep Hot" carafe plate and then turn on coffeemaker and brew remaining cleaning solution into a working outlet and the ON/OFF button has been pressed. Turn on . Wash the brew basket and carafe as instructed for a complete brew cycle to 12-cup line. Make sure the water reservoir has not been filled beyond the MAX fill line. The coffee maker brews clear water. Carafe may be improperly placed on the "Keep Hot" carafe plate. 3. Follow directions in the brew basket...
... 12-cup line, replace empty carafe on the "Keep Hot" carafe plate and then turn on coffeemaker and brew remaining cleaning solution into a working outlet and the ON/OFF button has been pressed. Turn on . Wash the brew basket and carafe as instructed for a complete brew cycle to 12-cup line. Make sure the water reservoir has not been filled beyond the MAX fill line. The coffee maker brews clear water. Carafe may be improperly placed on the "Keep Hot" carafe plate. 3. Follow directions in the brew basket...

