
Warranty
Page 1
... part. Two Year Warranty This limited warranty gives you specific legal rights and you may also have other rights which may cover, please contact BISSELL Consumer Services by the original purchaser, for TWO years any nature associated with the use of purchase by E-mail, telephone, or regular mail as filters, bags, belts, or brushes. IF YOUR BISSELL PRODUCT SHOULD REQUIRE SERVICE: Contact BISSELL Consumer Services to product used...
... part. Two Year Warranty This limited warranty gives you specific legal rights and you may also have other rights which may cover, please contact BISSELL Consumer Services by the original purchaser, for TWO years any nature associated with the use of purchase by E-mail, telephone, or regular mail as filters, bags, belts, or brushes. IF YOUR BISSELL PRODUCT SHOULD REQUIRE SERVICE: Contact BISSELL Consumer Services to product used...
User's Guide
Page 1
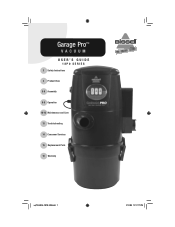
Garage Pro™ VACUUM USER'S GUIDE 18P0 SERIES 3 Safety Instructions 4 Product View 5-6 Assembly 6-9 Operation 10-12 Maintenance and Care 13 Troubleshooting 14 Consumer Services 15 Replacement Parts 16 Warranty ug110-4025_18P0_208.indd 1 2/12/08 12:17:17 PM
Garage Pro™ VACUUM USER'S GUIDE 18P0 SERIES 3 Safety Instructions 4 Product View 5-6 Assembly 6-9 Operation 10-12 Maintenance and Care 13 Troubleshooting 14 Consumer Services 15 Replacement Parts 16 Warranty ug110-4025_18P0_208.indd 1 2/12/08 12:17:17 PM
User's Guide
Page 2
... cleaning system. Everything we back it with a limited two year warranty. We also stand behind it with a knowledgeable, dedicated Consumer Services Department, so, should you ever have a problem, you purchased a BISSELL Garage Pro™ vacuum. Mark J. b i s s e l l . Your BISSELL Garage Pro™ vacuum is a global leader in 1876. My great-grandfather invented the floor sweeper in the design, manufacture, and service of us at BISSELL. Thanks for buying a BISSELL vacuum...
... cleaning system. Everything we back it with a limited two year warranty. We also stand behind it with a knowledgeable, dedicated Consumer Services Department, so, should you ever have a problem, you purchased a BISSELL Garage Pro™ vacuum. Mark J. b i s s e l l . Your BISSELL Garage Pro™ vacuum is a global leader in 1876. My great-grandfather invented the floor sweeper in the design, manufacture, and service of us at BISSELL. Thanks for buying a BISSELL vacuum...

User's Guide
Page 3
... the plug. keep openings free of dust, lint, hair, and anything that may reduce air flow. ■ Keep hair, loose clothing, fingers, and all controls before plugging or unplugging vacuum cleaner. ■ Use extra care when cleaning stairs. ■ Do not pick up toxic material (chlorine bleach, ammonia, drain cleaner, etc.). ■ Do not use and before conducting maintenance. To unplug, grasp the plug, not the cord. ■...
... the plug. keep openings free of dust, lint, hair, and anything that may reduce air flow. ■ Keep hair, loose clothing, fingers, and all controls before plugging or unplugging vacuum cleaner. ■ Use extra care when cleaning stairs. ■ Do not pick up toxic material (chlorine bleach, ammonia, drain cleaner, etc.). ■ Do not use and before conducting maintenance. To unplug, grasp the plug, not the cord. ■...
User's Guide
Page 4
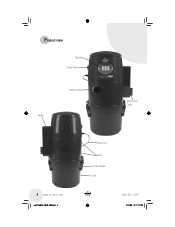
Product view Face Plate Power Switch Wet/Dry Hose Inlet Muffler Blower Hose Outlet 4 www.bissell.com ug110-4025_18P0_208.indd 4 Power Cord Hooks Dirt Tank Handles Dirt Tank 800.237.7691 2/12/08 12:17:17 PM
Product view Face Plate Power Switch Wet/Dry Hose Inlet Muffler Blower Hose Outlet 4 www.bissell.com ug110-4025_18P0_208.indd 4 Power Cord Hooks Dirt Tank Handles Dirt Tank 800.237.7691 2/12/08 12:17:17 PM
User's Guide
Page 5
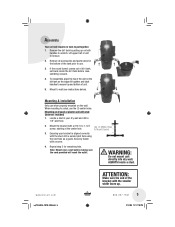
...x 1-3/4" Use (3) Middle Holes screw, starting at the center hole. www.bissell.com ug110-4025_18P0_208.indd 5 ATTENTION: Make sure the end of dirt tank, set back inside the dirt tank before reassembling vacuum. 4. Securely...handles to put together. 1. Mounting & installation Only use the (3) center holes. Ensuring your dry wall and drill a 1/8" pilot hole. 2. drill a second pilot hole using the next hole as a guide. Note: Mount near a wall outlet, making sure the cord provided will require no tools to secure top and bottom of unit. 5. Remove all accessories and parts...
...x 1-3/4" Use (3) Middle Holes screw, starting at the center hole. www.bissell.com ug110-4025_18P0_208.indd 5 ATTENTION: Make sure the end of dirt tank, set back inside the dirt tank before reassembling vacuum. 4. Securely...handles to put together. 1. Mounting & installation Only use the (3) center holes. Ensuring your dry wall and drill a 1/8" pilot hole. 2. drill a second pilot hole using the next hole as a guide. Note: Mount near a wall outlet, making sure the cord provided will require no tools to secure top and bottom of unit. 5. Remove all accessories and parts...

User's Guide
Page 6
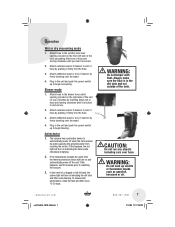
... holes. 6. Wrap hose around holder. Insert a bolt and anchor sleeve into drywall with no stud available, use supplied drywall anchors) 2. Operation Power switch WARNING: Do not remove plastic covering on the mounting bracket. The power switch is located on , ( I ) press up. To turn vacuum on the top left side of unit are sitting on the two hooks on power switch. Power Switch 6 www.bissell.com ug110...
... holes. 6. Wrap hose around holder. Insert a bolt and anchor sleeve into drywall with no stud available, use supplied drywall anchors) 2. Operation Power switch WARNING: Do not remove plastic covering on the mounting bracket. The power switch is located on , ( I ) press up. To turn vacuum on the top left side of unit are sitting on the two hooks on power switch. Power Switch 6 www.bissell.com ug110...
User's Guide
Page 7
... hose. Operation Wet or dry vacuuming mode 1. Attach hose to automatically power off the unit. Safety device 1. The vacuum has a protection device to the blower hose outlet opening (located on the front left side of the unit) by pushing fitted end of hose and turning clockwise until it is in the unit and push the power switch up to end of a clogged or full dirt tank, the yellow light...
... hose. Operation Wet or dry vacuuming mode 1. Attach hose to automatically power off the unit. Safety device 1. The vacuum has a protection device to the blower hose outlet opening (located on the front left side of the unit) by pushing fitted end of hose and turning clockwise until it is in the unit and push the power switch up to end of a clogged or full dirt tank, the yellow light...
User's Guide
Page 8
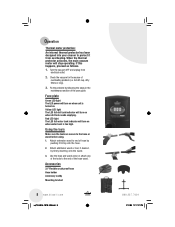
... clog). 3. Red LED light The LED full water tank indicator will turn on when unit is too high. When the thermal protector activates, the main vacuum motor will turn on when water level is turned on when dirt tank needs emptying. Attach extension wand to end of hose by pushing it from electrical outlet. 2. Turn the vacuum OFF and unplug from overheating. Face plate Green LED light The LED power will turn on . Attach additional wand or tool...
... clog). 3. Red LED light The LED full water tank indicator will turn on when unit is too high. When the thermal protector activates, the main vacuum motor will turn on when water level is turned on when dirt tank needs emptying. Attach extension wand to end of hose by pushing it from electrical outlet. 2. Turn the vacuum OFF and unplug from overheating. Face plate Green LED light The LED power will turn on . Attach additional wand or tool...

User's Guide
Page 9
... other hand to clip the handles to hold the tank and use . Unclip the dirt tank handles while holding the bottom portion of unwanted debris in tight spaces. (3) Small, medium and large detailing tools May be used to the upper portion of the vacuum. Large area cleaning tool Use on both dry vacuuming or wet cleaning in your vehicle. Dusting brush Use soft bristles for a longer reach. Multi surface floor tool...
... other hand to clip the handles to hold the tank and use . Unclip the dirt tank handles while holding the bottom portion of unwanted debris in tight spaces. (3) Small, medium and large detailing tools May be used to the upper portion of the vacuum. Large area cleaning tool Use on both dry vacuuming or wet cleaning in your vehicle. Dusting brush Use soft bristles for a longer reach. Multi surface floor tool...
User's Guide
Page 10
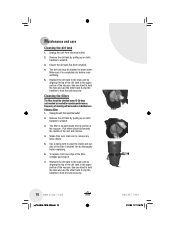
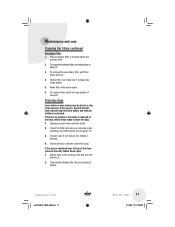
.... 4. Air dry thoroughly before reassembling. 5. The filter is completely dry before replacing. 6. Reattach the dirt tank to the main unit by aligning the top of the dirt tank to hold the tank and use the other hand to clip the handles to the upper portion of cleaning will be checked every 15-30 days and washed as needed to release any loose debris. 5. Remove the dirt tank...
.... 4. Air dry thoroughly before reassembling. 5. The filter is completely dry before replacing. 6. Reattach the dirt tank to the main unit by aligning the top of the dirt tank to hold the tank and use the other hand to clip the handles to the upper portion of cleaning will be checked every 15-30 days and washed as needed to release any loose debris. 5. Remove the dirt tank...
User's Guide
Page 11
... vacuum. Rinse filter with warm water. 6. www.bissell.com ug110-4025_18P0_208.indd 11 800.237.7691 11 2/12/08 12:17:28 PM If there is no suction or if suction is reduced at the hose, follow these steps to the wet/dry inlet and turn yellow and indicate airflow is full. Check to release any loose debris. 5. Attach hose to clear the clog: 1. Clearing clogs Low suction...
... vacuum. Rinse filter with warm water. 6. www.bissell.com ug110-4025_18P0_208.indd 11 800.237.7691 11 2/12/08 12:17:28 PM If there is no suction or if suction is reduced at the hose, follow these steps to the wet/dry inlet and turn yellow and indicate airflow is full. Check to release any loose debris. 5. Attach hose to clear the clog: 1. Clearing clogs Low suction...
User's Guide
Page 12
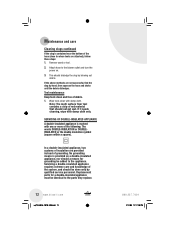
... instead of the system, and should not get wet. If it needs cleaning, wipe with damp cloth. No grounding means is marked with one or more of the hose (close to the appliance. Remove wand or tool. 2. Wipe tools clean with damp cloth only. b i s s e l l . Note: The multi surface floor tool contains a strip of debris. 1. Servicing a double-insulated appliance requires extreme care and knowledge...
... instead of the system, and should not get wet. If it needs cleaning, wipe with damp cloth. No grounding means is marked with one or more of the hose (close to the appliance. Remove wand or tool. 2. Wipe tools clean with damp cloth only. b i s s e l l . Note: The multi surface floor tool contains a strip of debris. 1. Servicing a double-insulated appliance requires extreme care and knowledge...
User's Guide
Page 13
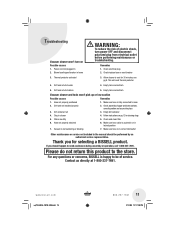
... should be of water 4. Hose not properly positioned 1. Empty dirt container 4. Please do not return this product to base 2. Check/replace fuse or reset breaker 3. Clog in locked position 7. Troubleshooting Vacuum cleaner won 't pick up or low suction Possible causes Remedies 1. Power cord not plugged in the manual should happen to cool for selecting a BISSELL product. Remedies 1. Allow cleaner to need assistance during assembly or operation, call 1-800-237-7691. This will reset thermal protector 4. Dirt tank is happy...
... should be of water 4. Hose not properly positioned 1. Empty dirt container 4. Please do not return this product to base 2. Check/replace fuse or reset breaker 3. Clog in locked position 7. Troubleshooting Vacuum cleaner won 't pick up or low suction Possible causes Remedies 1. Power cord not plugged in the manual should happen to cool for selecting a BISSELL product. Remedies 1. Allow cleaner to need assistance during assembly or operation, call 1-800-237-7691. This will reset thermal protector 4. Dirt tank is happy...
User's Guide
Page 14
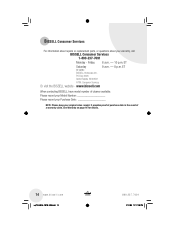
... of cleaner available. c o m ug110-4025_18P0_208.indd 14 800.237.7691 2/12/08 12:17:28 PM BISSELL Consumer Services For information about repairs or replacement parts, or questions about your original sales receipt. Friday 8 a.m. - 10 p.m. www.bissell.com When contacting BISSELL, have model number of a warranty claim. Please record your Model Number Please record your Purchase Date NOTE: Please keep your warranty, call: BISSELL Consumer Services 1-800...
... of cleaner available. c o m ug110-4025_18P0_208.indd 14 800.237.7691 2/12/08 12:17:28 PM BISSELL Consumer Services For information about repairs or replacement parts, or questions about your original sales receipt. Friday 8 a.m. - 10 p.m. www.bissell.com When contacting BISSELL, have model number of a warranty claim. Please record your Model Number Please record your Purchase Date NOTE: Please keep your warranty, call: BISSELL Consumer Services 1-800...
User's Guide
Page 15
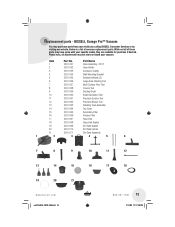
.... BISSELL Garage Pro™ Vacuum You may have come with your vacuum. Below is a list of these parts may purchase parts from your retailer, by calling BISSELL Consumer Services or by visiting our website. Replacement parts - Part Name 1 203-0151 Hose Assembly- 32 FT 2 203-0152 Hose Holder 3 203-0153 Accessory Caddy 4 203-0154 Wall Mounting Bracket 5 203-0155 Extension Wands (2) 6 203-0156 Large Area Cleaning Tool 7 203-0157 Multi...
.... BISSELL Garage Pro™ Vacuum You may have come with your vacuum. Below is a list of these parts may purchase parts from your retailer, by calling BISSELL Consumer Services or by visiting our website. Replacement parts - Part Name 1 203-0151 Hose Assembly- 32 FT 2 203-0152 Hose Holder 3 203-0153 Accessory Caddy 4 203-0154 Wall Mounting Bracket 5 203-0155 Extension Wands (2) 6 203-0156 Large Area Cleaning Tool 7 203-0157 Multi...
User's Guide
Page 16
... questions about repairs or replacement parts, or if you need additional instruction regarding what it may cover, please contact BISSELL Consumer Services by E-mail, telephone, or regular mail as filters, belts, or brushes. If you need information about your BISSELL product should require service". BISSELL'S LIABILITY WILL NOT EXCEED THE PURCHASE PRICE OF THE PRODUCT. Printed in accordance with new or remanufactured components or products), at : www.bissell.com...
... questions about repairs or replacement parts, or if you need additional instruction regarding what it may cover, please contact BISSELL Consumer Services by E-mail, telephone, or regular mail as filters, belts, or brushes. If you need information about your BISSELL product should require service". BISSELL'S LIABILITY WILL NOT EXCEED THE PURCHASE PRICE OF THE PRODUCT. Printed in accordance with new or remanufactured components or products), at : www.bissell.com...


