Setup Manual
Page 2
... & Jumpers Setup 13 3.1 How to Setup Jumpers 13 3.2 Detail Settings 13 Chapter 4: Useful Help 18 4.1 Driver Installation Note 18 4.2 Software 19 4.3 Extra Information 23 4.4 AMI BIOS Beep Code 25 4.5 Troubleshooting 26 Appendix: SPEC In Other Languages 27 German...28 French ...30 Italian...32 Spanish ...34 Portuguese ...36 Polish...38 Russian ...40...
... & Jumpers Setup 13 3.1 How to Setup Jumpers 13 3.2 Detail Settings 13 Chapter 4: Useful Help 18 4.1 Driver Installation Note 18 4.2 Software 19 4.3 Extra Information 23 4.4 AMI BIOS Beep Code 25 4.5 Troubleshooting 26 Appendix: SPEC In Other Languages 27 German...28 French ...30 Italian...32 Spanish ...34 Portuguese ...36 Polish...38 Russian ...40...

Setup Manual
Page 5
... @60Hz VGA: 2048 x 1536 @75Hz NOTE: This motherboard supports Multiple VGA output, and the configuration is as below: (HDMI is not supported under DOS and BIOS setup.) Display Devices Enabled VGA + HDMI VGA + DVI-D HDMI + DVI-D O O X Caution: HDMI / DVI-D can not be plugged at the same time, or there ... x1 Connect to DVI monitor x1 Connect to RJ-45 ethernet cable x4 Connect to USB devices x3 Provide Audio-In/Out and microphone connection Biostar reserves the right to add or remove support for any OS with or without notice 1.4 REAR PANEL CONNECTORS PS/2 Keyboard / Mouse LAN USBX2 HDMI...
... @60Hz VGA: 2048 x 1536 @75Hz NOTE: This motherboard supports Multiple VGA output, and the configuration is as below: (HDMI is not supported under DOS and BIOS setup.) Display Devices Enabled VGA + HDMI VGA + DVI-D HDMI + DVI-D O O X Caution: HDMI / DVI-D can not be plugged at the same time, or there ... x1 Connect to DVI monitor x1 Connect to RJ-45 ethernet cable x4 Connect to USB devices x3 Provide Audio-In/Out and microphone connection Biostar reserves the right to add or remove support for any OS with or without notice 1.4 REAR PANEL CONNECTORS PS/2 Keyboard / Mouse LAN USBX2 HDMI...

Setup Manual
Page 6
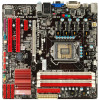
Motherboard Manual 1.5 MOTHERBOARD LAYOUT U S BK B 1 DD R 3_B 1 DD R 3_A 1 HDMI1 D V I1 Socket 1156 C PU 1 ID E 1 C P U_FA N1 ATX PW R 1 VGA1 SATA3 SATA1 SATA4 SATA2 JU S BV 1 R J 45U S B1 A U DI O1 ATX P WR 2 PEX16_1 BAT1 BIOS LAN PCI1 CODEC PCI2 J S P DI FOU T1 PEX1_1 Super I/O F_AUDIO1 J_PRINT1 J_COM1 H55 J U SB V 2 JCMOS1 SY S _FA N 1 CIR1 F_USB2 F_USB1 PANEL1 Note: ■ represents the 1st pin. 4
Motherboard Manual 1.5 MOTHERBOARD LAYOUT U S BK B 1 DD R 3_B 1 DD R 3_A 1 HDMI1 D V I1 Socket 1156 C PU 1 ID E 1 C P U_FA N1 ATX PW R 1 VGA1 SATA3 SATA1 SATA4 SATA2 JU S BV 1 R J 45U S B1 A U DI O1 ATX P WR 2 PEX16_1 BAT1 BIOS LAN PCI1 CODEC PCI2 J S P DI FOU T1 PEX1_1 Super I/O F_AUDIO1 J_PRINT1 J_COM1 H55 J U SB V 2 JCMOS1 SY S _FA N 1 CIR1 F_USB2 F_USB1 PANEL1 Note: ■ represents the 1st pin. 4

Setup Manual
Page 19
... control and communication. 26 15 Pin Assignment 1 IrDA serial input 2 Ground 3 Ground 4 Key 5 IrDA serial output 6 IR Power 17 Set the jumper to restore the BIOS safe setting and the CMOS data. Please carefully follow the procedures to "Pin 2-3 close ". 5. Set the jumper to avoid damaging the motherboard. 3 1 Pin 1-2 Close: Normal...
... control and communication. 26 15 Pin Assignment 1 IrDA serial input 2 Ground 3 Ground 4 Key 5 IrDA serial output 6 IR Power 17 Set the jumper to restore the BIOS safe setting and the CMOS data. Please carefully follow the procedures to "Pin 2-3 close ". 5. Set the jumper to avoid damaging the motherboard. 3 1 Pin 1-2 Close: Normal...
Setup Manual
Page 21
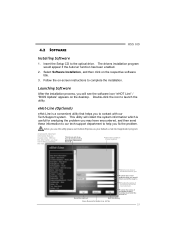
... utility,please set Outlook Express as your area or the area cl ose to you to help you will see the software icon "eHOT Line" / "BIOS Update" appears on the respective software title. 3. Send the mail out. Launching Software After the installation process, you fix the problem. This bl ock will...
... utility,please set Outlook Express as your area or the area cl ose to you to help you will see the software icon "eHOT Line" / "BIOS Update" appears on the respective software title. 3. Send the mail out. Launching Software After the installation process, you fix the problem. This bl ock will...
Setup Manual
Page 22
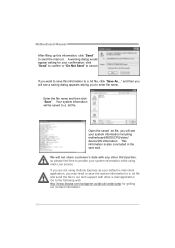
...information to a .txt file and send the file to our tech support with any other e-mail application. Go to the following web http://www.biostar.com.tw/app/en-us/about/contact.php for your default e-mail client application, you will not share customer's data with other third parties,... so please feel free to provide your system information including motherboard/BIOS/CPU/video/ device/OS information. If you will be saved to a .txt file. click "Send" to confirm or "Do Not Send" to ...
...information to a .txt file and send the file to our tech support with any other e-mail application. Go to the following web http://www.biostar.com.tw/app/en-us/about/contact.php for your default e-mail client application, you will not share customer's data with other third parties,... so please feel free to provide your system information including motherboard/BIOS/CPU/video/ device/OS information. If you will be saved to a .txt file. click "Send" to confirm or "Do Not Send" to ...

Setup Manual
Page 23
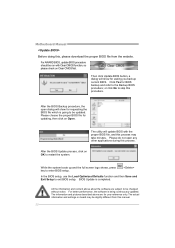
AWARD BIOS Show current BIOS information AMI BIOS Clear CMOS function (Only for AWARD BIOS) Save current BIOS to update your motherboard BIOS under Windows system. H55 HD BIOS Update BIOS Update is a convenient utility which allows you to a .bin file Update BIOS with a BIOS file Once click on this button, the saving dialog will show. Choose the position to save file and enter file name. (We recommend that the file name should be English/number and no longer than 7 characters.) Then click Save. 21
AWARD BIOS Show current BIOS information AMI BIOS Clear CMOS function (Only for AWARD BIOS) Save current BIOS to update your motherboard BIOS under Windows system. H55 HD BIOS Update BIOS Update is a convenient utility which allows you to a .bin file Update BIOS with a BIOS file Once click on this button, the saving dialog will show. Choose the position to save file and enter file name. (We recommend that the file name should be English/number and no longer than 7 characters.) Then click Save. 21
Setup Manual
Page 24
... during this process. Please do not open dialog will show for updating, then click on OK to the Backup BIOS procedure; BIOS Update is being continuously updated. Then click Update BIOS button, a dialog will update BIOS with Clear CMOS function, so please check on board may take minutes. After the... are subject to skip this procedure. While the system boots up and the full screen logo shows, press key to exit BIOS setup. The utility will show for your reference only. The information and pictures described above about the software are for requesting the...
... during this process. Please do not open dialog will show for updating, then click on OK to the Backup BIOS procedure; BIOS Update is being continuously updated. Then click Update BIOS button, a dialog will update BIOS with Clear CMOS function, so please check on board may take minutes. After the... are subject to skip this procedure. While the system boots up and the full screen logo shows, press key to exit BIOS setup. The utility will show for your reference only. The information and pictures described above about the software are for requesting the...
Setup Manual
Page 26
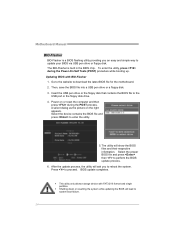
... the floppy disk drive. 4. After the update process, the utility will show the BIOS files and their respective information. z This utility only allows storage device with BIO-Flasher 1. Go to the website to perform the BIOS update process. 6. A select dialog as the picture on or reset the computer and... then press during the Power-On Self Tests (POST) procedure while booting up. Select the proper BIOS file and press then to download the latest BIOS file for the motherboard. 2. To enter the utility, press during the POST process. The utility will ask you ...
... the floppy disk drive. 4. After the update process, the utility will show the BIOS files and their respective information. z This utility only allows storage device with BIO-Flasher 1. Go to the website to perform the BIOS update process. 6. A select dialog as the picture on or reset the computer and... then press during the Power-On Self Tests (POST) procedure while booting up. Select the proper BIOS file and press then to download the latest BIOS file for the motherboard. 2. To enter the utility, press during the POST process. The utility will ask you ...

Setup Manual
Page 27
...happens again. z If beep codes are generated when all hope, eliminate the possibility of interference by a malfunctioning add-in flash device) POST BIOS Beep Codes Number of Beeps Description 1 Memory refresh timer error 3 Base memory read/write test error 6 Keyboard controller BAT command failed 7 General... File read error 7 No Flash EPROM detected 10 Flash Erase error 11 Flash Program error 12 "AMIBOOT.ROM" file size error 13 BIOS ROM image mismatch (file layout does not match image present in card. z If beep codes are not generated when all expansion cards ...
...happens again. z If beep codes are generated when all hope, eliminate the possibility of interference by a malfunctioning add-in flash device) POST BIOS Beep Codes Number of Beeps Description 1 Memory refresh timer error 3 Base memory read/write test error 6 Keyboard controller BAT command failed 7 General... File read error 7 No Flash EPROM detected 10 Flash Erase error 11 Flash Program error 12 "AMIBOOT.ROM" file size error 13 BIOS ROM image mismatch (file layout does not match image present in card. z If beep codes are not generated when all expansion cards ...

Bios Setup
Page 1
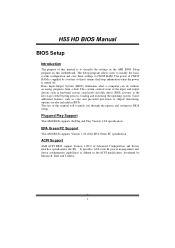
H55 HD BIOS Manual BIOS Setup 1 1 Main Menu 3 2 Advanced Menu 8 3 PCIPnP Menu 22 4 Boot Menu 25 5 Chipset Menu 28 6 Performance Menu 33 7 Exit Menu 36 i
H55 HD BIOS Manual BIOS Setup 1 1 Main Menu 3 2 Advanced Menu 8 3 PCIPnP Menu 22 4 Boot Menu 25 5 Chipset Menu 28 6 Performance Menu 33 7 Exit Menu 36 i
Bios Setup
Page 2
...users to modify the basic system configuration and save these settings to guide you through the options and settings in BIOS. EPA Green PC Support T his AMI BIOS supports the Plug and Play Version 1.0A specification. T his system controls most of the input and output ...by a battery so that it retains theSetup information when the power is supplied by Microso ft, Intel and T oshiba. 1 Basic Input-Output System (BIOS) determines what a computer can do without accessing programs from a disk. Some additional features, such as keyboard, mouse, serial ports and disk drives. ...
...users to modify the basic system configuration and save these settings to guide you through the options and settings in BIOS. EPA Green PC Support T his AMI BIOS supports the Plug and Play Version 1.0A specification. T his system controls most of the input and output ...by a battery so that it retains theSetup information when the power is supplied by Microso ft, Intel and T oshiba. 1 Basic Input-Output System (BIOS) determines what a computer can do without accessing programs from a disk. Some additional features, such as keyboard, mouse, serial ports and disk drives. ...
Bios Setup
Page 3
... this manual is for most conditions to ensure system's compatibility and stability. Use Load Setup Default under the Exit Menu. z T he BIOS information described in this is supported. We will see General Help description at the top right corner, and this user's manual and any settings...DDR3 SDRAM (Double Data Rate III Synchronous DRAM) is providing a brief description of this manual. In the BIOS setup utility, you can use these keys to enter the BIOS setup utility. If the system becomes unstable after changing any system damage that particular menu are at the bottom ...
... this manual is for most conditions to ensure system's compatibility and stability. Use Load Setup Default under the Exit Menu. z T he BIOS information described in this is supported. We will see General Help description at the top right corner, and this user's manual and any settings...DDR3 SDRAM (Double Data Rate III Synchronous DRAM) is providing a brief description of this manual. In the BIOS setup utility, you can use these keys to enter the BIOS setup utility. If the system becomes unstable after changing any system damage that particular menu are at the bottom ...

Bios Setup
Page 4
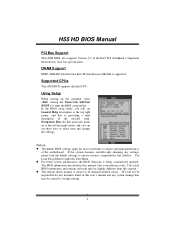
System Date Set the system date. Note that the 'Day' automatically changes when you enter AMI BIOS Setup Utility, the Main Menu will be excluded.. Change Field Tab Select Field F1 General Help F10 Save and Exit ESC Exit vxx.xx (C)Copyright .../SATA Configuration [ 00:00:00] [Fri 01/01/2010] Select Screen Select Item +- H55 HD BIOS Manual 1 Main Menu Once you set the date. 3 Main Advanced BIOS SETUP UTILITY PCIPnP Boot Chipset Performance Exit System Overview AMI BIOS Version :01.01.01 Build Date:01/01/10 System Memory Size : Use [ENTER], [TAB...
System Date Set the system date. Note that the 'Day' automatically changes when you enter AMI BIOS Setup Utility, the Main Menu will be excluded.. Change Field Tab Select Field F1 General Help F10 Save and Exit ESC Exit vxx.xx (C)Copyright .../SATA Configuration [ 00:00:00] [Fri 01/01/2010] Select Screen Select Item +- H55 HD BIOS Manual 1 Main Menu Once you set the date. 3 Main Advanced BIOS SETUP UTILITY PCIPnP Boot Chipset Performance Exit System Overview AMI BIOS Version :01.01.01 Build Date:01/01/10 System Memory Size : Use [ENTER], [TAB...

Bios Setup
Page 5
...SAT A controller. Configure SATA as SATA#1 Configuration > AHCI Configuration > SATA 1 Device > SATA 2 Device > SATA 3 Device > SATA 4 Device BIOS SETUP UTILITY [IDE] [Compatible] Hard Disk Write Protect [Disabled] IDE Detect Time Out (Sec) [35] ATA(PI)80Pin Cable Detection [Host & Device...] Options IDE AHCI Disabled Select Screen Select Item EnterGo to choose the SAT A operation mode. H55 HD BIOS Manual IDE/S ATA Configuration T he BIOS will automatically detect the presence of detailed options. Options: Compatible (Default) / Enhanced 4 Main IDE/SATA Configuration ...
...SAT A controller. Configure SATA as SATA#1 Configuration > AHCI Configuration > SATA 1 Device > SATA 2 Device > SATA 3 Device > SATA 4 Device BIOS SETUP UTILITY [IDE] [Compatible] Hard Disk Write Protect [Disabled] IDE Detect Time Out (Sec) [35] ATA(PI)80Pin Cable Detection [Host & Device...] Options IDE AHCI Disabled Select Screen Select Item EnterGo to choose the SAT A operation mode. H55 HD BIOS Manual IDE/S ATA Configuration T he BIOS will automatically detect the presence of detailed options. Options: Compatible (Default) / Enhanced 4 Main IDE/SATA Configuration ...

Bios Setup
Page 6
...Exit vxx.xx (C)Copyright 1985-200x, American Megatrends, Inc. AHCI BIOS Support T his BIOS feature controls the AHCI function of d evice connec ted to t he system. H55 HD BIOS Manual AHCI Configuration Main AHCI Settings AHCI BIOS Support > AHCI Port0 > AHCI Port1 > AHCI Port2 > ...Enables for supporting Select Screen Select Item +- S elect Screen S elect Item +- Options: Enabled (Default) / Disabled AHCI Port0/Port1/Port2/Port3/Port4/Port5 Main BIOS S ETUP UTILITY AHCI Port0 Devic e : AHCI Port0 S.M.A .R.T. [Aut o] [Ena bled] Sele ct the type of the SAT A controller. C hange ...
...Exit vxx.xx (C)Copyright 1985-200x, American Megatrends, Inc. AHCI BIOS Support T his BIOS feature controls the AHCI function of d evice connec ted to t he system. H55 HD BIOS Manual AHCI Configuration Main AHCI Settings AHCI BIOS Support > AHCI Port0 > AHCI Port1 > AHCI Port2 > ...Enables for supporting Select Screen Select Item +- S elect Screen S elect Item +- Options: Enabled (Default) / Disabled AHCI Port0/Port1/Port2/Port3/Port4/Port5 Main BIOS S ETUP UTILITY AHCI Port0 Devic e : AHCI Port0 S.M.A .R.T. [Aut o] [Ena bled] Sele ct the type of the SAT A controller. C hange ...

Bios Setup
Page 7
Options: Enabled (Default) / Disabled SATA 1/2/3/4 Device Main BIOS SETU P U TILITY SATA1 Device Device : Type [Aut o] LBA/Large Mode [Aut o] Block (Multi-S ector Transfer)[Aut o] PIO Mode [Aut o] DMA Mode [Aut o] S.M.A.R.T [Aut o]...elect Item +- SATA Port0/1/2/3/4/5 This item allows you to control the device S.M.A.R.T function. Options: Auto (Default) / Disabled 6 H55 HD BIOS Manual Devic e This area shows the detected connected device. T he BIOS detects the information and values of resp ective devices, and these information and values are shown below to the name...
Options: Enabled (Default) / Disabled SATA 1/2/3/4 Device Main BIOS SETU P U TILITY SATA1 Device Device : Type [Aut o] LBA/Large Mode [Aut o] Block (Multi-S ector Transfer)[Aut o] PIO Mode [Aut o] DMA Mode [Aut o] S.M.A.R.T [Aut o]...elect Item +- SATA Port0/1/2/3/4/5 This item allows you to control the device S.M.A.R.T function. Options: Auto (Default) / Disabled 6 H55 HD BIOS Manual Devic e This area shows the detected connected device. T he BIOS detects the information and values of resp ective devices, and these information and values are shown below to the name...

Bios Setup
Page 8
... transfer. Options: 35 (Default) / 30 / 25 / 20 / 15 / 10 / 5 / 0 ATA(PI) 80Pin Cable Detection Select the mechanism for detecting IDE/SAT A devices. is accessed through BIOS. Options: Auto (Default) / SWDMA0 ~ 2 / MWDMA0 ~ 2 / UDMA0 ~ 5 S.M.A.R.T Set the Smart Monitoring, Analysis, and Reporting T echnology. H55 HD...
... transfer. Options: 35 (Default) / 30 / 25 / 20 / 15 / 10 / 5 / 0 ATA(PI) 80Pin Cable Detection Select the mechanism for detecting IDE/SAT A devices. is accessed through BIOS. Options: Auto (Default) / SWDMA0 ~ 2 / MWDMA0 ~ 2 / UDMA0 ~ 5 S.M.A.R.T Set the Smart Monitoring, Analysis, and Reporting T echnology. H55 HD...

Bios Setup
Page 9
...> Onboard PCI/PCI-E Devices Configuration > Intel VT-d Configuration > MPS Configuration > PCI Express Configuration > Smbios Configuration > USB Configuration Configure CPU. Advanced BIOS S ETUP UTILITY Confi gure advanced CPU setting s Modul e Version:01. 04 Manuf acturer:Intel CPU Frequ ency : BCLK Speed : Cache L1 ...re the settings o f CPU, Super I/O, Power Management, and other system devices. S elect Screen S elect Item +- Notice z Beware of that the BIOS automatically detects. C hange Option F1 G eneral Help F1 0 S ave and Exit ES C E xit vxx.xx (C)C opyright 198 5-200x, Amer ...
...> Onboard PCI/PCI-E Devices Configuration > Intel VT-d Configuration > MPS Configuration > PCI Express Configuration > Smbios Configuration > USB Configuration Configure CPU. Advanced BIOS S ETUP UTILITY Confi gure advanced CPU setting s Modul e Version:01. 04 Manuf acturer:Intel CPU Frequ ency : BCLK Speed : Cache L1 ...re the settings o f CPU, Super I/O, Power Management, and other system devices. S elect Screen S elect Item +- Notice z Beware of that the BIOS automatically detects. C hange Option F1 G eneral Help F1 0 S ave and Exit ES C E xit vxx.xx (C)C opyright 198 5-200x, Amer ...

Bios Setup
Page 10
... it must first query the processor to help keep them cool. Options: Disabled (Default) / Enabled 9 T his reduces the latency associated with memory reads. H55 HD BIOS Manual C1E Support C1E is "Enhanced Halt State" function, this function helps to be required in the near future. Options: Enabled (Default) / Disabled Hardware Prefetcher...
... it must first query the processor to help keep them cool. Options: Disabled (Default) / Enabled 9 T his reduces the latency associated with memory reads. H55 HD BIOS Manual C1E Support C1E is "Enhanced Halt State" function, this function helps to be required in the near future. Options: Enabled (Default) / Disabled Hardware Prefetcher...

