Update Manual
Page 3
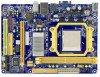
...to search for your BIOS via USB pen drive. 1. Click Yes to restart system. 8. Press the [Y] key to start updating BIOS. 7. Power on board may be changed without notice. Then, copy and save the BIOS file into a USB flash (pen) drive. 3. Insert the USB pen drive that ...BIOS file to flash the BIOS file. Select the proper BIOS file, and a message asking if you are for the BIOS file. 6. BIOSTAR BIOS flasher BIOSTAR BIOS Flasher is completed, asking you to restart the system. After entering the POST screen, the BIOSFLASHER utility pops out. The information and...
...to search for your BIOS via USB pen drive. 1. Click Yes to restart system. 8. Press the [Y] key to start updating BIOS. 7. Power on board may be changed without notice. Then, copy and save the BIOS file into a USB flash (pen) drive. 3. Insert the USB pen drive that ...BIOS file to flash the BIOS file. Select the proper BIOS file, and a message asking if you are for the BIOS file. 6. BIOSTAR BIOS flasher BIOSTAR BIOS Flasher is completed, asking you to restart the system. After entering the POST screen, the BIOSFLASHER utility pops out. The information and...

Setup Manual
Page 3
... parts will cause short circuits which may be differed by touching any safely grounded appliance, or use grounded wrist strap to bend or flex the board. „ Do not leave any unfastened small parts inside ) FDD Cable X 1 (optional) USB 2.0 Cable X1 (optional) Serial ATA Power Cable X 1 (optional) Note...; Before you for ATX Case X 1 Installation Guide X 1 Fully Setup Driver CD X 1 (full version manual files inside the case after installation. Hold the board on the edge, do not try to remove the static charge. „ Avoid touching the components on motherboard or the rear side of the...
... parts will cause short circuits which may be differed by touching any safely grounded appliance, or use grounded wrist strap to bend or flex the board. „ Do not leave any unfastened small parts inside ) FDD Cable X 1 (optional) USB 2.0 Cable X1 (optional) Serial ATA Power Cable X 1 (optional) Note...; Before you for ATX Case X 1 Installation Guide X 1 Fully Setup Driver CD X 1 (full version manual files inside the case after installation. Hold the board on the edge, do not try to remove the static charge. „ Avoid touching the components on motherboard or the rear side of the...
Setup Manual
Page 4
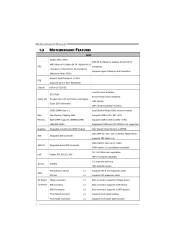
... 5.1 channels audio out High Definition Audio Slots PCI Express x16 slot PCI slot x1 Supports PCI-E x16 expansion cards x1 Supports PCI expansion cards On Board Floppy connector x1 Each connector supports 2 Floppy drives Connector IDE Connector x1 Each connector supports 2 IDE device SATA Connector x2 Each connector supports 1 SATA devices...
... 5.1 channels audio out High Definition Audio Slots PCI Express x16 slot PCI slot x1 Supports PCI-E x16 expansion cards x1 Supports PCI expansion cards On Board Floppy connector x1 Each connector supports 2 Floppy drives Connector IDE Connector x1 Each connector supports 2 IDE device SATA Connector x2 Each connector supports 1 SATA devices...

Setup Manual
Page 5
...Connector (24pin) Power Connector (4pin) Printer Port Connector Serial port Connector PS/2 Keyboard PS/2 Mouse Back Panel VGA port I/O LAN port USB Port Audio Jack Board Size 170 mm(W) x 235 mm(L) Special Features RAID 0 / 1 OS Support Windows XP / Vista / 7 MCP6PB M2+ SPEC x1 CPU Fan power ...Connect to D-SUB monitor x1 Connect to RJ-45 ethernet cable x4 Connect to USB devices x3 Provide Audio-In/Out and microphone connection MicroATX Biostar Reserves the right to add or remove support for any OS With or without notice. 1.4 REAR PANEL CONNECTORS PS/2 Mouse PS/ 2 ...
...Connector (24pin) Power Connector (4pin) Printer Port Connector Serial port Connector PS/2 Keyboard PS/2 Mouse Back Panel VGA port I/O LAN port USB Port Audio Jack Board Size 170 mm(W) x 235 mm(L) Special Features RAID 0 / 1 OS Support Windows XP / Vista / 7 MCP6PB M2+ SPEC x1 CPU Fan power ...Connect to D-SUB monitor x1 Connect to RJ-45 ethernet cable x4 Connect to USB devices x3 Provide Audio-In/Out and microphone connection MicroATX Biostar Reserves the right to add or remove support for any OS With or without notice. 1.4 REAR PANEL CONNECTORS PS/2 Mouse PS/ 2 ...

Setup Manual
Page 26
Replace cable. System only boots from a hard disk 1. fails to disk controller board. Back up the hard drive is inoperative. Review system's equipment. Run SETUP program and select correct drive types. Call the drive manufacturers for compatibility with ...
Replace cable. System only boots from a hard disk 1. fails to disk controller board. Back up the hard drive is inoperative. Review system's equipment. Run SETUP program and select correct drive types. Call the drive manufacturers for compatibility with ...
Bios Manual
Page 4
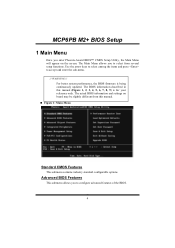
... settings on the screen. Advanced BIOS Features This submenu allows you enter Phoenix-Award BIOS™ CMOS Setup Utility, the Main Menu will appear on board may be slightly different from several setup functions. For better system performance, the BIOS firmware is for your reference only. MCP6PB M2+ BIOS Setup 1 Main...
... settings on the screen. Advanced BIOS Features This submenu allows you enter Phoenix-Award BIOS™ CMOS Setup Utility, the Main Menu will appear on board may be slightly different from several setup functions. For better system performance, the BIOS firmware is for your reference only. MCP6PB M2+ BIOS Setup 1 Main...

Bios Manual
Page 22
... allows you wish to use it. Onboard I/O Address Onboard FDC Controller Select enabled if your system has a floppy disk controller (FDC) installed on the system board and you to enable or disable the Onboard LAN Boot ROM. If you to control the onboard MAC Media Interface. The Choices: Pin Strap (default...
... allows you wish to use it. Onboard I/O Address Onboard FDC Controller Select enabled if your system has a floppy disk controller (FDC) installed on the system board and you to enable or disable the Onboard LAN Boot ROM. If you to control the onboard MAC Media Interface. The Choices: Pin Strap (default...
Bios Manual
Page 23
.... Onboard Parallel Port This item allows you to determine how the parallel port should be enabled if your system has a USB installed on the system board. MCP6PB M2+ BIOS Setup Onboard Serial Port 1 Select an address and corresponding interrupt for the port. The default value is SPP. The Choices: Auto (default...
.... Onboard Parallel Port This item allows you to determine how the parallel port should be enabled if your system has a USB installed on the system board. MCP6PB M2+ BIOS Setup Onboard Serial Port 1 Select an address and corresponding interrupt for the port. The default value is SPP. The Choices: Auto (default...

