Update Manual
Page 1
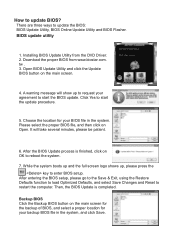
... select a proper location for your agreement to restart the computer. There are three ways to reboot the system. 7. Installing BIOS Update Utility from www.biostar.com. After entering the BIOS setup, please go to the Save & Exit, using the Restore Defaults function to load Optimized Defaults, and select Save Changes and Reset to...
... select a proper location for your agreement to restart the computer. There are three ways to reboot the system. 7. Installing BIOS Update Utility from www.biostar.com. After entering the BIOS setup, please go to the Save & Exit, using the Restore Defaults function to load Optimized Defaults, and select Save Changes and Reset to...
Update Manual
Page 2
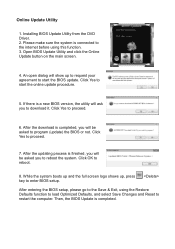
... the system boots up and the full screen logo shows up to request your agreement to start the online update procedure. 5. Then, the BIOS Update is connected to the internet before using the Restore Defaults function to load Optimized Defaults, and select Save Changes and Reset to download it.... After the download is a new BIOS version, the utility will ask you to restart the computer. If there is completed, you will be asked you will show up , press key...
... the system boots up and the full screen logo shows up to request your agreement to start the online update procedure. 5. Then, the BIOS Update is connected to the internet before using the Restore Defaults function to load Optimized Defaults, and select Save Changes and Reset to download it.... After the download is a new BIOS version, the utility will ask you to restart the computer. If there is completed, you will be asked you will show up , press key...
Update Manual
Page 3
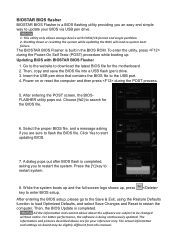
...Self Tests (POST) procedure while booting up , press key to the USB port. 4. Press the [Y] key to start updating BIOS. 7. Click Yes to restart system. 8. The BIOSTAR BIOS Flasher is being continuously updated. Power on board may be changed without notice. This utility only allows storage device with... BIOSTAR BIOS Flasher 1. While the system boots up and the full screen logo shows up . After entering the POST screen, the BIOSFLASHER...
...Self Tests (POST) procedure while booting up , press key to the USB port. 4. Press the [Y] key to start updating BIOS. 7. Click Yes to restart system. 8. The BIOSTAR BIOS Flasher is being continuously updated. Power on board may be changed without notice. This utility only allows storage device with... BIOSTAR BIOS Flasher 1. While the system boots up and the full screen logo shows up . After entering the POST screen, the BIOSFLASHER...
Setup Manual
Page 2
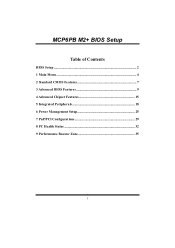
... Chapter 4: RAID Functions 19 4.1 Operating System 19 4.2 Raid Arrays 19 4.3 How RAID Works 19 Chapter 5: Useful Help 21 5.1 Driver Installation Note 21 5.2 Software 22 5.3 Award BIOS Beep Code 23 5.4 Extra Information 23 5.5 Troubleshooting 24 Appendix: SPEC In Other Languages 26 German...26 French ...28 Italian...30 Spanish ...32 Portuguese ...34 Polish...
... Chapter 4: RAID Functions 19 4.1 Operating System 19 4.2 Raid Arrays 19 4.3 How RAID Works 19 Chapter 5: Useful Help 21 5.1 Driver Installation Note 21 5.2 Software 22 5.3 Award BIOS Beep Code 23 5.4 Extra Information 23 5.5 Troubleshooting 24 Appendix: SPEC In Other Languages 26 German...26 French ...28 Italian...30 Spanish ...32 Portuguese ...34 Polish...
Setup Manual
Page 8
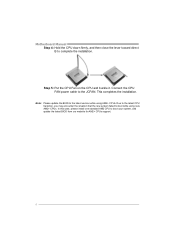
... the installation. Motherboard Manual Step 4: Hold the CPU down firmly, and then close the lever toward direct B to boot your system, and update the latest BIOS from our website for AM2+ CPUs support. 6 Connect the CPU FAN power cable to the latest version while using new AM2+ CPUs. Due to the... latest CPU transition, you may encounter the situation that the new system failed to boot while using AM2+ CPUs. Note: Please update the BIOS to the JCFAN. Step 5: Put the CPU Fan on the CPU and buckle it.
... the installation. Motherboard Manual Step 4: Hold the CPU down firmly, and then close the lever toward direct B to boot your system, and update the latest BIOS from our website for AM2+ CPUs support. 6 Connect the CPU FAN power cable to the latest version while using new AM2+ CPUs. Due to the... latest CPU transition, you may encounter the situation that the new system failed to boot while using AM2+ CPUs. Note: Please update the BIOS to the JCFAN. Step 5: Put the CPU Fan on the CPU and buckle it.
Setup Manual
Page 18
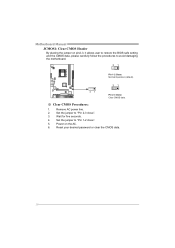
Set the jumper to "Pin 2-3 close ". 5. Set the jumper to avoid damaging the motherboard. 31 Pin 1-2 Close: Normal Operation (default). 31 31 Pin 2-3 Close: Clear CMOS data. ※ Clear CMOS Procedures: 1. Motherboard Manual JCMOS1: Clear CMOS Header By placing the jumper on the AC. 6. Wait for five seconds. 4. Remove AC power line. 2. Power on pin2-3, it allows user to restore the BIOS safe setting and the CMOS data, please carefully follow the procedures to "Pin 1-2 close ". 3. Reset your desired password or clear the CMOS data. 16
Set the jumper to "Pin 2-3 close ". 5. Set the jumper to avoid damaging the motherboard. 31 Pin 1-2 Close: Normal Operation (default). 31 31 Pin 2-3 Close: Clear CMOS data. ※ Clear CMOS Procedures: 1. Motherboard Manual JCMOS1: Clear CMOS Header By placing the jumper on the AC. 6. Wait for five seconds. 4. Remove AC power line. 2. Power on pin2-3, it allows user to restore the BIOS safe setting and the CMOS data, please carefully follow the procedures to "Pin 1-2 close ". 3. Reset your desired password or clear the CMOS data. 16
Setup Manual
Page 24
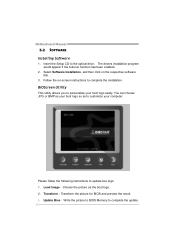
...;Choose the picture as to personalize your boot logo so as the boot logo. 2. Transform:Transform the picture for BIOS and preview the result. 3. Update Bios:Write the picture to BIOS Memory to the optical drive. You can choose JPG or BMP as your boot logo easily. Please follow the following...
...;Choose the picture as to personalize your boot logo so as the boot logo. 2. Transform:Transform the picture for BIOS and preview the result. 3. Update Bios:Write the picture to BIOS Memory to the optical drive. You can choose JPG or BMP as your boot logo easily. Please follow the following...
Setup Manual
Page 25
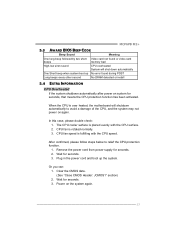
... the system may not power on again. Power on system for seconds. 3. Clear the CMOS data. (See "Close CMOS Header: JCMOS1" section) 2. MCP6PB M2+ 5.3 AWARD BIOS BEEP CODE Beep Sound Meaning One long beep followed by two short Video card not found during POST Long beeps every other second No DRAM...
... the system may not power on again. Power on system for seconds. 3. Clear the CMOS data. (See "Close CMOS Header: JCMOS1" section) 2. MCP6PB M2+ 5.3 AWARD BIOS BEEP CODE Beep Sound Meaning One long beep followed by two short Video card not found during POST Long beeps every other second No DRAM...
Bios Manual
Page 1
MCP6PB M2+ BIOS Setup Table of Contents BIOS Setup 2 1 Main Menu 4 2 Standard CMOS Features 7 3 Advanced BIOS Features 9 4 Advanced Chipset Features 15 5 Integrated Peripherals 18 6 Power Management Setup 25 7 PnP/PCI Configurations 29 8 PC Health Status 32 9 Performance Booster Zone 35 1
MCP6PB M2+ BIOS Setup Table of Contents BIOS Setup 2 1 Main Menu 4 2 Standard CMOS Features 7 3 Advanced BIOS Features 9 4 Advanced Chipset Features 15 5 Integrated Peripherals 18 6 Power Management Setup 25 7 PnP/PCI Configurations 29 8 PC Health Status 32 9 Performance Booster Zone 35 1
Bios Manual
Page 2
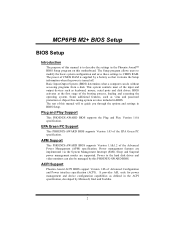
...input and output devices such as virus and password protection or chipset fine-tuning options are supported. APM Support This PHOENIX-AWARD BIOS supports Version 1.1&1.2 of Advanced Configuration and Power interface specification (ACPI). It provides ASL code for power management and device configuration ...capabilities as defined in the Phoenix-Award™ BIOS Setup program on this motherboard. The power of CMOS RAM is supplied by a battery so that it retains the Setup information...
...input and output devices such as virus and password protection or chipset fine-tuning options are supported. APM Support This PHOENIX-AWARD BIOS supports Version 1.1&1.2 of Advanced Configuration and Power interface specification (ACPI). It provides ASL code for power management and device configuration ...capabilities as defined in the Phoenix-Award™ BIOS Setup program on this motherboard. The power of CMOS RAM is supplied by a battery so that it retains the Setup information...
Bios Manual
Page 3
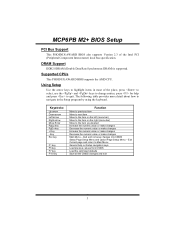
... about how to quit. Keystroke Up arrow Down arrow Left arrow Right arrow Move Enter PgUp key PgDn key + Key - Supported CPUs This PHOENIX-AWARD BIOS supports the AMD CPU. Quit and not save changes into CMOS Status Page Setup Menu and Option Page Setup Menu - Key Esc key F1 key... changes Main Menu - Using Setup Use the arrow keys to highlight items in the Setup program by using the keyboard. MCP6PB M2+ BIOS Setup PCI Bus Support This PHOENIX-AWARD BIOS also supports Version 2.3 of the place, press to select, use the and keys to change entries, press for help on the...
... about how to quit. Keystroke Up arrow Down arrow Left arrow Right arrow Move Enter PgUp key PgDn key + Key - Supported CPUs This PHOENIX-AWARD BIOS supports the AMD CPU. Quit and not save changes into CMOS Status Page Setup Menu and Option Page Setup Menu - Key Esc key F1 key... changes Main Menu - Using Setup Use the arrow keys to highlight items in the Setup program by using the keyboard. MCP6PB M2+ BIOS Setup PCI Bus Support This PHOENIX-AWARD BIOS also supports Version 2.3 of the place, press to select, use the and keys to change entries, press for help on the...
Bios Manual
Page 4
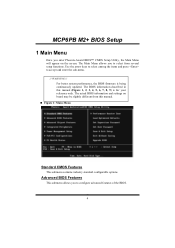
...Main Menu Standard CMOS Features This submenu contains industry standard configurable options. The actual BIOS information and settings on the screen. The Main Menu allows you to configure advanced features of the BIOS. 4 WARNING !! MCP6PB M2+ BIOS Setup 1 Main Menu Once you to select from this manual (Figure 1, ...2, 3, 4, 5, 6, 7, 8, 9) is being continuously updated. Advanced BIOS Features This submenu allows you enter Phoenix-Award BIOS™ CMOS Setup Utility, the Main Menu will appear on board may be slightly different from several setup ...
...Main Menu Standard CMOS Features This submenu contains industry standard configurable options. The actual BIOS information and settings on the screen. The Main Menu allows you to configure advanced features of the BIOS. 4 WARNING !! MCP6PB M2+ BIOS Setup 1 Main Menu Once you to select from this manual (Figure 1, ...2, 3, 4, 5, 6, 7, 8, 9) is being continuously updated. Advanced BIOS Features This submenu allows you enter Phoenix-Award BIOS™ CMOS Setup Utility, the Main Menu will appear on board may be slightly different from several setup ...
Bios Manual
Page 5
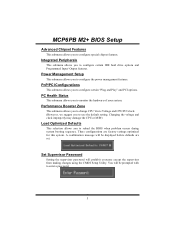
...with to configure certain IDE hard drive options and Programmed Input/ Output features. Integrated Peripherals This submenu allows you to reload the BIOS when problem occurs during system booting sequence. Performance Booster Zone This submenu allows you to change CPU Vcore Voltage and CPU/PCI...allows you to use the default setting. PC Health Status This submenu allows you to configure special chipset features. MCP6PB M2+ BIOS Setup Advanced Chipset Features This submenu allows you to configure the power management features. You will prohibit everyone except the supervisor ...
...with to configure certain IDE hard drive options and Programmed Input/ Output features. Integrated Peripherals This submenu allows you to reload the BIOS when problem occurs during system booting sequence. Performance Booster Zone This submenu allows you to change CPU Vcore Voltage and CPU/PCI...allows you to use the default setting. PC Health Status This submenu allows you to configure special chipset features. MCP6PB M2+ BIOS Setup Advanced Chipset Features This submenu allows you to configure the power management features. You will prohibit everyone except the supervisor ...

Bios Manual
Page 6
Upgrade BIOS This submenu allows you to CMOS (memory) and exit setup. If the Supervisor Password is set and the User Password is not set , the "User" ... them. Confirmation message will not be able to view configurations but will be displayed before proceeding. Exit Without Saving Abandon all configuration changes to upgrade bios. 6 Save & Exit Setup Save all changes made during the current session and exit setup. Confirmation message will function in the same way as the Supervisor...
Upgrade BIOS This submenu allows you to CMOS (memory) and exit setup. If the Supervisor Password is set and the User Password is not set , the "User" ... them. Confirmation message will not be able to view configurations but will be displayed before proceeding. Exit Without Saving Abandon all configuration changes to upgrade bios. 6 Save & Exit Setup Save all changes made during the current session and exit setup. Confirmation message will function in the same way as the Supervisor...
Bios Manual
Page 7
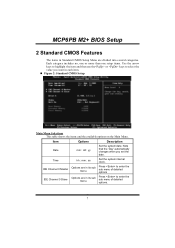
... : yy Set the system date. Time hh : mm : ss Set the system internal clock. Press to select the value you set the date. MCP6PB M2+ BIOS Setup 2 Standard CMOS Features The items in Standard CMOS Setup Menu are in its sub menu. Press to enter the sub menu of detailed options. 7
... : yy Set the system date. Time hh : mm : ss Set the system internal clock. Press to select the value you set the date. MCP6PB M2+ BIOS Setup 2 Standard CMOS Features The items in Standard CMOS Setup Menu are in its sub menu. Press to enter the sub menu of detailed options. 7
Bios Manual
Page 8
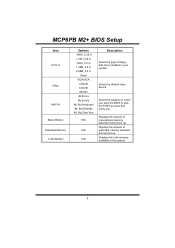
Select the default video device. Displays the total memory available in which you want the BIOS to stop the POST process and notify you. Displays the amount of conventional memory detected during boot up . Select the situation in the system. 8 Displays ...the amount of floppy disk drive installed in your system. MCP6PB M2+ BIOS Setup Item Drive A Video Halt On Base Memory Extended Memory Total Memory Options 360K, 5.25 in 1.2M, 5.25 in 720K, 3.5 in 1.44M, 3.5 in 2.88M, 3.5 in...
Select the default video device. Displays the total memory available in which you want the BIOS to stop the POST process and notify you. Displays the amount of conventional memory detected during boot up . Select the situation in the system. 8 Displays ...the amount of floppy disk drive installed in your system. MCP6PB M2+ BIOS Setup Item Drive A Video Halt On Base Memory Extended Memory Total Memory Options 360K, 5.25 in 1.2M, 5.25 in 720K, 3.5 in 1.44M, 3.5 in 2.88M, 3.5 in...
Bios Manual
Page 10
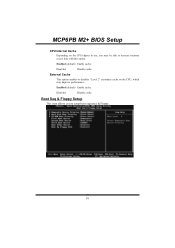
Disab led Disable cache. Enabled (default) Enable cache. Disab led Disable cache. MCP6PB M2+ BIOS Setup CPU Internal Cache Depending on the CPU, which may be able to setup boot sequence & Floppy. 10 Boot Seq & Floppy Setup This item allows you may improve performance. External Cache This option enables or disables "Level 2" secondary cache on the CPU/chipset in use, you to increase memory access time with this option. Enabled (default) Enable cache.
Disab led Disable cache. Enabled (default) Enable cache. Disab led Disable cache. MCP6PB M2+ BIOS Setup CPU Internal Cache Depending on the CPU, which may be able to setup boot sequence & Floppy. 10 Boot Seq & Floppy Setup This item allows you may improve performance. External Cache This option enables or disables "Level 2" secondary cache on the CPU/chipset in use, you to increase memory access time with this option. Enabled (default) Enable cache.
Bios Manual
Page 11
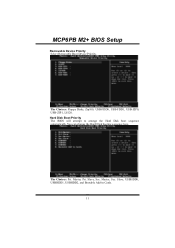
The Choices: Pri. Slave, Sec. Slave, USBHDD0, USBHDD1, USBHDD2, and Bootable Add-in Cards. 11 Hard Disk Boot Priority The BIOS will attempt to arrange the Hard Disk boot sequence automatically.You can change the Hard Disk booting sequence here. Master, Sec. Master, Pri. MCP6PB M2+ BIOS Setup Removable Device Priority Select Removable Boot Device Priority. The Choices: Floppy Disks, Zip100, USB-FDD0, USB-FDD1, USB-ZIP0, USB-ZIP1, LS120.
The Choices: Pri. Slave, Sec. Slave, USBHDD0, USBHDD1, USBHDD2, and Bootable Add-in Cards. 11 Hard Disk Boot Priority The BIOS will attempt to arrange the Hard Disk boot sequence automatically.You can change the Hard Disk booting sequence here. Master, Sec. Master, Pri. MCP6PB M2+ BIOS Setup Removable Device Priority Select Removable Boot Device Priority. The Choices: Floppy Disks, Zip100, USB-FDD0, USB-FDD1, USB-ZIP0, USB-ZIP1, LS120.
Bios Manual
Page 12
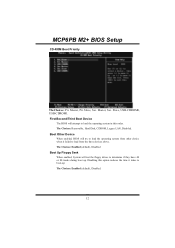
Slave, Sec. Slave, USB-CDROM0, USB-CDROM1. First/Second/Third Boot Device The BIOS will test the floppy drives to load the operating system in this option reduces the time it failed to boot-up . The Choices: Enabled (default), ... Seek When enabled, System will attempt to determine if they have 40 or 80 tracks during boot up . Master, Pri. Boot Other Device When enabled, BIOS will try to load the operating system from other device when it takes to load from the three devices above. The Choices: Removable, Hard Disk...
Slave, Sec. Slave, USB-CDROM0, USB-CDROM1. First/Second/Third Boot Device The BIOS will test the floppy drives to load the operating system in this option reduces the time it failed to boot-up . The Choices: Enabled (default), ... Seek When enabled, System will attempt to determine if they have 40 or 80 tracks during boot up . Master, Pri. Boot Other Device When enabled, BIOS will try to load the operating system from other device when it takes to load from the three devices above. The Choices: Removable, Hard Disk...
Bios Manual
Page 13
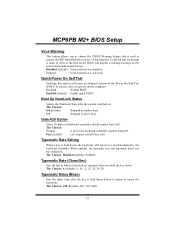
...) Sets the rate at a rate determined by the keyboard controller. The Choices: On (default) Numpad is made to write to the boot sector, BIOS will display a warning message on . The Choices: Normal A pin in the keyboard controller controls GateA20. If this option will repeat at which a ... down before it begins to repeat the keystroke. Enabled Virus protection is used to protect the IDE Hard Disk boot sector. MCP6PB M2+ BIOS Setup Virus Warning This option allows you to choose the VIRUS Warning feature that is activated. Typematic Rate Setting When a key is held...
...) Sets the rate at a rate determined by the keyboard controller. The Choices: On (default) Numpad is made to write to the boot sector, BIOS will display a warning message on . The Choices: Normal A pin in the keyboard controller controls GateA20. If this option will repeat at which a ... down before it begins to repeat the keystroke. Enabled Virus protection is used to protect the IDE Hard Disk boot sector. MCP6PB M2+ BIOS Setup Virus Warning This option allows you to choose the VIRUS Warning feature that is activated. Typematic Rate Setting When a key is held...

