

Setup Manual
Page 2
Table of Contents Chapter 1: Introduction 3 1.1 Before You Start 3 1.2 Package Checklist 3 1.3 Motherboard Features 4 1.4 Rear Panel Connectors 6 1.5 Motherboard Layout 7 Chapter 2: Hardware Installation 8 2.1 Installing Central Processing Unit (CPU 8 2.2 FAN Headers 10 2.3 ... 25 5.1 T-Power Introduction 25 5.2 T-Power BIOS Feature 26 5.3 T-Power Windows Feature 34 Chapter 6: Useful Help 43 6.1 Driver Installation Note 43 6.2 Award BIOS Beep Code 44 6.3 Extra Information 44 6.4 Troubleshooting 46 Appendencies: SPEC In Other Language 48 German...
Table of Contents Chapter 1: Introduction 3 1.1 Before You Start 3 1.2 Package Checklist 3 1.3 Motherboard Features 4 1.4 Rear Panel Connectors 6 1.5 Motherboard Layout 7 Chapter 2: Hardware Installation 8 2.1 Installing Central Processing Unit (CPU 8 2.2 FAN Headers 10 2.3 ... 25 5.1 T-Power Introduction 25 5.2 T-Power BIOS Feature 26 5.3 T-Power Windows Feature 34 Chapter 6: Useful Help 43 6.1 Driver Installation Note 43 6.2 Award BIOS Beep Code 44 6.3 Extra Information 44 6.4 Troubleshooting 46 Appendencies: SPEC In Other Language 48 German...
Setup Manual
Page 3
.... 1.2 PACKAGE CHECKLIST HDD Cable X 1 Serial ATA Cable X 1 Rear I/O Panel for choosing our product. Before you start installing the motherboard, please make sure you follow the instructions below: „ Prepare a dry and stable working environment with sufficient lighting. „ Always disconnect...computer from power outlet before operation. „ Before you for ATX Case X 1 User's Manual X 1 Fully Setup Driver CD X 1 FDD Cable X 1 (optional) USB 2.0 Cable X1 (optional) S/PDIF out Cable X 1 (optional) 3 Hold the board on motherboard or the rear side of the board unless necessary.
.... 1.2 PACKAGE CHECKLIST HDD Cable X 1 Serial ATA Cable X 1 Rear I/O Panel for choosing our product. Before you start installing the motherboard, please make sure you follow the instructions below: „ Prepare a dry and stable working environment with sufficient lighting. „ Always disconnect...computer from power outlet before operation. „ Before you for ATX Case X 1 User's Manual X 1 Fully Setup Driver CD X 1 FDD Cable X 1 (optional) USB 2.0 Cable X1 (optional) S/PDIF out Cable X 1 (optional) 3 Hold the board on motherboard or the rear side of the board unless necessary.

Setup Manual
Page 43
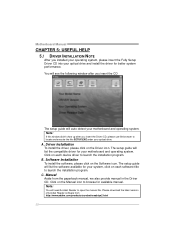
... system performance. B. Software Installation To install the software, please click on the Driver icon. Manual Aside from http://www.adobe.com/products/acrobat/readstep2.html 43 Note: You will auto detect your motherboard and operating system. Driver Installation To install the driver, please click on the Software icon. Click on the Manual icon to...
... system performance. B. Software Installation To install the software, please click on the Driver icon. Manual Aside from http://www.adobe.com/products/acrobat/readstep2.html 43 Note: You will auto detect your motherboard and operating system. Driver Installation To install the driver, please click on the Software icon. Click on the Manual icon to...

User Manual
Page 2
... Start 1 1.2 Package Checklist 1 1.3 Motherboard Features 2 1.4 Rear Panel Connectors 4 1.5 Motherboard Layout 5 Chapter 2: Hardware Installation 6 ...2.1 Installing Central Processing Unit (CPU 6 2.2 FAN Headers 8 2.3 Installing System Memory 9 2.4 Connectors and Slots 11 Chapter 3: Headers & Jumpers Setup 13 3.1 How to Setup Jumpers 13 3.2 Detail Settings 13 Chapter 4: RAID Functions 19 4.1 Operation System 19 4.2 Raid Arrays 19 4.3 How RAID Works 19 Chapter 5: Useful Help 22 5.1 Driver...
... Start 1 1.2 Package Checklist 1 1.3 Motherboard Features 2 1.4 Rear Panel Connectors 4 1.5 Motherboard Layout 5 Chapter 2: Hardware Installation 6 ...2.1 Installing Central Processing Unit (CPU 6 2.2 FAN Headers 8 2.3 Installing System Memory 9 2.4 Connectors and Slots 11 Chapter 3: Headers & Jumpers Setup 13 3.1 How to Setup Jumpers 13 3.2 Detail Settings 13 Chapter 4: RAID Functions 19 4.1 Operation System 19 4.2 Raid Arrays 19 4.3 How RAID Works 19 Chapter 5: Useful Help 22 5.1 Driver...

User Manual
Page 3
... the rear side of the board unless necessary. A690G-M2 CHAPTER 1: INTRODUCTION 1.1 BEFORE YOU START Thank you take the motherboard out from dangerous area, such as heat source, humid air and water. 1.2 PACKAGE CHECKLIST HDD Cable X 1 Serial ATA Cable X 1 Rear I/O Panel for ...try to bend or flex the board. „ Do not leave any unfastened small parts inside the case after installation. Before you start installing the motherboard, please make sure you follow the instructions below: „ Prepare a dry and stable working environment with sufficient lighting. „ Always disconnect the...
... the rear side of the board unless necessary. A690G-M2 CHAPTER 1: INTRODUCTION 1.1 BEFORE YOU START Thank you take the motherboard out from dangerous area, such as heat source, humid air and water. 1.2 PACKAGE CHECKLIST HDD Cable X 1 Serial ATA Cable X 1 Rear I/O Panel for ...try to bend or flex the board. „ Do not leave any unfastened small parts inside the case after installation. Before you start installing the motherboard, please make sure you follow the instructions below: „ Prepare a dry and stable working environment with sufficient lighting. „ Always disconnect the...
User Manual
Page 24
... will need Acrobat Reader to locate and execute the file SETUP.EXE under your motherboard and operating system. Motherboard Manual CHAPTER 5: USEFUL HELP 5.1 DRIVER INSTALLATION NOTE After you installed your operating system, please insert the Fully Setup Driver CD into your motherboard and operating system. You will list the software available for your optical drive...
... will need Acrobat Reader to locate and execute the file SETUP.EXE under your motherboard and operating system. Motherboard Manual CHAPTER 5: USEFUL HELP 5.1 DRIVER INSTALLATION NOTE After you installed your operating system, please insert the Fully Setup Driver CD into your motherboard and operating system. You will list the software available for your optical drive...


