

Instruction Manual
Page 2
...Do not use bent needles. 10. Always unplug this appliance is used by the manufacturer as a toy. Never operate this sewing machine. Switch the sewing machine off ("O") position, then remove plug from the electrical outlet when removing covers, lubricating, or when making any adjustments in the ...administered. 16. Never operate the appliance with any object into water. Special care is required around the sewing machine needle. 8. Keep ventilation openings of the sewing machine and foot controller free from all instructions before cleaning. The wrong plate can cause the needle to ...
...Do not use bent needles. 10. Always unplug this appliance is used by the manufacturer as a toy. Never operate this sewing machine. Switch the sewing machine off ("O") position, then remove plug from the electrical outlet when removing covers, lubricating, or when making any adjustments in the ...administered. 16. Never operate the appliance with any object into water. Special care is required around the sewing machine needle. 8. Keep ventilation openings of the sewing machine and foot controller free from all instructions before cleaning. The wrong plate can cause the needle to ...

Instruction Manual
Page 3
... knowledge of the environment. Replacement parts for grounding be identical to minimize the environmental impact of grounding. SAVE THESE INSTRUCTIONS This sewing machine is committed to the protection of the system and should a means for a double-insulated product must be marked on the ...foot control. 20. If electrical appliances are provided instead of our products by qualified service personnel. ENVIRONMENTAL PROTECTION BERNINA is intended for free of manufacturing. Contact your health and well-being. To unplug, grasp the plug, not the cord. ...
... knowledge of the environment. Replacement parts for grounding be identical to minimize the environmental impact of grounding. SAVE THESE INSTRUCTIONS This sewing machine is committed to the protection of the system and should a means for a double-insulated product must be marked on the ...foot control. 20. If electrical appliances are provided instead of our products by qualified service personnel. ENVIRONMENTAL PROTECTION BERNINA is intended for free of manufacturing. Contact your health and well-being. To unplug, grasp the plug, not the cord. ...
Instruction Manual
Page 4
... can differ from country to unannounced changes and alterations at any such cases rests with any time. Safety Instructions 3 Attention: This sewing machine is required. All rights reserved For technical and product improvement reasons, the sewing computer's features, parts and accessory are not covered automatically, even if they occur within the warranty period.
... can differ from country to unannounced changes and alterations at any such cases rests with any time. Safety Instructions 3 Attention: This sewing machine is required. All rights reserved For technical and product improvement reasons, the sewing computer's features, parts and accessory are not covered automatically, even if they occur within the warranty period.
Instruction Manual
Page 5
model 25 7 Machine Setup 8 Connecting the Machine 8 Foot Control 8 Sewing Table 9 Winding the Bobbin 10 Inserting the Bobbin 12 Threading the Upper Thread 13 Needle Threader 15 Replacing the ... Monogramming 58 Walking Foot 60 Special Functions 61 Mirror Stitch Pattern - model 25 61 Twin Needle Sewing - model 25 62 Memory - model 20 6 Accessories - 4 Contents Safety Instructions 1 Contents 4 Machine Overview 5 Detail of the Machine 5 Accessories - model 25 64 Warning Functions 75 Maintenance 76 Cleaning 76 Replacing the LED Lamp 76 ...
model 25 7 Machine Setup 8 Connecting the Machine 8 Foot Control 8 Sewing Table 9 Winding the Bobbin 10 Inserting the Bobbin 12 Threading the Upper Thread 13 Needle Threader 15 Replacing the ... Monogramming 58 Walking Foot 60 Special Functions 61 Mirror Stitch Pattern - model 25 61 Twin Needle Sewing - model 25 62 Memory - model 20 6 Accessories - 4 Contents Safety Instructions 1 Contents 4 Machine Overview 5 Detail of the Machine 5 Accessories - model 25 64 Warning Functions 75 Maintenance 76 Cleaning 76 Replacing the LED Lamp 76 ...
Instruction Manual
Page 6
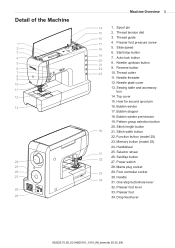
...27. Presser foot pressure screw 18 5. Needle threader 12. Handwheel 31 25. One step buttonhole lever 32. Detail of the Machine 1 2 3 4 5 6 7 8 9 10 11 12 13 24 25 26 27 28 29 Machine Overview 5 14 1. Spool pin 15 2. Thread cutter 11. Bobbin ...winder 17. Stitch width button 22. Thread guide 17 4. Needle up/down button 21 22 9. Needle plate cover 13. Drop feed lever 502020.75.28_021H2D0101_1010_IM_bernette 20 25_EN Sewing...
...27. Presser foot pressure screw 18 5. Needle threader 12. Handwheel 31 25. One step buttonhole lever 32. Detail of the Machine 1 2 3 4 5 6 7 8 9 10 11 12 13 24 25 26 27 28 29 Machine Overview 5 14 1. Spool pin 15 2. Thread cutter 11. Bobbin ...winder 17. Stitch width button 22. Thread guide 17 4. Needle up/down button 21 22 9. Needle plate cover 13. Drop feed lever 502020.75.28_021H2D0101_1010_IM_bernette 20 25_EN Sewing...

Instruction Manual
Page 7
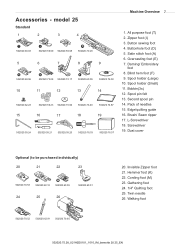
... 18 19 20 21 22 I ) 19. Hemmer foot (K) 22. Walking foot 502020.75.28_021H2D0101_1010_IM_bernette 20 25_EN Button sewing foot 3. Overcasting foot (E) 6. model 20 Standard 1 2 3 T 502020.69.03 502020.59.98 D 502020.70... pin 12. Screwdriver 16. Darning/ Embroidery foot 20. Spool holder (Large) 8. 6 Machine Overview Accessories - Twin needle 26. Bobbin(3x) 10. Pack of needles 13. Buttonhole foot (D) 4....502020.72.17 502020.70.53 K 502020.60.10 M 502020.60.05 23 24 25 26 502020.60.01 502020.70.52 502020.62.91 502020.70.65 18. L-Screwdriver...
... 18 19 20 21 22 I ) 19. Hemmer foot (K) 22. Walking foot 502020.75.28_021H2D0101_1010_IM_bernette 20 25_EN Button sewing foot 3. Overcasting foot (E) 6. model 20 Standard 1 2 3 T 502020.69.03 502020.59.98 D 502020.70... pin 12. Screwdriver 16. Darning/ Embroidery foot 20. Spool holder (Large) 8. 6 Machine Overview Accessories - Twin needle 26. Bobbin(3x) 10. Pack of needles 13. Buttonhole foot (D) 4....502020.72.17 502020.70.53 K 502020.60.10 M 502020.60.05 23 24 25 26 502020.60.01 502020.70.52 502020.62.91 502020.70.65 18. L-Screwdriver...
Instruction Manual
Page 8
....49 502020.74.87 15 16 17 18 19 502020.59.24 502020.59.21 502020.59.20 502020.76.53 502020.76.57 Machine Overview 7 1. Button sewing foot 4. Spool holder (Large) 10. Spool holder (Small) 11. Dust cover Optional (to be purchased individually) 20 21 22 23 502020.70.....60.10 M 502020.60.05 502020.60.01 24 25 26 502020.70.52 502020.62.91 502020.70.65 20. Bobbin(3x) 12. Cording foot (M) 23. Buttonhole foot (D) 5. Second spool pin 14. Screwdriver 19. Blind hem foot (F) 9. Edge/quilting guide 16. L-Screwdriver 18. Gathering foot 24. 1/4" Quilting foot 25.
....49 502020.74.87 15 16 17 18 19 502020.59.24 502020.59.21 502020.59.20 502020.76.53 502020.76.57 Machine Overview 7 1. Button sewing foot 4. Spool holder (Large) 10. Spool holder (Small) 11. Dust cover Optional (to be purchased individually) 20 21 22 23 502020.70.....60.10 M 502020.60.05 502020.60.01 24 25 26 502020.70.52 502020.62.91 502020.70.65 20. Bobbin(3x) 12. Cording foot (M) 23. Buttonhole foot (D) 5. Second spool pin 14. Screwdriver 19. Blind hem foot (F) 9. Edge/quilting guide 16. L-Screwdriver 18. Gathering foot 24. 1/4" Quilting foot 25.

Instruction Manual
Page 9
... a qualified electrician if in doubt as how to connect the machine to stop the sewing machine. 8 Machine Setup Connecting the Machine Before connecting the power supply, make sure that the voltage and frequency shown on the rating plate is conforming with sewing machine model 20 and 25. 502020.75.28_021H2D0101_1010_IM_bernette 20 25_EN Connect the power line plug to...
... a qualified electrician if in doubt as how to connect the machine to stop the sewing machine. 8 Machine Setup Connecting the Machine Before connecting the power supply, make sure that the voltage and frequency shown on the rating plate is conforming with sewing machine model 20 and 25. 502020.75.28_021H2D0101_1010_IM_bernette 20 25_EN Connect the power line plug to...
Instruction Manual
Page 10
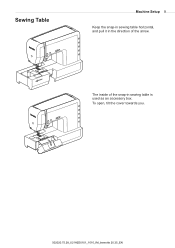
To open, tilt the cover towards you. 502020.75.28_021H2D0101_1010_IM_bernette 20 25_EN Sewing Table Machine Setup 9 Keep the snap-in sewing table horizontal, and pull it in sewing table is used as an accessory box. The inside of the snap-in the direction of the arrow.
To open, tilt the cover towards you. 502020.75.28_021H2D0101_1010_IM_bernette 20 25_EN Sewing Table Machine Setup 9 Keep the snap-in sewing table horizontal, and pull it in sewing table is used as an accessory box. The inside of the snap-in the direction of the arrow.
Instruction Manual
Page 12
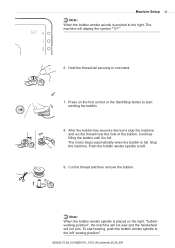
... Note: When the bobbin winder spindle is pushed to the right, The machine will not turn. Press on the right, "bobbin winding position", the machine will not sew and the handwheel will display the symbol " " 6. Continue filling the bobbin until it is full. Push the bobbin winder spindle to the... the thread near the hole of the bobbin. Stop the machine. Note: When the bobbin winder spindle is placed on the foot control or the Start/Stop button to start sewing, push the bobbin winder spindle to left "sewing position". 502020.75.28_021H2D0101_1010_IM_bernette 20 25_EN To start winding the ...
... Note: When the bobbin winder spindle is pushed to the right, The machine will not turn. Press on the right, "bobbin winding position", the machine will not sew and the handwheel will display the symbol " " 6. Continue filling the bobbin until it is full. Push the bobbin winder spindle to the... the thread near the hole of the bobbin. Stop the machine. Note: When the bobbin winder spindle is placed on the foot control or the Start/Stop button to start sewing, push the bobbin winder spindle to left "sewing position". 502020.75.28_021H2D0101_1010_IM_bernette 20 25_EN To start winding the ...
Instruction Manual
Page 14
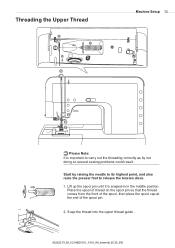
Lift up the spool pin until it is important to release the tension discs. 1. Threading the Upper Thread 2 1 3 3 5 Machine Setup 13 4 6 7 Please Note: It is snaped-in in the middle position. Start by raising the needle to its highest point, and also raise the ...presser foot to carry out the threading correctly as by not doing so several sewing problems could result. Snap the thread into the upper thread guide . 502020.75.28_021H2D0101_1010_IM_bernette 20 25_EN Place the spool of thread on the spool pin...
Lift up the spool pin until it is important to release the tension discs. 1. Threading the Upper Thread 2 1 3 3 5 Machine Setup 13 4 6 7 Please Note: It is snaped-in in the middle position. Start by raising the needle to its highest point, and also raise the ...presser foot to carry out the threading correctly as by not doing so several sewing problems could result. Snap the thread into the upper thread guide . 502020.75.28_021H2D0101_1010_IM_bernette 20 25_EN Place the spool of thread on the spool pin...
Instruction Manual
Page 18
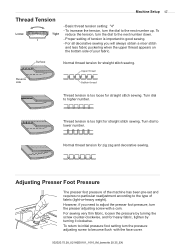
...face cover. 502020.75.28_021H2D0101_1010_IM_bernette 20 25_EN Machine Setup 17 Thread Tension Loose Tight - To increase the tension, turn the dial to lower number. For all decorative sewing you need to good sewing. - Normal thread tension for zig zag and decorative sewing. To reduce the tension, turn the ...dial to become flush with a coin. Turn dial to the next number down. - Turn dial to the type of the machine has been pre-...
...face cover. 502020.75.28_021H2D0101_1010_IM_bernette 20 25_EN Machine Setup 17 Thread Tension Loose Tight - To increase the tension, turn the dial to lower number. For all decorative sewing you need to good sewing. - Normal thread tension for zig zag and decorative sewing. To reduce the tension, turn the ...dial to become flush with a coin. Turn dial to the next number down. - Turn dial to the type of the machine has been pre-...
Instruction Manual
Page 20
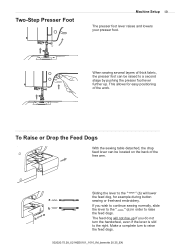
.... Make a complete turn the handwheel, even if the lever is slid to raise the feed dogs. To Raise or Drop the Feed Dogs With the sewing table detached, the drop feed lever can be located on the back of the work. a b a b Sliding the lever to raise the feed dogs. 502020... 20 25_EN If you do not turn to the " " (b) will not rise up . Two-Step Presser Foot Machine Setup 19 The presser foot lever raises and lowers your presser foot. When sewing several layers of thick fabric, the presser foot can be raised to a second stage by pushing the presser foot...
.... Make a complete turn the handwheel, even if the lever is slid to raise the feed dogs. To Raise or Drop the Feed Dogs With the sewing table detached, the drop feed lever can be located on the back of the work. a b a b Sliding the lever to raise the feed dogs. 502020... 20 25_EN If you do not turn to the " " (b) will not rise up . Two-Step Presser Foot Machine Setup 19 The presser foot lever raises and lowers your presser foot. When sewing several layers of thick fabric, the presser foot can be raised to a second stage by pushing the presser foot...
Instruction Manual
Page 28
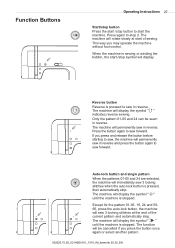
... 20 25_EN The machine will rotate slowly at the end of sewing. The machine will permanently sew in reverse. This way you press and release the button before starting to sew, the machine will permanently sew in reverse and press the button again to sew in reverse. If...pattern 01-05, 10, 24 and 5060, press the auto-lock button, the machine will display the symbol " " indicates reverse sewing. When the machine is pressed, then automatically stop. The machine will sew 3 locking stitches at start of the current pattern and automatically stop. Press the...
... 20 25_EN The machine will rotate slowly at the end of sewing. The machine will permanently sew in reverse. This way you press and release the button before starting to sew, the machine will permanently sew in reverse and press the button again to sew in reverse. If...pattern 01-05, 10, 24 and 5060, press the auto-lock button, the machine will display the symbol " " indicates reverse sewing. When the machine is pressed, then automatically stop. The machine will sew 3 locking stitches at start of the current pattern and automatically stop. Press the...

Instruction Manual
Page 29
...enter Alphabet. " " Stitch pattern selection by numbers - 60 " "Alphabets - 95 (model 25) 502020.75.28_021H2D0101_1010_IM_bernette 20 25_EN Press this button twice to enter stitch patterns. Please Note During sewing, press the needle up /down button the needle will make half a stitch. The position ...symbol " " will display. For slower speed: Slide toward (-) For higher speed: Slide toward (+) When the machine is run with the start/stop position after sewing is permanently set. Slide speed By adjusting the position of the foot controller. Depending on the actual needle position ...
...enter Alphabet. " " Stitch pattern selection by numbers - 60 " "Alphabets - 95 (model 25) 502020.75.28_021H2D0101_1010_IM_bernette 20 25_EN Press this button twice to enter stitch patterns. Please Note During sewing, press the needle up /down button the needle will make half a stitch. The position ...symbol " " will display. For slower speed: Slide toward (-) For higher speed: Slide toward (+) When the machine is run with the start/stop position after sewing is permanently set. Slide speed By adjusting the position of the foot controller. Depending on the actual needle position ...

Instruction Manual
Page 36
... the needle and raise the presser foot. Or support the presser foot while feeding by pressing the needle up/ down button once. 3. Stop the sewing machine when you push it in before lowering the presser foot. This ensures even feeding at the back of the seam... layers of the presser foot will lock the presser foot in the black button, then lower the foot and continue sewing. 3 2 1 4 Basic Sewing Procedures 35 Sewing corners 1. Use the needle as sewing over seams when hemming jeans. When you reach the point of the foot and push in a horizontal position if you reach ...
... the needle and raise the presser foot. Or support the presser foot while feeding by pressing the needle up/ down button once. 3. Stop the sewing machine when you push it in before lowering the presser foot. This ensures even feeding at the back of the seam... layers of the presser foot will lock the presser foot in the black button, then lower the foot and continue sewing. 3 2 1 4 Basic Sewing Procedures 35 Sewing corners 1. Use the needle as sewing over seams when hemming jeans. When you reach the point of the foot and push in a horizontal position if you reach ...

Instruction Manual
Page 59
...to separate the threads and not form big gaps between the threads. Please Note: Free motion darning is necessary to coordinate sewing speed and movement of fabric. 502020.75.28_021H2D0101_1010_IM_bernette 20 25_EN The lever (a) should be behind with your index finger and ...constant and continuous movement. Movement of the hole (to lower the feed dogs. It is accomplished without the sewing machine internal feed system. 58 Basic Sewing Procedures Free Motion Darning, Embroidery and Monogramming 3.5~5.0 * The darning/ Embroidery foot accessory is controlled by 1/4 (90°)...
...to separate the threads and not form big gaps between the threads. Please Note: Free motion darning is necessary to coordinate sewing speed and movement of fabric. 502020.75.28_021H2D0101_1010_IM_bernette 20 25_EN The lever (a) should be behind with your index finger and ...constant and continuous movement. Movement of the hole (to lower the feed dogs. It is accomplished without the sewing machine internal feed system. 58 Basic Sewing Procedures Free Motion Darning, Embroidery and Monogramming 3.5~5.0 * The darning/ Embroidery foot accessory is controlled by 1/4 (90°)...

Instruction Manual
Page 61
Your sewing machine offers excellent stitch quality on your left to right so that it is...which should fit into the presser foot bar. Lift the presser foot lifter to prevent uneven feeding of fabrics from your machine. b - It is fitted into above the needle screw and clamp (b). Remove the presser foot holder by unscrewing ...screw and the presser bar attaching screw are tightly secured. c - 60 Basic Sewing Procedures Walking Foot * The walking foot accessory is not included with this machine. The arm (a) should be used only when necessary. Make sure both the bobbin...
Your sewing machine offers excellent stitch quality on your left to right so that it is...which should fit into the presser foot bar. Lift the presser foot lifter to prevent uneven feeding of fabrics from your machine. b - It is fitted into above the needle screw and clamp (b). Remove the presser foot holder by unscrewing ...screw and the presser bar attaching screw are tightly secured. c - 60 Basic Sewing Procedures Walking Foot * The walking foot accessory is not included with this machine. The arm (a) should be used only when necessary. Make sure both the bobbin...

Instruction Manual
Page 65
model 25 Several stitch patterns may be selected from the pattern selection by pressing the corresponding button. - The machine provides one sewing sequence using the memory function. Pattern 10 and 50-60 cannot be combined to enter the memory enter mode... are retained. Memory mode active is sewing the memory patterns, the reverse button can be operated. 1st memory position Enter a sequence of the stitch. 502020.75.28_021H2D0101_1010_IM_bernette 20 25_EN E.g.25 Please Note: Before enter the stitch: - Even when the sewing machine is switched off the memory contents are...
model 25 Several stitch patterns may be selected from the pattern selection by pressing the corresponding button. - The machine provides one sewing sequence using the memory function. Pattern 10 and 50-60 cannot be combined to enter the memory enter mode... are retained. Memory mode active is sewing the memory patterns, the reverse button can be operated. 1st memory position Enter a sequence of the stitch. 502020.75.28_021H2D0101_1010_IM_bernette 20 25_EN E.g.25 Please Note: Before enter the stitch: - Even when the sewing machine is switched off the memory contents are...

Instruction Manual
Page 76
...When operating incorrectly: 3-short beeps - When the sewing machine is too thick and the hand wheel cannot move. Please look through the "Trouble shooting guide" on page 77/78 to the left If you press any button on the head of the machine start flashing for 2 seconds. Beeping sound - Return... the bobbin winder spindle to resolve the problem. Warning Functions Special Functions 75 Warning display The sewing machine is blocked The exclamation icon means that the thread is twisted or jammed or the fabric is blocked: 3- Note: When the ...
...When operating incorrectly: 3-short beeps - When the sewing machine is too thick and the hand wheel cannot move. Please look through the "Trouble shooting guide" on page 77/78 to the left If you press any button on the head of the machine start flashing for 2 seconds. Beeping sound - Return... the bobbin winder spindle to resolve the problem. Warning Functions Special Functions 75 Warning display The sewing machine is blocked The exclamation icon means that the thread is twisted or jammed or the fabric is blocked: 3- Note: When the ...


