User Guide
Page 11
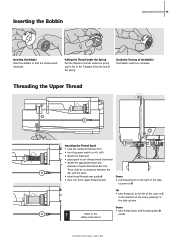
...the arrow, placing it lies in the take-up to the left under the spring until it in the T-shaped slit at the end of spool determines disc size. Clockwise Turning of the Bobbin The bobbin must be no clearance between the disc and the spool • take - ...• take thread up lever ! up cover to C in the direction of the take thread through guides D and E Inserting the Bobbin Operating Instructions 11 Inserting the Bobbin Insert the bobbin so that the thread winds clockwise. Threading the Upper Thread C A B D Attaching the Thread Spool • raise the needle and ...
...the arrow, placing it lies in the take-up to the left under the spring until it in the T-shaped slit at the end of spool determines disc size. Clockwise Turning of the Bobbin The bobbin must be no clearance between the disc and the spool • take - ...• take thread up lever ! up cover to C in the direction of the take thread through guides D and E Inserting the Bobbin Operating Instructions 11 Inserting the Bobbin Insert the bobbin so that the thread winds clockwise. Threading the Upper Thread C A B D Attaching the Thread Spool • raise the needle and ...
User Guide
Page 104
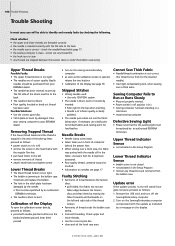
...screw Lower Thread Breaks • The lower thread tension is too tight. • The bobbin is too tight. • The needles are trapped between the tension discs or under the bobbin case spring. • Incorrect threading. Calibration of the Display To open the calibration screen directly, proceed...with the update as follows: • power switch to «0» (off the Sewing/Embroidery computer 2. Take your sewing computer to your BERNINA dealer. • The needle has been inserted incorrectly. If necessary use fabric edge) between the tension discs: • pull folded, thin ...
...screw Lower Thread Breaks • The lower thread tension is too tight. • The bobbin is too tight. • The needles are trapped between the tension discs or under the bobbin case spring. • Incorrect threading. Calibration of the Display To open the calibration screen directly, proceed...with the update as follows: • power switch to «0» (off the Sewing/Embroidery computer 2. Take your sewing computer to your BERNINA dealer. • The needle has been inserted incorrectly. If necessary use fabric edge) between the tension discs: • pull folded, thin ...
User Guide
Page 150
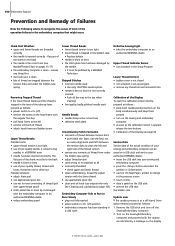
...tension is too tight • use original oiler only. Turn on the Sewing/Embroidery computer and proceed with the update as indicated by a BERNINA Technician Skipped Stitches • incorrect needle used: • Use only 130/705H needle system • needle is the correct size (see ... • stitch plate hole or hook tip is damaged: take -up program • remove any thread lint and remnants from under the bobbin case spring • adjust thread tension • used Needle Breaks • needle clamp screw is too loose • defective stitch plate Unsatisfactory Stitch Formation...
...tension is too tight • use original oiler only. Turn on the Sewing/Embroidery computer and proceed with the update as indicated by a BERNINA Technician Skipped Stitches • incorrect needle used: • Use only 130/705H needle system • needle is the correct size (see ... • stitch plate hole or hook tip is damaged: take -up program • remove any thread lint and remnants from under the bobbin case spring • adjust thread tension • used Needle Breaks • needle clamp screw is too loose • defective stitch plate Unsatisfactory Stitch Formation...


