User Guide
Page 1
... sewing computer only for household use , it to the product. The symbol product. To disconnect, turn all moving parts. See instructions for a double-insulated product must be used or where oxygen is intended for its intended use the BERNINA original stitch plate. Replacement parts for servicing of electrical shock: 1. Always use as threading or changing the needle, threading the bobbin or changing the presser foot etc. 10. Do not pull or push fabric...
... sewing computer only for household use , it to the product. The symbol product. To disconnect, turn all moving parts. See instructions for a double-insulated product must be used or where oxygen is intended for its intended use the BERNINA original stitch plate. Replacement parts for servicing of electrical shock: 1. Always use as threading or changing the needle, threading the bobbin or changing the presser foot etc. 10. Do not pull or push fabric...
User Guide
Page 5
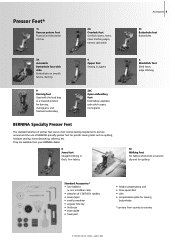
... foot Blind hems, edge stitching 50 Walking foot For fabrics which stick or tend to slip and for quilting Standard Accessories* • four bobbins (+ one in a lowered position for darning, monograms, and freehand embroidery 20C Open embroidery foot Embroidery, appliqué, satin stitch seams, monograms BERNINA Specialty Presser Feet The standard selection of presser feet covers most normal sewing requirements, but we recommend the use of 130/705 H needles • seam ripper • small screwdriver • angular Torx key • lint brush • seam guide •...
... foot Blind hems, edge stitching 50 Walking foot For fabrics which stick or tend to slip and for quilting Standard Accessories* • four bobbins (+ one in a lowered position for darning, monograms, and freehand embroidery 20C Open embroidery foot Embroidery, appliqué, satin stitch seams, monograms BERNINA Specialty Presser Feet The standard selection of presser feet covers most normal sewing requirements, but we recommend the use of 130/705 H needles • seam ripper • small screwdriver • angular Torx key • lint brush • seam guide •...

User Guide
Page 13
... BERNINA dealer! Changing the Needle Removing the Needle • raise the needle • turn power switch to «0» (off) • lower the presser foot • loosen the needle clamp screw • pull the needle down to remove Inserting the Needle • flat side of the sewing computer behind the handwheel • essential aid for stability, this prevents the thread from getting caught on the spool pin CFL Sewing Light (CFL = Cool Fluorescent Light...
... BERNINA dealer! Changing the Needle Removing the Needle • raise the needle • turn power switch to «0» (off) • lower the presser foot • loosen the needle clamp screw • pull the needle down to remove Inserting the Needle • flat side of the sewing computer behind the handwheel • essential aid for stability, this prevents the thread from getting caught on the spool pin CFL Sewing Light (CFL = Cool Fluorescent Light...

User Guide
Page 23
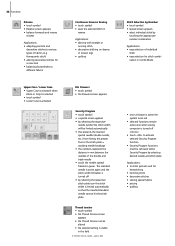
...» (clear) button is pressed, the changes are deleted. 37 37 Saving Altered Settings Permanently The basic settings programmed by number • an arrow pointing down indicates that the presser foot is still raised Lowered Feed Dog • if the feed dog is highlighted in the SAA. Presser Foot Indicator • the recommended presser foot for the selected stitch is displayed by BERNINA can be changed and stored in...
...» (clear) button is pressed, the changes are deleted. 37 37 Saving Altered Settings Permanently The basic settings programmed by number • an arrow pointing down indicates that the presser foot is still raised Lowered Feed Dog • if the feed dog is highlighted in the SAA. Presser Foot Indicator • the recommended presser foot for the selected stitch is displayed by BERNINA can be changed and stored in...
User Guide
Page 32
... selecting the respective stitch plate icon the stitch width is limited automatically so that the inserted standard needle cannot hit the stitch plate Thread tension • touch symbol • the Thread Tension screen appears • the Thread Tension can be limited automatically • this prevents the inserted special needle (double needle, etc.) from hitting the presser foot or the stitch plate = avoiding needle breakage • the numbers represent the distance in mm between the needles of fabrics (e.g.
... selecting the respective stitch plate icon the stitch width is limited automatically so that the inserted standard needle cannot hit the stitch plate Thread tension • touch symbol • the Thread Tension screen appears • the Thread Tension can be limited automatically • this prevents the inserted special needle (double needle, etc.) from hitting the presser foot or the stitch plate = avoiding needle breakage • the numbers represent the distance in mm between the needles of fabrics (e.g.

User Guide
Page 38
Applications Straight Stitch Stitch: Needle: Thread: Feed dog: Presser foot: Straight stitch No. 1 size and type suitable for the fabric selected cotton or polyester up (sewing position) Reverse pattern foot No. 1C or Jeans foot No. 8 (optional accessory) Open Seam • durable seam for firm and densely woven fabrics such as denim and corduroy • reinforced seam subject to hard wear Adjust the stitch length to adjust stitch or pivot. Adjust the stitch length to the technique, e.g. Activate needle stop down Prevents the fabric from slipping when...
Applications Straight Stitch Stitch: Needle: Thread: Feed dog: Presser foot: Straight stitch No. 1 size and type suitable for the fabric selected cotton or polyester up (sewing position) Reverse pattern foot No. 1C or Jeans foot No. 8 (optional accessory) Open Seam • durable seam for firm and densely woven fabrics such as denim and corduroy • reinforced seam subject to hard wear Adjust the stitch length to adjust stitch or pivot. Adjust the stitch length to the technique, e.g. Activate needle stop down Prevents the fabric from slipping when...
User Guide
Page 41
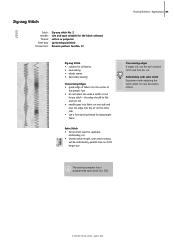
...long a stitch - Applications 41 Zig-zag Stitch • suitable for the fabric selected cotton or polyester up (sewing position) Reverse pattern foot No. 1C Practical Stitches - Zig-zag Stitch Stitch: Needle: Thread: Feed dog: Presser foot: Zig-zag stitch No. 2 size and type suitable for all fabrics • overcasting • elastic seams • decorative sewing Oversewing Edges • guide edge of fabric into the air on stitch length bar Oversewing edges If edges roll, use a fine darning thread for lightweight fabric Satin Stitch • dense stitch used for new decorative...
...long a stitch - Applications 41 Zig-zag Stitch • suitable for the fabric selected cotton or polyester up (sewing position) Reverse pattern foot No. 1C Practical Stitches - Zig-zag Stitch Stitch: Needle: Thread: Feed dog: Presser foot: Zig-zag stitch No. 2 size and type suitable for all fabrics • overcasting • elastic seams • decorative sewing Oversewing Edges • guide edge of fabric into the air on stitch length bar Oversewing edges If edges roll, use a fine darning thread for lightweight fabric Satin Stitch • dense stitch used for new decorative...

User Guide
Page 43
... the darning hoop smoothly by hand • work in irregular lengths • turn work by a quarter turn - 180° 3. Complete Darning • sew loosely and in same direction as this prevents holes and thread breakage) • work from left to prevent distortion • use the slide-on the wrong side of the fabric, the hoop is better spread over the first rows - Manual Darning Stitch: Needle: Thread: Feed dog: Presser foot: Straight stitch No. 1 size and type suitable...
... the darning hoop smoothly by hand • work in irregular lengths • turn work by a quarter turn - 180° 3. Complete Darning • sew loosely and in same direction as this prevents holes and thread breakage) • work from left to prevent distortion • use the slide-on the wrong side of the fabric, the hoop is better spread over the first rows - Manual Darning Stitch: Needle: Thread: Feed dog: Presser foot: Straight stitch No. 1 size and type suitable...

User Guide
Page 44
... feed the fabric properly Possible Problems With Sewing Knits Seam Becomes Wavy • oversew a thread along the edge • after sewing adjust edges by pulling the thread to regain the original length of these adjustments may be necessary) Presser Foot Pressure • soft, loose knits can be sewn to give more security to suit the fabric, the seam should be as elastic as the fabric • for greater elasticity use a shorter stitch length...
... feed the fabric properly Possible Problems With Sewing Knits Seam Becomes Wavy • oversew a thread along the edge • after sewing adjust edges by pulling the thread to regain the original length of these adjustments may be necessary) Presser Foot Pressure • soft, loose knits can be sewn to give more security to suit the fabric, the seam should be as elastic as the fabric • for greater elasticity use a shorter stitch length...

User Guide
Page 49
Zipper Stitch: Needle: Thread: Feed dog: Presser foot: Needle position: Straight stitch No. 1 size and type suitable for even stitch formation use a 90 - 100 needle lower presser foot and continue to sew Starting to sew • hold threads firmly when starting to top Practical Stitches - velvet) • prepare zipper as a decorative element To sew around the zipper pull • close zipper again • continue to sew to the base of the zipper (needle position down) • turn fabric and sew across the seam (needle position down) • turn fabric again and...
Zipper Stitch: Needle: Thread: Feed dog: Presser foot: Needle position: Straight stitch No. 1 size and type suitable for even stitch formation use a 90 - 100 needle lower presser foot and continue to sew Starting to sew • hold threads firmly when starting to top Practical Stitches - velvet) • prepare zipper as a decorative element To sew around the zipper pull • close zipper again • continue to sew to the base of the zipper (needle position down) • turn fabric and sew across the seam (needle position down) • turn fabric again and...

User Guide
Page 50
... Stitches - Applications Blind Hem Stitch: Needle: Thread: Feed dog: Presser foot: Blindstitch wide No. 9, Blindstitch narrow No. 29 size and type suitable for the fabric selected cotton, polyester, silk or monofilament up (sewing position) Blindstitch foot No. 5 Blind hem wide Blind Hem Wide No. 9 • for invisible hems in medium to heavy fabrics Blind Hem Narrow No. 29 • for invisible hems in batiste Preparation • finish the raw edges as desired • fold the hem...
... Stitches - Applications Blind Hem Stitch: Needle: Thread: Feed dog: Presser foot: Blindstitch wide No. 9, Blindstitch narrow No. 29 size and type suitable for the fabric selected cotton, polyester, silk or monofilament up (sewing position) Blindstitch foot No. 5 Blind hem wide Blind Hem Wide No. 9 • for invisible hems in medium to heavy fabrics Blind Hem Narrow No. 29 • for invisible hems in batiste Preparation • finish the raw edges as desired • fold the hem...
User Guide
Page 74
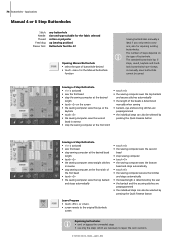
... Buttonholes - Sewing a 4 Step Buttonhole • «1» is ideal if you only need to repair the worn sections The standard buttonhole has 6 steps, round, keyhole and handlook buttonholes have 4 steps. Applications Manual 4 or 6 Step Buttonholes Stitch: Needle: Thread: Feed dog: Presser foot: any buttonhole size and type suitable for the fabric selected cotton or polyester up (sewing position) Buttonhole foot No. 3C Opening Manual Buttonhole • select the type of buttonhole. A manually sewn buttonhole cannot be selected by pressing the Quick Reverse button Leave...
... Buttonholes - Sewing a 4 Step Buttonhole • «1» is ideal if you only need to repair the worn sections The standard buttonhole has 6 steps, round, keyhole and handlook buttonholes have 4 steps. Applications Manual 4 or 6 Step Buttonholes Stitch: Needle: Thread: Feed dog: Presser foot: any buttonhole size and type suitable for the fabric selected cotton or polyester up (sewing position) Buttonhole foot No. 3C Opening Manual Buttonhole • select the type of buttonhole. A manually sewn buttonhole cannot be selected by pressing the Quick Reverse button Leave...

User Guide
Page 79
...: Needle: Thread: feed dog: Presser foot: Straight stitch No. 1 size and type suitable for the fabric selected monofilament or cotton down (darning position) Darning foot No. 9 or Quilting foot No. 29 (optional accessory) Freehand Quilting • for the fabric selected monofilament 30/2 cotton thread up (sewing position) Reverse pattern foot No. 1C or Walking foot No. 50 (optional accessory) Quilt Stitches - Applications 79 Hand-look Quilt Stitch • Suitable for all freehand quilt work • when pivoting make sure that the fabric does not become distorted Monofilament breaks...
...: Needle: Thread: feed dog: Presser foot: Straight stitch No. 1 size and type suitable for the fabric selected monofilament or cotton down (darning position) Darning foot No. 9 or Quilting foot No. 29 (optional accessory) Freehand Quilting • for the fabric selected monofilament 30/2 cotton thread up (sewing position) Reverse pattern foot No. 1C or Walking foot No. 50 (optional accessory) Quilt Stitches - Applications 79 Hand-look Quilt Stitch • Suitable for all freehand quilt work • when pivoting make sure that the fabric does not become distorted Monofilament breaks...

User Guide
Page 80
... the Setup Program or directly on or off . If the BSR function is deactivated and later re-activated without pressing an additional button • touch the button «BSR2» to 5mm). Applications Freehand Quilting With BSR (BERNINA Stitch Regulator) optional Stitch: Needle: Thread: Feed dog: Presser foot: Straight stitch No. 1 or Zig-zag stitch No. 2 size and type suitable for free-motion quilting (sewing) using the straight stitch and a pre-selected stitch length (up to the Safety Instructions! Without fabric feed the...
... the Setup Program or directly on or off . If the BSR function is deactivated and later re-activated without pressing an additional button • touch the button «BSR2» to 5mm). Applications Freehand Quilting With BSR (BERNINA Stitch Regulator) optional Stitch: Needle: Thread: Feed dog: Presser foot: Straight stitch No. 1 or Zig-zag stitch No. 2 size and type suitable for free-motion quilting (sewing) using the straight stitch and a pre-selected stitch length (up to the Safety Instructions! Without fabric feed the...
User Guide
Page 104
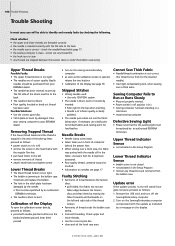
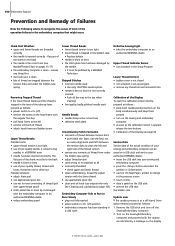
... • remove remnants of thread under the bobbin case spring Upper Thread Breaks Possible Faults: • The upper thread tension is of a poor quality. The flat side of behind the presser foot. • When sewing over a thick seam. Needle Breaks • Needle clamp screw loose. • Fabric taken out in front of instead of the shank must be repolished by an authorized BERNINA technician. • The needle is trapped in off ) • remove the screw on the...
... • remove remnants of thread under the bobbin case spring Upper Thread Breaks Possible Faults: • The upper thread tension is of a poor quality. The flat side of behind the presser foot. • When sewing over a thick seam. Needle Breaks • Needle clamp screw loose. • Fabric taken out in front of instead of the shank must be repolished by an authorized BERNINA technician. • The needle is trapped in off ) • remove the screw on the...
User Guide
Page 114
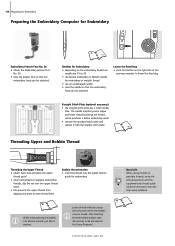
...; remove the standard stitch plate and replace it with the straight stitch plate 19 Threading Upper and Bobbin Thread Threading the Upper Thread • attach foam pad and place the upper thread spool • when using the vertical spool pin and the supplementary thread guide (optional accessory) may also help avoid problems. 13 Lower thread indicator sensor will only work when the bobbin cover is closed, after inserting the embroidery bobbin case. (Sensor has to lower the feed dog Straight Stitch Plate (optional accessory) • the straight stitch plate has a small needle hole...
...; remove the standard stitch plate and replace it with the straight stitch plate 19 Threading Upper and Bobbin Thread Threading the Upper Thread • attach foam pad and place the upper thread spool • when using the vertical spool pin and the supplementary thread guide (optional accessory) may also help avoid problems. 13 Lower thread indicator sensor will only work when the bobbin cover is closed, after inserting the embroidery bobbin case. (Sensor has to lower the feed dog Straight Stitch Plate (optional accessory) • the straight stitch plate has a small needle hole...
User Guide
Page 150
... needle is opened, release the two buttons • Calibration of thread are threaded correctly • the needle is trapped in a BERNINA store • needle has been inserted incorrectly. See Cleaning and Lubricating on the display Remove the USB stick and turn on the USB stick • remove the USB stick the bobbin case Update error If the update process is clean - flat part of the shank to an authorized BERNINA dealer • reduce embroidery speed Lower Thread Breaks • lower thread tension...
... needle is opened, release the two buttons • Calibration of thread are threaded correctly • the needle is trapped in a BERNINA store • needle has been inserted incorrectly. See Cleaning and Lubricating on the display Remove the USB stick and turn on the USB stick • remove the USB stick the bobbin case Update error If the update process is clean - flat part of the shank to an authorized BERNINA dealer • reduce embroidery speed Lower Thread Breaks • lower thread tension...
User Guide
Page 165
...; Pattern End • Quick Reverse Button on Head Frame • Automatic Thread Cutter • Securing Function • Slide Speed Control • Start-Stop Button 40 163-173 129-130 116-117 117 119 103 28 28 28 28 28 28 28, 128 28, 128 F Fabric, Needle, Thread 15 Feed Dog • Feed Dog and Fabric Feed 19-20 • Feed Dog Up/Down 19 • Lowered Feed Dog 23 • Sewing Corners 20 Flat Joining Seam 47 Foot Control 8 Free...
...; Pattern End • Quick Reverse Button on Head Frame • Automatic Thread Cutter • Securing Function • Slide Speed Control • Start-Stop Button 40 163-173 129-130 116-117 117 119 103 28 28 28 28 28 28 28, 128 28, 128 F Fabric, Needle, Thread 15 Feed Dog • Feed Dog and Fabric Feed 19-20 • Feed Dog Up/Down 19 • Lowered Feed Dog 23 • Sewing Corners 20 Flat Joining Seam 47 Foot Control 8 Free...
User Guide
Page 166
...;BSR» Screen 82 • Using Functions in the BSR Mode 81 R Important Embroidery Information 117-118 Important Facts about Thread and Needles 16 Inserting the Bobbin 11 K Key to Signs 3 M Main Category Buttons • Alphabets • Buttonholes • Decorative Stitches • Embroidery Mode/ Sewing Mode • Personal Program • Practical Stitches • Quilt Stitches • Setup Program • Tutorial for Embroidery Manual Darning 25-27 25 26 25...
...;BSR» Screen 82 • Using Functions in the BSR Mode 81 R Important Embroidery Information 117-118 Important Facts about Thread and Needles 16 Inserting the Bobbin 11 K Key to Signs 3 M Main Category Buttons • Alphabets • Buttonholes • Decorative Stitches • Embroidery Mode/ Sewing Mode • Personal Program • Practical Stitches • Quilt Stitches • Setup Program • Tutorial for Embroidery Manual Darning 25-27 25 26 25...

User Guide
Page 167
... 98 Upper Thread Tension 33 • Sewing Settings 94 • Text in Welcome Screen 93 • Touch (Screen Sensibility) 96 V • Update 99-100 • Version Information 99 Vari Overlock Seam 45 Sewing Light-CFL 13 Sewing on Elastic, Shirring Elastic/Cord 52 W Slide-on Bobbin Winder 10 Thread Tension 33, 114 Thread, Needle, Fabric 15 Threading the Bobbin Thread 114 Threading the Upper Thread 11, 114 • Double Needle, Triple Needle 14 Triple Straight Stitch 38 Trouble Shooting 104, 150 Tutorial (only for Embroidery...
... 98 Upper Thread Tension 33 • Sewing Settings 94 • Text in Welcome Screen 93 • Touch (Screen Sensibility) 96 V • Update 99-100 • Version Information 99 Vari Overlock Seam 45 Sewing Light-CFL 13 Sewing on Elastic, Shirring Elastic/Cord 52 W Slide-on Bobbin Winder 10 Thread Tension 33, 114 Thread, Needle, Fabric 15 Threading the Bobbin Thread 114 Threading the Upper Thread 11, 114 • Double Needle, Triple Needle 14 Triple Straight Stitch 38 Trouble Shooting 104, 150 Tutorial (only for Embroidery...


