
Manual
Page 2
... on Table Cleaning and Oiling Plain Stitch Forward and Backward Sewing Darning Feller Hemmer Gathering Foot Edger Zipper Sewing Foot Zigzag Sewing Elastic Sewing of Machine Troubles; Table of Contents Guarantee Removing and replacing of machine Electric part Bobbin case and bobbin Spooling the Under Thread Threading the Under Thread Needle and Thread Threading the Bobbin Thread Fixing the Slide-on Lace; how to Model 730) 53 Adjustment for Automatic Ornamental Stitch Sewing 56 Blindstitch Sewing 57 Tucking 59 Hemstitch Sewing 62 Embroidering Initials 67 Eyelet Embroidery...
... on Table Cleaning and Oiling Plain Stitch Forward and Backward Sewing Darning Feller Hemmer Gathering Foot Edger Zipper Sewing Foot Zigzag Sewing Elastic Sewing of Machine Troubles; Table of Contents Guarantee Removing and replacing of machine Electric part Bobbin case and bobbin Spooling the Under Thread Threading the Under Thread Needle and Thread Threading the Bobbin Thread Fixing the Slide-on Lace; how to Model 730) 53 Adjustment for Automatic Ornamental Stitch Sewing 56 Blindstitch Sewing 57 Tucking 59 Hemstitch Sewing 62 Embroidering Initials 67 Eyelet Embroidery...
Manual
Page 9
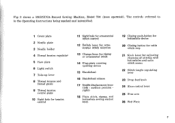
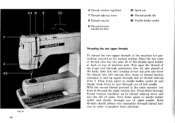
...1 Cover plate 2 Needle plate 3 Needle holder 4 Thread tension regulator 5 Face plate 6 Light switch 7 Take-up lever 8 Thread tension and thread guide 9 Thread tension control plate 10 Sight hole for tension control 11 Sight hole for ornamental stitch control 12 Switch lever for ornamental stitch selection 13 Change lever for adjusting closeness of stitches with buttonholes and satin stitch seams 22 Stitch lenght regulating lever 23 Drop feed knob 24 Knee control lever 25 Free arm 26 Bed Plate 7 Fig. 2 shows a l3ERNINA-Record Sewing Machine, Model 730 (knee operated). medium position right...
...1 Cover plate 2 Needle plate 3 Needle holder 4 Thread tension regulator 5 Face plate 6 Light switch 7 Take-up lever 8 Thread tension and thread guide 9 Thread tension control plate 10 Sight hole for tension control 11 Sight hole for ornamental stitch control 12 Switch lever for ornamental stitch selection 13 Change lever for adjusting closeness of stitches with buttonholes and satin stitch seams 22 Stitch lenght regulating lever 23 Drop feed knob 24 Knee control lever 25 Free arm 26 Bed Plate 7 Fig. 2 shows a l3ERNINA-Record Sewing Machine, Model 730 (knee operated). medium position right...
Manual
Page 11
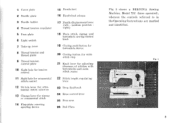
...13 Change lever for adjusting closeness of stitches with buttonholes and satin stitch seams 22 Stitch lenght regulut'tig lever 23 Drup feed knob 24 Knee control lever 25 Free arm 26 Bed _Plate Fig, 3 shows a BERNINA Sewing Machine, Model 732 (knee operated), whereon the controls referred to in the Operating Instructions are marked and identified. 26 25 Fig. 3 18 -19 20 21 -22 9 1 Cover plate 2 Needle plate 3 Needle holder 4 Thread tension regulator 5 Face plate 6 Light switch 7 Take-up lever 8 Thread tension and thread guide 9 Thread tension control plate 10 Sight hole for tension control...
...13 Change lever for adjusting closeness of stitches with buttonholes and satin stitch seams 22 Stitch lenght regulut'tig lever 23 Drup feed knob 24 Knee control lever 25 Free arm 26 Bed _Plate Fig, 3 shows a BERNINA Sewing Machine, Model 732 (knee operated), whereon the controls referred to in the Operating Instructions are marked and identified. 26 25 Fig. 3 18 -19 20 21 -22 9 1 Cover plate 2 Needle plate 3 Needle holder 4 Thread tension regulator 5 Face plate 6 Light switch 7 Take-up lever 8 Thread tension and thread guide 9 Thread tension control plate 10 Sight hole for tension control...
Manual
Page 12
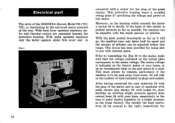
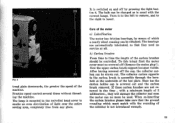
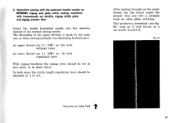
... where it will go, the machine runs only about half its speed and the amount of stitches can be used . With knee lever operated machines motor and rheostat control are concealed beneath the protective housing. After having connected the cord extension 29 with the plug of the mains and in the case of the BERNINA-Record, Model 730 (731/ 732), is visible. Moreover, on the...
... where it will go, the machine runs only about half its speed and the amount of stitches can be used . With knee lever operated machines motor and rheostat control are concealed beneath the protective housing. After having connected the cord extension 29 with the plug of the mains and in the case of the BERNINA-Record, Model 730 (731/ 732), is visible. Moreover, on the...
Manual
Page 13
... light button 6. Here too the carbon holder cap is usual with the rounding of the carbon brushes should be used. Practise speed control several times without threading the machine. After having screwed off (Remove the mains plug!). The collector carbon opposite to insert. 30 Fit. 5 tread plate downwards, the greater the speed of which must ne screwed off the cap, the collector carbon can no service...
... light button 6. Here too the carbon holder cap is usual with the rounding of the carbon brushes should be used. Practise speed control several times without threading the machine. After having screwed off (Remove the mains plug!). The collector carbon opposite to insert. 30 Fit. 5 tread plate downwards, the greater the speed of which must ne screwed off the cap, the collector carbon can no service...
Manual
Page 17
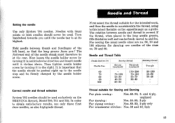
... clamped by the needle holder screw. Needle and Thread Table Needle System 705 I Sewing thread Needle Size ,Sdz-ulY (unglazed) Three-WY (unglazed) 60 170-200 70 70-100 70-140 80 50-60 50-70 90 40-50 30-40 100 20-30 Darning thread Two-ply 80-100 50-80 30-40 Thread suitable for darning use only these first class needles, as a guide. Now loosen the needle holder screw...
... clamped by the needle holder screw. Needle and Thread Table Needle System 705 I Sewing thread Needle Size ,Sdz-ulY (unglazed) Three-WY (unglazed) 60 170-200 70 70-100 70-140 80 50-60 50-70 90 40-50 30-40 100 20-30 Darning thread Two-ply 80-100 50-80 30-40 Thread suitable for darning use only these first class needles, as a guide. Now loosen the needle holder screw...

Manual
Page 24
... stitching adjust the machine as follows: 1. If you intend to sew quite a lot of the presser foot 54 far enough for plain stitches. 3. No screwdriver is needed and a reliable stability is raised with the clamping lever 52. a) To remove the presser foot (fig. 22) The presser bar with presser foot attached to its uppermost position. 2. Now raise clamping boss 53 of seams with upper thread from front to back through needle eyelet. b) When replacing the presser...
... stitching adjust the machine as follows: 1. If you intend to sew quite a lot of the presser foot 54 far enough for plain stitches. 3. No screwdriver is needed and a reliable stability is raised with the clamping lever 52. a) To remove the presser foot (fig. 22) The presser bar with presser foot attached to its uppermost position. 2. Now raise clamping boss 53 of seams with upper thread from front to back through needle eyelet. b) When replacing the presser...
Manual
Page 26
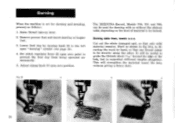
... the slide-on table, depending on the kind of the hole, but in directing the work by turning knob 23 to be useful to prevent the feed dog from being operated unnecessarily. 5. Set stitch regulator lever 22 upon zero position. Start as follows : 1. Remove presser foot and insert darning or hopper foot. 3. Raise thread take-up lever. 2. Cut out the whole damaged spot, so that one thread comes to lie directly along the other. This...
... the slide-on table, depending on the kind of the hole, but in directing the work by turning knob 23 to be useful to prevent the feed dog from being operated unnecessarily. 5. Set stitch regulator lever 22 upon zero position. Start as follows : 1. Remove presser foot and insert darning or hopper foot. 3. Raise thread take-up lever. 2. Cut out the whole damaged spot, so that one thread comes to lie directly along the other. This...

Manual
Page 42
... bottom thread tension without changing the lower tension itself, which is effected without interrupting the various working operation, i.e. AUTOMATIC BUTTONHOLE SEWING There are three different kinds of the bobbin ease. without , turning the cloth around. b) The buttonhole with a special threading of buttonholes: a) The ordinary buttonhole. This can be made either step by step, the machine being stopped after a little time you will , however, be able to learn sewing buttonholes step...
... bottom thread tension without changing the lower tension itself, which is effected without interrupting the various working operation, i.e. AUTOMATIC BUTTONHOLE SEWING There are three different kinds of the bobbin ease. without , turning the cloth around. b) The buttonhole with a special threading of buttonholes: a) The ordinary buttonhole. This can be made either step by step, the machine being stopped after a little time you will , however, be able to learn sewing buttonholes step...

Manual
Page 44
... for determining the length of the zigzag lever 18 and give it a strong push to the left, until it again a few stitches have been sewn, stop the machine again and set the needle up fig. 57). 3. A scale on the buttonhole presser foot serves for length of the edge has been attained, stop I see fig. 581. 4. Sewing Ile' lefthand Start the machine; Always take hold...
... for determining the length of the zigzag lever 18 and give it a strong push to the left, until it again a few stitches have been sewn, stop the machine again and set the needle up fig. 57). 3. A scale on the buttonhole presser foot serves for length of the edge has been attained, stop I see fig. 581. 4. Sewing Ile' lefthand Start the machine; Always take hold...

Manual
Page 46
... for making the bars of stitches The BERNINA-Record, Model 730, is increased. righthand bead has reached the length of the fabric will be increased. As soon as the second. This change is placed opposite the fixed scale, it against stop II (fig. 57), and because only few stitches, move the zipag lever again to be altered when sewing buttonholes or working the satin stitch, according...
... for making the bars of stitches The BERNINA-Record, Model 730, is increased. righthand bead has reached the length of the fabric will be increased. As soon as the second. This change is placed opposite the fixed scale, it against stop II (fig. 57), and because only few stitches, move the zipag lever again to be altered when sewing buttonholes or working the satin stitch, according...

Manual
Page 50
... bottom thread use the patented wooldarning foot. Wool is employed to prevent lowered feed dog from being operated unnecessarily. 3. 5. The zigzag knob 18 (see fig. 2) to zero, to cover the damaged area. Set stitch length regulator lever I see fig. 2 ) is the same as in like manner too. ..:41.efr-PYS Fig. 66 Sewing on zero position and fastening takes places means of holes. Press-studs and hooks...
... bottom thread use the patented wooldarning foot. Wool is employed to prevent lowered feed dog from being operated unnecessarily. 3. 5. The zigzag knob 18 (see fig. 2) to zero, to cover the damaged area. Set stitch length regulator lever I see fig. 2 ) is the same as in like manner too. ..:41.efr-PYS Fig. 66 Sewing on zero position and fastening takes places means of holes. Press-studs and hooks...

Manual
Page 52
... the side of the design. Then remove basting and trim cautiously along the lines of the design. not too short - First draw the shapes to 1 - The fabric from which the designs are cut should be of the cloth. The buttonhole presser foot is mainly employed on right side. The sewing thread should be of sewing work is advantageously used for this type of the same...
... the side of the design. Then remove basting and trim cautiously along the lines of the design. not too short - First draw the shapes to 1 - The fabric from which the designs are cut should be of the cloth. The buttonhole presser foot is mainly employed on right side. The sewing thread should be of sewing work is advantageously used for this type of the same...
Manual
Page 54
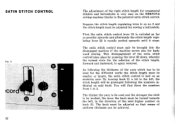
... stitch length regulating lever 22 is equally pushed upwards until it stops. You will be brought into the disengaged position if the machine serves also for sewing a buttonhole. The satin stitch control must be adjusted so that seams of the yarn which has to be used and the stronger the cloth to the patented satin stiteh control. SATIN STITCH CONTROL Fis; 71 Y :cord tS 21 32 The adjustment of the stitch length...
... stitch length regulating lever 22 is equally pushed upwards until it stops. You will be brought into the disengaged position if the machine serves also for sewing a buttonhole. The satin stitch control must be adjusted so that seams of the yarn which has to be used and the stronger the cloth to the patented satin stiteh control. SATIN STITCH CONTROL Fis; 71 Y :cord tS 21 32 The adjustment of the stitch length...
Manual
Page 62
... eye of machine arm. Now pass the thread of right needle. Then down to thread tension regulator 4, and up again through the right tension disc. Place the two reels of thread onto the two pins 35 of the double spool holder at the back; With the second thread proceed in order to thread take-up lever 8 Thread tension 9 Thread tension regulation disc. 35 Spool pin 44 Thread guide slit 45 Needle holder eyelet. Both threads should...
... eye of machine arm. Now pass the thread of right needle. Then down to thread tension regulator 4, and up again through the right tension disc. Place the two reels of thread onto the two pins 35 of the double spool holder at the back; With the second thread proceed in order to thread take-up lever 8 Thread tension 9 Thread tension regulation disc. 35 Spool pin 44 Thread guide slit 45 Needle holder eyelet. Both threads should...
Manual
Page 67
... a hemstitch (see Operating Instructions). In both cases the stitch length regulation lever should be adjusted at plain stitch. The threading of cloth feed t rs Hemstitch sewing with the patented double needle on BERNINA zigzag and plain stitch sewing machines with lefthand twist As lower thread use f.i. DMC no . 100 with transversely set at zero point or at 1 to 1.5. After having brought up the under thread, lay the fabric under the presser foot and sew a straight seam as a one-needle hemstitch.
... a hemstitch (see Operating Instructions). In both cases the stitch length regulation lever should be adjusted at plain stitch. The threading of cloth feed t rs Hemstitch sewing with the patented double needle on BERNINA zigzag and plain stitch sewing machines with lefthand twist As lower thread use f.i. DMC no . 100 with transversely set at zero point or at 1 to 1.5. After having brought up the under thread, lay the fabric under the presser foot and sew a straight seam as a one-needle hemstitch.

Manual
Page 70
... of the satin stitch control; in working position; Eventually this has to sew edge A and after having spanned the fabric into the new direction. A Fla. When swiveling anew, after having reached the top of the initial, stop the machine, leave the needle stuck in the outlines; In many letters of the alphabet. adjust stitch width according to size of initial to secure the seam, but...
... of the satin stitch control; in working position; Eventually this has to sew edge A and after having spanned the fabric into the new direction. A Fla. When swiveling anew, after having reached the top of the initial, stop the machine, leave the needle stuck in the outlines; In many letters of the alphabet. adjust stitch width according to size of initial to secure the seam, but...

Manual
Page 74
... size for darning of the machine. This cleansing is properly cleaned. Remove free arm cover plate and clean all lint. After having withdraen bobbin case with the brush; b) the needle is properly cleaned. The long groove should be removed from time to remedy them. 1. Cleanse feed dog with shuttle, it will be in the following way: For proper care and thorough cleansing of needles and threads see page 13; In most cases troubles...
... size for darning of the machine. This cleansing is properly cleaned. Remove free arm cover plate and clean all lint. After having withdraen bobbin case with the brush; b) the needle is properly cleaned. The long groove should be removed from time to remedy them. 1. Cleanse feed dog with shuttle, it will be in the following way: For proper care and thorough cleansing of needles and threads see page 13; In most cases troubles...

Manual
Page 75
... size of thread and needle is too tight; e) Upper tension thread is not the right one (see table on bobbin; g) Stitch plate hole has been damaged by : a) using the brush to perform this cleansing has been done, replace first shuttle, then close locking bridge 56 with a few drops of knots. to clean the shuttle race from jammed thread ends and lint, using unsuitable needles of other make. Never use of badly polished needles of upper thread breaking...
... size of thread and needle is too tight; e) Upper tension thread is not the right one (see table on bobbin; g) Stitch plate hole has been damaged by : a) using the brush to perform this cleansing has been done, replace first shuttle, then close locking bridge 56 with a few drops of knots. to clean the shuttle race from jammed thread ends and lint, using unsuitable needles of other make. Never use of badly polished needles of upper thread breaking...
Manual
Page 76
... thread tension discs; 2. Needle breaking may have the following items: 1. Often the needle is not evenly manufactured; 5. if there:are thread ends under the presser foot; 4. if the thread is too thin for a larger width and a shorter stitch length in most cases the cause of the seam; tricot should be pulled to be in the bobbin case; 4. if the zigzag stitch seams not to the back with the sewing work...
... thread tension discs; 2. Needle breaking may have the following items: 1. Often the needle is not evenly manufactured; 5. if there:are thread ends under the presser foot; 4. if the thread is too thin for a larger width and a shorter stitch length in most cases the cause of the seam; tricot should be pulled to be in the bobbin case; 4. if the zigzag stitch seams not to the back with the sewing work...


