Bernina Aurora 440QE Support Question
Bernina Aurora 440QE Support Question
Find answers below for this question about Bernina Aurora 440QE.Need a Bernina Aurora 440QE manual? We have 1 online manual for this item!
Question posted by rosborne5 on December 5th, 2012
Bobbin Problem
The bobbin is making clanky noise, spitting out pieces of thread. Top thread is not picking up bottom thread. No stitches form on top. Bottom thread is all bunched up. I cleaned out lint. Took out hook and cleaned, changed needle, tried different tension. Help! Bernina Aurora 440QE
Robin Osborne
Current Answers
Related Bernina Aurora 440QE Manual Pages
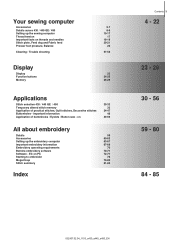
User Guide - Page 3
..., Balance
Cleaning / Trouble shooting
Display
Display Function buttons Memory
5-7 8-9 10-17 17 18-19 20-21 22
57-58
23 24-25 26-29
Applications
Stitch selection 430 / 440 QE / 450 Temporary altered stitch memory Application of buttonholes / Eyelets / Button sew - Your sewing computer
Accessories Details aurora 430 / 440 QE / 450 Setting up the sewing computer Thread tension...
User Guide - Page 4
...
032907.52.04_1103_a430_a440_a450_EN
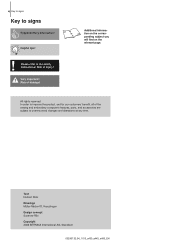
4 Key to signs
Key to the safety instructions!
In order to improve the product, and for our customers' benefit, all of the sewing and embroidery computer's features, parts, and accessories are subject to unannounced changes and alterations at any time.
User Guide - Page 5
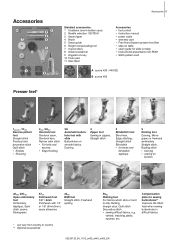
...Straight stitch, Quilt stitch Decorative stitch • sewing difficult fabrics, e.g.
velvets, matching plaids, squares, etc. Accessories
9 7
35 4 8
6 10
Standard accessories: 1 5 bobbins (one in bobbin ...Stitch-pattern card
1
A aurora 430 / 440 QE
2
11
A
B
B aurora 450
Presser feet*
1430/440 , 1C450 Reverse pattern foot Straight stitch Practical and decorative stitch Quilt stitch...
User Guide - Page 9
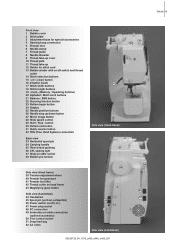
...33 Horizontal spool pin 34 Carrying handle 35 Rear thread guideng 36 CFL sewing light 37 Slide-on table socket 38 Bobbin pre-tension
Side view (Head frame) 39 Tension...Front view 1 Bobbin cover 2 Stitch plate 3 Attachment base for special accessories 4 Darning hoop connection 5 Presser foot 6 Needle clamp 7 Thread guide 8 Needle threader 9 Thread take-up cover 10 Thread path 11 Thread take-up /down...
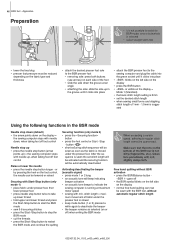
User Guide - Page 11
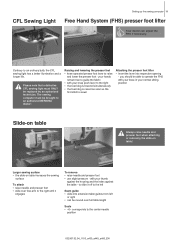
The sewing computer must ONLY be brought to the right • the feed dog is lowered simultaneously • the feed dog is raised as soon as the first stitch is sewn
Attaching the presser ... table
Always raise needle and presser foot when attaching or removing the slide-on table increases the sewing
surface
To attach • raise needle and presser foot • slide over full table length...
User Guide - Page 13
... horizontal
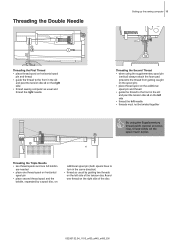
spool pin • place second thread spool and the
bobbin, separated by guiding two threads on the right side of the disc
032907.52.04_1103_a430_a440_a450_EN Threading the Double Needle
Setting up the sewing computer 13
A
Threading the First Thread • place thread spool on horizontal spool
pin and thread • guide the thread to the front in the slit...
User Guide - Page 16
...
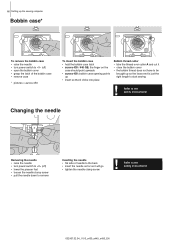
case should point upwards • aurora 450: bobbin case opening points
up • insert so that it clicks into place
Bobbin thread cutter • take the thread over cutter A and cut it • close the bobbin cover • the bobbin thread does not have to be
brought up the sewing computer
Bobbin case*
A
To remove the bobbin case • raise the...
User Guide - Page 18
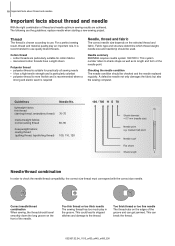
... stitches and damage to check the needle/thread compatibility, the correct size thread must correspond with the correct size needle.
Thread
The thread is recommended to length and form of the needle. Checking the needle condition The needle condition should be used. Guidelines
lightweight fabrics: thin thread (darning thread, embroidery thread)
mediumweight fabrics: normal sewing...
User Guide - Page 27
... the
-button = the stitch
• press the
-button = the stitch
combination will be saved
combination will be saved
• during the process of saving an
• during the process of the bobbin case for best results
(430 / 440 QE)
032907.52.04_1103_a430_a440_a450_EN Functions - Memory 27
aurora 430 / 440 QE
aurora 450
Example A:
Example A:
Sewing a stitch combination conti-
User Guide - Page 28
...
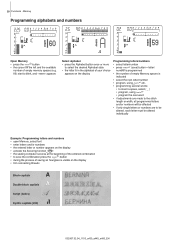
• program, using
• program the next word
• if adjustments are made to the stitch
length or width, all programmed letters
and/or numbers will be affected
• if only single letters... or number appears on the display
• activate the Securing function
• the sewing computer secures at the beginning of the entered combination
• to save the combination ...
User Guide - Page 36
... the Balance (see page 22 for all fabrics • secures beginning and end of seam
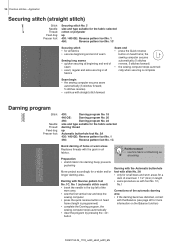
Sewing long seams • quicker securing at beginning and end of holes or worn areas Replaces threads with straight stitch forward
Darning program
Stitch:
Needle: Thread: Feed dog: Presser foot:
430:
Darning program No. 18
440 QE:
Darning program No...
User Guide - Page 46
... arrows) on the display =
Mode 1 (Standard) • the basic stitch length setting is not dirty (fingerprints, etc.). Clean lens periodically with needle up lower thread • hold upper and lower thread and press
the Start-/Stop button to start the BSR mode • sew 5-6 securing stitches • press the Start-/Stop button to stop button twice...
User Guide - Page 52
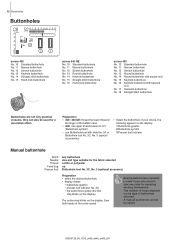
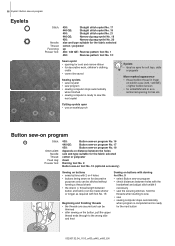
... No. 14 Round buttonhole with square end No. 15 Keyhole buttonhole No. 16 Keyhole buttonhole with tapered
end No. 17 Heirloom buttonhole No. 18 Straight stitch buttonhole
#VUUPOIPMFTBSFOPUPOMZQSBDUJDBM DMPTVSFT UIFZDBOBMTPCFVTFEGPSB EFDPSBUJWFFGGFDU
1SFQBSBUJPO 2&UISFBEUIFMPXFSUISFBEJO
UIFGJOHFSPGUIF...
User Guide - Page 53
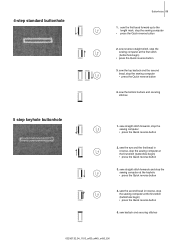
... begin ) • press the Quick reverse button
5. sew the top bartack and the second bead, stop the sewing computer • press the Quick reverse button
2. sew straight stitch forwards, stop the sewing computer • press the Quick reverse button
4. sew reverse straight stitch, stop the sewing computer at the first stitch (buttonhole begin ) • press the Quick reverse button...
User Guide - Page 55
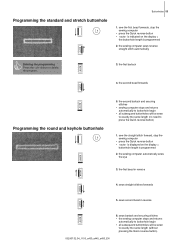
... stops and returns automatically to buttonhole begin • all subsequent buttonholes will be sewn to exactly the same length (no need to delete the program.
3. sew the straight stitch forward, stop the sewing computer
• press the Quick reverse button • «auto» is indicated on the display =
buttonhole length is programmed...
User Guide - Page 56
...
or puppets
More marked appearance • thread bobbin thread in finger
on bobbin case (430 / 440 QE) = tighter bobbin tension • for embellishment or as required with the
handwheel and adjust stitch width if necessary • sew the securing stitches; Button sew-on program
Stitch:
Stitch width: Needle: Thread:
Feed dog: Presser foot:
430:
Button sew-on program No. 16
440 QE:
Button...
User Guide - Page 60
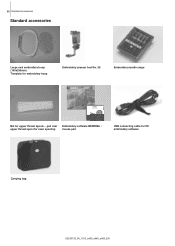
... for even spooling
Embroidery software BERNINA / mouse pad
USB connecting cable for upper thread spools - 60 Standard accessories
Standard accessories
Large oval embroidery hoop (145x255mm) Template for embroidery hoop
Embroidery presser foot No. 26
Embroidery needle range
Art Design ...
User Guide - Page 63
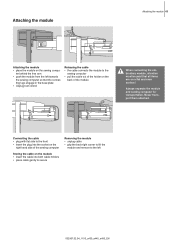
...8226; grip the back right corner to lift the
module and remove to the left towards
the sewing computer so that the connecting lugs engage in the base plate • Unplug foot control
Releasing the... module
When connecting the embroidery module, attention must be paid that all items are on the sewing compu- ter behind the free arm • push the module from the left
032907.52....
User Guide - Page 73
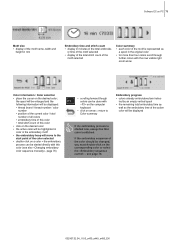
... be displayed: • thread brand / thread number / color
number • position of the current color / total
number of all colors • embroidery time of this color • total stitch count of this color (...size • display of the motif name, width and
height in mm
Embroidery time and stitch count • display in the embroidery motif • the embroidery hoop will be done with...
User Guide - Page 85
...
23
Cleaning
57
Seam guide (presser foot)
5, 35
Seam guide on slide-on table
11
Settings
Balance
22
Presser foot pressure
22
Thread tension
17
Setting up the sewing-/embroidery
computer
Embroidery module
63-67
Sewing computer
10-17
Sewing
Accessories
5-7
Function buttons
24-25
Letters (Alphabets)
25, 28
Reverse sewing
25
Sewing corners
21
Sewing stitch combinations...
Similar Questions

Bernina Qe 440 Decoratve Stitch 60 And 61 , Quilting Sttch. Does Not Perform.
the stitch is supposed to imitate hand quilting by using regular thread in bobbin and monofilament o...
the stitch is supposed to imitate hand quilting by using regular thread in bobbin and monofilament o...
(Posted by estelle74157 1 year ago)

Bernina 950 Sewing Machine
How to oil a Bernina industrial 950 sewing machine?
How to oil a Bernina industrial 950 sewing machine?
(Posted by vhermean 8 years ago)

I Have A Bernina 1090s Sewing Machine. How You Turn Off The Button Stitch Settin
(Posted by frogg595 10 years ago)

Bernina 1090 S Sewing Machine Manual
I Dont See The User Manual For This Machine For Free Downloading.what User Manual Are The Same As Th...
I Dont See The User Manual For This Machine For Free Downloading.what User Manual Are The Same As Th...
(Posted by cynthianel 10 years ago)

How Is The Front Cover Removed From A Bernina Aurora 440qe Sewing Machine?
My dealer has had two opportunities to repair my machine and did an OK job except for getting the co...
My dealer has had two opportunities to repair my machine and did an OK job except for getting the co...
(Posted by lholdren 11 years ago)