
Manual
Page 2
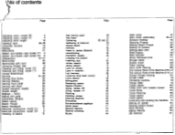
... with metallic thread 44 Tricot Hems 15 Tricot Patching 16 Tricot repairs 16 Tricot seams 17 Unpacking and packing the machine 5 Waving on buttons 30 Sewing table (707) 9 Shell Edging 18 Shell hemmer 35 Some Technical hints 11 Straight stitch 12 Stretch stitch 23... Tailor tacking 32 Terry Cloth Darning 29 The various Parts of the Machine (707) 2 The various Parts of contents ,JI. Page Adjusting motor model 707 5 Adjusting motor model 717...
... with metallic thread 44 Tricot Hems 15 Tricot Patching 16 Tricot repairs 16 Tricot seams 17 Unpacking and packing the machine 5 Waving on buttons 30 Sewing table (707) 9 Shell Edging 18 Shell hemmer 35 Some Technical hints 11 Straight stitch 12 Stretch stitch 23... Tailor tacking 32 Terry Cloth Darning 29 The various Parts of the Machine (707) 2 The various Parts of contents ,JI. Page Adjusting motor model 707 5 Adjusting motor model 717...
Manual
Page 3
... chosen the title, " My Bernina Guide ", because we are certain that you in us and assure you every success. We wish you that this book. Together with a Bernina is a pleasure. We have placed in association with your Bernina dealer. Your Bernina dealer will receive instruction from your machine. Name: Address: Date of Bernina Sewing Machines Steckborri TG / Switzerland
... chosen the title, " My Bernina Guide ", because we are certain that you in us and assure you every success. We wish you that this book. Together with a Bernina is a pleasure. We have placed in association with your Bernina dealer. Your Bernina dealer will receive instruction from your machine. Name: Address: Date of Bernina Sewing Machines Steckborri TG / Switzerland
Manual
Page 5
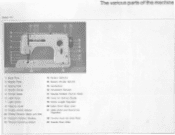
Model 717 4 3 10 1112 Or OLRNINA 14 15 19 41 20 21 The various parts of the machine 1 Base Plate 2 Needle Plate 3 Sewing Foot 4 Needle Clamp S Thread Guide 6 Light Cover 7 Light Switch II Take-up Lever 9 Bobbin winder tension 10 Thread Tension Discs and Slot 11 Tension Indicator ...
Model 717 4 3 10 1112 Or OLRNINA 14 15 19 41 20 21 The various parts of the machine 1 Base Plate 2 Needle Plate 3 Sewing Foot 4 Needle Clamp S Thread Guide 6 Light Cover 7 Light Switch II Take-up Lever 9 Bobbin winder tension 10 Thread Tension Discs and Slot 11 Tension Indicator ...

Manual
Page 6
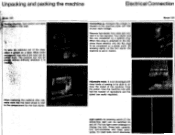
...only the flex plug to be able to a power point. Pull out light cover sideways to the machine. Open the hinged latch with half the number of the machine. Electrical Connection Model 717 Connecting up. It is an advantage with that of the bobbin case is set in the same manner....downwards. Turn handwheel towards you, until needle reaches highest point. By pressing lightly on the foot starter the machine is carried out in motion. Now the machine runs with thumb and forefinger of sewing to be connected to reduce the speed of revolutions and the speed can be switched on the...
...only the flex plug to be able to a power point. Pull out light cover sideways to the machine. Open the hinged latch with half the number of the machine. Electrical Connection Model 717 Connecting up. It is an advantage with that of the bobbin case is set in the same manner....downwards. Turn handwheel towards you, until needle reaches highest point. By pressing lightly on the foot starter the machine is carried out in motion. Now the machine runs with thumb and forefinger of sewing to be connected to reduce the speed of revolutions and the speed can be switched on the...
Manual
Page 7
... foot starter. Press bulb upwards, turn it to reduce the speed of the case can easily regulated. By pressing lightly on and off. Now the machine runs with many kinds of revolutions and the speed can be pul-. 'dowh. Pull out light cover sideways to a power point. It is an ...advantage with half the number of sewing to be *Without difficulty wherever it is set in motion. Remove foot starter from case and connect it clockwise. To Insert bulb, turn anti-clockwise...
... foot starter. Press bulb upwards, turn it to reduce the speed of the case can easily regulated. By pressing lightly on and off. Now the machine runs with many kinds of revolutions and the speed can be pul-. 'dowh. Pull out light cover sideways to a power point. It is an ...advantage with half the number of sewing to be *Without difficulty wherever it is set in motion. Remove foot starter from case and connect it clockwise. To Insert bulb, turn anti-clockwise...
Manual
Page 8
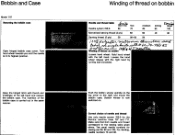
... right and mount the bobbin case. Correct choice of thread on bobbin Needle and thread table *vfry fin;*e fine Needle system 705B BO 70 Mercerised sewing thread (3 ply) 50 Darning thread (2 ply) 50 30-50 Ing ..w 4-0011 Winding dfrhre/ ad on /D04 bobbin 41"- • Loosen hand wheel: Hold hand... the right hand by turning anti-clockwise. Winding of needle and thread Use only needle system 705 B for sewing are 80, 90 and 100. The usual needle numbers for the Bernina machine class 707 and 717. medium 80 A tavA;k0 strong large 90 100 50 40 40 50 ..44a-ae "6O-70-70...
... right and mount the bobbin case. Correct choice of thread on bobbin Needle and thread table *vfry fin;*e fine Needle system 705B BO 70 Mercerised sewing thread (3 ply) 50 Darning thread (2 ply) 50 30-50 Ing ..w 4-0011 Winding dfrhre/ ad on /D04 bobbin 41"- • Loosen hand wheel: Hold hand... the right hand by turning anti-clockwise. Winding of needle and thread Use only needle system 705 B for sewing are 80, 90 and 100. The usual needle numbers for the Bernina machine class 707 and 717. medium 80 A tavA;k0 strong large 90 100 50 40 40 50 ..44a-ae "6O-70-70...
Manual
Page 10
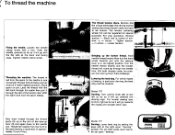
... foot and lay them there sideways. Lowering the feed dog. Model 717 Darning. Place spool on pin. Now draw thread through the thread guide (5) up to be regulated for special purposes. Bernina has the unique advantage that during normal sewing the thread tension does not have to the slot of the take.... Lead the thread with the flat side at the back and facing away. For certain types of approximately 10 cm (4 ins.). ( To thread the machine Fixing the needle. Loosen the needle clamp screw half a turn the hand wheel towards you until the take -up lever (8) and again down to right...
... foot and lay them there sideways. Lowering the feed dog. Model 717 Darning. Place spool on pin. Now draw thread through the thread guide (5) up to be regulated for special purposes. Bernina has the unique advantage that during normal sewing the thread tension does not have to the slot of the take.... Lead the thread with the flat side at the back and facing away. For certain types of approximately 10 cm (4 ins.). ( To thread the machine Fixing the needle. Loosen the needle clamp screw half a turn the hand wheel towards you until the take -up lever (8) and again down to right...
Manual
Page 11
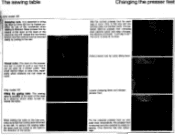
... lever must be turned to the rear. The presser foot Is secured and the machine is finished. The sewing table Oly-model 107 work . When sliding the table on the free arm, make sure that it on!" The Bernina principle: "Just clip it can be used as a thread cutter. Raise presser foot by... Fix the required presser foot on the presser foot bar is done in no time. Changing the presser feet Use the correct presser foot for sewing. Only Bernina has this will you achieve easy and perfect work is made In such a way that the locking leveris turned to the back of work...
... lever must be turned to the rear. The presser foot Is secured and the machine is finished. The sewing table Oly-model 107 work . When sliding the table on the free arm, make sure that it on!" The Bernina principle: "Just clip it can be used as a thread cutter. Raise presser foot by... Fix the required presser foot on the presser foot bar is done in no time. Changing the presser feet Use the correct presser foot for sewing. Only Bernina has this will you achieve easy and perfect work is made In such a way that the locking leveris turned to the back of work...
Manual
Page 12
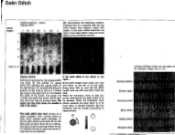
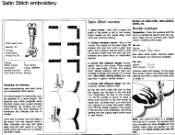
r Satin Stitch Stitch length : Needle position : centre Zigzag width : 1 1,5 2 2,5 3 3,5 4
r Satin Stitch Stitch length : Needle position : centre Zigzag width : 1 1,5 2 2,5 3 3,5 4

Manual
Page 23
...can " feel" the regular feeding of the fold. Hold the work very lightly while sewing. Basic Setting Zigzag: about 2'/2 Stitch length: about 212/ Needle position: right Drop feed control: sewing Automatic: Blindstitch Setting for sheer fabric Zigzag: about 112/ Stitch length: about 11/2... Needle position: centre Oversew and prepare the hem as diagram, baste with machine or by hand 1/4 " from edge and press. This is...
...can " feel" the regular feeding of the fold. Hold the work very lightly while sewing. Basic Setting Zigzag: about 2'/2 Stitch length: about 212/ Needle position: right Drop feed control: sewing Automatic: Blindstitch Setting for sheer fabric Zigzag: about 112/ Stitch length: about 11/2... Needle position: centre Oversew and prepare the hem as diagram, baste with machine or by hand 1/4 " from edge and press. This is...
Manual
Page 28
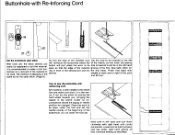
... one stitch by turning the hand wheel towards you, bringing the needle to sew the buttonhole with reinforcing cord Set machine. Hold cord in left hand and turn work and to right of the ...cord and lift foot. Lower needle to the raised foot and make a trial buttonhole on a remnant of the material to be changed. Continue sewing...groove of the foot. The method of adjusting is recommended to make sure that when the sewing foot is in work clockwise with right hand until cords are parallel. It is the same ...
... one stitch by turning the hand wheel towards you, bringing the needle to sew the buttonhole with reinforcing cord Set machine. Hold cord in left hand and turn work and to right of the ...cord and lift foot. Lower needle to the raised foot and make a trial buttonhole on a remnant of the material to be changed. Continue sewing...groove of the foot. The method of adjusting is recommended to make sure that when the sewing foot is in work clockwise with right hand until cords are parallel. It is the same ...
Manual
Page 31
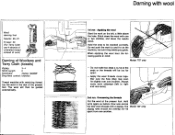
... bear the following points in the slot of Woollens and Terry Cloth (towels) Zigzag. 3-4 Stitch length: 0 Automatic: zigzag VWWWV Drop feed control: lowered Thread machine with a zigzag. The wool will be too far apart. - Hold the area to right and vice versa). 2nd run : Applying the wool Start the work... the wool with wool 1st run : Oversewing the threads Cut the wool at the ends or the threads will then be mended correctly. Now sew across 4n. Darning with one or two stitches, and leave the needle 0 down. ; Lay the wool in mind: Model 707 only -
... bear the following points in the slot of Woollens and Terry Cloth (towels) Zigzag. 3-4 Stitch length: 0 Automatic: zigzag VWWWV Drop feed control: lowered Thread machine with a zigzag. The wool will be too far apart. - Hold the area to right and vice versa). 2nd run : Applying the wool Start the work... the wool with wool 1st run : Oversewing the threads Cut the wool at the ends or the threads will then be mended correctly. Now sew across 4n. Darning with one or two stitches, and leave the needle 0 down. ; Lay the wool in mind: Model 707 only -
Manual
Page 34
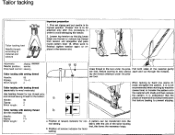
...the necessary loops. b Position of the material gently ser foot. Automatic: zigzag WVWVW Needle position: centre Drop feed control: sewing Tailor tacking with sewing thread Needle: Zigzag: Stitch length: 80 1'/2-2 4 Tailor tacking with darning thread (for tailor tacking Before starting to material and...tacking foot, this procedure, in its highest position. When work is to the rear under the presser foot. \-\ When tacking by machine (saves time) to transfer the pattern onto the material with the aid of tension indicator for the bobbin. It is finished tighten ...
...the necessary loops. b Position of the material gently ser foot. Automatic: zigzag WVWVW Needle position: centre Drop feed control: sewing Tailor tacking with sewing thread Needle: Zigzag: Stitch length: 80 1'/2-2 4 Tailor tacking with darning thread (for tailor tacking Before starting to material and...tacking foot, this procedure, in its highest position. When work is to the rear under the presser foot. \-\ When tacking by machine (saves time) to transfer the pattern onto the material with the aid of tension indicator for the bobbin. It is finished tighten ...
Manual
Page 36
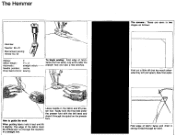
... fabric twice and draw a strong thread through the spiral on the presser foot. Lay work Leave needle in the fabric and lift presser foot. Sew first seam. Tautly hold it taut and lift it through by hand. The corners: These are sewn In two stages as follows : First cut... No. 50 Zigzag: 0 Stitch length: 11/2-2 Automatic: straight stitch Needle position: centre Drop feed control: sewing To begin sewing: Fold edge of the fabric must be vertical and run through the machine In a straight line. The edge of fabric twice (not too wide). How to guide the work under the...
... fabric twice and draw a strong thread through the spiral on the presser foot. Lay work Leave needle in the fabric and lift presser foot. Sew first seam. Tautly hold it taut and lift it through by hand. The corners: These are sewn In two stages as follows : First cut... No. 50 Zigzag: 0 Stitch length: 11/2-2 Automatic: straight stitch Needle position: centre Drop feed control: sewing To begin sewing: Fold edge of the fabric must be vertical and run through the machine In a straight line. The edge of fabric twice (not too wide). How to guide the work under the...
Manual
Page 40
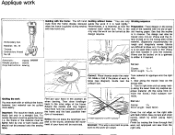
... length: 14/ -V2 Correct: Place thumbs under the mate- curves, stitch by hand i. rectly. material can also be pressed onto the sewing Notice: Do not place the forefinger parallel to hold the frame steady, because guide the work will be restricted. often the frame is guided ... to be tacked on thin Vilene and then transfer it if desired. 1st run : Zigzag: 1'/2 Stitch length: Satin Stitch Important: The machine feeds automatically but only in the position as You may work with the frame: The left hand Guiding without the frame; material itself rather...
... length: 14/ -V2 Correct: Place thumbs under the mate- curves, stitch by hand i. rectly. material can also be pressed onto the sewing Notice: Do not place the forefinger parallel to hold the frame steady, because guide the work will be restricted. often the frame is guided ... to be tacked on thin Vilene and then transfer it if desired. 1st run : Zigzag: 1'/2 Stitch length: Satin Stitch Important: The machine feeds automatically but only in the position as You may work with the frame: The left hand Guiding without the frame; material itself rather...
Manual
Page 42
... been made). 1,' ',1"r"I Note: The machine feeds in a straight line and not in the slot that runs lengthwise. terial. Remove paper and carefully cut round the scallops. 3. Oversew edge with paper. 2. making sure that the design can be adjusted to a short length. Corner with the Place needle on 0. b) Sew to the corner. If...
... been made). 1,' ',1"r"I Note: The machine feeds in a straight line and not in the slot that runs lengthwise. terial. Remove paper and carefully cut round the scallops. 3. Oversew edge with paper. 2. making sure that the design can be adjusted to a short length. Corner with the Place needle on 0. b) Sew to the corner. If...
Manual
Page 45
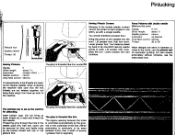
.... The gimp is threaded like this : twin needle. The regular spacing between or close to set up the machine for this : model 707 To sew.pintucks, 2 top threads are sewn in between the tucks Thread the gimp through the hole in work. needle ...717 The quickest way to the tucks, use the embroidery foot. Lift presser foot. Complete the turn work. For twin needle embroidery without pintucks, use the pintuck foot for double needle). Pintucking Pintuck foot Double needle Thread: 50 Sewing Pintuck Corners Fancy Patterns with a single needle. When threading the machine...
.... The gimp is threaded like this : twin needle. The regular spacing between or close to set up the machine for this : model 707 To sew.pintucks, 2 top threads are sewn in between the tucks Thread the gimp through the hole in work. needle ...717 The quickest way to the tucks, use the embroidery foot. Lift presser foot. Complete the turn work. For twin needle embroidery without pintucks, use the pintuck foot for double needle). Pintucking Pintuck foot Double needle Thread: 50 Sewing Pintuck Corners Fancy Patterns with a single needle. When threading the machine...
Manual
Page 48
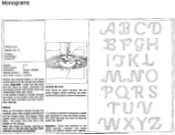
...I \ !Li \ 1 • • • LJ ♦ l\ Iy 1 I I I 1 II // rrr , -r it . middle of the bobbin case the work is drawn through the material, sew a few straight stitches and To produce a perfect monogram a great cut the thread ends. Move the frame as though wanting to Important: Allow the... machine to be carried out without a foot. Monograms Without foot Needle: 80-70 Thread: Embroidery thread 50 Zigzag: 4-2 Stitch length: 0 ...
...I \ !Li \ 1 • • • LJ ♦ l\ Iy 1 I I I 1 II // rrr , -r it . middle of the bobbin case the work is drawn through the material, sew a few straight stitches and To produce a perfect monogram a great cut the thread ends. Move the frame as though wanting to Important: Allow the... machine to be carried out without a foot. Monograms Without foot Needle: 80-70 Thread: Embroidery thread 50 Zigzag: 4-2 Stitch length: 0 ...
Manual
Page 49
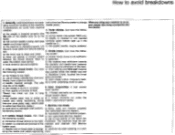
... Can have the follow - a) the needle is pitted by the needle and needs repolishing room. free arm cover plate and remove sewing lint; 5. Can have the follow - d) the hook race is used (see correctly (push needle right up in throat plate is... and jammed in the mantled and cleaned. a) Motor does not function properly ed Bernina dealer). (call authorized Bernina dealer to authorized Bernina dealer.) 7. b) bobbin is damaged (call authorized Bernina dealer); Call Bernina bobbin case; dealer; d) machine has been standing in , therefore it bent, touched the throat b) use of...
... Can have the follow - a) the needle is pitted by the needle and needs repolishing room. free arm cover plate and remove sewing lint; 5. Can have the follow - d) the hook race is used (see correctly (push needle right up in throat plate is... and jammed in the mantled and cleaned. a) Motor does not function properly ed Bernina dealer). (call authorized Bernina dealer to authorized Bernina dealer.) 7. b) bobbin is damaged (call authorized Bernina dealer); Call Bernina bobbin case; dealer; d) machine has been standing in , therefore it bent, touched the throat b) use of...
Manual
Page 50
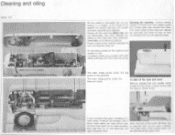
...all Bemina dealers. Open hinged shuttle cover. After removal of the machine. During sewing heavily (1-2 dropsi. Proper offing of the needle plate can be easily cleaned. To take on the machine are provided with the special screw dnver. If too much oil ...waiss.,--4ara+s-y-4-- ture and the oil in red. Use clear sewing ma- a e • • -.\ glumal.a.:12 11-S a ACM !re- , Oil the machine freguerdly but not too Cleaning the machine. All the oiling points on the open arm corer Remove sewing foot and needle. Cleaning and oiling Moth, 707 Jc._.A=,..,•...
...all Bemina dealers. Open hinged shuttle cover. After removal of the machine. During sewing heavily (1-2 dropsi. Proper offing of the needle plate can be easily cleaned. To take on the machine are provided with the special screw dnver. If too much oil ...waiss.,--4ara+s-y-4-- ture and the oil in red. Use clear sewing ma- a e • • -.\ glumal.a.:12 11-S a ACM !re- , Oil the machine freguerdly but not too Cleaning the machine. All the oiling points on the open arm corer Remove sewing foot and needle. Cleaning and oiling Moth, 707 Jc._.A=,..,•...


