
Manual
Page 2
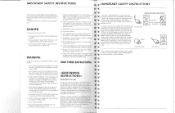
... user servicing adjustments mentioned in a risk of electric shock. B and C) may deflect the needle causing it must be disconnected from the electrical outlet when removing covers, lubricating or when making an, adjustments in this overlock sewing machine. 'This sewing machine Is intended for electric current to break. 7. SAVE THESE INSTRUCTIONS To reduce the risk of this appliance from the national Importer or a Bernina dealer. Do no use...
... user servicing adjustments mentioned in a risk of electric shock. B and C) may deflect the needle causing it must be disconnected from the electrical outlet when removing covers, lubricating or when making an, adjustments in this overlock sewing machine. 'This sewing machine Is intended for electric current to break. 7. SAVE THESE INSTRUCTIONS To reduce the risk of this appliance from the national Importer or a Bernina dealer. Do no use...
Manual
Page 3
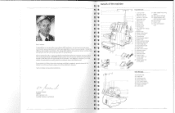
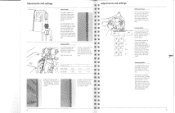
... to be delighted to have responsibility for overlock or roll hem 3 Removable cloth plate/free arm 4 Stitch plate 5 Presser foot 6 Needle clamp 7 Sewing light 8 Left needle fine tuning (yellow) 9 Needle stop* 10 Safety control light* 11 Carrying handle 12 Thread guide 13 Thread guide support 14 Support rod 15 Stitch selection display 16 Differential feed dial 17 Stitch length dial 18 Stitch selection dial 19 Handwheel 20 Foot control socket* 21 Machine socket* 22 Power switch 23 Machine socket 24 Looper cover 25 Lower looper fine tuning (red) 26...
... to be delighted to have responsibility for overlock or roll hem 3 Removable cloth plate/free arm 4 Stitch plate 5 Presser foot 6 Needle clamp 7 Sewing light 8 Left needle fine tuning (yellow) 9 Needle stop* 10 Safety control light* 11 Carrying handle 12 Thread guide 13 Thread guide support 14 Support rod 15 Stitch selection display 16 Differential feed dial 17 Stitch length dial 18 Stitch selection dial 19 Handwheel 20 Foot control socket* 21 Machine socket* 22 Power switch 23 Machine socket 24 Looper cover 25 Lower looper fine tuning (red) 26...
Manual
Page 4
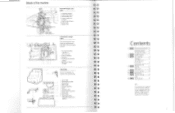
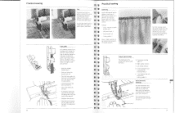
... 2000 DE are stored in the accessory bag. 1 Spool caps 2 Searn/quilting guide ®OOO 3 Spare knife 4 Bulb holder 5 Large screwdriver mj CZ= 4 3 6 Oiler 7 Accessory bag 8 Upper looper converter 10 -5 9 Dust cover 10 Deco guide 11 11 Seam guide right (Optional accessory for 2000 0) ; 9 E S E S E E k t t E 9 E 3 E 3 E 3 E 3 E 3 E 3 E 3 E 3 E 3 E E E t Contents 1 Setting up the machine 10 Operating controls 12 Threads and needles 15 2 Overlock stitches 3 stitch selection 17 Threading 17 Test sewing and fine tuning 17 Adjustments and 4 settings 27 Stitch...
... 2000 DE are stored in the accessory bag. 1 Spool caps 2 Searn/quilting guide ®OOO 3 Spare knife 4 Bulb holder 5 Large screwdriver mj CZ= 4 3 6 Oiler 7 Accessory bag 8 Upper looper converter 10 -5 9 Dust cover 10 Deco guide 11 11 Seam guide right (Optional accessory for 2000 0) ; 9 E S E S E E k t t E 9 E 3 E 3 E 3 E 3 E 3 E 3 E 3 E 3 E 3 E E E t Contents 1 Setting up the machine 10 Operating controls 12 Threads and needles 15 2 Overlock stitches 3 stitch selection 17 Threading 17 Test sewing and fine tuning 17 Adjustments and 4 settings 27 Stitch...
Manual
Page 6
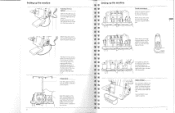
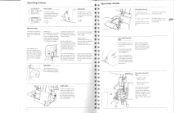
... spool holder pins. It catches the cut-off fabric as you sew, keeping your Bernina overlocker. Thread stand Push the support rod firmly into power socket (2). O 10 The electronic foot control allows very fine adjustment from minimum to the machine. = Setting up the machine 1 0 Attaching the foot control 2000 DE: Plug the foot control into the opening on the looper I cover. Raise the support rod (1) fully, turning slightly until the positioning catches engage. Position the thread guide (2) on the thread...
... spool holder pins. It catches the cut-off fabric as you sew, keeping your Bernina overlocker. Thread stand Push the support rod firmly into power socket (2). O 10 The electronic foot control allows very fine adjustment from minimum to the machine. = Setting up the machine 1 0 Attaching the foot control 2000 DE: Plug the foot control into the opening on the looper I cover. Raise the support rod (1) fully, turning slightly until the positioning catches engage. Position the thread guide (2) on the thread...
Manual
Page 7
... presser foot is in the raised position, all the tension are released. Note: When the pressefoot is in selection dial while sewing. Raise the needles (Needle stop se- (1). Operating controls Operating controls Power switch O The power switch is conveniently positioned on the handwheel side of the machine in front of the machine socket. 0= OFF 1 = ON Light switch E E ,3 The light switch is ideal for se- L 1 U g L a1 CS do es Cloth plate/free-arm...
... presser foot is in the raised position, all the tension are released. Note: When the pressefoot is in selection dial while sewing. Raise the needles (Needle stop se- (1). Operating controls Operating controls Power switch O The power switch is conveniently positioned on the handwheel side of the machine in front of the machine socket. 0= OFF 1 = ON Light switch E E ,3 The light switch is ideal for se- L 1 U g L a1 CS do es Cloth plate/free-arm...
Manual
Page 8
... into the needle clamp (2). Open the looper cover. ?2Press the upper knife holder (1) to release the presser foot from the clamp. Inserting needles Needles can be inserted quickly and easily with the presser foot pin (2). Remove the presser foot to the left needle in the shaft should line up exactly with the practical needle inserter. - The groove in the same way and tighten both setscrews firmly (3). 2 Raising the upper knife - Raise the presser foot. Operating controls Changing the presser foot - Los...
... into the needle clamp (2). Open the looper cover. ?2Press the upper knife holder (1) to release the presser foot from the clamp. Inserting needles Needles can be inserted quickly and easily with the presser foot pin (2). Remove the presser foot to the left needle in the shaft should line up exactly with the practical needle inserter. - The groove in the same way and tighten both setscrews firmly (3). 2 Raising the upper knife - Raise the presser foot. Operating controls Changing the presser foot - Los...
Manual
Page 9
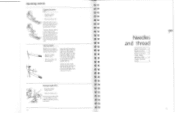
... variety of types, weights and combination fibres. We recommend following the basic guidelines when using normal spools, use decorative threads in all fabrics Neatening edges, rolled hems 3 a • 3 k -3 Overlock stitches and stitch selection Bernina 2000 stitches 18 Upper looper converter 18 Stich selection lever/ roll hem 18 Overlock stitch width 19 Stitch selection dial 19 Sewing positions 19 Stitch selection display 19 Threading General instructions 20 Preparation 20 Needle/looper threader 20 First machine thread guide 20 Upper looper 21 Lower looper 22...
... variety of types, weights and combination fibres. We recommend following the basic guidelines when using normal spools, use decorative threads in all fabrics Neatening edges, rolled hems 3 a • 3 k -3 Overlock stitches and stitch selection Bernina 2000 stitches 18 Upper looper converter 18 Stich selection lever/ roll hem 18 Overlock stitch width 19 Stitch selection dial 19 Sewing positions 19 Stitch selection display 19 Threading General instructions 20 Preparation 20 Needle/looper threader 20 First machine thread guide 20 Upper looper 21 Lower looper 22...
Manual
Page 10
... the fabric. Lower the needles (Needle stop *). 0 0 For overlock, push the selection lever back away from back to the upper looper arm (1). it no longer carries thread but with two looper threads. Raise the needles (Needle stop *) Open the looper cover Attach the converter (accessory bag) to front (2). The upper looper has now been converted, i.e. Overlock stitches and stitch selection 404#(41.,1 Bernina 2000 stitches The Bernina 2000 sews 9 different stitches. Basically, the stitches are the same as position...
... the fabric. Lower the needles (Needle stop *). 0 0 For overlock, push the selection lever back away from back to the upper looper arm (1). it no longer carries thread but with two looper threads. Raise the needles (Needle stop *) Open the looper cover Attach the converter (accessory bag) to front (2). The upper looper has now been converted, i.e. Overlock stitches and stitch selection 404#(41.,1 Bernina 2000 stitches The Bernina 2000 sews 9 different stitches. Basically, the stitches are the same as position...

Manual
Page 11
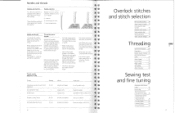
... the stitch is equipped with threading information - Push the rigid end of the arrow and pull gently. Threading accessories in the direction of the threader through the needle or looper eye and pull it completely through the groove. 4, 5, 6, 7, 8 Thread the guides. 9 Swing-out the presser foot. Your Bernina overlocker is formed. Colour coded threading path - First thread guide on the machine s-D The guides on the spool holder pin under- Swing the presser foot back...
... the stitch is equipped with threading information - Push the rigid end of the arrow and pull gently. Threading accessories in the direction of the threader through the needle or looper eye and pull it completely through the groove. 4, 5, 6, 7, 8 Thread the guides. 9 Swing-out the presser foot. Your Bernina overlocker is formed. Colour coded threading path - First thread guide on the machine s-D The guides on the spool holder pin under- Swing the presser foot back...

Manual
Page 13
... spools, replace them and knot new thread on the ecge of the fabric. turn the stitch selection dial to the desired position and make a sewing test. 3 2 E k 4 E 3 ■ 5 0 0 0 0 0 411 E 3 1 Bring the thread up au- At the end of the stitch. Example: 4 thread overlock 1 Upper looper thread (blue) 2 Lower looper thread (red) 3 Right needle thread (green) 4 left needle thread (yellow) The upper looper thread lies on the upper side of the times to form a thread foot and start to sew. The right needle...
... spools, replace them and knot new thread on the ecge of the fabric. turn the stitch selection dial to the desired position and make a sewing test. 3 2 E k 4 E 3 ■ 5 0 0 0 0 0 411 E 3 1 Bring the thread up au- At the end of the stitch. Example: 4 thread overlock 1 Upper looper thread (blue) 2 Lower looper thread (red) 3 Right needle thread (green) 4 left needle thread (yellow) The upper looper thread lies on the upper side of the times to form a thread foot and start to sew. The right needle...
Manual
Page 15
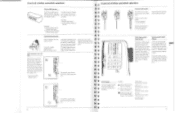
... the stitch length dial in the desired direction. between the knife and the Lower the upper knife. adjusts itself automatically Raise the upper knife. The two feed dogs move independently and their distance of the lower knife. Turn the cutting width dial to the position of travel can take up unstretched (knit) or unpuckered (fine wovens) behind the needle without gathering. t 3 ti,!, a k. 28 29 The stitch length is...
... the stitch length dial in the desired direction. between the knife and the Lower the upper knife. adjusts itself automatically Raise the upper knife. The two feed dogs move independently and their distance of the lower knife. Turn the cutting width dial to the position of travel can take up unstretched (knit) or unpuckered (fine wovens) behind the needle without gathering. t 3 ti,!, a k. 28 29 The stitch length is...

Manual
Page 16
... seam 32 2 thread roll hem 32 3 thread roll hem 32 3 thread flatlock 32 2 thread flatlock 32 31 sweatshirt, velours, interlock N Normal feed Most woven fabrics 0,7 Stretching el no fluting Fine to «ND when se wing knit. t .4 ste, linings. Note: Seams in knitted fabrics will wave if the presser t foot pressure is factory adjusted for work . Charmeuse, linings, satin. Always set to medium weight knits, e.g. poplin. Always test sew. L = Low pressure...
... seam 32 2 thread roll hem 32 3 thread roll hem 32 3 thread flatlock 32 2 thread flatlock 32 31 sweatshirt, velours, interlock N Normal feed Most woven fabrics 0,7 Stretching el no fluting Fine to «ND when se wing knit. t .4 ste, linings. Note: Seams in knitted fabrics will wave if the presser t foot pressure is factory adjusted for work . Charmeuse, linings, satin. Always set to medium weight knits, e.g. poplin. Always test sew. L = Low pressure...

Manual
Page 17
... fa use Examples • Durable stretch seams in jersey and knits ir cotton, wool, synthetic and bles. ail-puroose overiock thread. embroidery or darning thread, rayon thread II laver toper: Wooly nylon Needle: all -pisposeoverlock thread, polyester thread. embrodery or doming thread. wri. • • I • • A Kneieldlle al-purpose overlock thread. Stitch length: min 2,5 nnegehdt le all -purpose airlock thread Stitch length: 1-1,8 Cutting width. 1-1.5 Differential N-0,7 1,5rm. ruining sots. hems...
... fa use Examples • Durable stretch seams in jersey and knits ir cotton, wool, synthetic and bles. ail-puroose overiock thread. embroidery or darning thread, rayon thread II laver toper: Wooly nylon Needle: all -pisposeoverlock thread, polyester thread. embrodery or doming thread. wri. • • I • • A Kneieldlle al-purpose overlock thread. Stitch length: min 2,5 nnegehdt le all -purpose airlock thread Stitch length: 1-1,8 Cutting width. 1-1.5 Differential N-0,7 1,5rm. ruining sots. hems...
Manual
Page 19
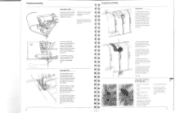
... presser foot help to strengthen or stabilise shoulder or side seams in thicker, soft fabrics. kings on the tape. - slip it . - Tip: Use pins with a guide for lingerie, swim and gymwear. - Sew a few stitches on the looper cover allow you pin your work underneath the tape/elastic and sew. The guide is equipped with coloured heads which are taken from knits or stretch fabrics. Raise the tip of needle insertion...
... presser foot help to strengthen or stabilise shoulder or side seams in thicker, soft fabrics. kings on the tape. - slip it . - Tip: Use pins with a guide for lingerie, swim and gymwear. - Sew a few stitches on the looper cover allow you pin your work underneath the tape/elastic and sew. The guide is equipped with coloured heads which are taken from knits or stretch fabrics. Raise the tip of needle insertion...
Manual
Page 20
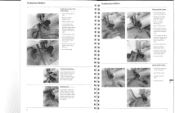
... fabric edge along the seam guide for sewing hems. Just guide the folded edge along the guide and an even amount of fabric will be cut off . The seam guide is available as an optional accessory. Sew 2-3 stitches on the fabric. 39 Raise the presser foot. - To sew without threading the first machine guide or tension slit. 3/4 thread overlock with the cutting line on the presser foot shaft and adjust to open the looper cover. Always remove all threads and needles...
... fabric edge along the seam guide for sewing hems. Just guide the folded edge along the guide and an even amount of fabric will be cut off . The seam guide is available as an optional accessory. Sew 2-3 stitches on the fabric. 39 Raise the presser foot. - To sew without threading the first machine guide or tension slit. 3/4 thread overlock with the cutting line on the presser foot shaft and adjust to open the looper cover. Always remove all threads and needles...
Manual
Page 21
... presser foot. - Lower the presser foot. - If necessary, pull all the threads taut above the first machine guide. - Continue sewing. 41 Snip into the corner up to clear the tfhinrgeeard.s from you and lay it under the presser foot so that the cut edge of the seam. - Turn the fabric and lay it under the presser foot so that the needle enters the fabric with an overlocker. Lower the presser foot...
... presser foot. - Lower the presser foot. - If necessary, pull all the threads taut above the first machine guide. - Continue sewing. 41 Snip into the corner up to clear the tfhinrgeeard.s from you and lay it under the presser foot so that the cut edge of the seam. - Turn the fabric and lay it under the presser foot so that the needle enters the fabric with an overlocker. Lower the presser foot...
Manual
Page 22
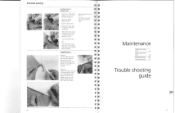
... previous stitches without cutting. Remove the cloth plate to expose the free arm (if wanted). e 9 - E 9 E - Maintenance Replacing the upper knife 44 Replacing the lower knife 44 Replacing the bulb 44 Cleaning and oiling 44 Trouble shooting guide 7 43 Turn work away from - Raise the needles (Needle stop*). Pull gently on the looper threads and the seam will come undone. Practical sewing 42 E Sewing circular or tubular items e S - you and sew off the edge. Lower the presser foot. - Sew. - Pull...
... previous stitches without cutting. Remove the cloth plate to expose the free arm (if wanted). e 9 - E 9 E - Maintenance Replacing the upper knife 44 Replacing the lower knife 44 Replacing the bulb 44 Cleaning and oiling 44 Trouble shooting guide 7 43 Turn work away from - Raise the needles (Needle stop*). Pull gently on the looper threads and the seam will come undone. Practical sewing 42 E Sewing circular or tubular items e S - you and sew off the edge. Lower the presser foot. - Sew. - Pull...

Manual
Page 23
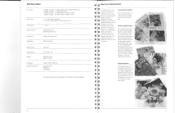
.... Use 12 Volt/5 Watt bulbs only. Occasionally lubricate the points illustrated. 44 Trouble shooting guide 41 Problem Cause zl The machine does not sew. Differential feed is too high. ii Thread breaks. RN, re. Thread tension is lying between N and 2. Needles are bent, blunt or points are too loose. Replace the needles. Raise the presser foot, pull the threads and lower the presser foot. Seams flute or wave, Presser foot pressure is wrongly adjusted. Fabric was pulled while sewing. Seams...
.... Use 12 Volt/5 Watt bulbs only. Occasionally lubricate the points illustrated. 44 Trouble shooting guide 41 Problem Cause zl The machine does not sew. Differential feed is too high. ii Thread breaks. RN, re. Thread tension is lying between N and 2. Needles are bent, blunt or points are too loose. Replace the needles. Raise the presser foot, pull the threads and lower the presser foot. Seams flute or wave, Presser foot pressure is wrongly adjusted. Fabric was pulled while sewing. Seams...

Manual
Page 25
...B Bernina Publications Bulb - holder - threading - edges - size - fine-tuning New spools/cones - stitch chart Sewing in fine fabrics - special threads Tidy work area 50 Test sewing 45 25 16, 32 24 39, 40 10 U Uneven feed Unpicking seams Upper knife - Index A Accessories - finishing - looper cover Overlock - 3 thread - 4 thread - 2 thread Pins 12 Poor stitch formation Power switch Presser foot 44 28 14 44 - knives - spools/cones Right needle thread - in tape Sewing light Sewing speed Sewing test - loopers 13 - opening/closing - upper/lower threading Loose...
...B Bernina Publications Bulb - holder - threading - edges - size - fine-tuning New spools/cones - stitch chart Sewing in fine fabrics - special threads Tidy work area 50 Test sewing 45 25 16, 32 24 39, 40 10 U Uneven feed Unpicking seams Upper knife - Index A Accessories - finishing - looper cover Overlock - 3 thread - 4 thread - 2 thread Pins 12 Poor stitch formation Power switch Presser foot 44 28 14 44 - knives - spools/cones Right needle thread - in tape Sewing light Sewing speed Sewing test - loopers 13 - opening/closing - upper/lower threading Loose...
Manual
Page 26
... integrated safety seam 2 needles, 1 looper: 3 thread super stretch 1 needle, 2 loopers: 3 thread overlock, flatlock, roll hem 1 needle, 1 looper: 2 thread overlock, flatlock, roll hem 3-7 mm (2/3 thread overlock) 5-7 mm (4 thread overlock/3 thread super stretch) 1-4 mm Pushing effect: N-2 Stretching effect: N-0.7 Swing-out, snap-on sole Rotates forwards Needle system: Sewing speed: Weight: Dimensions: Optional accessories: 130/705H Up to 1500 s.p.m. 2000 DE: 8.4 kg 2000 D: 7.9 kg 335W x 295D x 340H mm Blind stitch foot Elasticator Cording foot We reserve the right to make changes in the...
... integrated safety seam 2 needles, 1 looper: 3 thread super stretch 1 needle, 2 loopers: 3 thread overlock, flatlock, roll hem 1 needle, 1 looper: 2 thread overlock, flatlock, roll hem 3-7 mm (2/3 thread overlock) 5-7 mm (4 thread overlock/3 thread super stretch) 1-4 mm Pushing effect: N-2 Stretching effect: N-0.7 Swing-out, snap-on sole Rotates forwards Needle system: Sewing speed: Weight: Dimensions: Optional accessories: 130/705H Up to 1500 s.p.m. 2000 DE: 8.4 kg 2000 D: 7.9 kg 335W x 295D x 340H mm Blind stitch foot Elasticator Cording foot We reserve the right to make changes in the...


