
Manual
Page 2
... place by the manufacturer as threading needle, changing needle, threading looper, or changing presser foot and the like , extending from the national Importer or a Bernina dealer. Adapter Grounding means Grounding pin...path of burns, fire, electric shock or injury to break. 7. Do not use the proper needle plate. To unplug, grasp the plug not the cord. 16. Connect this appliance if it has... the like . 10. Return the appliance to break «GROUNDING INSTRUCTIONS» (Model 2000 D, USA only) This product must be grounded. Close attention is necessary when this appliance ...
... place by the manufacturer as threading needle, changing needle, threading looper, or changing presser foot and the like , extending from the national Importer or a Bernina dealer. Adapter Grounding means Grounding pin...path of burns, fire, electric shock or injury to break. 7. Do not use the proper needle plate. To unplug, grasp the plug not the cord. 16. Connect this appliance if it has... the like . 10. Return the appliance to break «GROUNDING INSTRUCTIONS» (Model 2000 D, USA only) This product must be grounded. Close attention is necessary when this appliance ...
Manual
Page 3
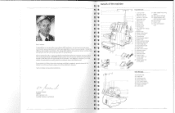
...Some hundred years ago, my great grandfather invented the world's first hemstitch sewing machine. The Bernina t 2000 is a new concept in general, please do not hesitate to contact your Bernina dealer who will give you years of your overlocker or sewing in overlocking. The unique stitch ...generation member of the family to have responsibility for overlock or roll hem 3 Removable cloth plate/free arm 4 Stitch plate 5 Presser foot 6 Needle clamp 7 Sewing light 8 Left needle fine tuning (yellow) 9 Needle stop* 10 Safety control light* 11 Carrying handle 12 Thread guide 13 Thread guide support...
...Some hundred years ago, my great grandfather invented the world's first hemstitch sewing machine. The Bernina t 2000 is a new concept in general, please do not hesitate to contact your Bernina dealer who will give you years of your overlocker or sewing in overlocking. The unique stitch ...generation member of the family to have responsibility for overlock or roll hem 3 Removable cloth plate/free arm 4 Stitch plate 5 Presser foot 6 Needle clamp 7 Sewing light 8 Left needle fine tuning (yellow) 9 Needle stop* 10 Safety control light* 11 Carrying handle 12 Thread guide 13 Thread guide support...

Manual
Page 5
i k r5 E E .7m.0 E xa h 0 ci E E- r t s t s t t t t I. Setting up the machine Attaching the foot control 10 Thread stand 10 Threads, cones, spools 11 Waste collector 11 Operating controls Power switch 12 Light switch 12 Electronics*/safety 12 Handwheel 12 Looper cover 12 Cloth plate/free arm 13 2-step presser foot lifter 13 Swing-out presser foot 13 Changing the presser foot 14 Inserting the needle 14 Raising the upper knife 14 9
i k r5 E E .7m.0 E xa h 0 ci E E- r t s t s t t t t I. Setting up the machine Attaching the foot control 10 Thread stand 10 Threads, cones, spools 11 Waste collector 11 Operating controls Power switch 12 Light switch 12 Electronics*/safety 12 Handwheel 12 Looper cover 12 Cloth plate/free arm 13 2-step presser foot lifter 13 Swing-out presser foot 13 Changing the presser foot 14 Inserting the needle 14 Raising the upper knife 14 9
Manual
Page 7
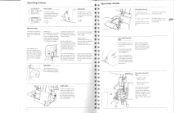
...also easier to provide more space between presser foot and stitch plate for If the machine has not been seconds, after which set up , i.e. E 1 = ON 2 2 = OFF E Electronics/safety Your Bernina overlocker is open the looper cover, press to Bernina) permits easy access for threading etc. when you press the... forwards in tape or elastic. To close the cover, push it is ideal for threading or changing the needles. L 1 U g L a1 CS do es Cloth plate/free-arm The cloth plate can be The free arm is swung out. Safety control lamp*: If overheating should occur, the motor will...
...also easier to provide more space between presser foot and stitch plate for If the machine has not been seconds, after which set up , i.e. E 1 = ON 2 2 = OFF E Electronics/safety Your Bernina overlocker is open the looper cover, press to Bernina) permits easy access for threading etc. when you press the... forwards in tape or elastic. To close the cover, push it is ideal for threading or changing the needles. L 1 U g L a1 CS do es Cloth plate/free-arm The cloth plate can be The free arm is swung out. Safety control lamp*: If overheating should occur, the motor will...
Manual
Page 12
...) Place the spool on the needle clamp. 7 Swing the presser foot out. Take the thread over the point of the wire and lay it under the thread guide plate and through the take . per looper converter, take - 4 up from spool and lay it from back to back. Lower looper (red) Place... the spool on the threader. Threading b 2. Thread the needle from back to its normal position. 12 Thread the ...
...) Place the spool on the needle clamp. 7 Swing the presser foot out. Take the thread over the point of the wire and lay it under the thread guide plate and through the take . per looper converter, take - 4 up from spool and lay it from back to back. Lower looper (red) Place... the spool on the threader. Threading b 2. Thread the needle from back to its normal position. 12 Thread the ...

Manual
Page 13
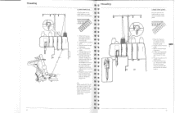
...A • • • 24 0 34 Starting to the existing thread. Example: 4 thread overlock 1 Upper looper thread (blue) 2 Lower looper thread (red) 3 Right needle thread (green) 4 left needle thread (yellow) The upper looper thread lies on the upper side of the fabric and the lower looper thread lies on the presser foot...the waste collector or on the ecge of the stitch. E Swing the presser foot E 3 back and lay the thread under the thread guide plate t and 5 through the take-up au- I Holding the fabric in the yel- The loops formed by both looper threads. g It) ...
...A • • • 24 0 34 Starting to the existing thread. Example: 4 thread overlock 1 Upper looper thread (blue) 2 Lower looper thread (red) 3 Right needle thread (green) 4 left needle thread (yellow) The upper looper thread lies on the upper side of the fabric and the lower looper thread lies on the presser foot...the waste collector or on the ecge of the stitch. E Swing the presser foot E 3 back and lay the thread under the thread guide plate t and 5 through the take-up au- I Holding the fabric in the yel- The loops formed by both looper threads. g It) ...
Manual
Page 22
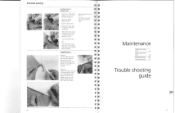
... E 9 E - Sew. - you and sew off the edge. Unpicking seams Method 1: Cut the loops formed by the needle threads with sharp scissors or the Bernina seam ripper. Raise the tip of the pres- (approx. 2.5 cm/1") of the cut is complete, sew a few stitches over.... - Remove the cloth plate to expose the free arm (if wanted). Lower the presser foot. - e s - When the seam is against the knife. Raise the needles (Needle stop*). E 9 t 9 t s t E E E E Method 2: Loosen the loops formed by the looper threads with a pin or your Bernina seam E ripper. Maintenance ...
... E 9 E - Sew. - you and sew off the edge. Unpicking seams Method 1: Cut the loops formed by the needle threads with sharp scissors or the Bernina seam ripper. Raise the tip of the pres- (approx. 2.5 cm/1") of the cut is complete, sew a few stitches over.... - Remove the cloth plate to expose the free arm (if wanted). Lower the presser foot. - e s - When the seam is against the knife. Raise the needles (Needle stop*). E 9 t 9 t s t E E E E Method 2: Loosen the loops formed by the looper threads with a pin or your Bernina seam E ripper. Maintenance ...

Manual
Page 23
...Should the machine overheat, the motor cuts outs for the thread being used . Use 12 Volt/5 Watt bulbs only. CID C Your Bernina overlocker requires very little lubrication as the main components are available from special material and generally does not need replacing. h.. Guide fabric gently...cover is open, the safety control lamp is made of each thread. a Fabric does not feed evenly. Insert needles fully into needle clamp with the stitch plate. - Needles are too loose. Too much fabric in the stitch. 444, Machine does not sew. Replacing the bulb Using ...
...Should the machine overheat, the motor cuts outs for the thread being used . Use 12 Volt/5 Watt bulbs only. CID C Your Bernina overlocker requires very little lubrication as the main components are available from special material and generally does not need replacing. h.. Guide fabric gently...cover is open, the safety control lamp is made of each thread. a Fabric does not feed evenly. Insert needles fully into needle clamp with the stitch plate. - Needles are too loose. Too much fabric in the stitch. 444, Machine does not sew. Replacing the bulb Using ...

Manual
Page 25
... Legend - adjusting width - checking Sewing - Seam guide right B Bernina Publications Bulb - breaking - system - knotting on F Fabric edges curl up Fabric edges wave Fabric feed Fabric/needle/thread Feed-uneven Fine tuning First thread guide Flat seams Foot control ...Support rod Swing-out foot Switch- replacing 32 Thread ends 32 - finishing - seam allowances - replacing C Cleaning and lubricating Cloth plate Cones, positioning Corners, sewing Correct stitch formation Cutting width D Deco guide Decorative finishes Decorative thread Differential feed Domestic spools E Edges...
... Legend - adjusting width - checking Sewing - Seam guide right B Bernina Publications Bulb - breaking - system - knotting on F Fabric edges curl up Fabric edges wave Fabric feed Fabric/needle/thread Feed-uneven Fine tuning First thread guide Flat seams Foot control ...Support rod Swing-out foot Switch- replacing 32 Thread ends 32 - finishing - seam allowances - replacing C Cleaning and lubricating Cloth plate Cones, positioning Corners, sewing Correct stitch formation Cutting width D Deco guide Decorative finishes Decorative thread Differential feed Domestic spools E Edges...

