Get support for Bernina Bernette 46

Bernina Bernette 46 Support Question

Bernina Bernette 46 Support Question

Find answers below for this question about Bernina Bernette 46.
Need a Bernina Bernette 46 manual? We have 1 online manual for this item!
Question posted by dogmama1789 on October 21st, 2023

Help Reassembling Bobbin Case

Mine not in r ight, needle hits metal when it comes down

Current Answers

Answer #1: Posted by Technicalproblemsolver on October 21st, 2023 1:47 PM
This answer was accepted by the poster of the original question.
Technicalproblemsolver

Member since:
September 25th, 2023

Points: 190,500
1,100
points
I'd be happy to help you with reassembling the bobbin case in your Bernina Bernette 46 sewing machine, Here's a step-by-step guide to ensure you do it correctly:

1. Start by turning off your sewing machine and unplugging it for safety.

2. Remove the needle from the needle clamp. This will prevent any accidental damage to the needle during the reassembly process.

3. Open the bobbin door or slide off the needle plate to gain access to the bobbin area.

4. Take out the bobbin case by releasing the latch or removing the retaining screw, depending on the type of bobbin case used in your machine.

5. Ensure that the bobbin case is clean and free from any lint or thread debris. You can use a small brush or a lint roller to clean it thoroughly.

6. Now, with the bobbin case in your hand, locate the small lever on the side. This lever helps control the thread tension. Check if it moves freely and is not stuck.

7. Place the bobbin case back into the bobbin area, ensuring that it is properly aligned. The hook or finger on the bobbin case should fit into the notch or groove in the machine.

8. Secure the bobbin case in place by latching it or tightening the retaining screw, depending on the type of bobbin case used.

9. Gently rotate the handwheel towards you, ensuring that the needle passes correctly above the bobbin case without hitting any metal parts. If you hear or feel any resistance or if the needle is hitting the metal, stop immediately.

10. If everything appears to be aligned correctly, you can reinsert the needle into the needle clamp and tighten it securely.

11. Finally, close the bobbin door or replace the needle plate, securing them in place. Once you've completed these steps, you can plug in your sewing machine and power it on to test the bobbin case.

If you're still experiencing issues with the needle hitting metal, I would recommend consulting the user manual or contacting and schedule a visit to a professional technician who specializes in sewing machine repairs. They will be able to examine your machine more thoroughly and offer guidance specific to your situation.


"Hi there,

I hope my response was helpful in addressing your question or concern. If you found it valuable, I kindly ask you to consider accepting my answer by clicking the designated button. Your support will not only acknowledge my efforts but also guide others in finding useful solutions. Thank you for your trust and I'm ready to assist you further if needed.

Best regards,
Technicalproblemsolver"
Answer #2: Posted by SonuKumar on October 21st, 2023 9:59 PM
SonuKumar

Member since:
May 9th, 2021

Points: 16,596,890
100
points
If the needle on your Bernina Bernette 46 sewing machine is hitting metal when it comes down, there are a few possible reasons:

The needle is not inserted correctly. Make sure that the needle is fully inserted into the needle clamp and that the needle clamp screw is tight.

The needle is bent or damaged. If the needle is bent or damaged, it will need to be replaced.

The bobbin case is not inserted correctly. Make sure that the bobbin case is fully inserted into the bobbin case holder and that the bobbin case latch is locked.

The bobbin case is damaged. If the bobbin case is damaged, it will need to be replaced.

The timing of the sewing machine is off. If the timing of the sewing machine is off, it can cause the needle to hit metal.

To troubleshoot the problem, you can try the following:

Check the needle to make sure that it is inserted correctly and that it is not bent or damaged.

Check the bobbin case to make sure that it is inserted correctly and that it is not damaged.

If you are still having problems, you may need to have the sewing machine timed by a qualified technician.

Here are some additional troubleshooting tips:

Make sure that the presser foot is raised before inserting or removing the needle.

Make sure that the presser foot is lowered before starting to sew.

Use the correct needle size and type for the fabric you are sewing.

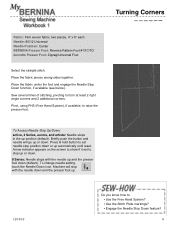
Sew slowly and carefully, especially when turning corners.

If you are not comfortable troubleshooting the sewing machine yourself, you should contact a qualified repair technician.


Please respond to my effort to provide you with the best possible solution by using the "Acceptable Solution" and/or the "Helpful" buttons when the answer has proven to be helpful.

Regards,
Sonu
Your search handyman for all e-support needs!!

Related Bernina Bernette 46 Manual Pages

Operation Manual - Page 2

Note: Some exercises apply only to all current BERNINA and bernette sewing machines. Table of Contents Introduction ...3 Sewing Machine Needles 4 Thread ...6 Presser Feet ...7 Securing Stitches...8 Turning Corners...20 Stitch, Function, and Foot Charts 21 8 Series activa 1008 bernette aurora 12/13/10 artista 3 Series The information in this workbook applies to models equipped with the ...
Operation Manual - Page 3

...sewing machines, and informative publications and classes. Using the information on your machine. Plus, BERNINA of your BERNINA machine, download Through the Needle ONLINE. After all, the next best thing to sewing ... your BERNINA or bernette sewing machine. This will help make it on the chart and on a fairly regular basis will help you determine if your machine can be used for...
Operation Manual - Page 4

... the diameter of stitching. shirt-weight 80 - very fine batiste 70 - the needle won't pierce fabric, so no thread loop forms to make sure needles are fully inserted as high as possible, with thread, needles are very important to stitch formation. Sewing Machine Needles General Information Along with the flat side to the back. Many "mechanical...
Operation Manual - Page 5

... a blue anti-cling coating which helps to fabric when seaming and cross-seaming. 70-100 75 & 90 80 A sharp point with a non-cutting metal wedge on denim and woven fabrics. Sharp point; used on Ultrasuede, vinyl, and plastic. Specially designed for use with a friction-reducing coating. Sewing Machine Needles Type Ballpoint Stretch Universal Double Triple...
Operation Manual - Page 6

... are stronger and smoother than cotton, it forms a single stitch? General construction, piecing, bobbin thread 60 wt.- Cotton 2 ply Mettler 60/2; The exercises in a "seesaw" action ...delicate machine embroidery, piecing and darning. Rayon A lustrous embroidery thread; Thread To achieve quality stitches, a sewing machine needs three things: correct thread, correct size needle,...
Operation Manual - Page 7

... presser feet & accessories, see the eye of the needle, resulting in easier threading ▪ are easy to change with one -piece full-shank presser feet available as optional accessories for all types of sewing (example, quilting, garment-making it indicates a version of the machine to a foot engineered for coded and refers to a standard...
Operation Manual - Page 8

... in half lengthwise to sew; Quilter's Securing Stitch: Several very short stitches at end. Begin to be 2" x 6". The machine will automatically secure the stitching, then continue stitching forward. Select the Securing Stitch. Securing Stitches Fabric: Firm woven fabric, two pieces, 4" x 6" each Needle: 80/12 Universal Needle Position: Center BERNINA Presser Foot: Reverse...
Operation Manual - Page 9

...2 additional corners. Machine will go up automatically until reset. Sew several lines of ...Needle Stop Down feature? 9 Place the fabric under the foot and engage the Needle Stop Down function, if available (see below). Turning Corners Fabric: Firm woven fabric, two pieces, 4" x 6" each Needle: 80/12 Universal Needle Position: Center BERNINA Presser Foot: Reverse Pattern Foot #1/1C/1D bernette...
Operation Manual - Page 10

...next stroke. Move needle position to : ▪Adjust the stitch width? ▪Adjust the stitch length? 10 or - sew using the following steps. The needle should lie flat,...Fabric: Firm woven fabric, 4" x 6" Needle: 80/12 Universal Needle Position: As directed in instructions BERNINA Presser Foot: Reverse Pattern Foot #1/1C/1D bernette Presser Foot: Zigzag/Universal Foot Select the Zigzag...
Operation Manual - Page 11

... on the extended hem allowance, keeping the folded edge next to the machine. Sew on the foot. Blind Hem Fabric: Heavy flannel, 6" x 7" Needle: 80/12 Universal Needle Position: As programmed BERNINA Presser Foot: Reverse Pattern Foot #1/1C/1D and Blind Hem Foot #5 bernette Presser Foot: Zigzag/Universal Foot and Blind Hem Foot (optional accessory) Attach...
Operation Manual - Page 12

... Foot: Zigzag/Universal Foot Attach Reverse Pattern Foot #1/1C/1D or bernette Zigzag/ Universal Foot to the machine. Triple Straight Stitch Fabric: Firm woven fabric, two pieces, 4" x 6" each Needle: 80/12 Universal Needle Position: As directed in the ditch of the seam, sew the length of the fabric on the ⅝" marking on the stitch...
Operation Manual - Page 14

sew the seam and press it is pulling and stretching as it open. Stretch Stitch 12/... to : ▪ Adjust the presser foot pressure? 14 Fabric: Spandex, two pieces, 2" x 6" each Needle: 80/12 Universal (Ballpoint may also be used) Needle Position: As programmed BERNINA Presser Foot: Reverse pattern Foot #1/1C/1D bernette Presser Foot: Zigzag/Universal Foot Select the Super Stretch stitch.
Operation Manual - Page 15

... Needle Position: Center BERNINA Presser Foot: Clear Embroidery Foot #39/39C/39D bernette Presser Foot: Cording Foot (optional accessory) Attach the desired foot to : ▪ Attach a presser foot with one 12" edge; Do not sew ...center front hole of cord for strength. 12/13/10 Do you know how to the machine. Tie a knot in the cord at the beginning and end of Clear Embroidery Foot #39...
Operation Manual - Page 17

... order and sew them as before trimming. Bring thread tails to your buttonholes. The best way to achieve this: • CB Hook Machines: Thread the bobbin thread through the hole in front.) Stitch the buttonhole on the stitch plate, behind the foot. Mark two short lines, between the layers. bernette 46 Standard Buttonhole-bernette 46 and 56...
Operation Manual - Page 18

...length of buttonhole desired. ▪ Position the needle over the first short line, aligning the needle (at the front of the buttonhole) with ...bernette 66 and 92c ▪ Position the foot over the drawn line, setting it is now programmed into the temporary memory. ▪ Move the foot to the line. ▪ Sew the first bead of the machine. • Stitch the buttonhole; Continue sewing...
Operation Manual - Page 19

...the machine. Note: A short shank is complete; If using the Button Sew-on Button Sew-On Foot #18? 12/13/10 19 trim the excess thread. To avoid breaking the needle,...away stabilizer, 4" x 4" Needle: 80/12 Universal BERNINA Presser Foot: Button Sew-On Foot #18 (optional) bernette Presser Foot: Button Sew-On Foot (optional) Lower the feed dog, then attach the Button Sew-On Foot to hold the ...
Operation Manual - Page 20

...is lying in reverse at the lower edge, sink the needle into the seam. Sew up the left side of the seam. Using a straight stitch, sew a ¾" seam from the right side of center...Adjust the needle position to the zipper teeth. Do you know how to the left . Topstitching the Zipper-bernette Left Side: Adjust the foot to : ▪ Machine baste a seam? ▪ Adjust the needle positions?...
Operation Manual - Page 21

... 21 21 21 21 30 30 Blindstitch 9 9 9 9 9 9 Button Sew-On 60 60 60 60 60 60 Quilter's Securing 1324 1324 324 324 324... 6 8 -- 3 3 3 -- 3 6 5 76 2 2 2 2 2 3 3 33 * The stitches on bernette model 46 are not numbered on the machine but are used in the order they appear on the chart in Workbook 1: Basic Operation. Stitch Chart The following stitches are indicated...
Operation Manual - Page 22

Machine Features & Functions The following features and functions are ...yes yes yes yes Hopper Mechanism yes yes yes yes yes yes Needle Positions 11 11 11 11 11 11 Needle Stop Down yes yes yes yes yes yes On-screen Buttonhole Measuring...no no yes yes yes yes yes yes 3 Series activa mechanical bernette 380 350PE 330 210 1008 92c 66 56 46 yes yes yes no no yes yes yes no yes yes yes...
Operation Manual - Page 23

...-- -- -- -- -- -- -- -- 46 X -X -X ---X ------- 23 Presser Feet ...-- -- -- -- -- -- -- -- -- -- -- -- -- -- -- -- 12/13/10 bernette 66 56 C J -- -- -- Open Embroidery Foot #20/20C/20D 20C 20C 20C 20C 20 ...indicated on the chart (-- Darning Foot #9 -- -- -- 9 -- 9 Button Sew-On Foot #18 18 -- 18 -- -- -- Circular Embroidery Attachment 83 -- --...

Similar Questions

My Sewing Machine Bernette 15 Stops Working
After 1 day using my Bernette 15 stops working - engine hoots but doesn't rotate spindle and hand wh...
(Posted by sgrayxx 12 years ago)
Ask a New Question
Use the box below to post a new question about this Bernina product .
Points & Prizes
  • You can earn points for nearly everything you do on HelpOwl.com
  • You can trade in those points for gift cards at leading retailers such as Amazon.com and Walmart
  • It's that simple!
See How it Works
Create a Free Account

Bernina Manuals

Find free Bernina Bernette 46 manuals and user guides available at ManualOwl.com. Try out our unique manual viewer allowing you to interact with manuals from directly within your browser!

Bernina Reviews

View thousands of Bernina user reviews and customer ratings available at ReviewOwl.com.

Contact Information

Complete Bernina customer service contact information including steps to reach representatives, hours of operation, customer support links and more from ContactHelp.com.

Scoreboard Ratings

See detailed Bernina customer service rankings, employee comments and much more from our sister site.