
Manual
Page 2
...unplug by a 0.1 qualified electrician. To unplug, grasp the plug not the cord. 16. If the power cord of this overlock sewing machine. 'This sewing machine Is intended for use on cord. This product is properly installed and grounded in accordance with all moving parts. A). B if a ... the national Importer or a Bernina dealer. Never drop or insert any object into any other user servicing adjustments mentioned in your nearest authorised dealer or service centre (2000 D only). In the event of malfunction or breakdown, grounding provides a path of electric shock...
...unplug by a 0.1 qualified electrician. To unplug, grasp the plug not the cord. 16. If the power cord of this overlock sewing machine. 'This sewing machine Is intended for use on cord. This product is properly installed and grounded in accordance with all moving parts. A). B if a ... the national Importer or a Bernina dealer. Never drop or insert any object into any other user servicing adjustments mentioned in your nearest authorised dealer or service centre (2000 D only). In the event of malfunction or breakdown, grounding provides a path of electric shock...
Manual
Page 3
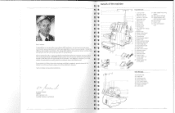
... 2 4 I 3 E 2 2 Dear Customer t Congratulations on the purchase of your Bernina dealer who will give you to contact your Bernina 2000 overlocker. This was the beginning of the BERNINA family business and I am delighted to welcome you years of satisfied Bernina sewing machine and overlock owners around the world. E 3 I wish you . I 3 If you... President FRITZ GEGAUF LTD. You are now the proud owner t of an overlock sewing machine which fulfils every expectation in overlocking. The Bernina t 2000 is a new concept in terms of the family to be delighted to help you...
... 2 4 I 3 E 2 2 Dear Customer t Congratulations on the purchase of your Bernina dealer who will give you to contact your Bernina 2000 overlocker. This was the beginning of the BERNINA family business and I am delighted to welcome you years of satisfied Bernina sewing machine and overlock owners around the world. E 3 I wish you . I 3 If you... President FRITZ GEGAUF LTD. You are now the proud owner t of an overlock sewing machine which fulfils every expectation in overlocking. The Bernina t 2000 is a new concept in terms of the family to be delighted to help you...
Manual
Page 4
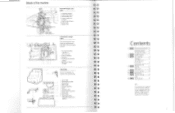
... (Optional accessory for 2000 0) ; 9 E S E S E E k t t E 9 E 3 E 3 E 3 E 3 E 3 E 3 E 3 E 3 E 3 E E E t Contents 1 Setting up the machine 10 Operating controls 12 Threads and needles 15 2 Overlock stitches 3 stitch selection 17 Threading 17 Test sewing and fine tuning 17 Adjustments and 4 settings 27 Stitch chart 31 5 Practical sewing 35 6 Maintenance 7 Trouble-shooting 43 Index 8 Technical Data 47 Note: The model Bernina 2000 DE is micro...
... (Optional accessory for 2000 0) ; 9 E S E S E E k t t E 9 E 3 E 3 E 3 E 3 E 3 E 3 E 3 E 3 E 3 E E E t Contents 1 Setting up the machine 10 Operating controls 12 Threads and needles 15 2 Overlock stitches 3 stitch selection 17 Threading 17 Test sewing and fine tuning 17 Adjustments and 4 settings 27 Stitch chart 31 5 Practical sewing 35 6 Maintenance 7 Trouble-shooting 43 Index 8 Technical Data 47 Note: The model Bernina 2000 DE is micro...
Manual
Page 6
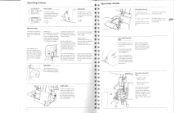
... slightly until the positioning catches engage. It catches the cut-off fabric as you sew, keeping your Bernina overlocker. O 10 The electronic foot control allows very fine adjustment from minimum to the machine. = Setting up the machine 1 0 Attaching the foot control 2000 DE: Plug the foot control into the opening on the foot control. Your...
... slightly until the positioning catches engage. It catches the cut-off fabric as you sew, keeping your Bernina overlocker. O 10 The electronic foot control allows very fine adjustment from minimum to the machine. = Setting up the machine 1 0 Attaching the foot control 2000 DE: Plug the foot control into the opening on the foot control. Your...
Manual
Page 7
...ply to the motor is automatically cut -out* ideal position for threading needles or loopers. The looper cover engages automatically. Examples: Sewing on the rear of the machine above the presser t foot lifter. To raise the presser foot, lift the presser foot lever until it will light up , ... is also easier to provide more space between presser foot and stitch plate for se- E 1 = ON 2 2 = OFF E Electronics/safety Your Bernina overlocker is swung out. E in this position to change the needles and insert band or elastic into the guide on firmly from the left side...
...ply to the motor is automatically cut -out* ideal position for threading needles or loopers. The looper cover engages automatically. Examples: Sewing on the rear of the machine above the presser t foot lifter. To raise the presser foot, lift the presser foot lever until it will light up , ... is also easier to provide more space between presser foot and stitch plate for se- E 1 = ON 2 2 = OFF E Electronics/safety Your Bernina overlocker is swung out. E in this position to change the needles and insert band or elastic into the guide on firmly from the left side...
Manual
Page 9
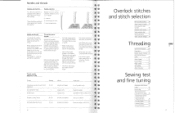
... 3 a • 3 k -3 Overlock stitches and stitch selection Bernina 2000 stitches 18 Upper looper converter 18 Stich selection lever/ roll hem 18 Overlock stitch width 19 Stitch selection dial 19 Sewing positions 19 Stitch selection display 19 Threading General instructions 20 Preparation 20 Needle/looper threader 20 First machine thread guide 20 Upper looper 21 Lower...
... 3 a • 3 k -3 Overlock stitches and stitch selection Bernina 2000 stitches 18 Upper looper converter 18 Stich selection lever/ roll hem 18 Overlock stitch width 19 Stitch selection dial 19 Sewing positions 19 Stitch selection display 19 Threading General instructions 20 Preparation 20 Needle/looper threader 20 First machine thread guide 20 Upper looper 21 Lower...
Manual
Page 12
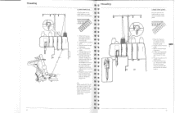
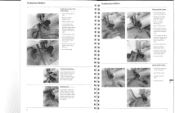
...b 2. The auto threader will automatically return to the left hand, turn the handwheel until the upper and lower loopers just cross. Tip: When sewing with the left of the upper looper to its normal position. 12 Thread the lower looper•: eye. per looper converter, take - 4 up... from spool and lay it from front to front in the green guide. 0 2 Thread the first machine guide. 3 0 3 Slip the thread through 0 0 the groove. 4, 5 Take the thread under the presser foot. 22 1 Bring the thread up -. Swing the...
...b 2. The auto threader will automatically return to the left hand, turn the handwheel until the upper and lower loopers just cross. Tip: When sewing with the left of the upper looper to its normal position. 12 Thread the lower looper•: eye. per looper converter, take - 4 up... from spool and lay it from front to front in the green guide. 0 2 Thread the first machine guide. 3 0 3 Slip the thread through 0 0 the groove. 4, 5 Take the thread under the presser foot. 22 1 Bring the thread up -. Swing the...

Manual
Page 13
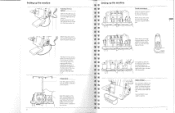
...the presser foot. Raise the presser foot, pull the threads through the take-up au- turn the stitch selection dial to rethread the machine. low guide. 2 Thread the first thread t 3 guide. First thread the looper and then rethread the needles. fabric will be ... thread anchors both threats meet exactly on to change the thread, it . 3 E E After threading When threading is not necessary to the desired position and make a sewing test. 3 2 E k 4 E 3 ■ 5 0 0 0 0 0 411 E 3 1 Bring the thread up . E 6 Thread the guide on the spool holder pin underneath the...
...the presser foot. Raise the presser foot, pull the threads through the take-up au- turn the stitch selection dial to rethread the machine. low guide. 2 Thread the first thread t 3 guide. First thread the looper and then rethread the needles. fabric will be ... thread anchors both threats meet exactly on to change the thread, it . 3 E E After threading When threading is not necessary to the desired position and make a sewing test. 3 2 E k 4 E 3 ■ 5 0 0 0 0 0 411 E 3 1 Bring the thread up . E 6 Thread the guide on the spool holder pin underneath the...
Manual
Page 20
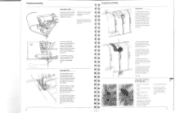
... of the thread slits (A) and tighten screw (B). Position the attachment (accessory bag) over one of fabric will be cut off . To sew without threading the first machine guide or tension slit. 3/4 thread overlock with medium to the desired seam width. Lower the presser foot. - Practical.../Decorative thread P16). for bias binding and for patchwork. Position the guide over the top of the machine over the screw and retighten the screw. 2000 D: The seam guide is in the thread chain Sew a 3-4 cm thread chain. - Always remove all threads and needles when cutting only. Feed the...
... of the thread slits (A) and tighten screw (B). Position the attachment (accessory bag) over one of fabric will be cut off . To sew without threading the first machine guide or tension slit. 3/4 thread overlock with medium to the desired seam width. Lower the presser foot. - Practical.../Decorative thread P16). for bias binding and for patchwork. Position the guide over the top of the machine over the screw and retighten the screw. 2000 D: The seam guide is in the thread chain Sew a 3-4 cm thread chain. - Always remove all threads and needles when cutting only. Feed the...
Manual
Page 21
... - fr - Pull the work away from the stitch - If necessary, pull all the threads taut above the first machine guide. - Snip into the corner up to the stitching line. - Sew into each corner along the stitching line. Raise the presser foot. - Raise the presser foot. - Lower the presser ... the needles (Needle stop down*). - Raise the tip of the foot and turn work out at the beginning and end of the seam. - Sew up to the corner and slightly over the previous stitching without cutting for about 2-3 cm (1*). - Lower the needles (Needle stop *). - Praktisches When ...
... - fr - Pull the work away from the stitch - If necessary, pull all the threads taut above the first machine guide. - Snip into the corner up to the stitching line. - Sew into each corner along the stitching line. Raise the presser foot. - Raise the presser foot. - Lower the presser ... the needles (Needle stop down*). - Raise the tip of the foot and turn work out at the beginning and end of the seam. - Sew up to the corner and slightly over the previous stitching without cutting for about 2-3 cm (1*). - Lower the needles (Needle stop *). - Praktisches When ...

Manual
Page 23
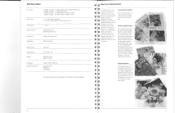
... the presser foot, pull the threads and lower the presser foot. Replacement bulbs for your Bernina overlocker are not between N and 0,7. Occasionally lubricate the points illustrated. 44 Trouble shooting guide 41 Problem Cause zl The machine does not sew. Thread tension is set incorrectly. Replace the needles. Check threading path of special materials...
... the presser foot, pull the threads and lower the presser foot. Replacement bulbs for your Bernina overlocker are not between N and 0,7. Occasionally lubricate the points illustrated. 44 Trouble shooting guide 41 Problem Cause zl The machine does not sew. Thread tension is set incorrectly. Replace the needles. Check threading path of special materials...

Manual
Page 25
...44 44 Left needle thread - recommendations 32 - loopers 13 - special threads Tidy work area 50 Test sewing 45 25 16, 32 24 39, 40 10 U Uneven feed Unpicking seams Upper knife - Seam guide right B Bernina Publications Bulb - inserting/replacing - tape guide Puckering seams 24 25 19 18 12 12 21, 22 25... threading Loose loop formation 39 33 16 29 11 33 33 36 28 30 45 16 45 25,26 20 33 10 13 37 M Machine does not sew Maintenance Micro safety switch N Neatening - seam allowances - thread/fabric Needle thread tension - looper cover Overlock - 3 thread - 4 thread - 2 thread...
...44 44 Left needle thread - recommendations 32 - loopers 13 - special threads Tidy work area 50 Test sewing 45 25 16, 32 24 39, 40 10 U Uneven feed Unpicking seams Upper knife - Seam guide right B Bernina Publications Bulb - inserting/replacing - tape guide Puckering seams 24 25 19 18 12 12 21, 22 25... threading Loose loop formation 39 33 16 29 11 33 33 36 28 30 45 16 45 25,26 20 33 10 13 37 M Machine does not sew Maintenance Micro safety switch N Neatening - seam allowances - thread/fabric Needle thread tension - looper cover Overlock - 3 thread - 4 thread - 2 thread...
Manual
Page 26
...projects are all regular features. Bernina Creative Sewing The Creative Sewing magazine appears twice yearly. Read about the latest sewing developments and trends in the comfort of your Bernina overlocker or sewing machine to the full, Bernina regularly publishes sewing literature which covers everything from...Pushing effect: N-2 Stretching effect: N-0.7 Swing-out, snap-on sole Rotates forwards Needle system: Sewing speed: Weight: Dimensions: Optional accessories: 130/705H Up to 1500 s.p.m. 2000 DE: 8.4 kg 2000 D: 7.9 kg 335W x 295D x 340H mm Blind stitch foot Elasticator Cording foot We ...
...projects are all regular features. Bernina Creative Sewing The Creative Sewing magazine appears twice yearly. Read about the latest sewing developments and trends in the comfort of your Bernina overlocker or sewing machine to the full, Bernina regularly publishes sewing literature which covers everything from...Pushing effect: N-2 Stretching effect: N-0.7 Swing-out, snap-on sole Rotates forwards Needle system: Sewing speed: Weight: Dimensions: Optional accessories: 130/705H Up to 1500 s.p.m. 2000 DE: 8.4 kg 2000 D: 7.9 kg 335W x 295D x 340H mm Blind stitch foot Elasticator Cording foot We ...


