
XL2420T User Manual
Page 28
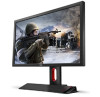
Turns the power on the screen, right next to adjust your monitor The control panel All OSD (On Screen Display) menus can be accessed by LED indicators. The control keys are embedded in a touchpad and are indicated by the control keys. 1 2 No. Touch of an LED indicator represents pressing the corresponding control key. 28 How to each key. Power key Description Accesses the functions or menu items displayed on or off. How to adjust your monitor Name 1. Control keys 2.
Turns the power on the screen, right next to adjust your monitor The control panel All OSD (On Screen Display) menus can be accessed by LED indicators. The control keys are embedded in a touchpad and are indicated by the control keys. 1 2 No. Touch of an LED indicator represents pressing the corresponding control key. 28 How to each key. Power key Description Accesses the functions or menu items displayed on or off. How to adjust your monitor Name 1. Control keys 2.
XL2420T User Manual
Page 29
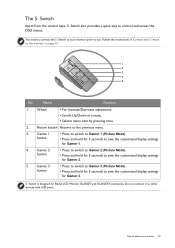
... settings for Gamer 3. Switch also provides a quick way to use. Switch to adjust your monitor prior to control and access the OSD menus. Switch is designed for 5 seconds to the previous menu. 3. How to the monitor. Gamer 2 button • Press to switch to Gamer 2 (Picture Mode). • Press and hold for 5 ...button Returns to save the customized display settings for Gamer 1. 4. Gamer 1 button • Press to switch to Gamer 1 (Picture Mode). • Press and hold for BenQ LCD Monitor XL2420T and XL2420TX exclusively. S. Switch Apart from the control keys, S.
... settings for Gamer 3. Switch also provides a quick way to use. Switch to adjust your monitor prior to control and access the OSD menus. Switch is designed for 5 seconds to the previous menu. 3. How to the monitor. Gamer 2 button • Press to switch to Gamer 2 (Picture Mode). • Press and hold for 5 ...button Returns to save the customized display settings for Gamer 1. 4. Gamer 1 button • Press to switch to Gamer 1 (Picture Mode). • Press and hold for BenQ LCD Monitor XL2420T and XL2420TX exclusively. S. Switch Apart from the control keys, S.
XL2420T User Manual
Page 30
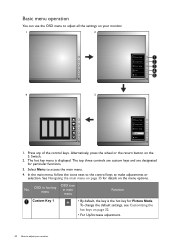
...• For Up/Increase adjustment. 30 How to access the main menu. 4. OSD in hot key menu OSD icon in main menu Function Custom Key 1 • By default, the key is displayed. Basic menu operation You can use the OSD menu to make adjustments or selection. Alternatively, press the wheel or the... return button on the menu options. To change the default settings, ...
...• For Up/Increase adjustment. 30 How to access the main menu. 4. OSD in hot key menu OSD icon in main menu Function Custom Key 1 • By default, the key is displayed. Basic menu operation You can use the OSD menu to make adjustments or selection. Alternatively, press the wheel or the... return button on the menu options. To change the default settings, ...
XL2420T User Manual
Page 31
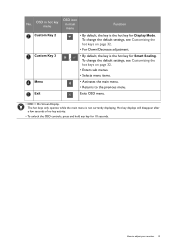
... hot keys on page 32. • Enters sub menus. • Selects menu items. Menu • Activates the main menu. • Returns to adjust your monitor 31 How to the previous menu. OSD in hot key menu OSD icon in main menu Function Custom Key 2 • By default, the key is not currently displaying.... Hot key displays will disappear after a few seconds of no key activity. • To unlock the OSD controls, press and hold any...
... hot keys on page 32. • Enters sub menus. • Selects menu items. Menu • Activates the main menu. • Returns to adjust your monitor 31 How to the previous menu. OSD in hot key menu OSD icon in main menu Function Custom Key 2 • By default, the key is not currently displaying.... Hot key displays will disappear after a few seconds of no key activity. • To unlock the OSD controls, press and hold any...
XL2420T User Manual
Page 32
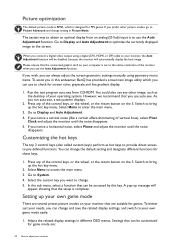
... control keys (also called custom keys) perform as the desktop of your monitor, the Auto Adjustment function will be accessed by this endeavour, BenQ has provided a screen test image utility which is designed for game mode are: 32 How to Picture Advanced and change the default setting and ... the connected graphic card on the S. A pop-up the hot key menu. Picture optimization The default picture mode is FPS1, which you can use auto.exe. If you wish, you can change setting in different OSD menus. If you use the Auto Adjustment function. Switch to the native ...
... control keys (also called custom keys) perform as the desktop of your monitor, the Auto Adjustment function will be accessed by this endeavour, BenQ has provided a screen test image utility which is designed for game mode are: 32 How to Picture Advanced and change the default setting and ... the connected graphic card on the S. A pop-up the hot key menu. Picture optimization The default picture mode is FPS1, which you can use auto.exe. If you wish, you can change setting in different OSD menus. If you use the Auto Adjustment function. Switch to the native ...
XL2420T User Manual
Page 35
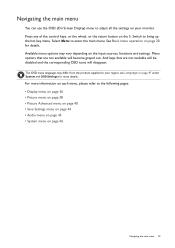
..., functions and settings. For more details. Select Menu to bring up the hot key menu. See Basic menu operation on your region, see Language on page 47 under System and OSD Settings for details. Switch to enter the main menu. Available menu options may differ from the product supplied to your... monitor. Navigating the main menu You can use the OSD (On Screen Display) menu to adjust all the settings on page 30 ...
..., functions and settings. For more details. Select Menu to bring up the hot key menu. See Basic menu operation on your region, see Language on page 47 under System and OSD Settings for details. Switch to enter the main menu. Available menu options may differ from the product supplied to your... monitor. Navigating the main menu You can use the OSD (On Screen Display) menu to adjust all the settings on page 30 ...
XL2420T User Manual
Page 36
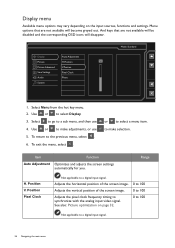
...Position Pixel Clock Not applicable to select a menu item. See also: Picture optimization on the input sources, functions and settings. Menu options that are not available will disappear. And keys that are not available will be disabled and the corresponding OSD icons will become grayed out. Use or... to a digital input signal. 36 Navigating the main menu To exit the menu, select . Adjusts the horizontal position of the screen image. 0 to 100 ...
...Position Pixel Clock Not applicable to select a menu item. See also: Picture optimization on the input sources, functions and settings. Menu options that are not available will disappear. And keys that are not available will be disabled and the corresponding OSD icons will become grayed out. Use or... to a digital input signal. 36 Navigating the main menu To exit the menu, select . Adjusts the horizontal position of the screen image. 0 to 100 ...
XL2420T User Manual
Page 38
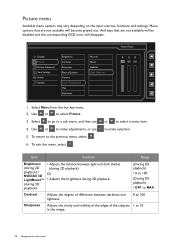
... Contrast Sharpness Black eQualizer Gamma Color Temperature Hue Saturation Normal Bluish Reddish User Mode Mode: Photo R GB 100 100 100 1. To exit the menu, select . or to make adjustments, or use 4. playback) / NVIDIA® 3D Or LightBoost™ • Adjusts the brightness during 3D... then use 5. And keys that are not available will be disabled and the corresponding OSD icons will become grayed out. Select to go to the previous menu, select . 6. Item Function Range Brightness • Adjusts the balance between darkness and lightness. 0 to 100 Sharpness Adjusts...
... Contrast Sharpness Black eQualizer Gamma Color Temperature Hue Saturation Normal Bluish Reddish User Mode Mode: Photo R GB 100 100 100 1. To exit the menu, select . or to make adjustments, or use 4. playback) / NVIDIA® 3D Or LightBoost™ • Adjusts the brightness during 3D... then use 5. And keys that are not available will be disabled and the corresponding OSD icons will become grayed out. Select to go to the previous menu, select . 6. Item Function Range Brightness • Adjusts the balance between darkness and lightness. 0 to 100 Sharpness Adjusts...
XL2420T User Manual
Page 40
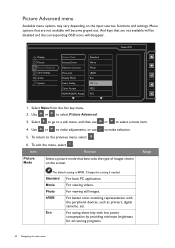
... brightness for all running programs. 40 Navigating the main menu Item Function Picture Mode Select a picture mode that are not available will be disabled and the corresponding OSD icons will become grayed out. To exit the menu, select . Photo For viewing still images. Use or... to the previous menu, select . 6. Eco For saving electricity with the peripheral devices, such as ...
... brightness for all running programs. 40 Navigating the main menu Item Function Picture Mode Select a picture mode that are not available will be disabled and the corresponding OSD icons will become grayed out. To exit the menu, select . Photo For viewing still images. Use or... to the previous menu, select . 6. Eco For saving electricity with the peripheral devices, such as ...
XL2420T User Manual
Page 44
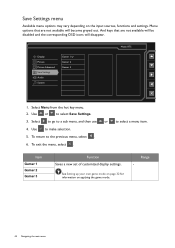
... . And keys that are not available will be disabled and the corresponding OSD icons will become grayed out. Select to go to a sub menu, and then use or to make selection. 5. Use or to the previous menu, select . 6. See Setting up your own game mode on page 32 for ...information on the input sources, functions and settings. Menu options that are not available will disappear. Select Menu from the hot key menu. 2. Item Gamer 1 Gamer 2 Gamer 3 Function Saves a new set of customized display settings. To return to select ...
... . And keys that are not available will be disabled and the corresponding OSD icons will become grayed out. Select to go to a sub menu, and then use or to make selection. 5. Use or to the previous menu, select . 6. See Setting up your own game mode on page 32 for ...information on the input sources, functions and settings. Menu options that are not available will disappear. Select Menu from the hot key menu. 2. Item Gamer 1 Gamer 2 Gamer 3 Function Saves a new set of customized display settings. To return to select ...
XL2420T User Manual
Page 45
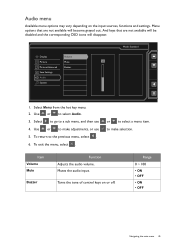
Item Volume Mute Buzzer Function Adjusts the audio volume. Mutes the audio input. Audio menu Available menu options may vary depending on or off. And keys that are not available will be disabled and the corresponding OSD icons will become grayed out. Select to go to make selection. Display Picture Picture Advanced Save Settings...
Item Volume Mute Buzzer Function Adjusts the audio volume. Mutes the audio input. Audio menu Available menu options may vary depending on or off. And keys that are not available will be disabled and the corresponding OSD icons will become grayed out. Select to go to make selection. Display Picture Picture Advanced Save Settings...
XL2420T User Manual
Page 46
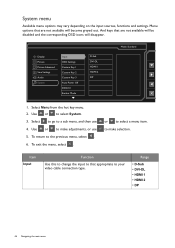
...Use or to that are not available will disappear. To return to make adjustments, or use 4. to the previous menu, select . 6. Display Picture Picture Advanced Save Settings Audio System Input OSD Settings Custom Key 1 Custom Key 2 Custom Key 3 Auto Power Off DDC/CI Emitter Mode D-Sub DVI-DL ...HDMI 1 HDMI 2 DP Mode: Standard 1. Select Menu from the hot key menu. 2. Item Input Function Use this to change the ...
...Use or to that are not available will disappear. To return to make adjustments, or use 4. to the previous menu, select . 6. Display Picture Picture Advanced Save Settings Audio System Input OSD Settings Custom Key 1 Custom Key 2 Custom Key 3 Auto Power Off DDC/CI Emitter Mode D-Sub DVI-DL ...HDMI 1 HDMI 2 DP Mode: Standard 1. Select Menu from the hot key menu. 2. Item Input Function Use this to change the ...
XL2420T User Manual
Page 47
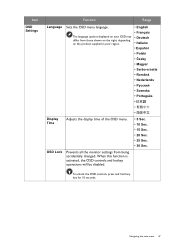
..., press and hold any key for 10 seconds. Item OSD Settings Function Range Language Sets the OSD menu language. • English The language options displayed on the product supplied in your region. • Français • Deutsch • Italiano • ...8226; Magyar • Serbo-croatia • Română • Nederlands • Svenska • Português Display Time Adjusts the display time of the OSD menu. • 5 Sec. • 10 Sec. • 15 Sec. • 20 Sec. • 25 Sec. • 30 Sec. When this function is activated, the...
..., press and hold any key for 10 seconds. Item OSD Settings Function Range Language Sets the OSD menu language. • English The language options displayed on the product supplied in your region. • Français • Deutsch • Italiano • ...8226; Magyar • Serbo-croatia • Română • Nederlands • Svenska • Português Display Time Adjusts the display time of the OSD menu. • 5 Sec. • 10 Sec. • 15 Sec. • 20 Sec. • 25 Sec. • 30 Sec. When this function is activated, the...
