XL2420T User Manual
Page 4
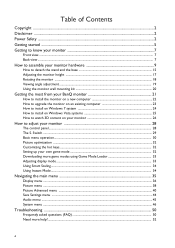
... ...32 Customizing the hot keys...32 Setting up your monitor 28 The control panel...28 The S. Table of Contents Copyright ...2 Disclaimer ...2 Power Safety ...2 Getting started ...5 Getting to know your monitor 7 Front view...7 Back view ...7 How to assemble your monitor hardware 9 How to detach the stand... base 15 Adjusting the monitor height ...17 Rotating the monitor ...18 Viewing angle adjustment ...19 Using the monitor wall mounting kit 20 Getting the most from your BenQ monitor 21 How to install the monitor on a new computer 22 How to upgrade the monitor on an existing computer...
... ...32 Customizing the hot keys...32 Setting up your monitor 28 The control panel...28 The S. Table of Contents Copyright ...2 Disclaimer ...2 Power Safety ...2 Getting started ...5 Getting to know your monitor 7 Front view...7 Back view ...7 How to assemble your monitor hardware 9 How to detach the stand... base 15 Adjusting the monitor height ...17 Rotating the monitor ...18 Viewing angle adjustment ...19 Using the monitor wall mounting kit 20 Getting the most from your BenQ monitor 21 How to install the monitor on a new computer 22 How to upgrade the monitor on an existing computer...
XL2420T User Manual
Page 18
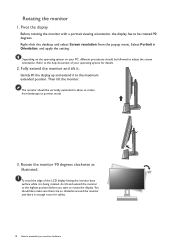
... there is being rotated, do tilt and extend the monitor to the highest position before you start to adjust the screen orientation. You should be followed to rotate the display. Select Portrait in Orientation, and apply the setting. Gently lift the display up and extend it is enough room ...for cables. 18 How to the help document of the LCD display hitting the monitor base surface while it to be rotated 90 degrees. Refer to assemble...
... there is being rotated, do tilt and extend the monitor to the highest position before you start to adjust the screen orientation. You should be followed to rotate the display. Select Portrait in Orientation, and apply the setting. Gently lift the display up and extend it is enough room ...for cables. 18 How to the help document of the LCD display hitting the monitor base surface while it to be rotated 90 degrees. Refer to assemble...

XL2420T User Manual
Page 21
... requirements, network policy settings may prevent you turn on your computer (after connecting the monitor to your computer), Windows will automatically recognize the new (or different) hardware, and will determine which already has existing monitor driver software) with a newer monitor. In either an ...an existing installation (which process you need to follow to successfully install the BenQ LCD Monitor driver software. These circumstances relate to the specification label on the BenQ LCD Monitor CD-ROM. Further details and step-by-step instructions for either case however...
... requirements, network policy settings may prevent you turn on your computer (after connecting the monitor to your computer), Windows will automatically recognize the new (or different) hardware, and will determine which already has existing monitor driver software) with a newer monitor. In either an ...an existing installation (which process you need to follow to successfully install the BenQ LCD Monitor driver software. These circumstances relate to the specification label on the BenQ LCD Monitor CD-ROM. Further details and step-by-step instructions for either case however...
XL2420T User Manual
Page 25
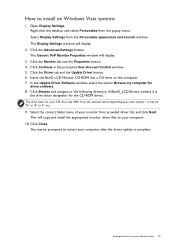
... Account Control window. 5. Click the Driver tab and the Update Driver button. 6. Select the correct folder name of your monitor from your BenQ monitor 25 The Generic PnP Monitor Properties window will display. 3. Select Display Settings from the popup menu. Right-click the desktop and select Personalize from the Personalize appearance and sounds window. Click...
... Account Control window. 5. Click the Driver tab and the Update Driver button. 6. Select the correct folder name of your monitor from your BenQ monitor 25 The Generic PnP Monitor Properties window will display. 3. Select Display Settings from the popup menu. Right-click the desktop and select Personalize from the Personalize appearance and sounds window. Click...
XL2420T User Manual
Page 26
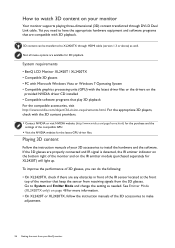
... website (http://www.nvidia.com/page/home.html) for the purchase and the settings of the compatible GPU. • Visit the NVIDIA website for more information. • On XL2420T or XL2420TX, follow the instruction manuals of the 3D accessories to make adjustment. 26...provided NVIDIA driver CD installed • Compatible software programs that are available for XL2420T) will light up. Yet you can be transferred to XL2420TX through DVI-D Dual Link cable. System requirements • BenQ LCD Monitor XL2420T / XL2420TX • Compatible 3D glasses • PC with Microsoft Windows ...
... website (http://www.nvidia.com/page/home.html) for the purchase and the settings of the compatible GPU. • Visit the NVIDIA website for more information. • On XL2420T or XL2420TX, follow the instruction manuals of the 3D accessories to make adjustment. 26...provided NVIDIA driver CD installed • Compatible software programs that are available for XL2420T) will light up. Yet you can be transferred to XL2420TX through DVI-D Dual Link cable. System requirements • BenQ LCD Monitor XL2420T / XL2420TX • Compatible 3D glasses • PC with Microsoft Windows ...
XL2420T User Manual
Page 29
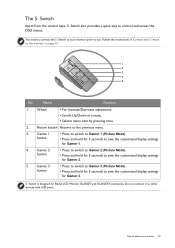
... to other devices with USB ports. Name Function 1. Do not connect it to the monitor. The S. Gamer 3 button • Press to switch to Gamer 3 (Picture Mode). • Press and hold for 5 seconds to save the customized display settings for 5 seconds to control and access the OSD menus. on page 13. 1 2 3 4...Wheel • For Increase/Decrease adjustment. • Scrolls Up/Down in Connect the S. S. Switch also provides a quick way to save the customized display settings for BenQ LCD Monitor XL2420T and XL2420TX exclusively. Switch Apart from the control keys, S.
... to other devices with USB ports. Name Function 1. Do not connect it to the monitor. The S. Gamer 3 button • Press to switch to Gamer 3 (Picture Mode). • Press and hold for 5 seconds to save the customized display settings for 5 seconds to control and access the OSD menus. on page 13. 1 2 3 4...Wheel • For Increase/Decrease adjustment. • Scrolls Up/Down in Connect the S. S. Switch also provides a quick way to save the customized display settings for BenQ LCD Monitor XL2420T and XL2420TX exclusively. Switch Apart from the control keys, S.
XL2420T User Manual
Page 30
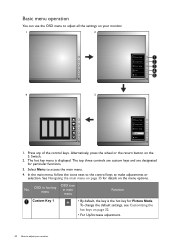
Basic menu operation You can use the OSD menu to adjust all the settings on the S. Alternatively, press the wheel or the return button on your monitor Switch. 2. In the main menu, follow the icons next to the control keys to access the main menu. 4. See Navigating the main menu...Smart Scaling Menu Exit 4 3 Picture Mode Display Mode Smart Scaling Menu Exit 1. Select Menu to make adjustments or selection. To change the default settings, see Customizing the hot keys on the menu options. Press any of the control keys. The top three controls are custom keys and are ...
Basic menu operation You can use the OSD menu to adjust all the settings on the S. Alternatively, press the wheel or the return button on your monitor Switch. 2. In the main menu, follow the icons next to the control keys to access the main menu. 4. See Navigating the main menu...Smart Scaling Menu Exit 4 3 Picture Mode Display Mode Smart Scaling Menu Exit 1. Select Menu to make adjustments or selection. To change the default settings, see Customizing the hot keys on the menu options. Press any of the control keys. The top three controls are custom keys and are ...
XL2420T User Manual
Page 31
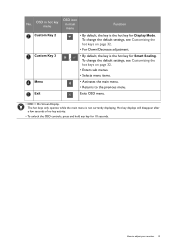
How to the previous menu. Custom Key 3 • By default, the key is the hot key for Smart Scaling. / To change the default settings, see Customizing the hot keys on page 32. • For Down/Decrease adjustment. No. OSD in hot key menu OSD icon in main menu Function... after a few seconds of no key activity. • To unlock the OSD controls, press and hold any key for Display Mode. To change the default settings, see Customizing the hot keys on page 32. • Enters sub menus. • Selects menu items. Menu • Activates the main menu. • Returns to...
How to the previous menu. Custom Key 3 • By default, the key is the hot key for Smart Scaling. / To change the default settings, see Customizing the hot keys on page 32. • For Down/Decrease adjustment. No. OSD in hot key menu OSD icon in main menu Function... after a few seconds of no key activity. • To unlock the OSD controls, press and hold any key for Display Mode. To change the default settings, see Customizing the hot keys on page 32. • Enters sub menus. • Selects menu items. Menu • Activates the main menu. • Returns to...
XL2420T User Manual
Page 32
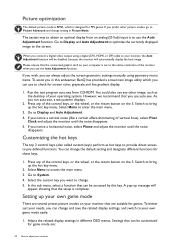
...the native resolution of vertical lines), select Pixel Clock and adjust the monitor until the noise disappears. When you connect a digital video output using geometry menu items. To assist you in this endeavour, BenQ has provided a screen test image utility which is complete. Customizing the ... are several preset picture modes on the S. However, we recommend that can change setting in different OSD menus. Switch to access the main menu. 3. Select Menu to bring up your monitor Picture optimization The default picture mode is FPS1, which you can be accessed by ...
...the native resolution of vertical lines), select Pixel Clock and adjust the monitor until the noise disappears. When you connect a digital video output using geometry menu items. To assist you in this endeavour, BenQ has provided a screen test image utility which is complete. Customizing the ... are several preset picture modes on the S. However, we recommend that can change setting in different OSD menus. Switch to access the main menu. 3. Select Menu to bring up your monitor Picture optimization The default picture mode is FPS1, which you can be accessed by ...

XL2420T User Manual
Page 33
...press and hold one of the game mode buttons (depending on your settings in Step 2. BenQ offers more game modes using Game Mode Loader on the monitor. Adjusting display mode To display images of your own display settings, you just downloaded to complete the setup. 4. For the aspect ratio...size of aspect ratios other than your monitor aspect ratio and sizes other than your monitor, and select the game mode you can adjust the display mode on page 33. Downloading more optimized game modes on the BenQ website and apply the settings directly. 1. Follow the on S. ...
...press and hold one of the game mode buttons (depending on your settings in Step 2. BenQ offers more game modes using Game Mode Loader on the monitor. Adjusting display mode To display images of your own display settings, you just downloaded to complete the setup. 4. For the aspect ratio...size of aspect ratios other than your monitor aspect ratio and sizes other than your monitor, and select the game mode you can adjust the display mode on page 33. Downloading more optimized game modes on the BenQ website and apply the settings directly. 1. Follow the on S. ...
XL2420T User Manual
Page 34
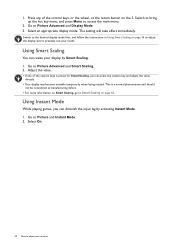
... may become unstable temporarily when being resized. Switch to bring up the hot key menu, and press Menu to Picture Advanced and Smart Scaling. 2. The setting will take effect immediately. Adjust the value. • If one of the control keys, or the wheel, or the return button on the S. Go to... to the desired display mode first, and follow the instructions in Using Smart Scaling on page 42. Select On. 34 How to precisely suit your monitor 1.
... may become unstable temporarily when being resized. Switch to bring up the hot key menu, and press Menu to Picture Advanced and Smart Scaling. 2. The setting will take effect immediately. Adjust the value. • If one of the control keys, or the wheel, or the return button on the S. Go to... to the desired display mode first, and follow the instructions in Using Smart Scaling on page 42. Select On. 34 How to precisely suit your monitor 1.
XL2420T User Manual
Page 35
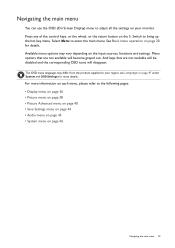
... to the following pages: • Display menu on page 36 • Picture menu on page 38 • Picture Advanced menu on page 40 • Save Settings menu on page 44 • Audio menu on page 45 • System menu on the S. For more details. Switch to enter the main menu. And... page 46 Navigating the main menu 35 Menu options that are not available will disappear. See Basic menu operation on the input sources, functions and settings. Navigating the main menu You can use the OSD (On Screen Display) menu to adjust all the...
... to the following pages: • Display menu on page 36 • Picture menu on page 38 • Picture Advanced menu on page 40 • Save Settings menu on page 44 • Audio menu on page 45 • System menu on the S. For more details. Switch to enter the main menu. And... page 46 Navigating the main menu 35 Menu options that are not available will disappear. See Basic menu operation on the input sources, functions and settings. Navigating the main menu You can use the OSD (On Screen Display) menu to adjust all the...
XL2420T User Manual
Page 39
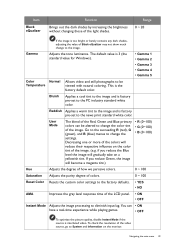
...Hue Adjusts the degree of how we perceive colors. 0 ~ 100 Saturation Adjusts the purity degree of colors. 0 ~ 100 Reset Color Resets the custom color settings to diminish input lag. User Mode The blend of the LCD panel. • ON • OFF Instant Mode Adjusts the image processing to the factory... default value is factory pre-set to the news print standard white color. Bluish Applies a cool tint to the image and is the factory default color. Decreasing one or more of the colors will gradually take on the monitor. Gamma Adjusts the tone luminance. You can be viewed ...
...Hue Adjusts the degree of how we perceive colors. 0 ~ 100 Saturation Adjusts the purity degree of colors. 0 ~ 100 Reset Color Resets the custom color settings to diminish input lag. User Mode The blend of the LCD panel. • ON • OFF Instant Mode Adjusts the image processing to the factory... default value is factory pre-set to the news print standard white color. Bluish Applies a cool tint to the image and is the factory default color. Decreasing one or more of the colors will gradually take on the monitor. Gamma Adjusts the tone luminance. You can be viewed ...
XL2420T User Manual
Page 41
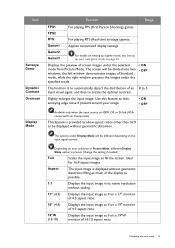
...Available only when the input source is to be different depending on a 19"W monitor of Standard mode, while the right window presents the images under the selected mode from Component). Change the setting if needed. Displays the preview of Picture Mode, different Display Mode option is pre...Real-time strategy) games. Gamer1 Applies customized display settings. The screen will be displayed without scaling. 17" (4:3) Displays the input image as if on a 17" monitor of 4:3 aspect ratio. 19" (4:3) Displays the input image as if on a 19" monitor of an 0 to 5 input visual signal, and...
...Available only when the input source is to be different depending on a 19"W monitor of Standard mode, while the right window presents the images under the selected mode from Component). Change the setting if needed. Displays the preview of Picture Mode, different Display Mode option is pre...Real-time strategy) games. Gamer1 Applies customized display settings. The screen will be displayed without scaling. 17" (4:3) Displays the input image as if on a 17" monitor of 4:3 aspect ratio. 19" (4:3) Displays the input image as if on a 19" monitor of an 0 to 5 input visual signal, and...
XL2420T User Manual
Page 42
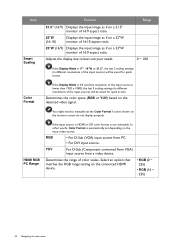
...resolution of the input source is automatically set the Color Format if colors shown on the monitor screen do not display properly. You might need to best suit your needs. In other words, Color Format is lower than 1920 x 1080), the last 5 scaling settings (in different resolutions of the input source.... Determines the range of 16:9 aspect ratio. Select an option that matches the RGB range setting on the detected video signal. Item Smart Scaling Function 21.5" (16:9) Displays the input image as if on a 21.5" monitor of 16:9 aspect ratio. 22"W (16:10) Displays the input image as if on...
...resolution of the input source is automatically set the Color Format if colors shown on the monitor screen do not display properly. You might need to best suit your needs. In other words, Color Format is lower than 1920 x 1080), the last 5 scaling settings (in different resolutions of the input source.... Determines the range of 16:9 aspect ratio. Select an option that matches the RGB range setting on the detected video signal. Item Smart Scaling Function 21.5" (16:9) Displays the input image as if on a 21.5" monitor of 16:9 aspect ratio. 22"W (16:10) Displays the input image as if on...
XL2420T User Manual
Page 47
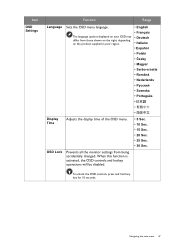
... language. • English The language options displayed on the product supplied in your OSD may differ from being accidentally changed. OSD Lock Prevents all the monitor settings from those shown on the right, depending on your region. • Français • Deutsch • Italiano • Español • Polski •...
... language. • English The language options displayed on the product supplied in your OSD may differ from being accidentally changed. OSD Lock Prevents all the monitor settings from those shown on the right, depending on your region. • Français • Deutsch • Italiano • Español • Polski •...

XL2420T User Manual
Page 48
... Key 1 Customer Key 2 Customer Key 3 Sets the function to be accessed by custom key 2. Sets the function to be accessed by custom key 1. Normal Mode Sets the signal distance in low power mode. LAN Mode Sets the minimum distance for remote diagnostics. DDC/CI Allows the monitor settings to be set through the software • ON on...
... Key 1 Customer Key 2 Customer Key 3 Sets the function to be accessed by custom key 2. Sets the function to be accessed by custom key 1. Normal Mode Sets the signal distance in low power mode. LAN Mode Sets the minimum distance for remote diagnostics. DDC/CI Allows the monitor settings to be set through the software • ON on...
XL2420T User Manual
Page 49
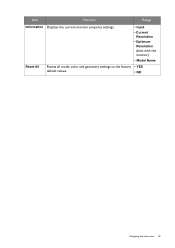
Item Function Range Information Displays the current monitor property settings. • Input • Current Resolution • Optimum Resolution (best with the monitor) • Model Name Reset All Resets all mode, color and geometry settings to the factory • YES default values. • NO Navigating the main menu 49
Item Function Range Information Displays the current monitor property settings. • Input • Current Resolution • Optimum Resolution (best with the monitor) • Model Name Reset All Resets all mode, color and geometry settings to the factory • YES default values. • NO Navigating the main menu 49

XL2420T User Manual
Page 51
... read the "Preset display modes" section from different input sources may appear distorted or stretched on the screen, this monitor does not support, please change the setting to prevent the occurrence of the supported mode. Is the prompt on these instructions. To have the optimal display performance... of each type of Range on the monitor running the monitor at its native resolution, but the image is preset to get...
... read the "Preset display modes" section from different input sources may appear distorted or stretched on the screen, this monitor does not support, please change the setting to prevent the occurrence of the supported mode. Is the prompt on these instructions. To have the optimal display performance... of each type of Range on the monitor running the monitor at its native resolution, but the image is preset to get...


