

Installation Handbook
Page 10
...Cable extension guide This guide provides additional information about how to extend VGA, HDMI and USB connections as required in this guide and the User Manual of the cable. • Ensure that incorrect connections may adversely affect picture quality. • Do not remove cables from the ports and... sockets by pulling the cable itself. Always grasp and pull the connectors at the end of your BenQ digital signage and interactive flat panel displays. Be aware that all devices before making connections. • Use certified, high-quality cables and...
...Cable extension guide This guide provides additional information about how to extend VGA, HDMI and USB connections as required in this guide and the User Manual of the cable. • Ensure that incorrect connections may adversely affect picture quality. • Do not remove cables from the ports and... sockets by pulling the cable itself. Always grasp and pull the connectors at the end of your BenQ digital signage and interactive flat panel displays. Be aware that all devices before making connections. • Use certified, high-quality cables and...

Installation Handbook
Page 11
... D-Sub (15-pin) cable VGA signal amplifier/repeater D-Sub (15-pin) cable Computer • Refer to the VGA input jack on the computer to the User Manual of your display for the location of VGA and corresponding audio input jacks. • The audio cable, VGA signal amplifier/repeater and additional VGA cable...
... D-Sub (15-pin) cable VGA signal amplifier/repeater D-Sub (15-pin) cable Computer • Refer to the VGA input jack on the computer to the User Manual of your display for the location of VGA and corresponding audio input jacks. • The audio cable, VGA signal amplifier/repeater and additional VGA cable...

Installation Handbook
Page 12
Display HDMI input jack HDMI signal amplifier/repeater HDMI cable DVD/Blu-ray player or computer HDMI cable • Refer to the User Manual of your display for the location of an HDMI signal amplifier is highly recommended. 1. Connect the HDMI input jack on the display to the HDMI ...
Display HDMI input jack HDMI signal amplifier/repeater HDMI cable DVD/Blu-ray player or computer HDMI cable • Refer to the User Manual of your display for the location of an HDMI signal amplifier is highly recommended. 1. Connect the HDMI input jack on the display to the HDMI ...

Installation Handbook
Page 13
Display USB port USB cable Faceplate USB cable Computer • Refer to the User Manual of your display for the location of USB port. • Any cable used in prior installations for other displays and projectors in the same location ...
Display USB port USB cable Faceplate USB cable Computer • Refer to the User Manual of your display for the location of USB port. • Any cable used in prior installations for other displays and projectors in the same location ...

Installation Handbook
Page 14
... the USB port of USB connection over a Category 5/5e/6 network cable. 1. Display USB port USB cable Active USB extension cable Computer • Refer to the User Manual of your display for the connected USB device. 1. Connect the type-A plug of the active USB extension cable to extend the length of USB port...
... the USB port of USB connection over a Category 5/5e/6 network cable. 1. Display USB port USB cable Active USB extension cable Computer • Refer to the User Manual of your display for the connected USB device. 1. Connect the type-A plug of the active USB extension cable to extend the length of USB port...

Installation Handbook
Page 15
.... • Refer to avoid electronic interference. Display USB port USB cable USB-CAT converter Category 5/5e/6 network cable USB cable Computer • Refer to the User Manual of your display for the maximum length of the Category 5/5e/6 network cable. • The type of USB port and plug on the active USB...
.... • Refer to avoid electronic interference. Display USB port USB cable USB-CAT converter Category 5/5e/6 network cable USB cable Computer • Refer to the User Manual of your display for the maximum length of the Category 5/5e/6 network cable. • The type of USB port and plug on the active USB...

Installation Handbook
Page 16
...) USB-CAT converter and a faceplate Depending on the environment where you install the display, you can use an active (powered) USB-CAT converter to the User Manual of your display for the location of USB port. • For best results, use only a certified active USB extension cable and high-quality faceplate. •...
...) USB-CAT converter and a faceplate Depending on the environment where you install the display, you can use an active (powered) USB-CAT converter to the User Manual of your display for the location of USB port. • For best results, use only a certified active USB extension cable and high-quality faceplate. •...
Installation Handbook
Page 28
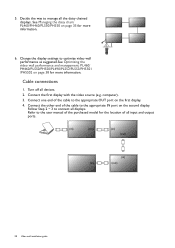
... daisy chain: PL460/PH460/PL550/PH550 on page 38 for the location of all displays. Refer to manage all devices. 2. Decide the way to the user manual of the purchased model for more information. 30° 30° 6. computer). 3. Turn off all the daisy chained displays.
... daisy chain: PL460/PH460/PL550/PH550 on page 38 for the location of all displays. Refer to manage all devices. 2. Decide the way to the user manual of the purchased model for more information. 30° 30° 6. computer). 3. Turn off all the daisy chained displays.
Installation Handbook
Page 29
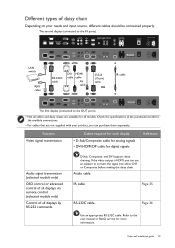
Audio cable IR cable Page 35 RS-232C cable. Refer to the user manual or BenQ service for digital signals Reference Audio signal transmission (selected models only) OSD control or advanced control of all displays via remote control (selected models only) ...
Audio cable IR cable Page 35 RS-232C cable. Refer to the user manual or BenQ service for digital signals Reference Audio signal transmission (selected models only) OSD control or advanced control of all displays via remote control (selected models only) ...

Installation Handbook
Page 35
... operation of the displays to create an IR loop. Refer to Notes on using the remote control on each of remote control. 5. Refer to the user manual of the first display. 3. The centralized management could be done by remote control (selected models only) 1. Management by remote control, RS-232 commands, or LAN...
... operation of the displays to create an IR loop. Refer to Notes on using the remote control on each of remote control. 5. Refer to the user manual of the first display. 3. The centralized management could be done by remote control (selected models only) 1. Management by remote control, RS-232 commands, or LAN...

Installation Handbook
Page 36
... displays using RJ45 cables (purchased separately if not supplied). Make sure the network connection is enabled. 36 Video wall installation guide Refer to the user manual or BenQ service for the commands. Connect the computer to the same LAN switch or hub just connected with your computer using the RS-232C serial null...
... displays using RJ45 cables (purchased separately if not supplied). Make sure the network connection is enabled. 36 Video wall installation guide Refer to the user manual or BenQ service for the commands. Connect the computer to the same LAN switch or hub just connected with your computer using the RS-232C serial null...
Installation Handbook
Page 37
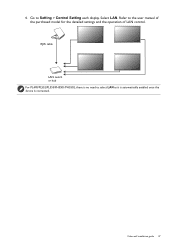
4. Select LAN. Go to select LAN as it is automatically enabled once the device is connected. RJ45 cable LAN switch or hub For PL490/PL552/PL553/PH5501/PH5502, there is no need to Setting > Control Setting each display. Refer to the user manual of the purchased model for the detailed settings and the operation of LAN control. Video wall installation guide 37
4. Select LAN. Go to select LAN as it is automatically enabled once the device is connected. RJ45 cable LAN switch or hub For PL490/PL552/PL553/PH5501/PH5502, there is no need to Setting > Control Setting each display. Refer to the user manual of the purchased model for the detailed settings and the operation of LAN control. Video wall installation guide 37
Installation Handbook
Page 38
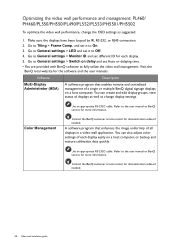
...displays in a video wall application. Go to General settings > LED and set Auto or delaying time. • You are provided with BenQ software to the user manual or BenQ service for demonstration videos if needed . Use an appropriate RS-232C cable. Go to General settings > Switch on delay and set it...: PL460/ PH460/PL550/PH550/PL490/PL552/PL553/PH5501/PH5502 To optimize the video wall performance, change display settings. Refer to the user manual or BenQ service for the software and the user manuals. Make sure the displays have been looped by IR, RS-232, or RJ45 connection. 2.
...displays in a video wall application. Go to General settings > LED and set Auto or delaying time. • You are provided with BenQ software to the user manual or BenQ service for demonstration videos if needed . Use an appropriate RS-232C cable. Go to General settings > Switch on delay and set it...: PL460/ PH460/PL550/PH550/PL490/PL552/PL553/PH5501/PH5502 To optimize the video wall performance, change display settings. Refer to the user manual or BenQ service for the software and the user manuals. Make sure the displays have been looped by IR, RS-232, or RJ45 connection. 2.

Installation Handbook
Page 42
...M4 screw: for M4 screw. 2. There are two loops of screw holes (outer & inner), depend on the design of each model. (Please check the user manual for using loop information) • Outer loop: Big screw holes for M6 screw. • Inner loop: Small screw holes for PL490 • Using ..."Edge Alignment Kit-2" on the design of each model. (Please check the user manual for using loop information) • Outer loop: Big screw holes for M6 screw. • Inner loop: Small screw holes for PL552/PL553/PH5501/...
...M4 screw: for M4 screw. 2. There are two loops of screw holes (outer & inner), depend on the design of each model. (Please check the user manual for using loop information) • Outer loop: Big screw holes for M6 screw. • Inner loop: Small screw holes for PL490 • Using ..."Edge Alignment Kit-2" on the design of each model. (Please check the user manual for using loop information) • Outer loop: Big screw holes for M6 screw. • Inner loop: Small screw holes for PL552/PL553/PH5501/...

Installation Handbook
Page 45
Setting the display position for special video wall layout If a special layout is requested, you will need an additional software and device (purchased separately) for more information. Video wall installation guide 45 Refer to the user manual of the purchased software for advanced settings.
Setting the display position for special video wall layout If a special layout is requested, you will need an additional software and device (purchased separately) for more information. Video wall installation guide 45 Refer to the user manual of the purchased software for advanced settings.

Installation Handbook
Page 65
... Make sure the power switch is displayed. somewhere else. The main board could be displayed. replacement. Possible causes Possible solutions This could be Contact the BenQ authorized service partner for details. Poor quality cable is reduced. If yes, the problem lies Incorrect cable connection. Restore the display to see if the... connected. Try with another graphic card (GPU). display. Picture/video No picture is switched on the selected input, connect the display with connected. See the user manual for damaged.
... Make sure the power switch is displayed. somewhere else. The main board could be displayed. replacement. Possible causes Possible solutions This could be Contact the BenQ authorized service partner for details. Poor quality cable is reduced. If yes, the problem lies Incorrect cable connection. Restore the display to see if the... connected. Try with another graphic card (GPU). display. Picture/video No picture is switched on the selected input, connect the display with connected. See the user manual for damaged.

Installation Handbook
Page 66
... solutions Go to Screen > Aspect > Wide Zoom or Zoom to verify the display's supported formats. Make sure the video cable is displayed. Refer to the user manual for stretched on the menu options. its native resolution, but no image is connected firmly to the display. The picture does not fill up the...
... solutions Go to Screen > Aspect > Wide Zoom or Zoom to verify the display's supported formats. Make sure the video cable is displayed. Refer to the user manual for stretched on the menu options. its native resolution, but no image is connected firmly to the display. The picture does not fill up the...
Installation Handbook
Page 67
... adjust the display. Troubleshooting 67 Yes, but the availability of the purchased model for more information. The picture is not displayed in the user manual of the screen when the input source is connected firmly to the display. • Go to Screen > Adjust Screen to the right;...61492;/+ on the video sources. The picture unstable, unfocused, or swimming. • Make sure the video cable is D-Sub (VGA). See the user manual of my display? Position, press /+ on the remote control to move the picture down. to find out the current resolution and timing. What...
... adjust the display. Troubleshooting 67 Yes, but the availability of the purchased model for more information. The picture is not displayed in the user manual of the screen when the input source is connected firmly to the display. • Go to Screen > Adjust Screen to the right;...61492;/+ on the video sources. The picture unstable, unfocused, or swimming. • Make sure the video cable is D-Sub (VGA). See the user manual of my display? Position, press /+ on the remote control to move the picture down. to find out the current resolution and timing. What...

Installation Handbook
Page 69
... a clean, soft, lint-free cloth with erosive substance, such as banana oil or ammonia. It is not supported by dust. Check the user manual for the supported operating systems. Visit the BenQ local website for your computer. Use a neutral detergent to ensure the touch function works. remove other USB peripherals. • Add a power...
... a clean, soft, lint-free cloth with erosive substance, such as banana oil or ammonia. It is not supported by dust. Check the user manual for the supported operating systems. Visit the BenQ local website for your computer. Use a neutral detergent to ensure the touch function works. remove other USB peripherals. • Add a power...
Installation Handbook
Page 74
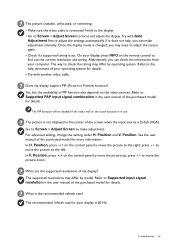
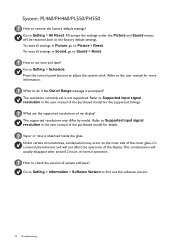
...time and date? Under certain circumstances, condensation may differ by model. Go to the user manual for more information. To reset all settings in Sound, go to Supported input signal resolution in the user manual of system software? Refer to Picture > Reset. Go to Setting > Information > ...purchased model for the supported timings. What are the supported resolutions of normal operation. How to Supported input signal resolution in the user manual of the display. The supported resolutions may occur on the inner side of the cover glass, it's a natural phenomenon and ...
...time and date? Under certain circumstances, condensation may differ by model. Go to the user manual for more information. To reset all settings in Sound, go to Supported input signal resolution in the user manual of system software? Refer to Picture > Reset. Go to Setting > Information > ...purchased model for the supported timings. What are the supported resolutions of normal operation. How to Supported input signal resolution in the user manual of the display. The supported resolutions may occur on the inner side of the cover glass, it's a natural phenomenon and ...


