

Installation Handbook
Page 3
... 44 Special signage installation guide 46 D series Full HD 55-inch dual-side display 46 Mounting installation ...49 Ceiling Mount ...49 Notice ...52 U-Mount ...54 H-mount ...58 Digital Signage Bar-Type Series 59 Installation notice ...59 Adjusting the OSD setting: For BH280/BH281/BH380 59 BH series HDMI connetion (EXCEPT BH280/BH281/BH380 60 Troubleshooting ...62 Connections...62 Picture/video ...65 Audio...68 Remote control...68 Touch function (selected models only 69 OSD menu/control panel/power button 71 LED indicators...73 Power ...73 System...
... 44 Special signage installation guide 46 D series Full HD 55-inch dual-side display 46 Mounting installation ...49 Ceiling Mount ...49 Notice ...52 U-Mount ...54 H-mount ...58 Digital Signage Bar-Type Series 59 Installation notice ...59 Adjusting the OSD setting: For BH280/BH281/BH380 59 BH series HDMI connetion (EXCEPT BH280/BH281/BH380 60 Troubleshooting ...62 Connections...62 Picture/video ...65 Audio...68 Remote control...68 Touch function (selected models only 69 OSD menu/control panel/power button 71 LED indicators...73 Power ...73 System...
Installation Handbook
Page 29
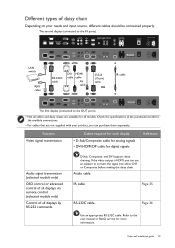
...-232C cable. Check the specifications of the purchased model for the available connections. • For cables that are available for more information. Video wall installation guide 29 Different types of daisy chain Depending on your product, you can purchase them separately. If the video output is HDMI, you can use an adapter to the user manual or BenQ service for all displays by RS-232 commands D-Sub, Composite, and DVI support...
...-232C cable. Check the specifications of the purchased model for the available connections. • For cables that are available for more information. Video wall installation guide 29 Different types of daisy chain Depending on your product, you can purchase them separately. If the video output is HDMI, you can use an adapter to the user manual or BenQ service for all displays by RS-232 commands D-Sub, Composite, and DVI support...

Installation Handbook
Page 34
... are connected. The default setting is no specific direction while going through all displays setting up the ID numbers. All models of MDA only support from 1 to 225. Setting the ID number of each display: PL460/PH460/PL550/PH550 Once you need to set an ID number for each display for video wall management would not be received correctly. This is helpful for a specific display. Set the ID number starting from 1-98. 34 Video wall installation guide To set...
... are connected. The default setting is no specific direction while going through all displays setting up the ID numbers. All models of MDA only support from 1 to 225. Setting the ID number of each display: PL460/PH460/PL550/PH550 Once you need to set an ID number for each display for video wall management would not be received correctly. This is helpful for a specific display. Set the ID number starting from 1-98. 34 Video wall installation guide To set...

Installation Handbook
Page 36
... and all displays using RJ45 cables (purchased separately if not supplied). Connect all displays separately to a display using a RJ45 cable (purchased separately if not supplied). 2. Refer to the RS-232 protocol document (downloaded from a computer. 1. Make sure the network connection is enabled. 36 Video wall installation guide Refer to the user manual or BenQ service for more information. • For PL490/PL552/PL553/PH5501/PH5502, choose the RS232 control form Card OPS or...
... and all displays using RJ45 cables (purchased separately if not supplied). Connect all displays separately to a display using a RJ45 cable (purchased separately if not supplied). 2. Refer to the RS-232 protocol document (downloaded from a computer. 1. Make sure the network connection is enabled. 36 Video wall installation guide Refer to the user manual or BenQ service for more information. • For PL490/PL552/PL553/PH5501/PH5502, choose the RS232 control form Card OPS or...
Installation Handbook
Page 38
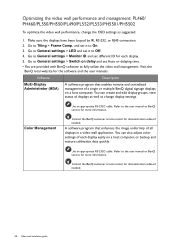
... multiple BenQ digital signage displays on a host computer. Color Management Contact the BenQ customer service center for more information. and set it to the user manual or BenQ service for demonstration videos if needed . 38 Video wall installation guide Refer to On. 3. Contact the BenQ customer service center for the software and the user manuals. Use an appropriate RS-232C cable. Make sure the displays have been looped by IR, RS-232, or RJ45 connection. 2. Optimizing the video wall performance...
... multiple BenQ digital signage displays on a host computer. Color Management Contact the BenQ customer service center for more information. and set it to the user manual or BenQ service for demonstration videos if needed . 38 Video wall installation guide Refer to On. 3. Contact the BenQ customer service center for the software and the user manuals. Use an appropriate RS-232C cable. Make sure the displays have been looped by IR, RS-232, or RJ45 connection. 2. Optimizing the video wall performance...
Installation Handbook
Page 59
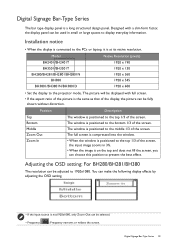
... The window is the same as that of the display, the picture can choose this position to the PCs or laptop, it is not1920x1080, only Zoom Out can make the following display effects by adjusting the OSD setting. • If the input source is at its native resolution. Installation notice • When the display is connected to present the best effect. You can be adjusted to the projector mode. Model Native Resolution (pixels...
... The window is the same as that of the display, the picture can choose this position to the PCs or laptop, it is not1920x1080, only Zoom Out can make the following display effects by adjusting the OSD setting. • If the input source is at its native resolution. Installation notice • When the display is connected to present the best effect. You can be adjusted to the projector mode. Model Native Resolution (pixels...

Installation Handbook
Page 65
... the video cable is heard. switched on the back of the control panel (keypad) buttons and check if the OSD menu could be caused by other appliances, traffic, or fluorescent lights in Standby mode when the input source is not connected. The display is in the surroundings. If yes, the problem lies Incorrect cable connection. The main board could be displayed. display. See the user manual for damaged. Possible causes Possible solutions The power cord...
... the video cable is heard. switched on the back of the control panel (keypad) buttons and check if the OSD menu could be caused by other appliances, traffic, or fluorescent lights in Standby mode when the input source is not connected. The display is in the surroundings. If yes, the problem lies Incorrect cable connection. The main board could be displayed. display. See the user manual for damaged. Possible causes Possible solutions The power cord...
Installation Handbook
Page 67
...; Check if a supported timing is set. In H. Position, press /+ on the remote control to Supported input signal resolution in the center of my display? press /- The picture unstable, unfocused, or swimming. • Make sure the video cable is connected firmly to the display. • Go to Screen > Adjust Screen to the right; Try with another video cable. Refer to adjust the settings automatically. In V. Position. press /- The recommended refresh rate for details. Does my display support...
...; Check if a supported timing is set. In H. Position, press /+ on the remote control to Supported input signal resolution in the center of my display? press /- The picture unstable, unfocused, or swimming. • Make sure the video cable is connected firmly to the display. • Go to Screen > Adjust Screen to the right; Try with another video cable. Refer to adjust the settings automatically. In V. Position. press /- The recommended refresh rate for details. Does my display support...

Installation Handbook
Page 68
Check the cable connection or try with another video cable. • The panel backlight may not be stable. Update the driver through Windows Update (for damaged. The audio cable is heard. volume appropriately. Either the display's or PC's Disable mute by pressing the MUTE button on the display again. operating system and launch the media player again. Power off the display and re-connect the audio cable. control. Your display's audio input is not Set the Audio Source of your display is...
Check the cable connection or try with another video cable. • The panel backlight may not be stable. Update the driver through Windows Update (for damaged. The audio cable is heard. volume appropriately. Either the display's or PC's Disable mute by pressing the MUTE button on the display again. operating system and launch the media player again. Power off the display and re-connect the audio cable. control. Your display's audio input is not Set the Audio Source of your display is...

Installation Handbook
Page 69
... driver files. Avoid using a small amount of abrasive materials to get enough power supply from the screen and the infrared plastic filter periodically. Check the user manual for the supported operating systems. Visit the BenQ local website for your computer to your computer. Remove dust or dirt from your computer. faceplate or USB extension cable) to turn off the display and unplug the power cord before you clean...
... driver files. Avoid using a small amount of abrasive materials to get enough power supply from the screen and the infrared plastic filter periodically. Check the user manual for the supported operating systems. Visit the BenQ local website for your computer to your computer. Remove dust or dirt from your computer. faceplate or USB extension cable) to turn off the display and unplug the power cord before you clean...
Installation Handbook
Page 78
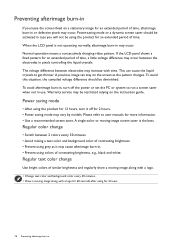
... leave the screen fixed on the instruction guide. Warranty service may occur. Power-saving mode or a dynamic screen saver should be restricted relying on a stationary image for an extended period of time, a little voltage difference may occur between electrodes may vary by models. When the LCD panel is the best. Regular color change Use bright colors of contrasting brightness. • Prevent using grey as the pattern changes. Regular text color change • Switch between 2 colors every 30...
... leave the screen fixed on the instruction guide. Warranty service may occur. Power-saving mode or a dynamic screen saver should be restricted relying on a stationary image for an extended period of time, a little voltage difference may occur between electrodes may vary by models. When the LCD panel is the best. Regular color change Use bright colors of contrasting brightness. • Prevent using grey as the pattern changes. Regular text color change • Switch between 2 colors every 30...

Installation Handbook
Page 79
... packing tapes on the display and check if the screen is found before a new installation. Check if the panel is missing. 9. Appendix 1: Installation Checklists Check the following one by collision to the bezel, metal frame, rear cover, and the accessories 8. scratched or cracked). 10. Check items Checking results Location & description Yes No of the carton. 6. Power on the carton. Check if any serious...
... packing tapes on the display and check if the screen is found before a new installation. Check if the panel is missing. 9. Appendix 1: Installation Checklists Check the following one by collision to the bezel, metal frame, rear cover, and the accessories 8. scratched or cracked). 10. Check items Checking results Location & description Yes No of the carton. 6. Power on the carton. Check if any serious...
Installation Handbook
Page 85
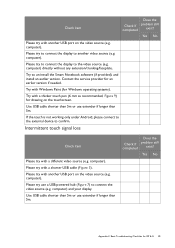
... the service provider for IFP & IL 85 Use USB cable shorter than 5m. Please try to connect the display to another USB port on the video source (e.g. Try to confirm. Intermittent touch signal loss Check item Please try with another video source (e.g. Please try with a shorter USB cable (Figure 3). Use USB cable shorter than 5m or use extender if longer than 5m or use a USB-powered hub (Figure 7) to the video source (e.g. Does the Check if completed problem...
... the service provider for IFP & IL 85 Use USB cable shorter than 5m. Please try to connect the display to another USB port on the video source (e.g. Try to confirm. Intermittent touch signal loss Check item Please try with another video source (e.g. Please try with a shorter USB cable (Figure 3). Use USB cable shorter than 5m or use extender if longer than 5m or use a USB-powered hub (Figure 7) to the video source (e.g. Does the Check if completed problem...
Installation Handbook
Page 87
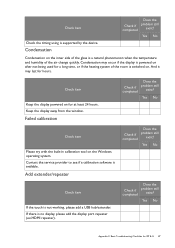
... service provider to see if a calibration software is supported by the device. Check if completed Does the problem still exist? Condensation Condensation on the Windows operating system. Yes No Check item If the touch is no display, please add the display port repeater (ex.HDMI repeater). Yes No Check item Please try with the built-in calibration tool on the inner side of the air change quickly...
... service provider to see if a calibration software is supported by the device. Check if completed Does the problem still exist? Condensation Condensation on the Windows operating system. Yes No Check item If the touch is no display, please add the display port repeater (ex.HDMI repeater). Yes No Check item Please try with the built-in calibration tool on the inner side of the air change quickly...

Installation Handbook
Page 91
... Troubleshooting Checklists for Video 91 Is the original cable provided by BenQ being used? Are the cables passing though any wall or floor trunking? Please specify the brand and the model name. Please provide the installer's contact name & phone number. _______ meters. What is the signal cable (HDMI, DVI, VGA, etc.) length, including trunking in wall? Are the affected units connected through splitter, matrix or other video wall controller? Daisy...
... Troubleshooting Checklists for Video 91 Is the original cable provided by BenQ being used? Are the cables passing though any wall or floor trunking? Please specify the brand and the model name. Please provide the installer's contact name & phone number. _______ meters. What is the signal cable (HDMI, DVI, VGA, etc.) length, including trunking in wall? Are the affected units connected through splitter, matrix or other video wall controller? Daisy...
DMS Local User Manual
Page 5
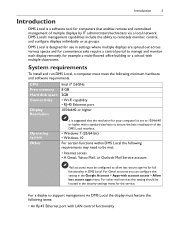
... less secure apps menu. DMS Local's management capabilities include the ability to manage and monitor each display remotely, for the service. CPU Free memory Hard disk space Connectivity Display Resolution Intel i7 2.6GHz 8 GB 2GB • Wi-Fi capability • RJ-45 Ethernet port 1054x640 or higher Operating system Other It is designed for use in settings where multiple displays are spread out...
... less secure apps menu. DMS Local's management capabilities include the ability to manage and monitor each display remotely, for the service. CPU Free memory Hard disk space Connectivity Display Resolution Intel i7 2.6GHz 8 GB 2GB • Wi-Fi capability • RJ-45 Ethernet port 1054x640 or higher Operating system Other It is designed for use in settings where multiple displays are spread out...

User Manual
Page 3
...3 BenQ ecoFACTS 4 Package contents 5 Setting up the display 6 Mounting the display 6 Parts of the display and their functions 8 Front/Rear panel 8 Input/output terminals 9 Remote control 10 Using the remote control 12 Connection 13 Connecting audio/video signals 13 Connecting the multimedia inputs 16 Connecting the touch module 17 Connecting power 18 Installing and Removing OPS module 19 Using the touch screen 20 Important instructions for using the touch screen 24 Basic operations 25 Turning the display on or off 25 Initial Setup 25 Sidebar Menu 26 Switching input signals...
...3 BenQ ecoFACTS 4 Package contents 5 Setting up the display 6 Mounting the display 6 Parts of the display and their functions 8 Front/Rear panel 8 Input/output terminals 9 Remote control 10 Using the remote control 12 Connection 13 Connecting audio/video signals 13 Connecting the multimedia inputs 16 Connecting the touch module 17 Connecting power 18 Installing and Removing OPS module 19 Using the touch screen 20 Important instructions for using the touch screen 24 Basic operations 25 Turning the display on or off 25 Initial Setup 25 Sidebar Menu 26 Switching input signals...
User Manual
Page 32
... home screen, select Settings ( ) > Wireless & networks ( ) > Ethernet configuration to turn Wi-Fi on. Eye Care solution is a software update available for eyesight protection: the display provides proprietary eye-care technology with your device or to open the Android home screen. 2. Downloading software BenQ may periodically release software updates that may add functions or applications associated with zero-flicker performance and ultra-low blue light emission, preventing...
... home screen, select Settings ( ) > Wireless & networks ( ) > Ethernet configuration to turn Wi-Fi on. Eye Care solution is a software update available for eyesight protection: the display provides proprietary eye-care technology with your device or to open the Android home screen. 2. Downloading software BenQ may periodically release software updates that may add functions or applications associated with zero-flicker performance and ultra-low blue light emission, preventing...

User Manual
Page 37
... image mode to Auto Tune to Eyecare, low blue light will be adjusted if the mode is set to User. The OSD (On-Screen Display) menu 33 Picture menu Screen images and icons in the image. Contrast Brightness Hue Sharpness Saturation Back Light PC Image Mode Color Temperature If the mode is set to synchronize the display automatically, or manually fine-tunes Clock, Phase, Horizontal Position, and Vertical Position. Adjusts the degree of difference between light and dark shades. Adjusts the back light darkness and lightness. Name Picture Mode...
... image mode to Auto Tune to Eyecare, low blue light will be adjusted if the mode is set to User. The OSD (On-Screen Display) menu 33 Picture menu Screen images and icons in the image. Contrast Brightness Hue Sharpness Saturation Back Light PC Image Mode Color Temperature If the mode is set to synchronize the display automatically, or manually fine-tunes Clock, Phase, Horizontal Position, and Vertical Position. Adjusts the degree of difference between light and dark shades. Adjusts the back light darkness and lightness. Name Picture Mode...

User Manual
Page 59
..., Horizontal Position, and Vertical Position functions to manually adjust the image. • Use the Default function (See Setting menu on page 35) to set the output signal's image resolution match to the display's native resolution. • If the result of the display. • Is the signal source device turned on page 54 to unlock the buttons and try again. • Are there any loose cable connections? Turn on the device and try again. Make sure that all cables are connected...
..., Horizontal Position, and Vertical Position functions to manually adjust the image. • Use the Default function (See Setting menu on page 35) to set the output signal's image resolution match to the display's native resolution. • If the result of the display. • Is the signal source device turned on page 54 to unlock the buttons and try again. • Are there any loose cable connections? Turn on the device and try again. Make sure that all cables are connected...


