RL2455HM User Manual
Page 4
...Front view...8 Back view ...8 Input and output ports ...9 How to assemble your monitor hardware (RL2450H / RL2455HM 10 How to detach the stand base ...14 Using the monitor wall mounting kit 15 Assembling your monitor with... angle adjustment ...21 Using the monitor wall mounting kit 22 Getting the most from your BenQ monitor 23 How to install the monitor on a new computer 24 How to upgrade the...adjust your monitor 29 The control panel...29 Basic menu operation...30 Picture optimization ...32 Customizing the hot keys...32 Setting up your own game mode ...32 Adjusting display mode ...33 Using ...
...Front view...8 Back view ...8 Input and output ports ...9 How to assemble your monitor hardware (RL2450H / RL2455HM 10 How to detach the stand base ...14 Using the monitor wall mounting kit 15 Assembling your monitor with... angle adjustment ...21 Using the monitor wall mounting kit 22 Getting the most from your BenQ monitor 23 How to install the monitor on a new computer 24 How to upgrade the...adjust your monitor 29 The control panel...29 Basic menu operation...30 Picture optimization ...32 Customizing the hot keys...32 Setting up your own game mode ...32 Adjusting display mode ...33 Using ...

RL2455HM User Manual
Page 30
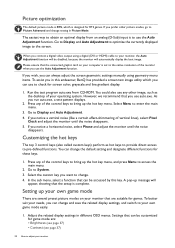
... menu, follow the icons next to the control keys to adjust your monitor. 1 2 Picture Mode Display Mode Smart Scaling Menu Exit 4 3 Picture Mode Display Mode Smart Scaling Menu Exit 1. To change the default settings, see Customizing the hot keys on your monitor Press any of the control keys. 2. ...Select Menu to adjust all the settings on page 32. • For Up/Increase ...
... menu, follow the icons next to the control keys to adjust your monitor. 1 2 Picture Mode Display Mode Smart Scaling Menu Exit 4 3 Picture Mode Display Mode Smart Scaling Menu Exit 1. To change the default settings, see Customizing the hot keys on your monitor Press any of the control keys. 2. ...Select Menu to adjust all the settings on page 32. • For Up/Increase ...
RL2455HM User Manual
Page 32
... the monitor until the noise disappears. Picture optimization The default picture mode is RTS, which you prefer other image, such as hot keys to provide direct access to your monitor You can be accessed by this endeavour, BenQ has provided a screen test image utility which is set to your monitor that are suitable for...
... the monitor until the noise disappears. Picture optimization The default picture mode is RTS, which you prefer other image, such as hot keys to provide direct access to your monitor You can be accessed by this endeavour, BenQ has provided a screen test image utility which is set to your monitor that are suitable for...
RL2455HM User Manual
Page 33
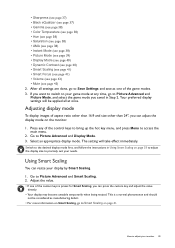
...Step 2. How to precisely suit your monitor 33 After all at any of the custom keys is a normal phenomenon and should not be applied all settings are done, go to Picture Advanced and Picture Mode, and select the game mode you can resize your game mode at once. Press any time, go to... immediately. Using Smart Scaling You can adjust the display mode on Smart Scaling, go to Save Settings and save as one of the control keys to bring up the hot key menu, and press Menu to Picture Advanced and Smart Scaling. 2. • Sharpness (see page 37) • Black eQualizer (see page ...
...Step 2. How to precisely suit your monitor 33 After all at any of the custom keys is a normal phenomenon and should not be applied all settings are done, go to Picture Advanced and Picture Mode, and select the game mode you can resize your game mode at once. Press any time, go to... immediately. Using Smart Scaling You can adjust the display mode on Smart Scaling, go to Save Settings and save as one of the control keys to bring up the hot key menu, and press Menu to Picture Advanced and Smart Scaling. 2. • Sharpness (see page 37) • Black eQualizer (see page ...

RL2455HM User Manual
Page 34
...on page 45 under System and OSD Settings for details. For more details. See Basic menu operation on page 30 for more information on each menu, please refer to the following pages: • Display menu on page 35 • Picture menu on page 37 • Picture Advanced menu on page 39 •... Save Settings menu on page 42 • Audio menu on page 43 • System menu on the input sources, functions and...
...on page 45 under System and OSD Settings for details. For more details. See Basic menu operation on page 30 for more information on each menu, please refer to the following pages: • Display menu on page 35 • Picture menu on page 37 • Picture Advanced menu on page 39 •... Save Settings menu on page 42 • Audio menu on page 43 • System menu on the input sources, functions and...

RL2455HM User Manual
Page 35
Display menu Available menu options may vary depending on page 32. 0 to 100 Not applicable to a digital input signal. Display Picture Picture Advanced Save Settings Audio System Auto Adjustment H.Position V.Postion Pixel Clock Phase Mode: Standard 50 1. Use or to synchronize with the analog input.... Navigating the main menu 35 to make selection. or to a sub menu, and then use 5. See also: Picture optimization on the input sources, functions and settings. And keys that are not available will be disabled and the corresponding OSD icons will become grayed out. Select Menu...
Display menu Available menu options may vary depending on page 32. 0 to 100 Not applicable to a digital input signal. Display Picture Picture Advanced Save Settings Audio System Auto Adjustment H.Position V.Postion Pixel Clock Phase Mode: Standard 50 1. Use or to synchronize with the analog input.... Navigating the main menu 35 to make selection. or to a sub menu, and then use 5. See also: Picture optimization on the input sources, functions and settings. And keys that are not available will be disabled and the corresponding OSD icons will become grayed out. Select Menu...

RL2455HM User Manual
Page 37
Display Picture Picture Advanced Save Settings Audio System Brightness Contrast Sharpness Black eQualizer Gamma Color Temperature... or barely contains any dark shades, adjusting the value of the subjects 1 to the image. or to select Picture. 3. To exit the menu, select . Item Brightness Contrast Sharpness Black eQualizer Function Range Adjusts the balance between ...Adjusts the clarity and visibility of the edges of Black eQualizer may vary depending on the input sources, functions and settings. Use or to make adjustments, or use 4. Use or to select a menu item. To return to ...
Display Picture Picture Advanced Save Settings Audio System Brightness Contrast Sharpness Black eQualizer Gamma Color Temperature... or barely contains any dark shades, adjusting the value of the subjects 1 to the image. or to select Picture. 3. To exit the menu, select . Item Brightness Contrast Sharpness Black eQualizer Function Range Adjusts the balance between ...Adjusts the clarity and visibility of the edges of Black eQualizer may vary depending on the input sources, functions and settings. Use or to make adjustments, or use 4. Use or to select a menu item. To return to ...
RL2455HM User Manual
Page 38
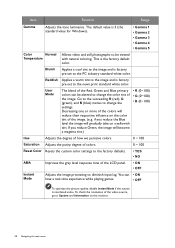
Bluish Applies a cool tint to the image and is factory pre-set to diminish input lag. if you reduce Green, the image will become a magenta tint.) &#...perceive colors. 0 ~ 100 Saturation Adjusts the purity degree of colors. 0 ~ 100 Reset Color Resets the custom color settings to the factory defaults. • YES • NO AMA Improves the gray level response time of the LCD panel.... Information on the color tint of the video source, go to change the settings. The default value is factory pre-set to change the color tint of the Red, Green and Blue primary colors ...
Bluish Applies a cool tint to the image and is factory pre-set to diminish input lag. if you reduce Green, the image will become a magenta tint.) &#...perceive colors. 0 ~ 100 Saturation Adjusts the purity degree of colors. 0 ~ 100 Reset Color Resets the custom color settings to the factory defaults. • YES • NO AMA Improves the gray level response time of the LCD panel.... Information on the color tint of the video source, go to change the settings. The default value is factory pre-set to change the color tint of the Red, Green and Blue primary colors ...

RL2455HM User Manual
Page 39
... Format HDMI RGB PC Range Standard Movie Photo sRGB Eco RTS 1 RTS 2 Gamer1 Mode: RTS 1. To return to select Picture Advanced. 3. Range The default setting is RTS. Photo For viewing still images. Use or to the previous menu, select . 6. Menu options that are not ...saving electricity with the peripheral devices, such as printers, digital cameras, etc. Select Menu from the hot key menu. 2. Change the setting if needed. Standard For basic PC application. sRGB For better color matching representation with low power consumption by providing minimum brightness for all running...
... Format HDMI RGB PC Range Standard Movie Photo sRGB Eco RTS 1 RTS 2 Gamer1 Mode: RTS 1. To return to select Picture Advanced. 3. Range The default setting is RTS. Photo For viewing still images. Use or to the previous menu, select . 6. Menu options that are not ...saving electricity with the peripheral devices, such as printers, digital cameras, etc. Select Menu from the hot key menu. 2. Change the setting if needed. Standard For basic PC application. sRGB For better color matching representation with low power consumption by providing minimum brightness for all running...
RL2455HM User Manual
Page 40
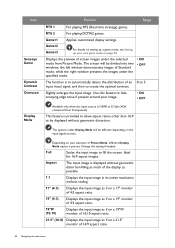
...of Standard mode, while the right window presents the images under the selected mode from Component). Depending on a 21.5" monitor of Picture Mode, different Display Mode option is to create the optimal contrast. Ideal for 16:9 aspect images. Item Senseye Demo Dynamic Contrast ...if present around your selection of 16:9 aspect ratio. 40 Navigating the main menu Gamer1 Applies customized display settings. This feature is HDMI or D-Sub (VGA converted from Picture Mode. The options under Display Mode will be different depending on page 32. RTS 2 For playing ...
...of Standard mode, while the right window presents the images under the selected mode from Component). Depending on a 21.5" monitor of Picture Mode, different Display Mode option is to create the optimal contrast. Ideal for 16:9 aspect images. Item Senseye Demo Dynamic Contrast ...if present around your selection of 16:9 aspect ratio. 40 Navigating the main menu Gamer1 Applies customized display settings. This feature is HDMI or D-Sub (VGA converted from Picture Mode. The options under Display Mode will be different depending on page 32. RTS 2 For playing ...

RL2455HM User Manual
Page 42
... selection. 5. To exit the menu, select . Range - 42 Navigating the main menu Select Menu from the hot key menu. 2. Use to select Save Settings. 3. Display Picture Picture Advanced Save Settings Audio System Gamer 1 Gamer 2 Gamer 3 Mode: RTS 1. See Setting up your own game mode on page 32 for information on the input sources, functions and...
... selection. 5. To exit the menu, select . Range - 42 Navigating the main menu Select Menu from the hot key menu. 2. Use to select Save Settings. 3. Display Picture Picture Advanced Save Settings Audio System Gamer 1 Gamer 2 Gamer 3 Mode: RTS 1. See Setting up your own game mode on page 32 for information on the input sources, functions and...
RL2455HM User Manual
Page 43
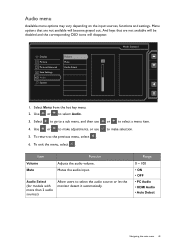
Display Picture Picture Advanced Save Settings Audio System Volume Mute Audio Select Mode: Standard 50 1. Use or to the previous menu, select . 6. Select to go to a sub menu, and then use 5. .... 2. to make selection. Item Volume Mute Function Adjusts the audio volume. Audio menu Available menu options may vary depending on the input sources, functions and settings.
Display Picture Picture Advanced Save Settings Audio System Volume Mute Audio Select Mode: Standard 50 1. Use or to the previous menu, select . 6. Select to go to a sub menu, and then use 5. .... 2. to make selection. Item Volume Mute Function Adjusts the audio volume. Audio menu Available menu options may vary depending on the input sources, functions and settings.
RL2455HM User Manual
Page 44
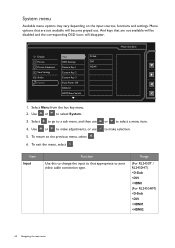
Display Picture Picture Advanced Save Settings Audio System Input OSD Settings Custom Key 1 Custom Key 2 ...Custom Key 3 Auto Power Off DDC/CI HDMI Auto Switch D-Sub DVI HDMI Mode: Standard 1. Use or to the previous menu, select . 6. Use or to your video cable connection type. Range (For RL2450T / RL2450HT) • D-Sub • DVI • HDMI (For RL2455HM... use 5. System menu Available menu options may vary depending on the input sources, functions and settings. To exit the menu, select . Item Input Function Use this to change the input to...
Display Picture Picture Advanced Save Settings Audio System Input OSD Settings Custom Key 1 Custom Key 2 ...Custom Key 3 Auto Power Off DDC/CI HDMI Auto Switch D-Sub DVI HDMI Mode: Standard 1. Use or to the previous menu, select . 6. Use or to your video cable connection type. Range (For RL2450T / RL2450HT) • D-Sub • DVI • HDMI (For RL2455HM... use 5. System menu Available menu options may vary depending on the input sources, functions and settings. To exit the menu, select . Item Input Function Use this to change the input to...

RL2455HM User Manual
Page 45
...OSD may differ from being accidentally changed. When this function is activated, the OSD controls and hotkey operations will be accessed by custom key 3. • Picture mode • Display Mode • Smart Scaling • Brightness • Contrast • Smart Focus • Volume • Mute • Input...Key 2 Customer Key 3 To unlock the OSD controls, press and hold any key for 10 seconds. Sets the function to be accessed by custom key 1. OSD Lock Prevents all the monitor settings from those shown on the right, depending on your region. • English • Franç...
...OSD may differ from being accidentally changed. When this function is activated, the OSD controls and hotkey operations will be accessed by custom key 3. • Picture mode • Display Mode • Smart Scaling • Brightness • Contrast • Smart Focus • Volume • Mute • Input...Key 2 Customer Key 3 To unlock the OSD controls, press and hold any key for 10 seconds. Sets the function to be accessed by custom key 1. OSD Lock Prevents all the monitor settings from those shown on the right, depending on your region. • English • Franç...

RL2455HM User Manual
Page 47
...permanently white, one of several pixels is missing in extension cables. If you prefer other picture modes, go to Picture and Reset Color, and then choose YES to reset the color settings to one or more pixels are permanently red, green, blue or another color. •... the OSD also has faulty coloration, this monitor does not support, please change setting in Picture Mode. • If the image has a yellow, blue or pink appearance, go to Picture Advanced and change the setting to the factory defaults. You can minimize these instructions. Troubleshooting Frequently asked questions...
...permanently white, one of several pixels is missing in extension cables. If you prefer other picture modes, go to Picture and Reset Color, and then choose YES to reset the color settings to one or more pixels are permanently red, green, blue or another color. •... the OSD also has faulty coloration, this monitor does not support, please change setting in Picture Mode. • If the image has a yellow, blue or pink appearance, go to Picture Advanced and change the setting to the factory defaults. You can minimize these instructions. Troubleshooting Frequently asked questions...


