

User Manual
Page 2
... View 8 Left side view 8 Upper Right side View 9 Under View 9 Control panel and functions 10 Remote control and functions 11 Remote control operation 12 Setup and Operation 13 Setting the remote control batteries 13 Connecting to the projector 13 Projection lens selection and Installation 14 Installing or Removing the Optional Lens 14 Installing the New Lens 14 Installing the New Lens Using the Anti-theft Screw 14 Removing the Existing Lens From the Projector 15 Choosing a location 16 Throw distance and screen size 17 Lens...
... View 8 Left side view 8 Upper Right side View 9 Under View 9 Control panel and functions 10 Remote control and functions 11 Remote control operation 12 Setup and Operation 13 Setting the remote control batteries 13 Connecting to the projector 13 Projection lens selection and Installation 14 Installing or Removing the Optional Lens 14 Installing the New Lens 14 Installing the New Lens Using the Anti-theft Screw 14 Removing the Existing Lens From the Projector 15 Choosing a location 16 Throw distance and screen size 17 Lens...

User Manual
Page 3
... Use of the Projector 56 Unlocking the Projector 57 Using the Physical Lock 57 Additional information 58 Care of the projector 58 Cleaning the lens 58 Cleaning the projector case 58 Storing the projector 58 Transporting the projector 58 Installing the Optional Color Wheel 62 Cleaning the Filters 64 Troubleshooting 66 Indicator Messages 66 Common Problems and Solutions 67 Tips for Troubleshooting 67 Image Problems 68 Specifications 70 Dimensions 71 Timing chart 72 3D Supported Timing 73 RS232 Command Control...
... Use of the Projector 56 Unlocking the Projector 57 Using the Physical Lock 57 Additional information 58 Care of the projector 58 Cleaning the lens 58 Cleaning the projector case 58 Storing the projector 58 Transporting the projector 58 Installing the Optional Color Wheel 62 Cleaning the Filters 64 Troubleshooting 66 Indicator Messages 66 Common Problems and Solutions 67 Tips for Troubleshooting 67 Image Problems 68 Specifications 70 Dimensions 71 Timing chart 72 3D Supported Timing 73 RS232 Command Control...
User Manual
Page 5
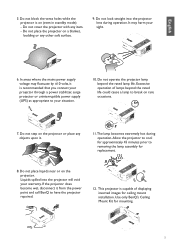
... displaying inverted images for mounting. 5 This projector is capable of lamps beyond the rated lamp life. Use only BenQ's Ceiling Mount Kit for ceiling mount installation. Allow the projector to cool for approximately 45 minutes prior to break on (even in standby mode): - Do not cover the projector with any other soft surface. 9. UPS 7. In areas where the mains power supply voltage may harm your situation. 10. Liquids spilled into the projector lens during operation...
... displaying inverted images for mounting. 5 This projector is capable of lamps beyond the rated lamp life. Use only BenQ's Ceiling Mount Kit for ceiling mount installation. Allow the projector to cool for approximately 45 minutes prior to break on (even in standby mode): - Do not cover the projector with any other soft surface. 9. UPS 7. In areas where the mains power supply voltage may harm your situation. 10. Liquids spilled into the projector lens during operation...

User Manual
Page 10
... projector in standby mode Select the input source Auto Sync to Move image left, right, up, or down LEFT BOTTON MENU Open / Close the OSD UP/ DOWN/ LEFT/ RIGHT BUTTONS Navigate and change settings in the OSD ENTER Select or change settings in the OSD CANCEL POWER Source AUTO Power (LED) WARNING (LED) LAMP 1 (LED) LAMP 2 (LED) Exit the On-Screen Display (OSD) Turn the projector on or off (main power switch must be turned on first). Focus the projected image ZOOM+ ZOOM- English Control panel and functions Devices Function FOCUS+ FOCUS...
... projector in standby mode Select the input source Auto Sync to Move image left, right, up, or down LEFT BOTTON MENU Open / Close the OSD UP/ DOWN/ LEFT/ RIGHT BUTTONS Navigate and change settings in the OSD ENTER Select or change settings in the OSD CANCEL POWER Source AUTO Power (LED) WARNING (LED) LAMP 1 (LED) LAMP 2 (LED) Exit the On-Screen Display (OSD) Turn the projector on or off (main power switch must be turned on first). Focus the projected image ZOOM+ ZOOM- English Control panel and functions Devices Function FOCUS+ FOCUS...
User Manual
Page 11
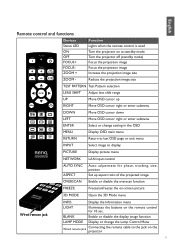
... Devices Status LED ON OFF FOCUS+ FOCUSZOOM + Function Lights when the remote control is used Turn the projector on the projector 11 BLANK Enable or disable the display image function LAMP MODE Display or change setting in the OSD MENU Display OSD main menu RETURN Return to last OSD page or exit menu INPUT Select image to the jack on at standby mode Turn the projector off (standby mode) Focus the projection image Focus the projection image Increase the projection image size ZOOM - PICTURE Display picture menu NETWORK LAN input control AUTO SYNC ASPECT Auto adjustment for...
... Devices Status LED ON OFF FOCUS+ FOCUSZOOM + Function Lights when the remote control is used Turn the projector on the projector 11 BLANK Enable or disable the display image function LAMP MODE Display or change setting in the OSD MENU Display OSD main menu RETURN Return to last OSD page or exit menu INPUT Select image to the jack on at standby mode Turn the projector off (standby mode) Focus the projection image Focus the projection image Increase the projection image size ZOOM - PICTURE Display picture menu NETWORK LAN input control AUTO SYNC ASPECT Auto adjustment for...

User Manual
Page 16
... Projection mode and press ◄/► until the Installation menu is required. *Set Floor Rear after you turn the projector on . 70cm 2. Press ▲/▼ to mount your equipment. 1. Note that a special rear projection screen and the BenQ Projector Ceiling Mount Kit are required for quick setup and portability. 3. Take into consideration the size and position of your screen, the location of a suitable power outlet, as well as the location...
... Projection mode and press ◄/► until the Installation menu is required. *Set Floor Rear after you turn the projector on . 70cm 2. Press ▲/▼ to mount your equipment. 1. Note that a special rear projection screen and the BenQ Projector Ceiling Mount Kit are required for quick setup and portability. 3. Take into consideration the size and position of your screen, the location of a suitable power outlet, as well as the location...
User Manual
Page 26
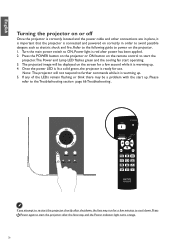
... the projector is warming up . Note: The projector will be a problem with the start operating. 3. Press the POWER button on the projector or ON button on the remote control to start the projector.The Power and Lamp LED flashes green and the cooling fan start up . 5. If you attempt to re-start the projector after the fans stop and the Power indicator light turns orange. 26 Please refer to power on the projector. 1. If any of the LEDs remain flashing or blink there...
... the projector is warming up . Note: The projector will be a problem with the start operating. 3. Press the POWER button on the projector or ON button on the remote control to start the projector.The Power and Lamp LED flashes green and the cooling fan start up . 5. If you attempt to re-start the projector after the fans stop and the Power indicator light turns orange. 26 Please refer to power on the projector. 1. If any of the LEDs remain flashing or blink there...
User Manual
Page 32
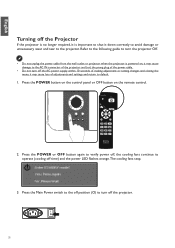
... correctly to avoid damage or unnecessary wear and tear to default. 1. English Turning off the Projector If the projector is no longer required, it is powered on the remote control. 2. Press the POWER or OFF button again to verify power off, the cooling fans continue to turn off time) and the power LED flashes orange.The cooling fans stop. 3. Refer to the following guide to operate (cooling-off the projector. 32
... correctly to avoid damage or unnecessary wear and tear to default. 1. English Turning off the Projector If the projector is no longer required, it is powered on the remote control. 2. Press the POWER or OFF button again to verify power off, the cooling fans continue to turn off time) and the power LED flashes orange.The cooling fans stop. 3. Refer to the following guide to operate (cooling-off the projector. 32

User Manual
Page 35
..., Italiano, Svenska, Português, Lamp Control Normal, Eco Lamp Mode Both, Lamp 1 only, Lamp 2 only, Auto Projection Mode Front, Rear, Ceiling+Front, Ceiling+Rear Fan Mode Normal, High, Up/Down Test Pattern None, RGB Ramps, Color Bars, Step Bars, Checkboard, Grid, Horizontal Lines, Vertical Lines, Diagonal Lines, Horizontal Ramp,Vertical Ramp,White Advance Setting Keystone Image Resizing Filter Message Off/100H/200H/500H/1000H LAN/RS232C LAN, RS232C Network Link Connected Disconnected DHCP Client On...
..., Italiano, Svenska, Português, Lamp Control Normal, Eco Lamp Mode Both, Lamp 1 only, Lamp 2 only, Auto Projection Mode Front, Rear, Ceiling+Front, Ceiling+Rear Fan Mode Normal, High, Up/Down Test Pattern None, RGB Ramps, Color Bars, Step Bars, Checkboard, Grid, Horizontal Lines, Vertical Lines, Diagonal Lines, Horizontal Ramp,Vertical Ramp,White Advance Setting Keystone Image Resizing Filter Message Off/100H/200H/500H/1000H LAN/RS232C LAN, RS232C Network Link Connected Disconnected DHCP Client On...

User Manual
Page 36
... a new color-processing algorithm and system level enhancements to set of preset values using ◄ or ► to the projected image. English Picture The pre-defined picture mode settings can be selected if picture mode is most suitable for viewing photos taken with an sRGB compatible and properly calibrated camera, and for more vibrant colors in the Picture menu such as picture mode, brightness, color temperature...etc.. Standard: For standard image.
... a new color-processing algorithm and system level enhancements to set of preset values using ◄ or ► to the projected image. English Picture The pre-defined picture mode settings can be selected if picture mode is most suitable for viewing photos taken with an sRGB compatible and properly calibrated camera, and for more vibrant colors in the Picture menu such as picture mode, brightness, color temperature...etc.. Standard: For standard image.

User Manual
Page 40
.... 4:3 Standard TV screen (4:3), proportionally four units wide for every three units high, no matter the size of the input signal automatically. Auto Sync may take some time to optimize the image automatically when the projector is switched or connected from a computer. Auto Recognize the input signal resolution automatically. Vertical Position Move the Image to recognize the resolution of the screen. When the optimum image can not be achieved, please use manual adjustment. 40
.... 4:3 Standard TV screen (4:3), proportionally four units wide for every three units high, no matter the size of the input signal automatically. Auto Sync may take some time to optimize the image automatically when the projector is switched or connected from a computer. Auto Recognize the input signal resolution automatically. Vertical Position Move the Image to recognize the resolution of the screen. When the optimum image can not be achieved, please use manual adjustment. 40
User Manual
Page 43
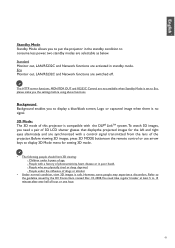
... viewing 3D images, press 3D MODE buttonson the remote control or use arrow keys to display 3D Mode menu for the left and right eyes alternately and are selectable as below. Background Background enables you to display a blue/black screen, Logo or captured image when there is no signal. 3D Mode: The 3D mode of hour or one hour. 43 English Standby Mode Standby Mode allows you to put the projector in the standby...
... viewing 3D images, press 3D MODE buttonson the remote control or use arrow keys to display 3D Mode menu for the left and right eyes alternately and are selectable as below. Background Background enables you to display a blue/black screen, Logo or captured image when there is no signal. 3D Mode: The 3D mode of hour or one hour. 43 English Standby Mode Standby Mode allows you to put the projector in the standby...

User Manual
Page 47
Source Status - Lamp life Warning 47 English Wall Color This function allows you to hide the message. - Whiteboard: Image is pressed. - Clean the Filter - Digital Zoom Press arrow key ◄ to reduce the image size or arrow key ► magnify the image on the projected image, Select On to display the message, Off to turn off below message on projection screen. Messaging The function allows you to project the image to a whiteboard. Message of entering standby mode when STANDBY button or Power button is...
Source Status - Lamp life Warning 47 English Wall Color This function allows you to hide the message. - Whiteboard: Image is pressed. - Clean the Filter - Digital Zoom Press arrow key ◄ to reduce the image size or arrow key ► magnify the image on the projected image, Select On to display the message, Off to turn off below message on projection screen. Messaging The function allows you to project the image to a whiteboard. Message of entering standby mode when STANDBY button or Power button is...
User Manual
Page 59
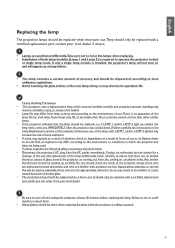
... lamp. Additionally, check carefully to operate the projector in the Lamp Replacement section of this manual.) Continuous use of the lamp with a new one should check the inside of use as a lamp failure. • The lamp contains a certain amount of mercury and should be replaced, i.e., if LAMP 1 and/or LAMP 2 light up carefully. Any broken shards found should be replaced when it burns out. TLamp Handling Precautions • This projector uses a high-pressure lamp...
... lamp. Additionally, check carefully to operate the projector in the Lamp Replacement section of this manual.) Continuous use of the lamp with a new one should check the inside of use as a lamp failure. • The lamp contains a certain amount of mercury and should be replaced, i.e., if LAMP 1 and/or LAMP 2 light up carefully. Any broken shards found should be replaced when it burns out. TLamp Handling Precautions • This projector uses a high-pressure lamp...

User Manual
Page 62
... additional sixsegment color wheel is optional. Remove the screws on the four-segment color wheel. 2. Wait until the lamp house and the color wheel cool off. 1.Turn the power off and disconnect the projector from the power outlet.Turn off all connected equipment and disconnect all other cables. 3. English Installing the Optional Color Wheel The projector comes with a four-segment color wheel installed. To replace the color wheel (located under the lamp cover adjacent to lamp 1) refer to the following guide.
... additional sixsegment color wheel is optional. Remove the screws on the four-segment color wheel. 2. Wait until the lamp house and the color wheel cool off. 1.Turn the power off and disconnect the projector from the power outlet.Turn off all connected equipment and disconnect all other cables. 3. English Installing the Optional Color Wheel The projector comes with a four-segment color wheel installed. To replace the color wheel (located under the lamp cover adjacent to lamp 1) refer to the following guide.

User Manual
Page 66
English Troubleshooting Indicator Messages Several indicator messages are used by the projector to Eco and is warming up LED INDICATOR Warning indicator LED STATUS Red blinks Red blinks 2 times Orange blinks POSSIBLE CAUSE The lamp cover is open. The internal temperature is set to Normal Lamp indicator Orange on the top surface of the projector show the status of the WARNING and lamp 1/2 as well as the general working order of the 4 LEDs. LED INDICATOR LED STATUS PROJECTOR STATUS Off AC off Red on Standby Power Indicator Green on Power on Orange blinks Projector is ...
English Troubleshooting Indicator Messages Several indicator messages are used by the projector to Eco and is warming up LED INDICATOR Warning indicator LED STATUS Red blinks Red blinks 2 times Orange blinks POSSIBLE CAUSE The lamp cover is open. The internal temperature is set to Normal Lamp indicator Orange on the top surface of the projector show the status of the WARNING and lamp 1/2 as well as the general working order of the 4 LEDs. LED INDICATOR LED STATUS PROJECTOR STATUS Off AC off Red on Standby Power Indicator Green on Power on Orange blinks Projector is ...

User Manual
Page 67
.... Check the following before proceeding to the problem-specific solutions. • Use some other electrical device to service personnel. 67 Keep a record of the steps you may encounter while using the projector. Red blinks 2 times (Repeatedly) The lamp does not illuminate ‧ The lamp is shut down abnormally. ‧ The lamp is burnt out ‧ Lamp circuit failure Contact with problems you take when troubleshooting: The information may help you replace...
.... Check the following before proceeding to the problem-specific solutions. • Use some other electrical device to service personnel. 67 Keep a record of the steps you may encounter while using the projector. Red blinks 2 times (Repeatedly) The lamp does not illuminate ‧ The lamp is shut down abnormally. ‧ The lamp is burnt out ‧ Lamp circuit failure Contact with problems you take when troubleshooting: The information may help you replace...

User Manual
Page 68
... a connected PC's video card, connect to another electrical device. 3. Ensure the power source is not caused by testing with no light from the projector 1. Remove the lens cap. 7. Adjust the Focus on the remote control or projector. 4. Problem:The image is reversed or upside down Check the Ceiling & Rear setting on the Setting menu of the OSD to turn off . Lamp Problems Problem:There is clean. 6. If you have the projector serviced. Verify the settings on the screen 1. Check that the projector lens is...
... a connected PC's video card, connect to another electrical device. 3. Ensure the power source is not caused by testing with no light from the projector 1. Remove the lens cap. 7. Adjust the Focus on the remote control or projector. 4. Problem:The image is reversed or upside down Check the Ceiling & Rear setting on the Setting menu of the OSD to turn off . Lamp Problems Problem:There is clean. 6. If you have the projector serviced. Verify the settings on the screen 1. Check that the projector lens is...

User Manual
Page 69
... the remote control code conforms to the projector's code. 9. Check the battery polarity. 5. Ensure that the reset switch in the room. 4. Replace the batteries. 6. Turn off other Infrared-enabled devices in the vicinity. 7. Have the remote control serviced. 8. Ensure the path between remote and sensor is set to the remote control 1. Turn off any fluorescent lights in the compartment lid on the projector. 2. English Remote Control Problems Problem:The projector does not respond to use position...
... the remote control code conforms to the projector's code. 9. Check the battery polarity. 5. Ensure that the reset switch in the room. 4. Replace the batteries. 6. Turn off other Infrared-enabled devices in the vicinity. 7. Have the remote control serviced. 8. Ensure the path between remote and sensor is set to the remote control 1. Turn off any fluorescent lights in the compartment lid on the projector. 2. English Remote Control Problems Problem:The projector does not respond to use position...
User Manual
Page 70
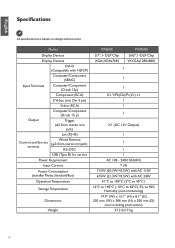
... Computer/Component (D-sub 15p) Component (RCA) S-Video (min Din 4 pin) Video (RCA) Output Computer/Component (D-sub 15 p) Trigger (φ3.5mm stereo min jack) Lan (RJ-45) Wired Remote Control and Service terminal (φ3.5mm stereo minjack) RS-232C USB (Type B) for service Power Requirement Input Current Power Consumption (standby Mode: Standard/Eco) Operation Temperature Storage Temperature Dimensions Weight PX9600 0.7",1- DLP Chip XGA(1024x768) PW9500 0.65",1-DLP Chip WXGA(1280x800) 1 1 1 X1,Y/Pb(Cb...
... Computer/Component (D-sub 15p) Component (RCA) S-Video (min Din 4 pin) Video (RCA) Output Computer/Component (D-sub 15 p) Trigger (φ3.5mm stereo min jack) Lan (RJ-45) Wired Remote Control and Service terminal (φ3.5mm stereo minjack) RS-232C USB (Type B) for service Power Requirement Input Current Power Consumption (standby Mode: Standard/Eco) Operation Temperature Storage Temperature Dimensions Weight PX9600 0.7",1- DLP Chip XGA(1024x768) PW9500 0.65",1-DLP Chip WXGA(1280x800) 1 1 1 X1,Y/Pb(Cb...

