

BenQ US PRJ 1 Year Warranty
Page 1
... the Product becomes defective during the warranty period subject to process the replacement. Lamp Warranty: Lamp is not responsible for lamps as specified below , BenQ America Corp. ("BenQ") warrants the BenQ Digital Projector ("Product") you are entitled to BenQ or a BenQ Authorized Service Provider and BenQ will cover the freight charges both ways. Obtaining Depot Warranty Service If you...
... the Product becomes defective during the warranty period subject to process the replacement. Lamp Warranty: Lamp is not responsible for lamps as specified below , BenQ America Corp. ("BenQ") warrants the BenQ Digital Projector ("Product") you are entitled to BenQ or a BenQ Authorized Service Provider and BenQ will cover the freight charges both ways. Obtaining Depot Warranty Service If you...

- For the purchase before May 01, 2010
Page 1
... the purchase date by the original retail purchaser (the "Customer") (except for lamps as specified below and refurbished units which have purchased from BenQ e-store or from a BenQ authorized reseller/retailer in materials or workmanship under normal consumer use new or reconditioned ...components or parts to process the replacement. Lamp Warranty: Lamp is not responsible for the remainder of the ...
... the purchase date by the original retail purchaser (the "Customer") (except for lamps as specified below and refurbished units which have purchased from BenQ e-store or from a BenQ authorized reseller/retailer in materials or workmanship under normal consumer use new or reconditioned ...components or parts to process the replacement. Lamp Warranty: Lamp is not responsible for the remainder of the ...
User Manual
Page 2
... 41 2 Table of contents Personalizing the projector menu display 41 Shutting down the projector 42 Menu operation 43 Maintenance 51 Care of the projector 51 Lamp information 52 Troubleshooting 58 Specifications 59 Warranty and Copyright information 64 Regulation statements ......65
... 41 2 Table of contents Personalizing the projector menu display 41 Shutting down the projector 42 Menu operation 43 Maintenance 51 Care of the projector 51 Lamp information 52 Troubleshooting 58 Specifications 59 Warranty and Copyright information 64 Regulation statements ......65

User Manual
Page 3
... occur. Important safety instructions 3 Save it is important that you may damage your projector through a power stabilizer, surge protector or uninterruptible power supply (UPS). 3. projector lamp is designed and tested to operate safely within a light beam may sense some countries, the line voltage is a normal phenomenon and not a product defect. Do...
... occur. Important safety instructions 3 Save it is important that you may damage your projector through a power stabilizer, surge protector or uninterruptible power supply (UPS). 3. projector lamp is designed and tested to operate safely within a light beam may sense some countries, the line voltage is a normal phenomenon and not a product defect. Do...
User Manual
Page 4
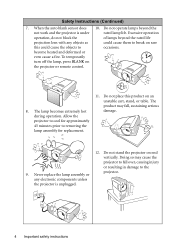
.... Do not place this could cause the objects to the 9. during operation. Excessive operation operation, do not block the of lamps beyond the not work and the projector is unplugged. 4 Important safety instructions Doing so may fall over, causing injury or resulting in... damage to occasions. any objects as could cause them to removing the lamp assembly for replacement. 12. When the auto blank sensor does 10. To temporarily turn off the lamp, press BLANK on end vertically. Safety Instructions (Continued) 7. Allow the projector to cool for...
.... Do not place this could cause the objects to the 9. during operation. Excessive operation operation, do not block the of lamps beyond the not work and the projector is unplugged. 4 Important safety instructions Doing so may fall over, causing injury or resulting in... damage to occasions. any objects as could cause them to removing the lamp assembly for replacement. 12. When the auto blank sensor does 10. To temporarily turn off the lamp, press BLANK on end vertically. Safety Instructions (Continued) 7. Allow the projector to cool for...

User Manual
Page 5
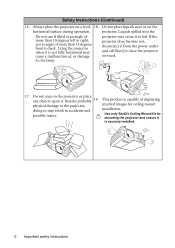
... circumstances should come into contact with all windows rolled up. - Do not block the ventilation holes. - Do not place this 15. Space that is the lamp which may contaminate optical components, shorten the projector's life span and darken the image. 14. Allow at least 50 cm clearance from walls and free...
... circumstances should come into contact with all windows rolled up. - Do not block the ventilation holes. - Do not place this 15. Space that is the lamp which may contaminate optical components, shorten the projector's life span and darken the image. 14. Allow at least 50 cm clearance from walls and free...
User Manual
Page 6
... instructions Besides probable 19. projector. Safety Instructions (Continued) 16. Use only BenQ's Ceiling Mount Kit for ceiling mount doing so may cause a malfunction of displaying physical damage to , the lamp. Using the projector when it from the power outlet and call BenQ to back. Liquids spilled into the - Do not place liquids near...
... instructions Besides probable 19. projector. Safety Instructions (Continued) 16. Use only BenQ's Ceiling Mount Kit for ceiling mount doing so may cause a malfunction of displaying physical damage to , the lamp. Using the projector when it from the power outlet and call BenQ to back. Liquids spilled into the - Do not place liquids near...
User Manual
Page 7
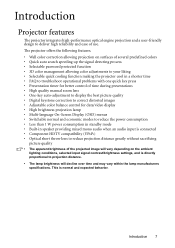
...quality • Digital keystone correction to correct distorted images • Adjustable color balance control for data/video display • High brightness projection lamp • Multi-language On-Screen Display (OSD) menus • Switchable normal and economic modes to reduce the power consumption • Less...connected • Component HDTV compatibility (YPbPr) • Optical short throw lens to projection distance. • The lamp brightness will decline over time and may vary within the lamp manufacturers specifications. Introduction 7 This is normal and expected behavior.
...quality • Digital keystone correction to correct distorted images • Adjustable color balance control for data/video display • High brightness projection lamp • Multi-language On-Screen Display (OSD) menus • Switchable normal and economic modes to reduce the power consumption • Less...connected • Component HDTV compatibility (YPbPr) • Optical short throw lens to projection distance. • The lamp brightness will decline over time and may vary within the lamp manufacturers specifications. Introduction 7 This is normal and expected behavior.
User Manual
Page 8
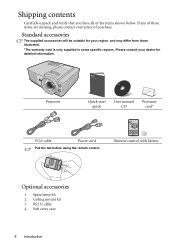
... using the remote control. RS232 cable 4. Please consult your dealer for your place of the items shown below. Remote control with battery Optional accessories 1. Spare lamp kit 2. Shipping contents Carefully unpack and verify that you have all of purchase. Standard accessories The supplied accessories will be suitable for detailed information. If...
... using the remote control. RS232 cable 4. Please consult your dealer for your place of the items shown below. Remote control with battery Optional accessories 1. Spare lamp kit 2. Shipping contents Carefully unpack and verify that you have all of purchase. Standard accessories The supplied accessories will be suitable for detailed information. If...
User Manual
Page 9
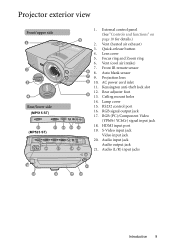
Vent (cool air intake) 7. Auto blank sensor 9. Rear adjuster foot 13. Lamp cover 15. RGB (PC)/Component Video (YPbPr/ YCbCr) signal input jack 18. Audio (L/R) input jacks 10 13 12 3 14 13 Introduction 9 Focus ring and Zoom .... External control panel (See "Controls and functions" on page 10 for details.) 2. Lens cover 5. Projector exterior view Front/upper side 1 2 PUSH 3 4 Rear/lower side (MP515 ST) 15 (MP525 ST) 17 18 15 16 17 5 6 7 8 9 19 21 19 20 11 1. Vent (heated air exhaust) 3. Quick-release button 4. RS232 control port 16. RGB signal output...
Vent (cool air intake) 7. Auto blank sensor 9. Rear adjuster foot 13. Lamp cover 15. RGB (PC)/Component Video (YPbPr/ YCbCr) signal input jack 18. Audio (L/R) input jacks 10 13 12 3 14 13 Introduction 9 Focus ring and Zoom .... External control panel (See "Controls and functions" on page 10 for details.) 2. Lens cover 5. Projector exterior view Front/upper side 1 2 PUSH 3 4 Rear/lower side (MP515 ST) 15 (MP525 ST) 17 18 15 16 17 5 6 7 8 9 19 21 19 20 11 1. Vent (heated air exhaust) 3. Quick-release button 4. RS232 control port 16. RGB signal output...
User Manual
Page 10
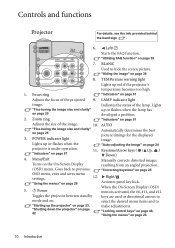
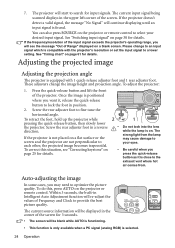
...lock. 5. select the desired menu items and to hide the screen picture. 5 12 "Hiding the image" on page 57 Adjusts the focus of the lamp. Left/ 2 8 Starts the FAQ function. 3 9 "Utilizing FAQ function" on the On-Screen Display resulting from an angled projection. (OSD) menu...and #12 Toggles the projector between standby keys are used as directional arrows to previous "Correcting keystone" on . Lights up or flashes when the lamp has developed a problem. II Power When the On-Screen Display (OSD) menu is under operation. "Indicators" on page 26 12. "Using ...
...lock. 5. select the desired menu items and to hide the screen picture. 5 12 "Hiding the image" on page 57 Adjusts the focus of the lamp. Left/ 2 8 Starts the FAQ function. 3 9 "Utilizing FAQ function" on the On-Screen Display resulting from an angled projection. (OSD) menu...and #12 Toggles the projector between standby keys are used as directional arrows to previous "Correcting keystone" on . Lights up or flashes when the lamp has developed a problem. II Power When the On-Screen Display (OSD) menu is under operation. "Indicators" on page 26 12. "Using ...
User Manual
Page 23
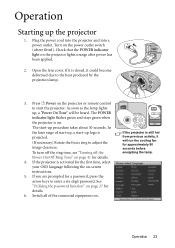
... fitted). If it is activated for the first time, select your OSD language following the on page 41 for approximately 90 seconds before energizing the lamp. In the later stage of the connected equipment on the projector or remote control to the heat produced by the projection... the projector is closed, it will be heard. If you are prompted for details. 6. As soon as the lamp lights up the projector 1. Plug the power cord into the projector and into a power outlet. The start the projector. To turn off the ring tone, ...
... fitted). If it is activated for the first time, select your OSD language following the on page 41 for approximately 90 seconds before energizing the lamp. In the later stage of the connected equipment on the projector or remote control to the heat produced by the projection... the projector is closed, it will be heard. If you are prompted for details. 6. As soon as the lamp lights up the projector 1. Plug the power cord into the projector and into a power outlet. The start the projector. To turn off the ring tone, ...
User Manual
Page 24
... is close to provide the best picture quality. The projector will be displayed in a reverse • Do not look into the lens direction. while the lamp is selected. 24 Operation If the projector doesn't detect a valid signal, the message "No Signal" will be blank while AUTO is functioning. •...release button to lock the foot in the upper left corner of Frequency and Clock to the exhaust vent where hot air comes from the lamp If the projector is not placed on page 61 for details. The current input signal being scanned displays in position. 2. The current source...
... is close to provide the best picture quality. The projector will be displayed in a reverse • Do not look into the lens direction. while the lamp is selected. 24 Operation If the projector doesn't detect a valid signal, the message "No Signal" will be blank while AUTO is functioning. •...release button to lock the foot in the upper left corner of Frequency and Clock to the exhaust vent where hot air comes from the lamp If the projector is not placed on page 61 for details. The current input signal being scanned displays in position. 2. The current source...
User Manual
Page 38
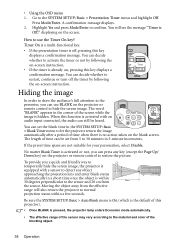
...-functional key. • If the presentation timer is off the timer by following the on , pressing this projector). • Once BLANK is pressed, the projector lamp enters Economic mode automatically. • The effective range of the sensor may vary according to let the projector return the image automatically after a period of...
...-functional key. • If the presentation timer is off the timer by following the on , pressing this projector). • Once BLANK is pressed, the projector lamp enters Economic mode automatically. • The effective range of the sensor may vary according to let the projector return the image automatically after a period of...

User Manual
Page 42
... II Power again to start the projector, the fans will continue to run for approximately 90 seconds to cool down , to protect the lamp, when you don't respond in a few minutes to any commands during the cooling process. The POWER indicator light flashes orange, the projection...for details. • If the projector is a steady orange and fans stop and the POWER indicator light turns orange. 42 Operation To protect the lamp, the projector will display prompting you can also activate the Quick cooling function. To shorten the cooling time, you . Press II Power and a ...
... II Power again to start the projector, the fans will continue to run for approximately 90 seconds to cool down , to protect the lamp, when you don't respond in a few minutes to any commands during the cooling process. The POWER indicator light flashes orange, the projection...for details. • If the projector is a steady orange and fans stop and the POWER indicator light turns orange. 42 Operation To protect the lamp, the projector will display prompting you can also activate the Quick cooling function. To shorten the cooling time, you . Press II Power and a ...
User Manual
Page 44
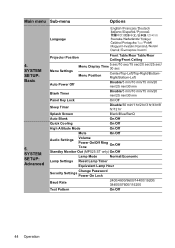
.../12 hr Splash Screen Black/Blue/BenQ Auto Blank On/Off Quick Cooling On/Off High Altitude Mode On/Off Mute On/Off Audio Settings Volume Power On/Off Ring Tone On/Off Standby Monitor Out (MP525 ST only) On/Off Lamp Mode Normal/Economic Lamp Settings Reset Lamp Timer Equivalent Lamp Hour Change Password Security Settings...
.../12 hr Splash Screen Black/Blue/BenQ Auto Blank On/Off Quick Cooling On/Off High Altitude Mode On/Off Mute On/Off Audio Settings Volume Power On/Off Ring Tone On/Off Standby Monitor Out (MP525 ST only) On/Off Lamp Mode Normal/Economic Lamp Settings Reset Lamp Timer Equivalent Lamp Hour Change Password Security Settings...

User Manual
Page 45
... Options 5. INFORMATION FAQ-Image and Installation FAQ-Features and Service Current System Status • Source • Picture Mode • Resolution • Color System • Equivalent Lamp Hour • Firmware Version Note that the menu items are available when the projector detects at least one valid signal. SYSTEM SETUP: Advanced Closed Caption...
... Options 5. INFORMATION FAQ-Image and Installation FAQ-Features and Service Current System Status • Source • Picture Mode • Resolution • Color System • Equivalent Lamp Hour • Firmware Version Note that the menu items are available when the projector detects at least one valid signal. SYSTEM SETUP: Advanced Closed Caption...
User Manual
Page 49
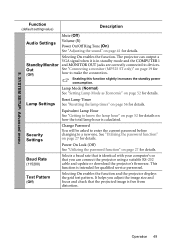
... to make the connection. This function is free from distortion. Operation 49 Out See "Connecting a monitor (MP525 ST only)" on page 19 for details on how the total lamp hour is in standby mode and the COMPUTER 1 Standby Monitor and MONITOR OUT jacks are correctly connected to ... to devices. The projector can connect the projector using a suitable RS-232 cable and update or download the projector's firmware. Lamp Mode (Normal) See "Setting Lamp Mode as Economic" on page 27 for details. Test Pattern (Off) Selecting On enables the function and the projector displays the...
... to make the connection. This function is free from distortion. Operation 49 Out See "Connecting a monitor (MP525 ST only)" on page 19 for details on how the total lamp hour is in standby mode and the COMPUTER 1 Standby Monitor and MONITOR OUT jacks are correctly connected to ... to devices. The projector can connect the projector using a suitable RS-232 cable and update or download the projector's firmware. Lamp Mode (Normal) See "Setting Lamp Mode as Economic" on page 27 for details. Test Pattern (Off) Selecting On enables the function and the projector displays the...
User Manual
Page 50
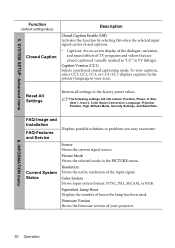
... Reset All Settings Returns all settings to problems you may encounter. Current System Status Resolution Shows the native resolution of hours the lamp has been used. Source Shows the current signal source. Color System Shows input system format: NTSC, PAL, SECAM, or RGB....CC4 (CC1 displays captions in the primary language in the PICTURE menu. The following settings will still remain: Position, Phase, H. Equivalent Lamp Hour Displays the number of the input signal. SYSTEM SETUP: Advanced menu Function (default setting/value) Closed Caption Description Closed Caption Enable ...
... Reset All Settings Returns all settings to problems you may encounter. Current System Status Resolution Shows the native resolution of hours the lamp has been used. Source Shows the current signal source. Color System Shows input system format: NTSC, PAL, SECAM, or RGB....CC4 (CC1 displays captions in the primary language in the PICTURE menu. The following settings will still remain: Position, Phase, H. Equivalent Lamp Hour Displays the number of the input signal. SYSTEM SETUP: Advanced menu Function (default setting/value) Closed Caption Description Closed Caption Enable ...

User Manual
Page 51
... the projector surface and cabinet material. Never use any parts of the projector Your projector needs little maintenance. Maintenance Care of the projector except the lamp. Storing the projector If you clean the case, turn the projector off using the proper shutdown procedure as alcohol, benzene, thinner or insecticide.
... the projector surface and cabinet material. Never use any parts of the projector Your projector needs little maintenance. Maintenance Care of the projector except the lamp. Storing the projector If you clean the case, turn the projector off using the proper shutdown procedure as alcohol, benzene, thinner or insecticide.

