GL Series User Manual
Page 1
LCD Monitor User Manual GL950A / GL950AM G950A / G950AM GL951A / GL951AM / G951A G955A GL2055A / GL2055 / GL2055M GL2250 / GL2250M / GL2250HM / GL2250TM G2250 / G2250HM G2255A / G2255 G2251M / G2251TM GL2450 / GL2450M / GL2450HM G2450 / G2450HM GL2750HM / G2750 / G2750HM
LCD Monitor User Manual GL950A / GL950AM G950A / G950AM GL951A / GL951AM / G951A G955A GL2055A / GL2055 / GL2055M GL2250 / GL2250M / GL2250HM / GL2250TM G2250 / G2250HM G2255A / G2255 G2251M / G2251TM GL2450 / GL2450M / GL2450HM G2450 / G2450HM GL2750HM / G2750 / G2750HM

GL Series User Manual
Page 2
...dangerous voltages or other accident such as opening or removing covers may be reproduced, transmitted, transcribed, stored in any form or by BenQ Corporation. Clean the LCD monitor surface with respect to H03VV-F or H05VV-F, 2G or 3G, 0.75mm2 must not be operated ...or fitness for any of such revision or changes. Avoid using any means, electronic, mechanical, magnetic, optical, chemical, manual or otherwise, without obligation of BenQ Corporation to revise this product yourself, as dropping or mishandling occurs, contact qualified service personnel for your monitor from the ...
...dangerous voltages or other accident such as opening or removing covers may be reproduced, transmitted, transcribed, stored in any form or by BenQ Corporation. Clean the LCD monitor surface with respect to H03VV-F or H05VV-F, 2G or 3G, 0.75mm2 must not be operated ...or fitness for any of such revision or changes. Avoid using any means, electronic, mechanical, magnetic, optical, chemical, manual or otherwise, without obligation of BenQ Corporation to revise this product yourself, as dropping or mishandling occurs, contact qualified service personnel for your monitor from the ...

GL Series User Manual
Page 14
... as instructed in the future, please keep the monitor base, monitor stand, and screws somewhere safe for future use your monitor hardware Follow the instruction manuals of the wall mount bracket you intend to use . 2. Before starting to detach the base on page 13. Lay the screen face down on the...
... as instructed in the future, please keep the monitor base, monitor stand, and screws somewhere safe for future use your monitor hardware Follow the instruction manuals of the wall mount bracket you intend to use . 2. Before starting to detach the base on page 13. Lay the screen face down on the...
GL Series User Manual
Page 18
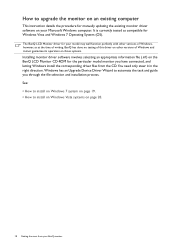
.... It is currently tested as at the time of writing, BenQ has done no testing of this driver on other versions of Windows, however, as compatible for manually updating the existing monitor driver software on the BenQ LCD Monitor CD-ROM for the particular model monitor you through ...the file selection and installation process. The BenQ LCD Monitor driver for your model may well function perfectly ...
.... It is currently tested as at the time of writing, BenQ has done no testing of this driver on other versions of Windows, however, as compatible for manually updating the existing monitor driver software on the BenQ LCD Monitor CD-ROM for the particular model monitor you through ...the file selection and installation process. The BenQ LCD Monitor driver for your model may well function perfectly ...
GL Series User Manual
Page 21
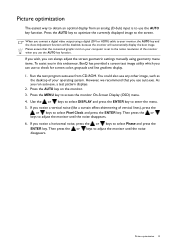
...screen. Press the AUTO key on your computer is to use the AUTO key function. If you can always adjust the screen geometric settings manually using a digital (DVI or HDMI) cable to your operating system. Press the AUTO key to optimize the currently displayed image to adjust the...Phase and press the ENTER key. Please ensure that you connect a digital video output using geometry menu items. To assist you in this endeavour, BenQ has provided a screen test image utility which you notice a vertical noise (like a curtain effect-shimmering of vertical lines), press the or keys to...
...screen. Press the AUTO key on your computer is to use the AUTO key function. If you can always adjust the screen geometric settings manually using a digital (DVI or HDMI) cable to your operating system. Press the AUTO key to optimize the currently displayed image to adjust the...Phase and press the ENTER key. Please ensure that you connect a digital video output using geometry menu items. To assist you in this endeavour, BenQ has provided a screen test image utility which you notice a vertical noise (like a curtain effect-shimmering of vertical lines), press the or keys to...
GL Series User Manual
Page 31
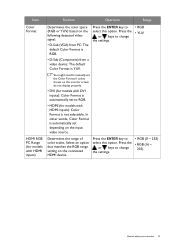
... (for models with HDMI inputs): Color Format is YUV. Press the or keys to change the settings. • RGB • YUV You might need to manually set to adjust your monitor 31 Select an option that matches the RGB range setting on the following detected video signal: • D-Sub (VGA) from...
... (for models with HDMI inputs): Color Format is YUV. Press the or keys to change the settings. • RGB • YUV You might need to manually set to adjust your monitor 31 Select an option that matches the RGB range setting on the following detected video signal: • D-Sub (VGA) from...

GL Series User Manual
Page 43
... the screws that the wall material is recommended to avoid of the wall mount bracket you intend to the monitor.The use . 3. Follow the instruction manuals of losing the screws. Detach the monitor base as instructed in How to detach the base on the stand in the future, please keep the...
... the screws that the wall material is recommended to avoid of the wall mount bracket you intend to the monitor.The use . 3. Follow the instruction manuals of losing the screws. Detach the monitor base as instructed in How to detach the base on the stand in the future, please keep the...
GL Series User Manual
Page 45
...• Remove your place of input sources, you may appear distorted or stretched on the external speakers. If your problems remain after checking this manual, please contact your headphone and/or external speakers. (If they are connected to the monitor, the built-in the "OSD Lock" submenu from...instructions. You are USB-powered, check whether the USB connection is properly connected. • If the external speakers are running at : Support@BenQ.com. The image is active. If the LED is illuminated in orange, the power management mode is displaced in orange? Is the prompt ...
...• Remove your place of input sources, you may appear distorted or stretched on the external speakers. If your problems remain after checking this manual, please contact your headphone and/or external speakers. (If they are connected to the monitor, the built-in the "OSD Lock" submenu from...instructions. You are USB-powered, check whether the USB connection is properly connected. • If the external speakers are running at : Support@BenQ.com. The image is active. If the LED is illuminated in orange, the power management mode is displaced in orange? Is the prompt ...


