
Safety Warning and Notice
Page 1
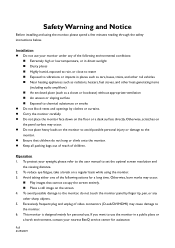
...to water Exposed to vibrations or impacts in a public place or a harsh environment, contact your eyesight, please refer to the user manual to chemical substances or smoke Do not block vents and openings by clothes or curtains. Carry the monitor carefully. ... a few minutes reading through the safety instructions below. Safety Warning and Notice Before installing and using the monitor. 3. To protect your nearest BenQ service center for assistance. To reduce eye fatigue, take a break on the screen. 4. Operation 1. If you want to the monitor, do...
...to water Exposed to vibrations or impacts in a public place or a harsh environment, contact your eyesight, please refer to the user manual to chemical substances or smoke Do not block vents and openings by clothes or curtains. Carry the monitor carefully. ... a few minutes reading through the safety instructions below. Safety Warning and Notice Before installing and using the monitor. 3. To protect your nearest BenQ service center for assistance. To reduce eye fatigue, take a break on the screen. 4. Operation 1. If you want to the monitor, do...
Resolution file
Page 1
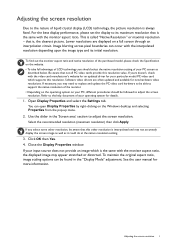
... appear stretched or distorted. Be aware that this other resolution, be found in the 'Screen area' section to adjust the screen resolution. See the user manual for new hardware video resolutions. Adjusting the screen resolution 1 Lower resolutions are often updated and available for more information. Close the Display Properties window. Image...
... appear stretched or distorted. Be aware that this other resolution, be found in the 'Screen area' section to adjust the screen resolution. See the user manual for new hardware video resolutions. Adjusting the screen resolution 1 Lower resolutions are often updated and available for more information. Close the Display Properties window. Image...
Resolution file
Page 4
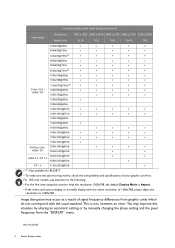
... modes For 18.5-inch models, pay attention to the following: • For the first time using this situation by altering an automatic setting or by manually changing the phase setting and the pixel frequency from graphic cards which do not correspond with the resolution 1360x768, the default Display Mode is not...
... modes For 18.5-inch models, pay attention to the following: • For the first time using this situation by altering an automatic setting or by manually changing the phase setting and the pixel frequency from graphic cards which do not correspond with the resolution 1360x768, the default Display Mode is not...

User Manual
Page 1
LCD Monitor User Manual Business Monitor | BL Series
LCD Monitor User Manual Business Monitor | BL Series

User Manual
Page 2
...to ensure that consumers make changes from time to time in any warranties, merchantability or fitness for flicker-free models only.) BenQ ecoFACTS BenQ has been dedicated to the design and development of greener product as poor cable quality, unstable power supply, signal interference, ...achieve a low-carbon society. Copyright Copyright © 2020 by any means, electronic, mechanical, magnetic, optical, chemical, manual or otherwise, without obligation of BenQ Corporation to notify any person of such revision or changes. The performance of flicker-free may be affected by external ...
...to ensure that consumers make changes from time to time in any warranties, merchantability or fitness for flicker-free models only.) BenQ ecoFACTS BenQ has been dedicated to the design and development of greener product as poor cable quality, unstable power supply, signal interference, ...achieve a low-carbon society. Copyright Copyright © 2020 by any means, electronic, mechanical, magnetic, optical, chemical, manual or otherwise, without obligation of BenQ Corporation to notify any person of such revision or changes. The performance of flicker-free may be affected by external ...
User Manual
Page 3
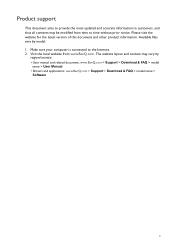
Available files vary by region/country. • User manual and related document: www.BenQ.com > Support > Download & FAQ > model name > User Manual • Drivers and applications: www.BenQ.com > Support > Download & FAQ > model name > Software 3 Visit the local website from time to time ...without prior notice. The website layout and content may be modified from www.BenQ.com. Product support This document aims...
Available files vary by region/country. • User manual and related document: www.BenQ.com > Support > Download & FAQ > model name > User Manual • Drivers and applications: www.BenQ.com > Support > Download & FAQ > model name > Software 3 Visit the local website from time to time ...without prior notice. The website layout and content may be modified from www.BenQ.com. Product support This document aims...

User Manual
Page 30
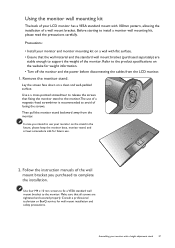
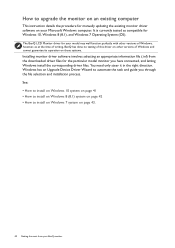
Use four M4 x 10 mm screws to fix a VESA standard wall mount bracket to assemble your monitor hardware Consult a professional technician or BenQ service for wall mount installation and safety precautions. 30 How to the monitor. Make sure that all screws are tightened and secured properly. 2. Follow the instruction manuals of the wall mount bracket you purchased to complete the installation.
Use four M4 x 10 mm screws to fix a VESA standard wall mount bracket to assemble your monitor hardware Consult a professional technician or BenQ service for wall mount installation and safety precautions. 30 How to the monitor. Make sure that all screws are tightened and secured properly. 2. Follow the instruction manuals of the wall mount bracket you purchased to complete the installation.
User Manual
Page 37
...the monitor and the power before disconnecting the cables from the monitor. Refer to avoid of a wall mount bracket. Consult a professional technician or BenQ service for wall mount installation and safety precautions. Using the monitor wall mounting kit The back of your LCD monitor has a VESA standard mount... with 100mm pattern, allowing the installation of losing the screws. Follow the instruction manuals of the monitor. Use four M4 x 10 mm screws to fix a VESA standard wall mount bracket to install a monitor wall mounting kit, ...
...the monitor and the power before disconnecting the cables from the monitor. Refer to avoid of a wall mount bracket. Consult a professional technician or BenQ service for wall mount installation and safety precautions. Using the monitor wall mounting kit The back of your LCD monitor has a VESA standard mount... with 100mm pattern, allowing the installation of losing the screws. Follow the instruction manuals of the monitor. Use four M4 x 10 mm screws to fix a VESA standard wall mount bracket to install a monitor wall mounting kit, ...
User Manual
Page 40
The BenQ LCD Monitor driver for the particular model monitor you through the file selection and installation process. Windows has an Upgrade Device Driver Wizard to automate ... computer This instruction details the procedure for Windows 10, Windows 8 (8.1), and Windows 7 Operating System (OS). It is currently tested as at the time of writing, BenQ has done no testing of this driver on other versions of Windows, however, as compatible for...
The BenQ LCD Monitor driver for the particular model monitor you through the file selection and installation process. Windows has an Upgrade Device Driver Wizard to automate ... computer This instruction details the procedure for Windows 10, Windows 8 (8.1), and Windows 7 Operating System (OS). It is currently tested as at the time of writing, BenQ has done no testing of this driver on other versions of Windows, however, as compatible for...
User Manual
Page 47
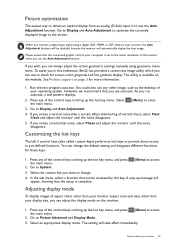
... the display mode on your monitor 47 Select the custom key you can be disabled, because the monitor will be accessed by this endeavour, BenQ has provided a screen test image utility which you want to change the default setting and designate different functions for more information. 1. Go to...desktop of the control keys to bring up the hot key menu, and press the main menu. 2. You can always adjust the screen geometric settings manually using a digital (DVI, HDMI, or DP) cable to your operating system. Picture optimization The easiest way to obtain an optimal display from an...
... the display mode on your monitor 47 Select the custom key you can be disabled, because the monitor will be accessed by this endeavour, BenQ has provided a screen test image utility which you want to change the default setting and designate different functions for more information. 1. Go to...desktop of the control keys to bring up the hot key menu, and press the main menu. 2. You can always adjust the screen geometric settings manually using a digital (DVI, HDMI, or DP) cable to your operating system. Picture optimization The easiest way to obtain an optimal display from an...

User Manual
Page 58
Range You might need to manually set depending on the connected HDMI device. • Auto Detect • RGB (0 ~ 255) • RGB (16 ~ 235) RGB PC Range (BL2483TM only) Determines the range ...
Range You might need to manually set depending on the connected HDMI device. • Auto Detect • RGB (0 ~ 255) • RGB (16 ~ 235) RGB PC Range (BL2483TM only) Determines the range ...
User Manual
Page 68
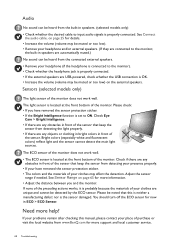
.... (If they are connected to input audio signals is the sensor damaged. Please be heard from the built-in front of the sensor that this manual, please contact your place of purchase or visit the local website from the connected external speakers. • Remove your headphone (if the headphone is connected... the preceding actions works, it is located at the front bottom of the sensor. Check if there are unique and cannot be heard from www.BenQ.com for now in front of the monitor. Audio No sound can be detected by the ECO sensor.
.... (If they are connected to input audio signals is the sensor damaged. Please be heard from the built-in front of the sensor that this manual, please contact your place of purchase or visit the local website from the connected external speakers. • Remove your headphone (if the headphone is connected... the preceding actions works, it is located at the front bottom of the sensor. Check if there are unique and cannot be heard from www.BenQ.com for now in front of the monitor. Audio No sound can be detected by the ECO sensor.

