User Manual
Page 2
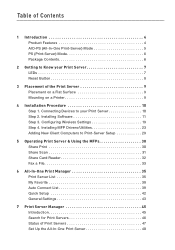
... Print-Server) Mode 5 PS (Print-Server) Mode 6 Package Contents 6 2 Getting to Know your Print Server 10 Step 2. Installing MFP Drivers/Utilities 23 Adding New Client Computers to your Print Server 7 LEDs 7 Reset Button 8 3 Placement of Print Servers 47 Set Up the All-In-One Print Server 48 Configuring Wireless Settings 19 Step 4. Connecting Devices to Print-Server Setup 29 5 Operating Print Server & Using the MFPs 30 Share Print 30 Share Scan 31 Share Card Reader 32 Fax a File 33...
... Print-Server) Mode 5 PS (Print-Server) Mode 6 Package Contents 6 2 Getting to Know your Print Server 10 Step 2. Installing MFP Drivers/Utilities 23 Adding New Client Computers to your Print Server 7 LEDs 7 Reset Button 8 3 Placement of Print Servers 47 Set Up the All-In-One Print Server 48 Configuring Wireless Settings 19 Step 4. Connecting Devices to Print-Server Setup 29 5 Operating Print Server & Using the MFPs 30 Share Print 30 Share Scan 31 Share Card Reader 32 Fax a File 33...
User Manual
Page 6
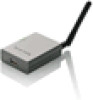
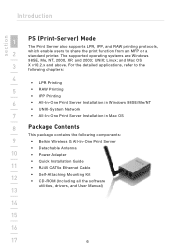
... Print Server Installation in Windows 98SE/Me/NT • UNIX-System Network 7 • All-In-One Print Server Installation in Mac OS 8 Package Contents This package contains the following components: 9 • Belkin Wireless G All-In-One Print Server • Detachable Antenna 10 • Power Adapter • Quick Installation Guide 11 • RJ45 CAT5e Ethernet Cable • Self-Attaching Mounting Kit 12 • CD-ROM (Including all the software utilities, drivers, and User Manual) 13...
... Print Server Installation in Windows 98SE/Me/NT • UNIX-System Network 7 • All-In-One Print Server Installation in Mac OS 8 Package Contents This package contains the following components: 9 • Belkin Wireless G All-In-One Print Server • Detachable Antenna 10 • Power Adapter • Quick Installation Guide 11 • RJ45 CAT5e Ethernet Cable • Self-Attaching Mounting Kit 12 • CD-ROM (Including all the software utilities, drivers, and User Manual) 13...
User Manual
Page 7
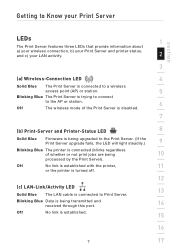
... the printer, 11 or the printer is turned off. 12 (c) LAN-Link/Activity LED 13 Solid Blue The L AN cable is connected to the Print Server. (If the Print Server upgrade fails, the LED will light steadily.) 9 Blinking Blue The printer is connected (blinks regardless of the Print Server is disabled. 7 (b) Print-Server and Printer-Status LED 8 Solid Blue Firmware is being upgraded to Print Server. Blinking Blue Data is being transmitted and received...
... the printer, 11 or the printer is turned off. 12 (c) LAN-Link/Activity LED 13 Solid Blue The L AN cable is connected to the Print Server. (If the Print Server upgrade fails, the LED will light steadily.) 9 Blinking Blue The printer is connected (blinks regardless of the Print Server is disabled. 7 (b) Print-Server and Printer-Status LED 8 Solid Blue Firmware is being upgraded to Print Server. Blinking Blue Data is being transmitted and received...

User Manual
Page 8
...; When the Print Server is rebooting, the Wireless- 4 Connection, and Print-Server and Printer Status LEDs will briefly turn ON and then back OFF. After rebooting, the 8 Print Server will be OFF, 3 awaiting the user to the release the button to reboot. • When the Print Server is reset to factory-default settings 9 10 11 12 13 14 15 16 17 8 Connection, and Print-Server and Printer-Status 7 LEDs will reset to default, the Wireless-
...; When the Print Server is rebooting, the Wireless- 4 Connection, and Print-Server and Printer Status LEDs will briefly turn ON and then back OFF. After rebooting, the 8 Print Server will be OFF, 3 awaiting the user to the release the button to reboot. • When the Print Server is reset to factory-default settings 9 10 11 12 13 14 15 16 17 8 Connection, and Print-Server and Printer-Status 7 LEDs will reset to default, the Wireless-

User Manual
Page 16
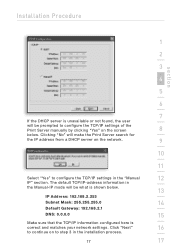
To set up the IP address of the Print Server, the default 1 is set to "DHCP" for the TCP/IP configuration. 2 3 4 5 6 7 8 The Print Server by default will try to step 3 in the "TCP/IP Configuration" window for your reference. Click 14 "Next" to continue on to get an IP 9 address from the connected Belkin Router running the Dynamic Host Configuration Protocol (DHCP) 10 server and the following screen will appear. 11 12 13 The newly assigned TCP/IP settings will be displayed in the installation process. 15 16 17 16 Installation Procedure section 10.
To set up the IP address of the Print Server, the default 1 is set to "DHCP" for the TCP/IP configuration. 2 3 4 5 6 7 8 The Print Server by default will try to step 3 in the "TCP/IP Configuration" window for your reference. Click 14 "Next" to continue on to get an IP 9 address from the connected Belkin Router running the Dynamic Host Configuration Protocol (DHCP) 10 server and the following screen will appear. 11 12 13 The newly assigned TCP/IP settings will be displayed in the installation process. 15 16 17 16 Installation Procedure section 10.
User Manual
Page 17
... the DHCP server is unavailable or not found, the user will be what is correct and matches your network settings. The default TCP/IP-address information in the Manual-IP mode will make the Print Server search for the IP address from a DHCP server on the screen 8 below . 13 IP Address: 192.168.2.253 Subnet Mask: 255.255.255.0 14 Default Gateway: 192.168.2.1 DNS: 0.0.0.0 15 Make sure that the TCP/IP information configured here...
... the DHCP server is unavailable or not found, the user will be what is correct and matches your network settings. The default TCP/IP-address information in the Manual-IP mode will make the Print Server search for the IP address from a DHCP server on the screen 8 below . 13 IP Address: 192.168.2.253 Subnet Mask: 255.255.255.0 14 Default Gateway: 192.168.2.1 DNS: 0.0.0.0 15 Make sure that the TCP/IP information configured here...
User Manual
Page 20
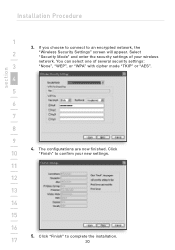
The configurations are now finished. Click 10 "Finish" to confirm your wireless network. Click "Finish" to an encrypted network, the 2 "Wireless Security Settings" screen will appear. You can select one of your new settings. 11 12 13 14 15 16 5. Installation Procedure section 1 3. Select "Security Mode" and enter the security settings of several security settings: 3 "None", "WEP", or "WPA" with cipher mode "TKIP" or "AES". 4 5 6 7 8 9 4. If you choose to connect to complete the installation. 17 20
The configurations are now finished. Click 10 "Finish" to confirm your wireless network. Click "Finish" to an encrypted network, the 2 "Wireless Security Settings" screen will appear. You can select one of your new settings. 11 12 13 14 15 16 5. Installation Procedure section 1 3. Select "Security Mode" and enter the security settings of several security settings: 3 "None", "WEP", or "WPA" with cipher mode "TKIP" or "AES". 4 5 6 7 8 9 4. If you choose to connect to complete the installation. 17 20

User Manual
Page 23
... connected to the Print Server via a USB cable, the Print Manager will appear. refer to the illustration below of "HP All-In-One Series," which is complete, the "Belkin All-In-One 2 Print Manager" window will automatically 3 display its name in the Print Server List. 4 5 6 7 8 9 Before you start to section 4.2. 12 13 4.1 Printer drivers/utilities have not been installed Before the installation, read the printer's manual...
... connected to the Print Server via a USB cable, the Print Manager will appear. refer to the illustration below of "HP All-In-One Series," which is complete, the "Belkin All-In-One 2 Print Manager" window will automatically 3 display its name in the Print Server List. 4 5 6 7 8 9 Before you start to section 4.2. 12 13 4.1 Printer drivers/utilities have not been installed Before the installation, read the printer's manual...
User Manual
Page 39
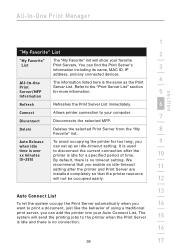
... the behavior of time. 10 (5-255) By default, there is no connection. 16 39 17 You can find the Print Server's information including its name, MAC ID, IP 3 address, and any connected devices. 4 All-In-One The information listed here is no timeout setting. It is used time is over xx minutes to disconnect the current connection after the printer and Print Server are installed completely so...
... the behavior of time. 10 (5-255) By default, there is no connection. 16 39 17 You can find the Print Server's information including its name, MAC ID, IP 3 address, and any connected devices. 4 All-In-One The information listed here is no timeout setting. It is used time is over xx minutes to disconnect the current connection after the printer and Print Server are installed completely so...

User Manual
Page 45
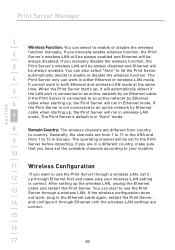
...address and 9 DHCP-server configuration. • System Configuration: Print Server's network- 10 ability setting and firmware upgrades. • Wireless Configuration: Searches for available 11 wireless networks and configures the wireless settings of all available Print Servers on the Print- 3 Server side. it does not include configuration functions for the client side or other file server in the network environment. 4 The configuration utility provides the following section. 15 16 45 17 This utility only provides configuration functions for the wireless connection...
...address and 9 DHCP-server configuration. • System Configuration: Print Server's network- 10 ability setting and firmware upgrades. • Wireless Configuration: Searches for available 11 wireless networks and configures the wireless settings of all available Print Servers on the Print- 3 Server side. it does not include configuration functions for the client side or other file server in the network environment. 4 The configuration utility provides the following section. 15 16 45 17 This utility only provides configuration functions for the wireless connection...

User Manual
Page 55
... computer. 14 Load Default: If you can see all available printing protocols and upgrade the new firmware for this Print Server. 10 Upgrade Firmware: You can use this "Upgrade Firmware" tool to default factory 15 settings, click "Load Default". 16 55 17 After selecting the firmware file, click the "Upgrade" button to finish the firmware- 12 update process. 13 Tip: Before you upgrade the firmware, make sure that the IP-address settings of the Print...
... computer. 14 Load Default: If you can see all available printing protocols and upgrade the new firmware for this Print Server. 10 Upgrade Firmware: You can use this "Upgrade Firmware" tool to default factory 15 settings, click "Load Default". 16 55 17 After selecting the firmware file, click the "Upgrade" button to finish the firmware- 12 update process. 13 Tip: Before you upgrade the firmware, make sure that the IP-address settings of the Print...
User Manual
Page 56
... manually enable wireless function, the Print Server's wireless LAN will be always enabled and Ethernet will be always disabled. It cannot work in the Ethernet cable again, restart the Print Server, 14 and configure it through a wireless LAN. If the wireless configuration does not work in a different country, make sure your wireless-LAN setting is in "Auto" mode. 8 Domain Country: The wireless channels are different from country to an active network by Ethernet cable when starting up, the Print Server...
... manually enable wireless function, the Print Server's wireless LAN will be always enabled and Ethernet will be always disabled. It cannot work in the Ethernet cable again, restart the Print Server, 14 and configure it through a wireless LAN. If the wireless configuration does not work in a different country, make sure your wireless-LAN setting is in "Auto" mode. 8 Domain Country: The wireless channels are different from country to an active network by Ethernet cable when starting up, the Print Server...
User Manual
Page 64
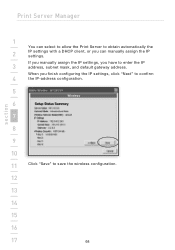
Print Server Manager section 1 You can select to allow the Print Server to save the wireless configuration. 12 13 14 15 16 17 64 When you finish configuring the IP settings, click "Next" to confirm 4 the IP-address configuration. 5 6 7 8 9 10 11 Click "Save" to obtain automatically the 2 IP settings with a DHCP client, or you have to enter the IP 3 address, subnet mask, and default gateway address. If you manually assign the IP settings, you can manually assign the IP settings.
Print Server Manager section 1 You can select to allow the Print Server to save the wireless configuration. 12 13 14 15 16 17 64 When you finish configuring the IP settings, click "Next" to confirm 4 the IP-address configuration. 5 6 7 8 9 10 11 Click "Save" to obtain automatically the 2 IP settings with a DHCP client, or you have to enter the IP 3 address, subnet mask, and default gateway address. If you manually assign the IP settings, you can manually assign the IP settings.
User Manual
Page 67
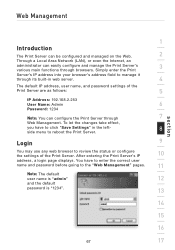
... status or configure the settings of the Print Server are as follows: 5 IP Address: 192.168.2.253 User Name: Admin 6 Password: 1234 Note: You can easily configure and manage the Print Server's 3 various main functions through browsers. Login 9 You may use any web browser to click "Save Settings" in web server. 4 The default IP address, user name, and password settings of the Print Server. Web Management section 1 Introduction The Print Server can be configured and managed on the Web. 2 Through a Local Area Network (LAN...
... status or configure the settings of the Print Server are as follows: 5 IP Address: 192.168.2.253 User Name: Admin 6 Password: 1234 Note: You can easily configure and manage the Print Server's 3 various main functions through browsers. Login 9 You may use any web browser to click "Save Settings" in web server. 4 The default IP address, user name, and password settings of the Print Server. Web Management section 1 Introduction The Print Server can be configured and managed on the Web. 2 Through a Local Area Network (LAN...

User Manual
Page 70
... through Ethernet until the wireless-LAN settings are searching for the Print Server again. 4 Wireless 5 Channel and SSID 6 If you to use the Print Server through a wireless LAN. If the wireless configuration does not work, plug in an alphanumeric format. The default password is "1234". 3 Re-type Password: enter the same password for it through the "Server Manager" utilities. 2 Password: enter the password you want to use the Print Server through a wireless LAN, set it through Ethernet first and make sure your wireless LAN setting...
... through Ethernet until the wireless-LAN settings are searching for the Print Server again. 4 Wireless 5 Channel and SSID 6 If you to use the Print Server through a wireless LAN. If the wireless configuration does not work, plug in an alphanumeric format. The default password is "1234". 3 Re-type Password: enter the same password for it through the "Server Manager" utilities. 2 Password: enter the password you want to use the Print Server through a wireless LAN, set it through Ethernet first and make sure your wireless LAN setting...
User Manual
Page 71
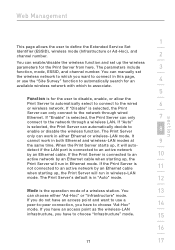
... 71 17 If you do not have an access point and want to connect in both Ethernet and wireless-LAN modes at 9 the same time. Web Management section 1 This page allows the user to define the Extended Service Set Identifier (ESSID), wireless mode (Infrastructure or Ad-Hoc), and channel number. 2 You can enable/disable the wireless function and set the wireless network to which you want to use the "Site Survey" function to automatically search...
... 71 17 If you do not have an access point and want to connect in both Ethernet and wireless-LAN modes at 9 the same time. Web Management section 1 This page allows the user to define the Extended Service Set Identifier (ESSID), wireless mode (Infrastructure or Ad-Hoc), and channel number. 2 You can enable/disable the wireless function and set the wireless network to which you want to use the "Site Survey" function to automatically search...

User Manual
Page 77
... the user has to set up to use the configured static IP address, if the Print Server is enabled, you have to each DHCP client. Web Management section 1 2 3 4 5 6 7 8 9 Disable - The internal DHCP server is not set the IP address manually. 11 Enable - However, 13 the Print Server itself if no external DHCP server is found 15 and the Print Server is disabled (recommended). 10 The Print Server has to get an IP address from a DHCP server in the "Starting Address", "Range", "Subnet Mask", "Gateway", and "DNS...
... the user has to set up to use the configured static IP address, if the Print Server is enabled, you have to each DHCP client. Web Management section 1 2 3 4 5 6 7 8 9 Disable - The internal DHCP server is not set the IP address manually. 11 Enable - However, 13 the Print Server itself if no external DHCP server is found 15 and the Print Server is disabled (recommended). 10 The Print Server has to get an IP address from a DHCP server in the "Starting Address", "Range", "Subnet Mask", "Gateway", and "DNS...

User Manual
Page 79
Web Management section 1 Firmware Upgrade From time to time, Belkin may release new upgrades to normal configuration. 14 15 16 79 17 the firmware will be updated in several minutes. 13 Be aware that if you have started upgrading firmware, you have existed. 3 4 5 6 7 8 9 10 11 This page allows the user to upgrade firmware of the Print Server. 12 Click "Browse" to select the new firmware in functionality and performance and...
Web Management section 1 Firmware Upgrade From time to time, Belkin may release new upgrades to normal configuration. 14 15 16 79 17 the firmware will be updated in several minutes. 13 Be aware that if you have started upgrading firmware, you have existed. 3 4 5 6 7 8 9 10 11 This page allows the user to upgrade firmware of the Print Server. 12 Click "Browse" to select the new firmware in functionality and performance and...
User Manual
Page 94
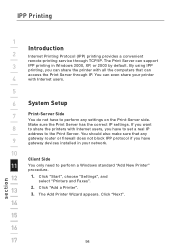
... Internet users. 5 6 System Setup 7 Print-Server Side You do not have to set a real IP address to perform a Windows standard "Add New Printer" procedure. 12 1. The Print Server can access the Print Server through TCP/IP. By using IPP printing, you have gateway devices installed in Windows 2000, XP, or 2003 by default. The Add Printer Wizard appears. You can even share your network. 10 Client Side 11 You only need to the Print Server. Make...
... Internet users. 5 6 System Setup 7 Print-Server Side You do not have to set a real IP address to perform a Windows standard "Add New Printer" procedure. 12 1. The Print Server can access the Print Server through TCP/IP. By using IPP printing, you have gateway devices installed in Windows 2000, XP, or 2003 by default. The Add Printer Wizard appears. You can even share your network. 10 Client Side 11 You only need to the Print Server. Make...
User Manual
Page 106
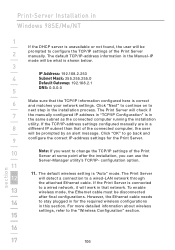
... TCP/IP-address settings configured manually are in that network. Print-Server Installation in the Manual-IP mode will be what is shown below. 3 IP Address: 192.168.2.253 4 Subnet Mask: 255.255.255.0 Default Gateway: 192.168.2.1 DNS: 0.0.0.0 5 6 Make sure that the TCP/IP information configured here is correct and matches your network settings. However, the Ethernet cable needs 14 to the "Wireless Configuration" section. 15 16 17 106 section The default TCP/IP-address information in Windows 98SE...
... TCP/IP-address settings configured manually are in that network. Print-Server Installation in the Manual-IP mode will be what is shown below. 3 IP Address: 192.168.2.253 4 Subnet Mask: 255.255.255.0 Default Gateway: 192.168.2.1 DNS: 0.0.0.0 5 6 Make sure that the TCP/IP information configured here is correct and matches your network settings. However, the Ethernet cable needs 14 to the "Wireless Configuration" section. 15 16 17 106 section The default TCP/IP-address information in Windows 98SE...


