
User Manual
Page 2
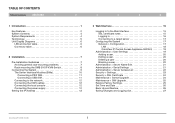
... Unit Display Diagrams 6 LED and button table 6 Connector table 6 2 Installation 7 Pre-Installation Guidelines 7 Avoiding general rack-mounting problems 7 Rack-mounting the SMB 216 IP KVM Switch 8 Connecting the System 9 The Server Interface Modules (SIMs 10 Connecting a PS/2 SIM 11 Connecting a USB SIM 11 Connecting to the network 12 Connecting the CAT5 cables 12 Connecting the local console 12 Connecting the power supply 12 Setting the IP Address 13 3 4 5 6 3 Web Interface 15 Logging In to the Web Interface 15 SSL certificate notes...
... Unit Display Diagrams 6 LED and button table 6 Connector table 6 2 Installation 7 Pre-Installation Guidelines 7 Avoiding general rack-mounting problems 7 Rack-mounting the SMB 216 IP KVM Switch 8 Connecting the System 9 The Server Interface Modules (SIMs 10 Connecting a PS/2 SIM 11 Connecting a USB SIM 11 Connecting to the network 12 Connecting the CAT5 cables 12 Connecting the local console 12 Connecting the power supply 12 Setting the IP Address 13 3 4 5 6 3 Web Interface 15 Logging In to the Web Interface 15 SSL certificate notes...
User Manual
Page 3
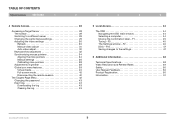
... 42 Changing the password 43 Event log 43 Downloading the log 43 Clearing the log 43 3 4 5 6 5 Local Access 44 The OSD 44 Navigating the OSD main window 44 Selecting a computer 44 Moving the confirmation label - F2 46 DDC - F1 45 Tuning - Table of Contents Table of Contents sections 1 2 4 Remote Access 28 Accessing a Target Server 28 The toolbar 29 Switching to the settings 47 6 Additional Information 48 Technical Specifications...
... 42 Changing the password 43 Event log 43 Downloading the log 43 Clearing the log 43 3 4 5 6 5 Local Access 44 The OSD 44 Navigating the OSD main window 44 Selecting a computer 44 Moving the confirmation label - F2 46 DDC - F1 45 Tuning - Table of Contents Table of Contents sections 1 2 4 Remote Access 28 Accessing a Target Server 28 The toolbar 29 Switching to the settings 47 6 Additional Information 48 Technical Specifications...
User Manual
Page 4
... KVM technology. Users experience immediate access when switching between multiple sessions over the Internet via a standard web browser. For quick and easy installation, please refer to troubleshoot servers faster and more servers across geographical locations. The innovative technology in the OmniView IP 5216K/5232K Switch combines hardware and software technology to deliver highperformance remote access, and enables you for purchasing the Belkin OmniView IP 5216K/5232K Switch with the Belkin Central Access...
... KVM technology. Users experience immediate access when switching between multiple sessions over the Internet via a standard web browser. For quick and easy installation, please refer to troubleshoot servers faster and more servers across geographical locations. The innovative technology in the OmniView IP 5216K/5232K Switch combines hardware and software technology to deliver highperformance remote access, and enables you for purchasing the Belkin OmniView IP 5216K/5232K Switch with the Belkin Central Access...
User Manual
Page 5
... access your KVM switch and all connected servers from any computer connected to make changes and perform reboots, regardless of network connectivity or server condition. Remote Serial Access The Switch provides support for up and change the Switch's functions quickly and easily through your web browser, without having to two serial devices, such as a managed power distribution unit (PDU), so you to set up to install additional software onto your servers. OmniViewIP 5216K/5232K 2 User-Friendly Interface The web-based interface...
... access your KVM switch and all connected servers from any computer connected to make changes and perform reboots, regardless of network connectivity or server condition. Remote Serial Access The Switch provides support for up and change the Switch's functions quickly and easily through your web browser, without having to two serial devices, such as a managed power distribution unit (PDU), so you to set up to install additional software onto your servers. OmniViewIP 5216K/5232K 2 User-Friendly Interface The web-based interface...
User Manual
Page 6
... Switch provides virtual-media support for up to 1600x1200@75Hz for both local and remote consoles. This is ideal for your Switch. This allows the remote user to copy files from a local USB or CD-ROM drive. Flash-Upgradeable Flash upgrades allow you to obtain the latest firmware updates for corporations operating servers at multiple sites such as your servers and protect data transferred over the Internet. Or boot a remote server from a USB...
... Switch provides virtual-media support for up to 1600x1200@75Hz for both local and remote consoles. This is ideal for your Switch. This allows the remote user to copy files from a local USB or CD-ROM drive. Flash-Upgradeable Flash upgrades allow you to obtain the latest firmware updates for corporations operating servers at multiple sites such as your servers and protect data transferred over the Internet. Or boot a remote server from a USB...

User Manual
Page 7
... a firmware upgrade. Visit www.belkin.com/support for more information. Introduction Table of Contents sections 1 2 3 4 5 6 System Contents • 1 OmniView IP 5216K/5232K Switch • 1 AC Power Cable • 1 Serial-to-RJ45 Interface Cable • 1x User Manual CD • 1 Quick Start Guide • 1 Set Rack-Mount Brackets and Screws System Requirements Host Computer Operating-System (OS) Platforms The Switch is compatible with CPUs running on, but not limited to a server requires...
... a firmware upgrade. Visit www.belkin.com/support for more information. Introduction Table of Contents sections 1 2 3 4 5 6 System Contents • 1 OmniView IP 5216K/5232K Switch • 1 AC Power Cable • 1 Serial-to-RJ45 Interface Cable • 1x User Manual CD • 1 Quick Start Guide • 1 Set Rack-Mount Brackets and Screws System Requirements Host Computer Operating-System (OS) Platforms The Switch is compatible with CPUs running on, but not limited to a server requires...
User Manual
Page 8
... Switch from a user workstation. Belkin UTP Patch Cables: A3L791-XX-YYY (CAT5e) A3L850-XX-YYY (FastCAT 5e) A3L980-XX-YYY (CAT6) Note: Use CAT6 solid cables for your OmniView IP 5216K/5232K Switch to help ensure the superior performance of remotely accessing and controlling target servers connected to ensure optimal data and video transmission. OmniViewIP 5216K/5232K 5 Introduction Table of Contents sections 1 2 3 4 5 6 OmniView SMB Server Interface Modules...
... Switch from a user workstation. Belkin UTP Patch Cables: A3L791-XX-YYY (CAT5e) A3L850-XX-YYY (FastCAT 5e) A3L980-XX-YYY (CAT6) Note: Use CAT6 solid cables for your OmniView IP 5216K/5232K Switch to help ensure the superior performance of remotely accessing and controlling target servers connected to ensure optimal data and video transmission. OmniViewIP 5216K/5232K 5 Introduction Table of Contents sections 1 2 3 4 5 6 OmniView SMB Server Interface Modules...
User Manual
Page 9
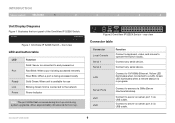
Digital Figure 1 OmniView IP 5232K Switch - Introduction Digital Table of Contents sections 1 2 3 4 5 6 Unit Display Diagrams Figure 1 illustrates the front panel of the OmniView IP 5232K Switch. front view J
Digital Figure 1 OmniView IP 5232K Switch - Introduction Digital Table of Contents sections 1 2 3 4 5 6 Unit Display Diagrams Figure 1 illustrates the front panel of the OmniView IP 5232K Switch. front view J
User Manual
Page 15
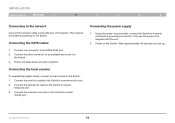
...cord supplied with a grounding connection. Connecting the CAT5 cables 1. Connecting the local console To operate the system locally, connect a local console to the Switch's console mouse port. Connect the monitor's cable to the LAN port of Contents sections 1 2 3 4 5 6 Connecting to the network Connect the network cable to the Switch's console monitor port. 2. Connecting the power supply 1. Connect the other connector to a socket outlet with the unit. 2. OmniViewIP 5216K/5232K 12 Follow the steps above for boot up. Power on the Switch. INSTALLATION Table...
...cord supplied with a grounding connection. Connecting the CAT5 cables 1. Connecting the local console To operate the system locally, connect a local console to the Switch's console mouse port. Connect the monitor's cable to the LAN port of Contents sections 1 2 3 4 5 6 Connecting to the network Connect the network cable to the Switch's console monitor port. 2. Connecting the power supply 1. Connect the other connector to a socket outlet with the unit. 2. OmniViewIP 5216K/5232K 12 Follow the steps above for boot up. Power on the Switch. INSTALLATION Table...
User Manual
Page 16
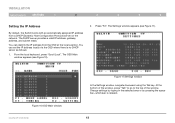
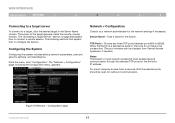
... Main window OmniViewIP 5216K/5232K Figure 11 Settings window In the Settings window, navigate downward using the Tab key. Change settings by typing in the selected area or by pressing the space bar-whichever is no DHCP server as follows: 1. Press "F2". At the bottom of the window, press "Tab" to go to the top of Contents sections 1 2 3 4 5 6 Setting the IP Address By default, the Switch boots with...
... Main window OmniViewIP 5216K/5232K Figure 11 Settings window In the Settings window, navigate downward using the Tab key. Change settings by typing in the selected area or by pressing the space bar-whichever is no DHCP server as follows: 1. Press "F2". At the bottom of the window, press "Tab" to go to the top of Contents sections 1 2 3 4 5 6 Setting the IP Address By default, the Switch boots with...
User Manual
Page 17
... the use of Contents sections 1 2 3 4 5 6 Changing the network parameters Enable DHCP - Once the IP address is satisfactory, log in to the web interface to complete the configuration, as explained in the next section. (Network parameters can assign a fixed IP address to which the Switch is disabled, enter the IP Address, Subnet Mask, and Gateway as explained on the same network to the Switch. INSTALLATION Table of the DHCP. When a DHCP server is disabled (Recommended...
... the use of Contents sections 1 2 3 4 5 6 Changing the network parameters Enable DHCP - Once the IP address is satisfactory, log in to the web interface to complete the configuration, as explained in the next section. (Network parameters can assign a fixed IP address to which the Switch is disabled, enter the IP Address, Subnet Mask, and Gateway as explained on the same network to the Switch. INSTALLATION Table of the DHCP. When a DHCP server is disabled (Recommended...
User Manual
Page 18
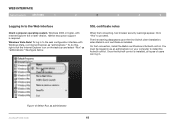
.... Click "Yes" to install the ActiveX control. On first connection, install the Belkin certificate and ActiveX control. Windows Vista Note! The first warning disappears upon the first Switch client installation, when Belkin's root certificate is required. Once the ActiveX control is installed, all types of Contents sections 1 2 3 4 5 6 Logging In to the web configuration interface with Internet Explorer 6.0 or later version. 128-bit encryption support is installed. To do this, right...
.... Click "Yes" to install the ActiveX control. On first connection, install the Belkin certificate and ActiveX control. Windows Vista Note! The first warning disappears upon the first Switch client installation, when Belkin's root certificate is required. Once the ActiveX control is installed, all types of Contents sections 1 2 3 4 5 6 Logging In to the web configuration interface with Internet Explorer 6.0 or later version. 128-bit encryption support is installed. To do this, right...
User Manual
Page 19
... accessing the server). Open your web browser (Internet Explorer version 6.0 or higher). 2. Columns: Server Name - The login page appears (see Figure 14). 5. and press "Enter". Type the Switch's system IP address-http or https://IP address/ - Port status can be on the Targets page. The web interface opens at the Targets page (see Figure 13). Current User - WEB INTERFACE Table of Contents sections 1 2 3 4 5 6 Logging in the configuration settings to give the server...
... accessing the server). Open your web browser (Internet Explorer version 6.0 or higher). 2. Columns: Server Name - The login page appears (see Figure 14). 5. and press "Enter". Type the Switch's system IP address-http or https://IP address/ - Port status can be on the Targets page. The web interface opens at the Targets page (see Figure 13). Current User - WEB INTERFACE Table of Contents sections 1 2 3 4 5 6 Logging in the configuration settings to give the server...
User Manual
Page 20
... System Configuring the system includes setting network parameters, user and security settings, and maintenance. TCP Ports - When the Switch is a standalone system, the ports do not have to be consecutive. (The port numbers can be open for the Switch's IP address. For client computer access from a secured LAN, the selected ports should be changed from Central Access Appliance, if needed.) Notes The firewall or router security access list must enable...
... System Configuring the system includes setting network parameters, user and security settings, and maintenance. TCP Ports - When the Switch is a standalone system, the ports do not have to be consecutive. (The port numbers can be open for the Switch's IP address. For client computer access from a secured LAN, the selected ports should be changed from Central Access Appliance, if needed.) Notes The firewall or router security access list must enable...
User Manual
Page 21
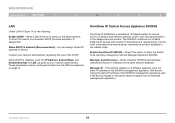
... your network administrator. Check this option to allow the Switch to be configured locally from the OSD as the 5000HQ management appliance.) OmniViewIP 5216K/5232K 18 You can be remotely managed by your network administrator regarding the use of servers and network devices, power, and user administration in the datacenter environment. Manager Auto Discovery - WEB INTERFACE Table of -band, KVM-via-IP access with modern IT standards and requirements. When a DHCP server...
... your network administrator. Check this option to allow the Switch to be configured locally from the OSD as the 5000HQ management appliance.) OmniViewIP 5216K/5232K 18 You can be remotely managed by your network administrator regarding the use of servers and network devices, power, and user administration in the datacenter environment. Manager Auto Discovery - WEB INTERFACE Table of -band, KVM-via-IP access with modern IT standards and requirements. When a DHCP server...
User Manual
Page 27
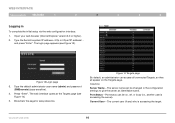
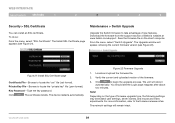
... see Figure 21). Save the firmware file on the type of firmware upgrade type, the following settings may be erased: user settings, server names, and mouse and video adjustments. Browse to begin the upgrade process. Note! Figure 21 Install SSL Certificate page Certificate File - Private Key File - Key Password - Verify the current and uploaded version of Belkin's website at www.belkin.com/support. The Upgrade window will reboot automatically. Figure 22 Firmware Upgrade 1. Upgrade the Switch firmware to take advantage of...
... see Figure 21). Save the firmware file on the type of firmware upgrade type, the following settings may be erased: user settings, server names, and mouse and video adjustments. Browse to begin the upgrade process. Note! Figure 21 Install SSL Certificate page Certificate File - Private Key File - Key Password - Verify the current and uploaded version of Belkin's website at www.belkin.com/support. The Upgrade window will reboot automatically. Figure 22 Firmware Upgrade 1. Upgrade the Switch firmware to take advantage of...
User Manual
Page 28
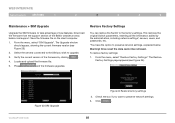
... WEB INTERFACE Table of Contents sections 1 2 3 4 5 6 Maintenance > SIM Upgrade Upgrade the SIM firmware to take advantage of the Belkin website at www. Download the firmware from the support section of new features. From the menu, select "SIM Upgrade". Locate and upload the firmware file. 5. To restore factory settings: 1. Figure 23 SIM Upgrade OmniViewIP 5216K/5232K Figure 24 Restore factory settings 2. belkin.com/support. Verify the current version of the firmware by the administrators, including network settings*, servers, users, and passwords...
... WEB INTERFACE Table of Contents sections 1 2 3 4 5 6 Maintenance > SIM Upgrade Upgrade the SIM firmware to take advantage of the Belkin website at www. Download the firmware from the support section of new features. From the menu, select "SIM Upgrade". Locate and upload the firmware file. 5. To restore factory settings: 1. Figure 23 SIM Upgrade OmniViewIP 5216K/5232K Figure 24 Restore factory settings 2. belkin.com/support. Verify the current version of the firmware by the administrators, including network settings*, servers, users, and passwords...
User Manual
Page 40
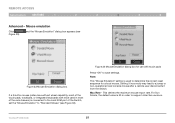
... "OK" to determine the correct reset sequence for a local mouse. This defines the maximum mouse report rate. For Sun Solaris, the default value is 20 in most of the rack drawers) is used in order to a jumpy or non-operational local console mouse after a remote user disconnects it incorrectly may lead to support older Sun versions. and the "Mouse Emulation...
... "OK" to determine the correct reset sequence for a local mouse. This defines the maximum mouse report rate. For Sun Solaris, the default value is 20 in most of the rack drawers) is used in order to a jumpy or non-operational local console mouse after a remote user disconnects it incorrectly may lead to support older Sun versions. and the "Mouse Emulation...
User Manual
Page 43
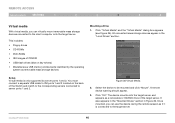
REmote AcCESS Table of CD\DVD • USB flash drives (disk on the back of the target server. A remote device warning should appear. 3. OmniViewIP 5216K/5232K 40 This includes: • Floppy drives • CD-ROMs • DVD-ROMs • ISO images of Contents sections 1 2 3 4 5 6 Virtual media With virtual media, you can virtually mount removable mass storage devices connected to the client...
REmote AcCESS Table of CD\DVD • USB flash drives (disk on the back of the target server. A remote device warning should appear. 3. OmniViewIP 5216K/5232K 40 This includes: • Floppy drives • CD-ROMs • DVD-ROMs • ISO images of Contents sections 1 2 3 4 5 6 Virtual media With virtual media, you can virtually mount removable mass storage devices connected to the client...
User Manual
Page 50
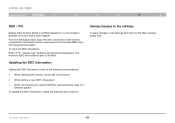
...". "Please wait" flashes a few times and disappears. F10 Display Data Channel (DDC) is sent to all connected SIMs when first installing the system. Saving changes to the settings To save changes to the settings and return to the system • When reconnecting an existing SIM that was temporarily used in any of the following circumstances: • When replacing the monitor connected to the Switch • When adding...
...". "Please wait" flashes a few times and disappears. F10 Display Data Channel (DDC) is sent to all connected SIMs when first installing the system. Saving changes to the settings To save changes to the settings and return to the system • When reconnecting an existing SIM that was temporarily used in any of the following circumstances: • When replacing the monitor connected to the Switch • When adding...


