
User Manual
Page 8
...air-conditioning equipment, or machines that create electrical noise (e.g., vacuum cleaners). Consider the following when deciding where to place the KVM Switch: whether or not you use the direct-access port selectors; and the length of the cables you intend to use to ... to the KVM Switch. the length of the cables attached to your console; Installing the KVM Switch Pre-Configuration Where to Place the KVM Switch The compact size of the KVM Switch makes it perfect for the hardware setup of a single KVM Switch. (F1DD102L or F1DD104L) Cable/model types: DVI models use: DVI/USB combo ...
...air-conditioning equipment, or machines that create electrical noise (e.g., vacuum cleaners). Consider the following when deciding where to place the KVM Switch: whether or not you use the direct-access port selectors; and the length of the cables you intend to use to ... to the KVM Switch. the length of the cables attached to your console; Installing the KVM Switch Pre-Configuration Where to Place the KVM Switch The compact size of the KVM Switch makes it perfect for the hardware setup of a single KVM Switch. (F1DD102L or F1DD104L) Cable/model types: DVI models use: DVI/USB combo ...
User Manual
Page 15
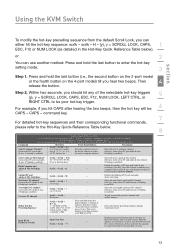
..., NUM LOCK, LEFT_CTRL, or RIGHT_CTRL -- -- -- -- -- -Press and hold the last button (i.e., the second button on the 2-port model or the fourth button on the 4-port model) till you hear three beeps, release the button, and then press (y) key. Then 4 release the button. H - (y), y = ... as detailed in the Hot-Key Quick Reference Table below . 8 Hot Key Quick Reference Table 2-/4-Port SOHO KVM Switch with Audio -- & Mic -- upgrade is currently on the left of PC port and audio & mic switching. (Hot key: Once this feature is a function key) ScrLk + ScrLk + Q ScrLk + ScrLk...
..., NUM LOCK, LEFT_CTRL, or RIGHT_CTRL -- -- -- -- -- -Press and hold the last button (i.e., the second button on the 2-port model or the fourth button on the 4-port model) till you hear three beeps, release the button, and then press (y) key. Then 4 release the button. H - (y), y = ... as detailed in the Hot-Key Quick Reference Table below . 8 Hot Key Quick Reference Table 2-/4-Port SOHO KVM Switch with Audio -- & Mic -- upgrade is currently on the left of PC port and audio & mic switching. (Hot key: Once this feature is a function key) ScrLk + ScrLk + Q ScrLk + ScrLk...

User Manual
Page 21
... "Upgrade" to the Host PC 1 Step 5. Step 6. 3 Check to make it ready for upload. 19 The KVM Switch has now entered into the upgrade mode. Now press the first front-panel button on the different models, the KVM cables you use will vary. 5 Step 7. 6 Click the "Browse" button and locate the firmware-upgrade file...
... "Upgrade" to the Host PC 1 Step 5. Step 6. 3 Check to make it ready for upload. 19 The KVM Switch has now entered into the upgrade mode. Now press the first front-panel button on the different models, the KVM cables you use will vary. 5 Step 7. 6 Click the "Browse" button and locate the firmware-upgrade file...

User Manual
Page 22
...After you click the "Upgrade" button, the file-transfer progress will be careful not to the "Firmware-Upgrade Troubleshooting" section. If not, switch to that does happen, please refer to power off the computer or disconnect the USB-cable connection. Otherwise, the file upload will be interrupted... when the progress bar runs through the advancement of the KVM Switch where you that the upgrade is complete. 20 Once the "Upgrade" button is pressed, the focus is immediately switched to the last button (port 2 on the 2-port model, port 4 on port 1 of the progress bar. ...
...After you click the "Upgrade" button, the file-transfer progress will be careful not to the "Firmware-Upgrade Troubleshooting" section. If not, switch to that does happen, please refer to power off the computer or disconnect the USB-cable connection. Otherwise, the file upload will be interrupted... when the progress bar runs through the advancement of the KVM Switch where you that the upgrade is complete. 20 Once the "Upgrade" button is pressed, the focus is immediately switched to the last button (port 2 on the 2-port model, port 4 on port 1 of the progress bar. ...

User Manual
Page 26
Check to make sure the KVM cables from port 1 are connected to the Mac Host Step 5. Press the first front-panel button on the different models, the KVM cables you use will vary. 24 Firmware-Upgrade Guide Connect your KVM Switch to the Mac host. Step 6. However, depending on the KVM Switch until you use the same KVM cable that you hear three beeps. Now the KVM Switch has entered into the upgrade mode. Note: A special upgrade cable is not needed to perform the upgrade since you can use for connecting to the computers.
Check to make sure the KVM cables from port 1 are connected to the Mac Host Step 5. Press the first front-panel button on the different models, the KVM cables you use will vary. 24 Firmware-Upgrade Guide Connect your KVM Switch to the Mac host. Step 6. However, depending on the KVM Switch until you use the same KVM cable that you hear three beeps. Now the KVM Switch has entered into the upgrade mode. Note: A special upgrade cable is not needed to perform the upgrade since you can use for connecting to the computers.
