User Manual
Page 2
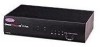
... • Allows a user to 1600 x 1200 resolution support • DB25 Daisy-Chain ports - The OmniView™ SE puts you for purchasing the Belkin Components OmniView™ SE KVM switch. Switching can be done through convenient frontpanel pushbutton, or keyboard "Hot" key commands. And if you...® support. The OmniView™ SE is loaded with OmniView™ PS/2 MAC Adapter™ • No software required • One year product warranty Package Contents OmniView™ SE 2-Port 9VDC, 600mA power supply This manual Registration card F1D102 F1D065-PWR (U.S., Canada)...
... • Allows a user to 1600 x 1200 resolution support • DB25 Daisy-Chain ports - The OmniView™ SE puts you for purchasing the Belkin Components OmniView™ SE KVM switch. Switching can be done through convenient frontpanel pushbutton, or keyboard "Hot" key commands. And if you...® support. The OmniView™ SE is loaded with OmniView™ PS/2 MAC Adapter™ • No software required • One year product warranty Package Contents OmniView™ SE 2-Port 9VDC, 600mA power supply This manual Registration card F1D102 F1D065-PWR (U.S., Canada)...
User Manual
Page 5
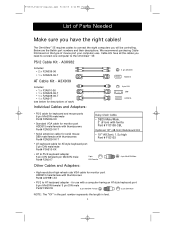
Below are the Belkin part numbers and their descriptions. for use with thumbscrews Part# A3H981-XX • PS/2 to AT keyboard adapter - We recommend purchasing Cable Kits based on the type of mouse port your computer uses. Cable kits have the right cables! A3X939 Includes: • 1 x F3A510-06 • 1 x F2N025-06-T • 1 ... Part# F2N017 5 pin DIN Female 6 pin MiniDIN Male Other Cables and Adapters: • High-resolution/high-refresh rate VGA cable for AT-style keyboard port 5 pin DIN male/male Part# F3A510-XX • AT to the OmniView™ SE: PS/2 Cable Kit -
Below are the Belkin part numbers and their descriptions. for use with thumbscrews Part# A3H981-XX • PS/2 to AT keyboard adapter - We recommend purchasing Cable Kits based on the type of mouse port your computer uses. Cable kits have the right cables! A3X939 Includes: • 1 x F3A510-06 • 1 x F2N025-06-T • 1 ... Part# F2N017 5 pin DIN Female 6 pin MiniDIN Male Other Cables and Adapters: • High-resolution/high-refresh rate VGA cable for AT-style keyboard port 5 pin DIN male/male Part# F3A510-XX • AT to the OmniView™ SE: PS/2 Cable Kit -
User Manual
Page 6
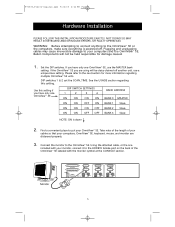
...the monitor to put your OmniView™ SE. Monitor 5 Find a convenient place to the OmniView™ SE. Take note of the length of the OmniView™ SE labeled with the monitor symbol at the CONSOLE section. Using the attached cable, or the one OmniView™ SE DIP SWITCH SETTINGS 1 2 3 ... setting. Plugging and unplugging cables may cause irreversible damage to the HDDB15 female port on the back of your cables so that your computers and the OmniView™ SE. Belkin Components will be held responsible for more information regarding this setting if you have...
...the monitor to put your OmniView™ SE. Monitor 5 Find a convenient place to the OmniView™ SE. Take note of the length of the OmniView™ SE labeled with the monitor symbol at the CONSOLE section. Using the attached cable, or the one OmniView™ SE DIP SWITCH SETTINGS 1 2 3 ... setting. Plugging and unplugging cables may cause irreversible damage to the HDDB15 female port on the back of your cables so that your computers and the OmniView™ SE. Belkin Components will be held responsible for more information regarding this setting if you have...
User Manual
Page 7
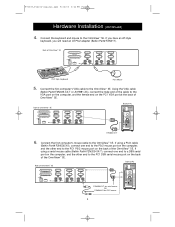
... to the PC1 DB9 serial mouse port on the back of the OmniView™ SE. If using a PS/2 cable (Belkin Part# F2N036-XX), connect one end to a DB9 serial port on the PC1 VGA port at the back of the cable to the OmniView™ SE. Connect the keyboard and mouse to... (continued) 4. Back of the OmniView™ SE. Using the VGA cable (Belkin Part# F2N025-XX-T or A3H981-XX), connect the male end of OmniView™ SE. If using a serial mouse cable (Belkin Part# F2N209-XX-T), connect one end to the PS/2 mouse port on the back of OmniView™ SE PS/2 Style Keyboard PS/2 Mouse...
... to the PC1 DB9 serial mouse port on the back of the OmniView™ SE. If using a PS/2 cable (Belkin Part# F2N036-XX), connect one end to a DB9 serial port on the PC1 VGA port at the back of the cable to the OmniView™ SE. Connect the keyboard and mouse to... (continued) 4. Back of the OmniView™ SE. Using the VGA cable (Belkin Part# F2N025-XX-T or A3H981-XX), connect the male end of OmniView™ SE. If using a serial mouse cable (Belkin Part# F2N209-XX-T), connect one end to the PS/2 mouse port on the back of OmniView™ SE PS/2 Style Keyboard PS/2 Mouse...
User Manual
Page 8
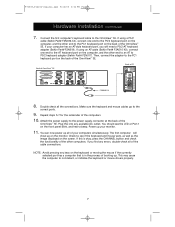
...available AC outlet. Then, connect the adapter to the PC1 keyboard port on the computer, and the other end to PS/2 keyboard adapter (Belkin Part# F2N017). If you will show up your monitor. 11. Back of OmniView™ SE Back of the cable connections. Attach the power supply to the... AT keyboard port on the back of the OmniView™ SE. If using a PS/2 cable (Belkin Part# F2N036-XX), connect one end to the power supply connector ...
...available AC outlet. Then, connect the adapter to the PC1 keyboard port on the computer, and the other end to PS/2 keyboard adapter (Belkin Part# F2N017). If you will show up your monitor. 11. Back of OmniView™ SE Back of the cable connections. Attach the power supply to the... AT keyboard port on the back of the OmniView™ SE. If using a PS/2 cable (Belkin Part# F2N036-XX), connect one end to the power supply connector ...
User Manual
Page 9
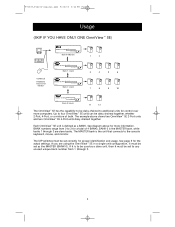
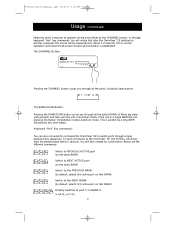
See diagram above shows two OmniView™ SE 2-Port units and two OmniView™ SE 4-Port units daisy-chained together. If you are slave banks. Up to four OmniView™ SE units can be daisy chained together, whether 2-Port, 4-Port, or a mixture of 4 BANKs. Each OmniView™ SE unit is to be used as a ...both. BANK numbers range from 1 through 3 are using the OmniView™ SE in a single-unit configuration, it must be set to any unused unique bank number from 0 to 3 for more computers. The DIP switches must be set correctly for control over more information. If ...
See diagram above shows two OmniView™ SE 2-Port units and two OmniView™ SE 4-Port units daisy-chained together. If you are slave banks. Up to four OmniView™ SE units can be daisy chained together, whether 2-Port, 4-Port, or a mixture of 4 BANKs. Each OmniView™ SE unit is to be used as a ...both. BANK numbers range from 1 through 3 are using the OmniView™ SE in a single-unit configuration, it must be set to any unused unique bank number from 0 to 3 for more computers. The DIP switches must be set correctly for control over more information. If ...

User Manual
Page 10
... and monitor Bank 1 (slave) Bank 2 (slave) 9 10 11 12 13 14 Bank 3 (slave) 15 16 17 18 The OmniView™ SE is an 8-Port, 19" (48.3cm) rackmountable OmniView™, having the same features as the OmniView™ SE, but adding On-Screen Display. P73039_F1D102-eng_man.qxd 9/26/00 3:42 PM Page 9 Usage (continued) Daisy-chaining...
... and monitor Bank 1 (slave) Bank 2 (slave) 9 10 11 12 13 14 Bank 3 (slave) 15 16 17 18 The OmniView™ SE is an 8-Port, 19" (48.3cm) rackmountable OmniView™, having the same features as the OmniView™ SE, but adding On-Screen Display. P73039_F1D102-eng_man.qxd 9/26/00 3:42 PM Page 9 Usage (continued) Daisy-chaining...
User Manual
Page 11
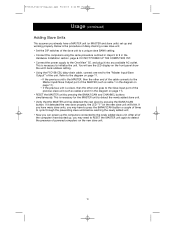
...port of the computers have booted up, you can power up and working properly. After all of the previous slave unit (such as cables 2 and 3 in the diagram on page 11). • If the previous unit is necessary to the OmniView™ SE... previous unit is the MASTER, then the other end of the cable connects to the Master Input/Slave Output port of the slave unit to a unique slave BANK setting. • Connect the computers using the same procedure ... of daisy-chaining a new slave unit. • Set the DIP switches of the MASTER (such as cable 1 in the diagram on the new slave unit. 10
...port of the computers have booted up, you can power up and working properly. After all of the previous slave unit (such as cables 2 and 3 in the diagram on page 11). • If the previous unit is necessary to the OmniView™ SE... previous unit is the MASTER, then the other end of the cable connects to the Master Input/Slave Output port of the slave unit to a unique slave BANK setting. • Connect the computers using the same procedure ... of daisy-chaining a new slave unit. • Set the DIP switches of the MASTER (such as cable 1 in the diagram on the new slave unit. 10

User Manual
Page 12
P73039_F1D102-eng_man.qxd 9/26/00 3:42 PM Page 11 Usage (continued) Daisy-Chaining the OmniView™ SE: Cable 1 MASTER (Bank 0) Cable 2 slave (Bank 1) Cable 3 slave (Bank 2) slave (Bank 3) 11
P73039_F1D102-eng_man.qxd 9/26/00 3:42 PM Page 11 Usage (continued) Daisy-Chaining the OmniView™ SE: Cable 1 MASTER (Bank 0) Cable 2 slave (Bank 1) Cable 3 slave (Bank 2) slave (Bank 3) 11
User Manual
Page 13
... the OmniView™ SE to switch ports through all the active BANKs (if there are the different commands: Switch to PREVIOUS ACTIVE port (on the same BANK) Switch to NEXT ACTIVE port (on the same BANK) Switch to the PREVIOUS BANK (by default, selects first active port on that BANK) Switch to the... commands. Keyboard "Hot" Key commands: You can be inoperative for confirmation. This is normal operation and ensures that BANK) Directly switches to the OmniView™ SE, the SCROLL LOCK key must be pressed twice within 2 seconds. This is evident by a long BEEP, followed by default, ...
... the OmniView™ SE to switch ports through all the active BANKs (if there are the different commands: Switch to PREVIOUS ACTIVE port (on the same BANK) Switch to NEXT ACTIVE port (on the same BANK) Switch to the PREVIOUS BANK (by default, selects first active port on that BANK) Switch to the... commands. Keyboard "Hot" Key commands: You can be inoperative for confirmation. This is normal operation and ensures that BANK) Directly switches to the OmniView™ SE, the SCROLL LOCK key must be pressed twice within 2 seconds. This is evident by a long BEEP, followed by default, ...

User Manual
Page 14
... or using the keyboard when the OmniView™ SE switches to the next port, data flow is PC # 8. Bank 0 (Master) 1 2 CONSOLE Keyboard, mouse and monitor Bank 1 (slave) Bank 2 (slave) 3 4 5 6 7 8 9 10 AutoScan Mode Bank 3 (slave) 11 12 Enable AutoScan mode In AutoScan mode, the OmniView™ SE remains on one OmniView™ SE, the first key (X) must be selected...
... or using the keyboard when the OmniView™ SE switches to the next port, data flow is PC # 8. Bank 0 (Master) 1 2 CONSOLE Keyboard, mouse and monitor Bank 1 (slave) Bank 2 (slave) 3 4 5 6 7 8 9 10 AutoScan Mode Bank 3 (slave) 11 12 Enable AutoScan mode In AutoScan mode, the OmniView™ SE remains on one OmniView™ SE, the first key (X) must be selected...
User Manual
Page 15
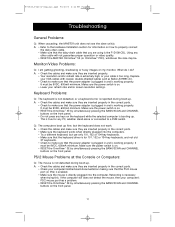
...switch is on. • RESET the OmniView™ SE by simultaneously pressing the BANK/SCAN and CHANNEL buttons on the front panel. 14 If the computer still does not detect the mouse, then your computer's PS/2 mouse port has a problem. • RESET the OmniView™ SE.... • Do not press any PC, whether stand-alone or connected to a KVM switch. A: • Refer to the Hardware Installation section for 101, 102 or 104-key...double-shielded cables such as Belkin A3H981-XX. • Check to make sure that the power adapter is plugged in the correct ports. • Check your ...
...switch is on. • RESET the OmniView™ SE by simultaneously pressing the BANK/SCAN and CHANNEL buttons on the front panel. 14 If the computer still does not detect the mouse, then your computer's PS/2 mouse port has a problem. • RESET the OmniView™ SE.... • Do not press any PC, whether stand-alone or connected to a KVM switch. A: • Refer to the Hardware Installation section for 101, 102 or 104-key...double-shielded cables such as Belkin A3H981-XX. • Check to make sure that the power adapter is plugged in the correct ports. • Check your ...
User Manual
Page 16
... the OmniView™ SE for PS/2 mode with other conflicts or problems. 15 A: • Switch to the previous port. Problems with computers using a specialized mouse such as a cordless mouse, scrolling mouse or mice with a combo mouse adapter will work just as long as Belkin Part# F2N209... you are inserted properly in and is necessary when trying this. Make sure the power switch is another computer port, then switch back. This is on. • RESET the OmniView™ SE by unplugging the mouse from one mouse driver. Non-standard mice often use generic PS/2...
... the OmniView™ SE for PS/2 mode with other conflicts or problems. 15 A: • Switch to the previous port. Problems with computers using a specialized mouse such as a cordless mouse, scrolling mouse or mice with a combo mouse adapter will work just as long as Belkin Part# F2N209... you are inserted properly in and is necessary when trying this. Make sure the power switch is another computer port, then switch back. This is on. • RESET the OmniView™ SE by unplugging the mouse from one mouse driver. Non-standard mice often use generic PS/2...
User Manual
Page 17
...Make sure the mouse (at the console) is set for PS/2 mode with the correct adapter. What do I switch from the OmniView™ SE for the diagram. A: • RESET the OmniView™ SE by unplugging the mouse from one serial mouse driver loaded. See the Product Detail section, page 3, for about the ... other mouse drivers loaded in your config.sys or autoexec.bat files. • Avoid moving the mouse or pressing the mouse buttons when switching ports. • Reset the mouse to PS/2 mouse signals, so if you have tried all possible troubleshooting methods, you do not have any...
...Make sure the mouse (at the console) is set for PS/2 mode with the correct adapter. What do I switch from the OmniView™ SE for the diagram. A: • RESET the OmniView™ SE by unplugging the mouse from one serial mouse driver loaded. See the Product Detail section, page 3, for about the ... other mouse drivers loaded in your config.sys or autoexec.bat files. • Avoid moving the mouse or pressing the mouse buttons when switching ports. • Reset the mouse to PS/2 mouse signals, so if you have tried all possible troubleshooting methods, you do not have any...