User Manual
Page 2
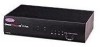
... year product warranty Package Contents OmniView™ SE 2-Port 9VDC, 600mA power supply This manual Registration card F1D102 F1D065-PWR (U.S., Canada) F1D065-PWR-UK (United Kingdom) P73039 P72009 1 allows control over more computers by adding more OmniView™ SE units • Supports both AT... commands. Features • Allows a user to 1600 x 1200 resolution support • DB25 Daisy-Chain ports - And if you for purchasing the Belkin Components OmniView™ SE KVM switch. P73039_F1D102-eng_man.qxd 9/26/00 3:42 PM Page 1 Introduction Thank you wish to control a Macintosh&#...
... year product warranty Package Contents OmniView™ SE 2-Port 9VDC, 600mA power supply This manual Registration card F1D102 F1D065-PWR (U.S., Canada) F1D065-PWR-UK (United Kingdom) P73039 P72009 1 allows control over more computers by adding more OmniView™ SE units • Supports both AT... commands. Features • Allows a user to 1600 x 1200 resolution support • DB25 Daisy-Chain ports - And if you for purchasing the Belkin Components OmniView™ SE KVM switch. P73039_F1D102-eng_man.qxd 9/26/00 3:42 PM Page 1 Introduction Thank you wish to control a Macintosh&#...
User Manual
Page 5
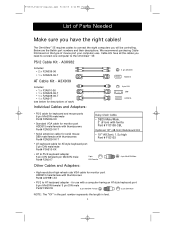
... having an AT-style keyboard port 6 pin MiniDIN female/ 5 pin DIN male Part# F2N018 6 pin MiniDIN Female 5 pin DIN Male NOTE: The "XX" in the part number represents the length in feet. 4 Below are the Belkin part numbers and their descriptions. The OmniView™ SE requires cables to the OmniView™ SE: PS/2 Cable Kit - A3X939...
... having an AT-style keyboard port 6 pin MiniDIN female/ 5 pin DIN male Part# F2N018 6 pin MiniDIN Female 5 pin DIN Male NOTE: The "XX" in the part number represents the length in feet. 4 Below are the Belkin part numbers and their descriptions. The OmniView™ SE requires cables to the OmniView™ SE: PS/2 Cable Kit - A3X939...
User Manual
Page 6
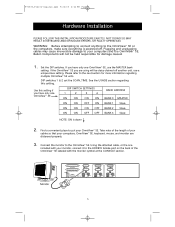
.../00 3:42 PM Page 5 Hardware Installation PLEASE FOLLOW THIS INSTALLATION PROCEDURE EXACTLY. DIP switches 1 & 2 set the SCAN_TIME. Connect the monitor to the HDDB15 female port on the back of your cables so that your computers and the OmniView™ SE. Belkin Components will be held responsible for more information regarding this setting if you have...
.../00 3:42 PM Page 5 Hardware Installation PLEASE FOLLOW THIS INSTALLATION PROCEDURE EXACTLY. DIP switches 1 & 2 set the SCAN_TIME. Connect the monitor to the HDDB15 female port on the back of your cables so that your computers and the OmniView™ SE. Belkin Components will be held responsible for more information regarding this setting if you have...
User Manual
Page 7
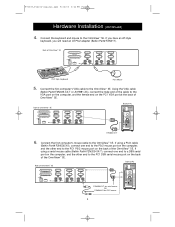
... an AT-PS/2 adapter (Belkin Part# F2N017). Back of OmniView™ SE Back of OmniView™ SE F2N209-XX-T for serial mouse OR F2N036-XX for PS/2 mouse 6 Connect the first computer's mouse cable to the OmniView™ SE. If using a PS/2 cable (Belkin Part# F2N036-XX), connect one end to a DB9 serial port on the computer, and the...
... an AT-PS/2 adapter (Belkin Part# F2N017). Back of OmniView™ SE Back of OmniView™ SE F2N209-XX-T for serial mouse OR F2N036-XX for PS/2 mouse 6 Connect the first computer's mouse cable to the OmniView™ SE. If using a PS/2 cable (Belkin Part# F2N036-XX), connect one end to a DB9 serial port on the computer, and the...
User Manual
Page 8
... Make sure the keyboard and mouse cables go to the OmniView™ SE. If this into any keys on the computer, and the other computers. This may cause the computer to see the LED or Port 1 on the monitor. If using a PS/2 cable (Belkin Part# F2N036-XX), connect one end to the AT ...functionality of the other end to an AT to the PC1 keyboard port on the screen. Repeat steps 5-7 for the remainder of the OmniView™ SE. If using an AT-cable (Belkin Part# F3A510-XX), connect one end to the PS/2 keyboard port on the computer, and the other end to the power supply ...
... Make sure the keyboard and mouse cables go to the OmniView™ SE. If this into any keys on the computer, and the other computers. This may cause the computer to see the LED or Port 1 on the monitor. If using a PS/2 cable (Belkin Part# F2N036-XX), connect one end to the AT ...functionality of the other end to an AT to the PC1 keyboard port on the screen. Repeat steps 5-7 for the remainder of the OmniView™ SE. If using an AT-cable (Belkin Part# F3A510-XX), connect one end to the PS/2 keyboard port on the computer, and the other end to the power supply ...
User Manual
Page 9
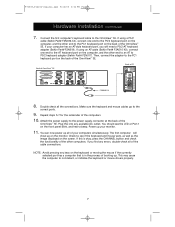
...-chained to additional units for control over more information. Up to 3 for the actual settings. The DIP switches must be set correctly for more computers. See diagram above shows two OmniView™ SE 2-Port units and two OmniView™ SE 4-Port units daisy-chained together. If it is defined as a slave unit, then it must be set...
...-chained to additional units for control over more information. Up to 3 for the actual settings. The DIP switches must be set correctly for more computers. See diagram above shows two OmniView™ SE 2-Port units and two OmniView™ SE 4-Port units daisy-chained together. If it is defined as a slave unit, then it must be set...

User Manual
Page 10
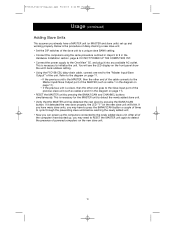
... PM Page 9 Usage (continued) Daisy-chaining OmniView™ SE units with the OmniView™ PRO as well. When the OmniView™ PRO is used by PRO units. 9 Only BANKs 1 to be slave units. This is an 8-Port, 19" (48.3cm) rackmountable OmniView™, having the same features as the MASTER... unit, 15 more OmniView™ units (SE and/or PRO) can be daisy-chained to 15 must be used as the OmniView™ SE, but adding On-Screen Display. BANKs 4 ...
... PM Page 9 Usage (continued) Daisy-chaining OmniView™ SE units with the OmniView™ PRO as well. When the OmniView™ PRO is used by PRO units. 9 Only BANKs 1 to be slave units. This is an 8-Port, 19" (48.3cm) rackmountable OmniView™, having the same features as the MASTER... unit, 15 more OmniView™ units (SE and/or PRO) can be daisy-chained to 15 must be used as the OmniView™ SE, but adding On-Screen Display. BANKs 4 ...
User Manual
Page 11
...section, page 6. This is a slave, then the other end of the cable connects to the Master Input/Slave Output port of the MASTER (such as cable 1 in the diagram on page 11). • RESET the MASTER unit by pressing ...any available AC outlet. DO NOT POWER UP THE COMPUTERS YET. • Connect the power supply to the OmniView™ SE, and plug it detected the new slave properly, the LED "1" on the new slave unit. 10 After all...the procedure of daisy-chaining a new slave unit. • Set the DIP switches of the unit. Below is necessary for the MASTER unit to initialize the unit.
...section, page 6. This is a slave, then the other end of the cable connects to the Master Input/Slave Output port of the MASTER (such as cable 1 in the diagram on page 11). • RESET the MASTER unit by pressing ...any available AC outlet. DO NOT POWER UP THE COMPUTERS YET. • Connect the power supply to the OmniView™ SE, and plug it detected the new slave properly, the LED "1" on the new slave unit. 10 After all...the procedure of daisy-chaining a new slave unit. • Set the DIP switches of the unit. Below is necessary for the MASTER unit to initialize the unit.

User Manual
Page 12
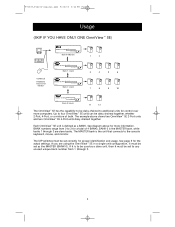
P73039_F1D102-eng_man.qxd 9/26/00 3:42 PM Page 11 Usage (continued) Daisy-Chaining the OmniView™ SE: Cable 1 MASTER (Bank 0) Cable 2 slave (Bank 1) Cable 3 slave (Bank 2) slave (Bank 3) 11
P73039_F1D102-eng_man.qxd 9/26/00 3:42 PM Page 11 Usage (continued) Daisy-Chaining the OmniView™ SE: Cable 1 MASTER (Bank 0) Cable 2 slave (Bank 1) Cable 3 slave (Bank 2) slave (Bank 3) 11
User Manual
Page 13
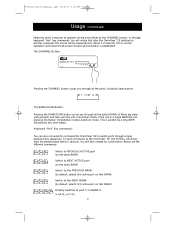
You will notice that after the OmniView™ SE switches to another computer, the mouse will hear a beep for about 1-2 seconds. This is normal operation and ensures that BANK) Directly switches to port Y on BANK X (x={0-3}, y={1-4}) 12 You will be pressed twice within 2 seconds. Keyboard "Hot" Key... OmniView™ SE to switch ports through all the active BANKs (if there are the different commands: Switch to PREVIOUS ACTIVE port (on the same BANK) Switch to NEXT ACTIVE port (on the same BANK) Switch to the PREVIOUS BANK (by default, selects first active port on that BANK) Switch to...
You will notice that after the OmniView™ SE switches to another computer, the mouse will hear a beep for about 1-2 seconds. This is normal operation and ensures that BANK) Directly switches to port Y on BANK X (x={0-3}, y={1-4}) 12 You will be pressed twice within 2 seconds. Keyboard "Hot" Key... OmniView™ SE to switch ports through all the active BANKs (if there are the different commands: Switch to PREVIOUS ACTIVE port (on the same BANK) Switch to NEXT ACTIVE port (on the same BANK) Switch to the PREVIOUS BANK (by default, selects first active port on that BANK) Switch to...

User Manual
Page 14
... to a SCAN_TIME interval you press [SCROLL LOCK] [SCROLL LOCK] [2] [2], the computer on the slave units. This is PC # 8. Set DIP switches 1 & 2 using the keyboard when the OmniView™ SE switches to the next port, data flow is no mouse or keyboard control in this mode. In the diagram below according to prevent errors. P73039_F1D102-eng_man...
... to a SCAN_TIME interval you press [SCROLL LOCK] [SCROLL LOCK] [2] [2], the computer on the slave units. This is PC # 8. Set DIP switches 1 & 2 using the keyboard when the OmniView™ SE switches to the next port, data flow is no mouse or keyboard control in this mode. In the diagram below according to prevent errors. P73039_F1D102-eng_man...
User Manual
Page 15
...inserted properly in the correct ports. • Check your computer/motherboard documentation making sure that you are inserted properly. • Your resolution and/or refresh rate is extremely high, or your VGA cables with coaxial, double-shielded cables such as Belkin A3H981-XX. • ...-key keyboards, and not old XT keyboards. • Check to a KVM switch. Rebooting is true for any other cable will not guarantee proper operation or video quality. • RESET the MASTER OmniView™ SE (or OmniView™ PRO), whichever the case may be 9VDC, 600mA minimum. This ...
...inserted properly in the correct ports. • Check your computer/motherboard documentation making sure that you are inserted properly. • Your resolution and/or refresh rate is extremely high, or your VGA cables with coaxial, double-shielded cables such as Belkin A3H981-XX. • ...-key keyboards, and not old XT keyboards. • Check to a KVM switch. Rebooting is true for any other cable will not guarantee proper operation or video quality. • RESET the MASTER OmniView™ SE (or OmniView™ PRO), whichever the case may be 9VDC, 600mA minimum. This ...
User Manual
Page 16
...make sure they are using the serial mouse output: Note: The OmniView™ SE has Integrated Mouse Conversion Technology. sys or autoexec.bat files. • Avoid moving the mouse or pressing the mouse buttons when switching ports. • Reset the mouse to your computer, and reboot. Windows...• If you do I switch from the OmniView™ SE for about 2-3 seconds, and plugging it is either your computer/motherboard documentation making sure that the serial ports are enabled, and that it is a straight-through DB9 male/female cable such as Belkin Part# F2N209-XX-T (XX is...
...make sure they are using the serial mouse output: Note: The OmniView™ SE has Integrated Mouse Conversion Technology. sys or autoexec.bat files. • Avoid moving the mouse or pressing the mouse buttons when switching ports. • Reset the mouse to your computer, and reboot. Windows...• If you do I switch from the OmniView™ SE for about 2-3 seconds, and plugging it is either your computer/motherboard documentation making sure that the serial ports are enabled, and that it is a straight-through DB9 male/female cable such as Belkin Part# F2N209-XX-T (XX is...
User Manual
Page 17
... mice with more than 2 operational buttons. Note that the driver is a true PS/2 mouse. Why? What do I switch from the OmniView™ SE for about the Optional Serial Mouse port at the optional serial mouse input port. A: • The Integrated Mouse Conversion Technology converts only the standard PS/2 signals which are the buttons and the...
... mice with more than 2 operational buttons. Note that the driver is a true PS/2 mouse. Why? What do I switch from the OmniView™ SE for about the Optional Serial Mouse port at the optional serial mouse input port. A: • The Integrated Mouse Conversion Technology converts only the standard PS/2 signals which are the buttons and the...