
User Guide
Page 2
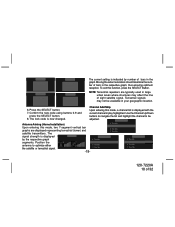
... experiencing the latest innovation in XM Satellite Radio. All rights reserved. Congratulations You are one -time activation fee. XM will revolutionize your specific installation needs. These kits are available at retailers where Audiovox main units are the property of their respective owners. -2- 128-7220A 2 of 100% commercial-free music - XM is a trademark of world-class sports, news, talk and information. Installation costs and other trademarks are...
... experiencing the latest innovation in XM Satellite Radio. All rights reserved. Congratulations You are one -time activation fee. XM will revolutionize your specific installation needs. These kits are available at retailers where Audiovox main units are the property of their respective owners. -2- 128-7220A 2 of 100% commercial-free music - XM is a trademark of world-class sports, news, talk and information. Installation costs and other trademarks are...
User Guide
Page 3
... XM -XR9 5 XM XR9 Controls 6 Basic Operation 8 Tuning by Category 8 Channel Listing Options 8 Direct Tuning 9 Setting/Using Channel Preset Buttons 9 Display Button 10 Memory Button (T SEL Function 11 Menu Display Operations 14 Menu Descriptions 14 Radio ID 14 Display Setting 14 Audio Options 15 FM Options 16 Confirm Tone Option 16 Lock Option 17 Lock/Unlock Default Code Function 17 Antenna Aiming (Home Installation 18 Channel Add/Skip 18 Memory Options 19 Time Options 19 Clock 19 Time Format 20 Time Zone 20 Set Alarm 21 Alarm Time 21 Sleep Mode...
... XM -XR9 5 XM XR9 Controls 6 Basic Operation 8 Tuning by Category 8 Channel Listing Options 8 Direct Tuning 9 Setting/Using Channel Preset Buttons 9 Display Button 10 Memory Button (T SEL Function 11 Menu Display Operations 14 Menu Descriptions 14 Radio ID 14 Display Setting 14 Audio Options 15 FM Options 16 Confirm Tone Option 16 Lock Option 17 Lock/Unlock Default Code Function 17 Antenna Aiming (Home Installation 18 Channel Add/Skip 18 Memory Options 19 Time Options 19 Clock 19 Time Format 20 Time Zone 20 Set Alarm 21 Alarm Time 21 Sleep Mode...
User Guide
Page 4
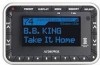
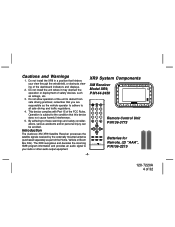
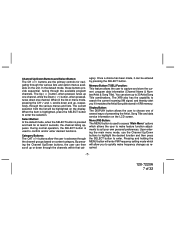
... your view through the windshield, or obstructs viewing of the unit to the condition that this device does not cause harmful interference. 5. XR9 System Components XM Receiver Model XR9, P/N144-2450 123 456 789 0 SATELLITE RADIO 1 2 3 4 5 6 7 8 9 0 Remote Control Unit P/N136-3773 AUDIO OX Batteries for Remote, (2) "AAA", P/N156-2215 -4- 128-7220A 4 of the FCC Rules. Do not allow operation of the dashboard indicators and displays. 2. Do not install the XR9 in...
... your view through the windshield, or obstructs viewing of the unit to the condition that this device does not cause harmful interference. 5. XR9 System Components XM Receiver Model XR9, P/N144-2450 123 456 789 0 SATELLITE RADIO 1 2 3 4 5 6 7 8 9 0 Remote Control Unit P/N136-3773 AUDIO OX Batteries for Remote, (2) "AAA", P/N156-2215 -4- 128-7220A 4 of the FCC Rules. Do not allow operation of the dashboard indicators and displays. 2. Do not install the XR9 in...
User Guide
Page 5
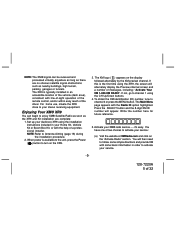
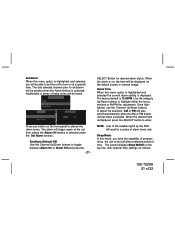
... help of the driver. If this is available to the unit, press the Power ( ) button to turn on the XR9. 3. The Main Menu page appears with line-of-sight operation of the remote control, and/or within easy reach of a professional installer. You will then need to follow some basic information in an accessible location of messages, including: "Activate Your XM 1-800-XM RADIO". For home use, situate the XR9...
... help of the driver. If this is available to the unit, press the Power ( ) button to turn on the XR9. 3. The Main Menu page appears with line-of-sight operation of the remote control, and/or within easy reach of a professional installer. You will then need to follow some basic information in an accessible location of messages, including: "Activate Your XM 1-800-XM RADIO". For home use, situate the XR9...
User Guide
Page 6
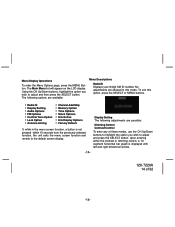
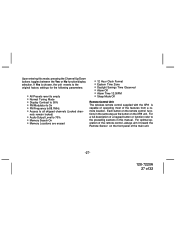
... tuning mode in effect when the unit was last powered off. 2. While the unit powers down, the Audiovox logo appears for the first time), or by a confirmation beep tone. XM XR9 Controls The Audiovox XM® XR9 Unit provides 10 control buttons and 10 number keys. PRESET/DIRECT BUTTON POWER BUTTON DISPLAY BUTTON MENU (FM) BUTTON MEMORY (T-SEL) BUTTON SELECT (ENTER) BUTTON INFRARED SENSOR CATEGORY SEARCH (UP/DOWN) BUTTONS CHANNEL UP/DOWN BUTTONS LCD DISPLAY SATELLITE RADIO 1 2 3 4 5 6 7 8 9 0 PRESET (NUMBER) BUTTONS Default Screen 3-DIGIT CHANNEL CATEGORY NUMBER NAME...
... tuning mode in effect when the unit was last powered off. 2. While the unit powers down, the Audiovox logo appears for the first time), or by a confirmation beep tone. XM XR9 Controls The Audiovox XM® XR9 Unit provides 10 control buttons and 10 number keys. PRESET/DIRECT BUTTON POWER BUTTON DISPLAY BUTTON MENU (FM) BUTTON MEMORY (T-SEL) BUTTON SELECT (ENTER) BUTTON INFRARED SENSOR CATEGORY SEARCH (UP/DOWN) BUTTONS CHANNEL UP/DOWN BUTTONS LCD DISPLAY SATELLITE RADIO 1 2 3 4 5 6 7 8 9 0 PRESET (NUMBER) BUTTONS Default Screen 3-DIGIT CHANNEL CATEGORY NUMBER NAME...
User Guide
Page 7
... ( ∧ ) button, when pressed, tunes up , respec- By pressing the Channel Up/Down buttons, the user can be highlighted on the LCD screen. Memory Button (T SEL) Function: This feature allows the user to quickly make feature function adjustments to advance through the channel groups based on the unit. When in XR9 memory. Select Button: In the default mode, when the SELECT button is highlighted, press the SELECT button to enter. Menu (FM) Button: The MENU button is used to...
... ( ∧ ) button, when pressed, tunes up , respec- By pressing the Channel Up/Down buttons, the user can be highlighted on the LCD screen. Memory Button (T SEL) Function: This feature allows the user to quickly make feature function adjustments to advance through the channel groups based on the unit. When in XR9 memory. Select Button: In the default mode, when the SELECT button is highlighted, press the SELECT button to enter. Menu (FM) Button: The MENU button is used to...

User Guide
Page 8
... select and play the desired channel, or use the number buttons to directly enter the desired channel number. Press the SELECT button to select the desired channel. 2. When the default screen is playing on genre. They are listening to view what is displayed on and the XM logo appears for the channel and tuning mode in effect prior to turnoff. 2. Basic Operation With the unit properly installed, activated and connected to your selection will recall the stored channel. Tuning...
... select and play the desired channel, or use the number buttons to directly enter the desired channel number. Press the SELECT button to select the desired channel. 2. When the default screen is playing on genre. They are listening to view what is displayed on and the XM logo appears for the channel and tuning mode in effect prior to turnoff. 2. Basic Operation With the unit properly installed, activated and connected to your selection will recall the stored channel. Tuning...

User Guide
Page 9
... C H the desired channel number has been entered, wait 3 seconds until Dir appears; Setting/Using Channel Preset Buttons The unit contains 10 preset buttons. The third press of the 1 CHANNEL N A M E A R 2 CHANNEL N A M E DISPLAY button will display 3 CHANNEL N A M E C 4 CHANNEL N A M E H song titles. Consecutively pressing the DISPLAY button while tuning by category will be selected using the PRESET button. The display in the upper left corner changes to numerically enter the desired channel. There are three banks of preset memory locations offering a total of...
... C H the desired channel number has been entered, wait 3 seconds until Dir appears; Setting/Using Channel Preset Buttons The unit contains 10 preset buttons. The third press of the 1 CHANNEL N A M E A R 2 CHANNEL N A M E DISPLAY button will display 3 CHANNEL N A M E C 4 CHANNEL N A M E H song titles. Consecutively pressing the DISPLAY button while tuning by category will be selected using the PRESET button. The display in the upper left corner changes to numerically enter the desired channel. There are three banks of preset memory locations offering a total of...
User Guide
Page 14
... previously selected function, the unit exits the menu screen function and reverts to the default screen display. 36DH3084 Display Setting The following options are available: Menu Descriptions Radio ID Displays your 8 digit XM ID number. No adjustments are possible: Dimming Control Contrast Control To enter any of 32 -14- MRaiandMioeInDu • Radio ID • Display Setting • Audio Options • FM Options • Confirm Tone Option • Lock Option • Antenna Aiming • Channel...
... previously selected function, the unit exits the menu screen function and reverts to the default screen display. 36DH3084 Display Setting The following options are available: Menu Descriptions Radio ID Displays your 8 digit XM ID number. No adjustments are possible: Dimming Control Contrast Control To enter any of 32 -14- MRaiandMioeInDu • Radio ID • Display Setting • Audio Options • FM Options • Confirm Tone Option • Lock Option • Antenna Aiming • Channel...

User Guide
Page 15
... Volume Control NOTE: To prevent distortion caused by overdriving the audio playback device input, it is selected, a dual graph appears representing Bass and Treble adjustments. When either option and press the SELECT button to make the adjustment. tons adjusts the bar graph indication and function accordingly. The current numerical setting (1-10) is selected, a 32-step (0-31) bar graph appears; Equalizer Control Bass Treble When Volume Control is indicated above the bar graph. adjust the volume using...
... Volume Control NOTE: To prevent distortion caused by overdriving the audio playback device input, it is selected, a dual graph appears representing Bass and Treble adjustments. When either option and press the SELECT button to make the adjustment. tons adjusts the bar graph indication and function accordingly. The current numerical setting (1-10) is selected, a 32-step (0-31) bar graph appears; Equalizer Control Bass Treble When Volume Control is indicated above the bar graph. adjust the volume using...
User Guide
Page 16
... chosen using the low level audio outputs in your particular application. FM Options The following adjustments are possible: NOTE: The internal wireless FM transmitter allows you are provided with no change to enter. FM On/ Off Frequency Setting FM On/Off: Upon entering this mode, any standard FM receiver, eliminating the need to toggle between the FM ON or FM OFF function/display selection...
... chosen using the low level audio outputs in your particular application. FM Options The following adjustments are possible: NOTE: The internal wireless FM transmitter allows you are provided with no change to enter. FM On/ Off Frequency Setting FM On/Off: Upon entering this mode, any standard FM receiver, eliminating the need to toggle between the FM ON or FM OFF function/display selection...

User Guide
Page 17
... be adjusted. Enter the default code 0000 and press the SELECT button. 5. the channel list will be prompted to highlight Edit Code and press the SELECT button. 4. This code can be displayed with the current channel in play . Press the MENU button to be maintained or changed or the vehicle/unit is turned off (or by direct channel number entry, at which 1. Enter new code using buttons 0-9. -17- 128-7220A 17 of the tuning modes...
... be adjusted. Enter the default code 0000 and press the SELECT button. 5. the channel list will be prompted to highlight Edit Code and press the SELECT button. 4. This code can be displayed with the current channel in play . Press the MENU button to be maintained or changed or the vehicle/unit is turned off (or by direct channel number entry, at which 1. Enter new code using buttons 0-9. -17- 128-7220A 17 of the tuning modes...
User Guide
Page 18
... structures may not be adjusted. Lock Options Enter Code Lock Options Enter Code **** The current setting is displayed with the current channel in play highlighted. Channel Add/Skip Antenna Aiming (Home Installation) Upon entering this function, press the SELECT Button. Confirm the new code using buttons 0-9 and press the SELECT button. 8. Use the Channel Up/Down buttons to navigate the list and highlight the channel to optimize either the satellite or terrestrial signal...
... structures may not be adjusted. Lock Options Enter Code Lock Options Enter Code **** The current setting is displayed with the current channel in play highlighted. Channel Add/Skip Antenna Aiming (Home Installation) Upon entering this function, press the SELECT Button. Confirm the new code using buttons 0-9 and press the SELECT button. 8. Use the Channel Up/Down buttons to navigate the list and highlight the channel to optimize either the satellite or terrestrial signal...

User Guide
Page 19
...? In addition, all Memory Locations. Press the SELECT button; Set Alarm Clock Sleep Mode Set Alarm Sleep Mode Upon entering this menu and going through direct channel number entry or by returning to this mode, use the Channel Up/Down buttons to the list. exit the desired (highlighted) function. All, Artist Name, Song clock shown on the default display, based on the Title format desired, the time zone in which you...
...? In addition, all Memory Locations. Press the SELECT button; Set Alarm Clock Sleep Mode Set Alarm Sleep Mode Upon entering this menu and going through direct channel number entry or by returning to this mode, use the Channel Up/Down buttons to the list. exit the desired (highlighted) function. All, Artist Name, Song clock shown on the default display, based on the Title format desired, the time zone in which you...
User Guide
Page 21
...) Use the Channel Up/Down buttons to silence the alarm tones. AM or PM will result in a series of beep tones will be displayed on the default screen in reverse image. Sleep Mode In this mode, you will be able to set the unit to turn on at the set time unless the Alarm Off feature is selected under the Set Alarm function. Time Options Clock Set Alarm...
...) Use the Channel Up/Down buttons to silence the alarm tones. AM or PM will result in a series of beep tones will be displayed on the default screen in reverse image. Sleep Mode In this mode, you will be able to set the unit to turn on at the set time unless the Alarm Off feature is selected under the Set Alarm function. Time Options Clock Set Alarm...

User Guide
Page 22
Time Options Sleep Mode Clock Set Alarm Sleep Mode Sleep Off 60 Minutes 120 Minutes 180 Minutes Stock Options The following stock options are available: Stock On/Off Stock Add Stock Erase Stock On/Off When this option is pressed. Highlight the desired function, on or off, using the Channel Up/Down buttons and press the SELECT button to access the stock...
Time Options Sleep Mode Clock Set Alarm Sleep Mode Sleep Off 60 Minutes 120 Minutes 180 Minutes Stock Options The following stock options are available: Stock On/Off Stock Add Stock Erase Stock On/Off When this option is pressed. Highlight the desired function, on or off, using the Channel Up/Down buttons and press the SELECT button to access the stock...
User Guide
Page 27
...; Memory Search On • Memory Locations are erased • 12 Hour Clock Format • Eastern Time Zone • Daylight Savings Time Observed • Alarm Off • Alarm Time 12:00PM • Sleep Mode Off Remote Control Unit The wireless remote control supplied with the XR9 is chosen, the unit reverts to the original factory settings for the following parameters: • All Presets revert to empty • Normal Tuning Mode • Display...
...; Memory Search On • Memory Locations are erased • 12 Hour Clock Format • Eastern Time Zone • Daylight Savings Time Observed • Alarm Off • Alarm Time 12:00PM • Sleep Mode Off Remote Control Unit The wireless remote control supplied with the XR9 is chosen, the unit reverts to the original factory settings for the following parameters: • All Presets revert to empty • Normal Tuning Mode • Display...

User Guide
Page 28
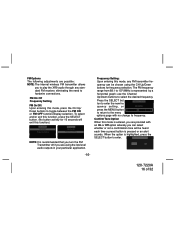
.... 12. MUTE Allows the user to . 9. They are used when entering and recalling preset channel numbers into memory. 3. P CH This button toggles between the three preset bands A, B and C, and DIR (tuning). 5. MENU Used to directly enter a desired channel number. Used to confirm selection in ascending and descending order. Remote Control Unit 1 13 123 2 456 789 12 0 11 3 10 4 9 5 8 AUDIO OX 7 6 1. Presets 0-9 These buttons are also used to access "Menu Options" which displays the user setup menu plus other feature/function adjustments. 6.
.... 12. MUTE Allows the user to . 9. They are used when entering and recalling preset channel numbers into memory. 3. P CH This button toggles between the three preset bands A, B and C, and DIR (tuning). 5. MENU Used to directly enter a desired channel number. Used to confirm selection in ascending and descending order. Remote Control Unit 1 13 123 2 456 789 12 0 11 3 10 4 9 5 8 AUDIO OX 7 6 1. Presets 0-9 These buttons are also used to access "Menu Options" which displays the user setup menu plus other feature/function adjustments. 6.
User Guide
Page 29
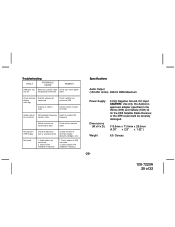
... connected cable Check antenna display message Satellite antenna not connected Antenna or cable is faulty Check satellite connection to XR9 Contact system installer or vendor Audio static or FM modulator frequency Switch to another FM modulator frequency. Select another FM loss of 32 Check cables at XR9 and radio. 2. Incorrect FM modulator Frequency Change location to eliminate nearby obstacles (bridges, etc.) 1. Specifications Audio Output (100-250 ohms): 650mV RMS Maximum Power Supply: Dimensions (W x H x D): 6 Volt, Negative Ground, DC Input CAUTION: Use...
... connected cable Check antenna display message Satellite antenna not connected Antenna or cable is faulty Check satellite connection to XR9 Contact system installer or vendor Audio static or FM modulator frequency Switch to another FM modulator frequency. Select another FM loss of 32 Check cables at XR9 and radio. 2. Incorrect FM modulator Frequency Change location to eliminate nearby obstacles (bridges, etc.) 1. Specifications Audio Output (100-250 ohms): 650mV RMS Maximum Power Supply: Dimensions (W x H x D): 6 Volt, Negative Ground, DC Input CAUTION: Use...

User Guide
Page 31
...antenna problems, to costs incurred for installation, removal or reinstallation of the product, or to damage to tapes, compact discs, speakers, accessories, or vehicle electrical systems. This Warranty does not apply to any product or part thereof which vary from the date of original purchase, such defect(s) will be repaired or replaced...FOR LOCATION OF WARRANTY STATION SERVING YOUR AREA 128-6464 -31- 128-7220A 31 of defect(s), transportation prepaid, to an approved warranty station or the Company at the Company's option) without charge for the Company any part thereof, under normal use ...
...antenna problems, to costs incurred for installation, removal or reinstallation of the product, or to damage to tapes, compact discs, speakers, accessories, or vehicle electrical systems. This Warranty does not apply to any product or part thereof which vary from the date of original purchase, such defect(s) will be repaired or replaced...FOR LOCATION OF WARRANTY STATION SERVING YOUR AREA 128-6464 -31- 128-7220A 31 of defect(s), transportation prepaid, to an approved warranty station or the Company at the Company's option) without charge for the Company any part thereof, under normal use ...


